Rocket Man
-
Posts
1009 -
Joined
-
Last visited
-
Days Won
26
Everything posted by Rocket Man
-

Trying to deploy over PXE UEFI x86 with WDS 2012
Rocket Man replied to goudviske's question in Deploy Server 2012
Your PXE DP is sitting on server 2012 and you have injected the winPE4.0 HP drivers and HP management pack drivers into a newly created wim image (not the default out of box wim image)? -
Trying to deploy over PXE UEFI x86 with WDS 2012
Rocket Man replied to goudviske's question in Deploy Server 2012
Is this SCCM 2012 SP1 CU1? The HP elite Pad 900 is a strange device. After posting this guide I found another problem. We got another HP elite pad shipped out to us, apparently exact same device, same insides etc... but when I try to PXE boot it, it successfully downloaded the NBP file etc..etc.. but after this it errored out saying no Network Found, the exact same error before applying CU1. For testing I PXE'd the the first set of HP elitepads that was initially PXEing fine after the upgrade and they still booted no problem What I had to do with the Elitepad that would not boot was at the stage it started to download the NBP file succesfully was to press the ENTER key(a few times).... once this was done it continued to boot and download the boot.wim and continued on to image successfully. Not sure as to why pressing ENTER key repeatedly or as to why I even tried it but it worked. Getting 3 more HP elitepad 900's within the next couple of weeks, wonder will they be same? Time will tell... -
Is this error with every system? How has your Task sequence partitioned the HD? Is the primary active partition set to 100% of the remaining Disk?
-
Would making the 3 Task sequences hidden be an option and make the deployment as available on all 3 task sequences. At site A give the IT Admin the deployment ID of task sequence A so when it prompts for the deployment ID and it is entered it will install the appropriate Task Sequence. At site B give the IT Admin the deployment ID of task sequence B so when it prompts for the deployment ID and it is entered it will install the appropriate Task Sequence. At site C give the IT Admin the deployment ID of task sequence C so when it prompts for the deployment ID and it is entered it will install the appropriate Task Sequence. May work for you, and there are probably better solutions to this, but if this solution works it will probably be the simpiler solution. Here is how you make a task sequence hidden.
-
Trying to deploy Win 8 ENT to HP Elitepad 900
Rocket Man replied to goudviske's question in Windows Deployment Services (WDS)
I'd say it wipes it due to my own 2 days of pain trying to image them, when mine failed initially there was no boot options at all, the device was totally wiped . Just to let you know you will not get these devices imaged with SCCM 2012 your setup has to be SCCM 2012 SP1 with CU1. The DP/PXE server also has to be built on server 2012. Rocket Man -
How about doing the opposite to what you had to do to get RDP working for the server........enable RDP on the workstation!
-
Batch files fail to deploy software
Rocket Man replied to sroy49's topic in Configuration Manager 2012
If the batch file is called install.bat then the command line should be install.bat. All files should be in the one source package i:e executable, licence key file and also the batch file and other files if needed. No need to make any amendments to the script, it should work! To test, place the files into a standard share and browse via UNC from a client and run the batch file. If it installs from this share then it should deploy via SCCM package! -
Batch files fail to deploy software
Rocket Man replied to sroy49's topic in Configuration Manager 2012
Is there any reason as to why you are pointing the batch to a share rather than creating package out of the source files? Probably size of files is the reason? If not then create a package out of the source files including the license key and a batch file like so: Start /wait "" %~dp0winedt60.exe /SILENT /NOCANCEL /NORESTART copy %~dp0WinEdt.skd "C:\Program Files(x86)\WinEdt Team\Winedt 6" /y Place the batch file in with the source files and create a program for the package. The command line will be nameofbatch.bat -
Find out who deployed software to a collection
Rocket Man replied to Torisdale's topic in Configuration Manager 2012
This information may be available in status messages for a specific user. It may be daunting task to do it this way, but if you only have a limited amount of CM admins then it should not be that time consuming. These status messages report on lots of tasks performed, RMC, console activation, collection modification, deployments, package creation/modification........so it may well be what you are looking for. -
Trying to deploy Win 8 ENT to HP Elitepad 900
Rocket Man replied to goudviske's question in Windows Deployment Services (WDS)
Disk Mgmt Bios Boot menu System Build This is UEFI?

-
Trying to deploy Win 8 ENT to HP Elitepad 900
Rocket Man replied to goudviske's question in Windows Deployment Services (WDS)
Will check this out when I am back in the office later on today and get back. Seems to be everyone was having problems imaging these devices, I even had our HP supplier making enquiries to my superior yesterday asking to give details on how I imaged it. Well there it is, hopefully it will help others out!! -
Yes indeed it is... thanks for testing this. thanks Rocket man
-
Trying to deploy Win 8 ENT to HP Elitepad 900
Rocket Man replied to goudviske's question in Windows Deployment Services (WDS)
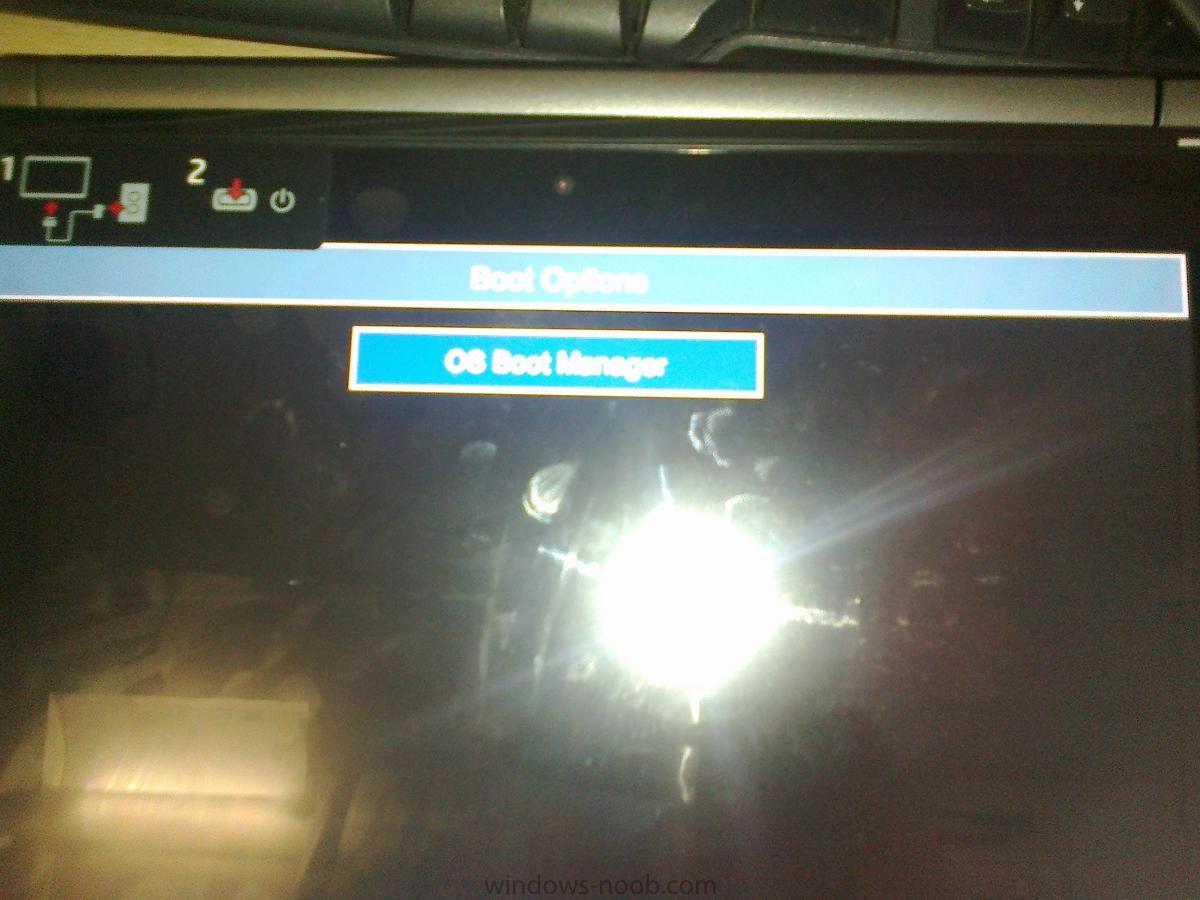
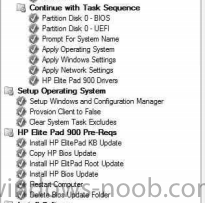
HERE IS HOW I SUCCESSFULLY IMAGED THE HP ELITEPAD 900 via SCCM 2012 SP1 CU1 For those of you who are eager to get PXE working with this type of device you will have install CU1 on your SCCM server. It is a relatively easy install. Once installed you can deploy the client/console updates as you wish (I haven’t done either as of yet). The first thing to do is get the HP drivers for this device from here Basically I just downloaded the Manageability Packs (WinPE4.0 and x86 Driver Pack). I created a driver pack out of the following folders that were extracted from the driver pack sp61365 Software - System Management Driver – Storage Driver – Network DO NOT leave the Driver - Firmware and Chipset folder in this driver package. A package has to be created out of this and deployed with the task sequence after WinPE environment. (There is a pdf file contained within this folder and a driver file which needs to be extracted). DO NOT leave the Operating System – Enhancement folder in the driver package either as this empty anyway and gives guidance on another task that has to be carried out after WinPE environment also. (Will cover this in the Task sequence explanation in a bit.) For testing purposes I created a new x86 boot.wim specifically for Win8 deployment and injected the HP WinPE4.0 driver pack into it and I also added the drivers from the previously created driver pack also. With this now done your HP ElitePad should be booting now and picking up any available task sequences!! Now to the good part of getting ready the extra packages needed to successfully deploy these devices. Download the following update Windows8-RT-KB2756872-x86.msu from here and create a package out of it with a command line as so wusa.exe Windows8-RT-KB2756872-x86.msu /quiet /norestart. From the Driver - Firmware and Chipset folder that was downloaded with the driver pack, extract the sp60725 file. This will have quite a few folders and files all of which are needed and a package created from, there is no need to create a program for this package as HP recommend a run command line to initiate the installation according to the PDF file that comes accompanied with it. (I changed this as you will see, for my own purposes). It is also recommended that you create a package out of the root cert update that can be got from here http://support.microsoft.com/kb/931125. Create another package out of it with a program command line like this rootsupd.exe /Q. Distribute all of these packages out to your DPs. If you haven’t already done so, which I can assume you already have is create a windows8 x86 image from the media and import it into SCCM. I did not use the standard install.wim from the media but instead built an image on a Hyper-V VM via the OEM media and installed .net3.5 features (for my own needs) before capturing it again. Now create your windows 8 Task sequence and select the appropriate wim image. You should have a Task sequence that looks like so: Sorry for the bad images!! Attach your driver package and appropriate query. And now attach the extra packages in the order seen below: The first step after setup operating system is to install the KB update. This will take a while and will restart your system even though the norestart switch has been specified in the command line. The second step which I altered for my own purposes was to copy the contents of the BIOS Update package which we created from the sp60725 file. This is a run command line like so xcopy “.\*.*” “C:\BiosUpdate” /D /E /C /I /Q /H /R /Y /S Don’t forget to reference the BIOS update package within the run command line task!! Next step is attach the root cert update package. Now we have to install the Bios Update that we copied to the local system in the previous step. This is done with a run command line step and a command like so: C:\BiosUpdate\FDSetup.exe –s –f This will execute the Bios Update locally on the system and it will take a while. It is recommended to place a restart command after this task also which I have done. And then after this I created a script that will delete the BiosUpdate folder from the C:\ drive because space is already problem with my devices…… 32GB!!! NB* The reason as to why I copied the Bios update folder locally and then executed it with a run command line is because I access content directly from the DP. Doing these steps allowed me to continue my OSD task sequence via accessing the DP instead of downloading all content locally first(which is slow), but if you go by HP guides from within the accompanied pdf this is how you have to deploy your Task sequence(download all content locally) otherwise it will fail at the BIOS update installation! Dallan.R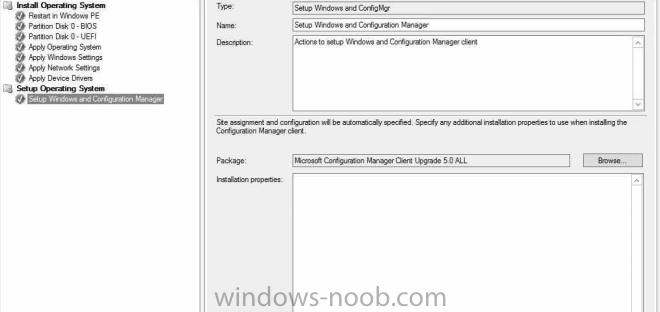
-
Yes of course do add the required silent switches!!
-
Trying to deploy Win 8 ENT to HP Elitepad 900
Rocket Man replied to goudviske's question in Windows Deployment Services (WDS)
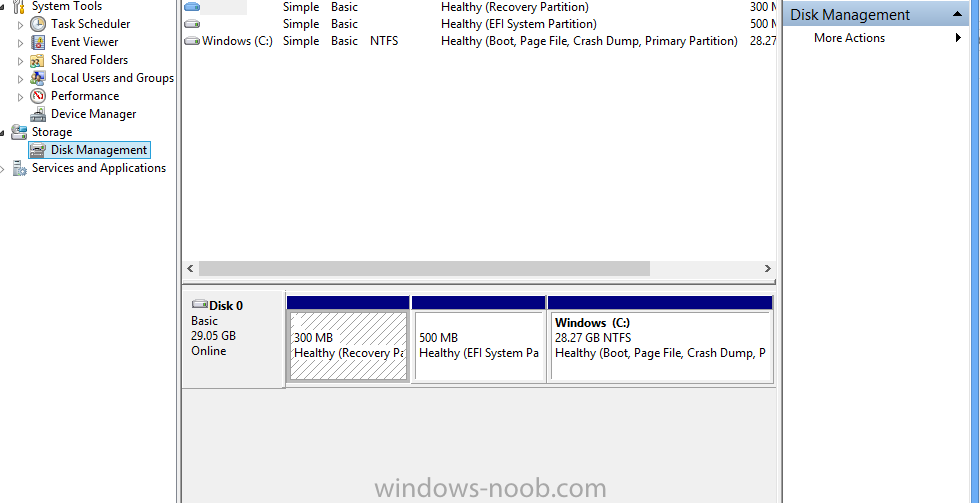
Well it definitely shows an EFI partition in disk management on my imaged ElitePads with windows 8 x86 Partition1: 300mb (Recovery) Partition2: 500mb (EFI) Partition3: xxGB Windows © Would I be right in saying that this is an EFI build? Have been busy creating images for other new devices this week so have not had a chance to get this basic guide done. Niall gave a good post on the windows surface pro, it is very similar to this but obviously drivers are different and a few other steps that HP recommend(1 of which needed to be altered to suit my enviornment). EDIT: And just to add HP dont supply drivers for windows8 x64 for these systems! -
SCEP not installing
Rocket Man replied to Kevin79's question in Troubleshooting, Tools, Hints and Tips
Has the contents of C:\ProgramData\Microsoft\Microsoft Antimalware folder been fully erased.. and all regkeys associated with the old version been removed? -
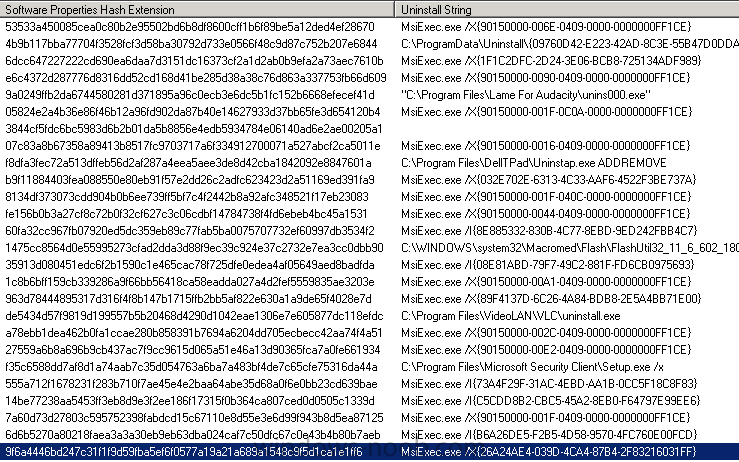
OK just a little tip that I noticed one day when rooting through the console.......On any of your systems that have java installed on them right click the object and use resource explorer. Navigate to the Installed software node of resource explorer. In here there is a wealth of information in relation to software.....one been uninstall string.. see image (this is my uninstall string for java version 1.6) Now I never have to uninstall any software in my enviornment....luckily we just refresh each year with new OSD and also whenever new out of boxes' systems come in.... but if I had to uninstall certain software this is where I would look first....it should do the trick (I think).... could you test it and report back as I would be interested to know myself if these uninstall strings work. Thanks Rocket Man
-
There can certainly be more than 1 switch on certain applications to deploy silently, that commandline is the one I use from version 1.6(unsure where I sourced it from, but it worked)...., It may work with your version.... not sure though...
-
your spelling is wrong "quite" should be "quiet" Also your /l switch should be /i not unless it's an uppercase i ......it looks like an l though?? Also you could try this command and see how you get on: msiexec /i "jre1.7.0_21.msi" ALLUSERS=1 /q /norestart
-
Task sequence that uses an Autoit script, is it possible?
Rocket Man replied to clivebuckwheat's question in Deploying Operating Systems
It may need to be downloaded locally first? Are you running your task sequence from the DP? If so you may need to copy the contents of the package to your system first and then use a run command line that executes it from the source location you have specified in your copy task. Doing it this way still allows you to run your TS from DP instead of having to download all the TS during OSD. Rocket Man -
If the updates have downloaded to the CCMCACHE and the user turns off the laptop and brings it offsite before the updates install it will install the updates Off-site and software center will alert with a required restart if needed...... Just after testing this
-
User account deleted under "Users"
Rocket Man replied to learningmode's topic in Configuration Manager 2012
This should come back in automatically...when depends on how frequent your user discovery method is set to....default 1 week and an extra option to add delta discovery. You can just rightclick on the dicovery method and run full discovery! This applies to all discovery methods. Rocket Man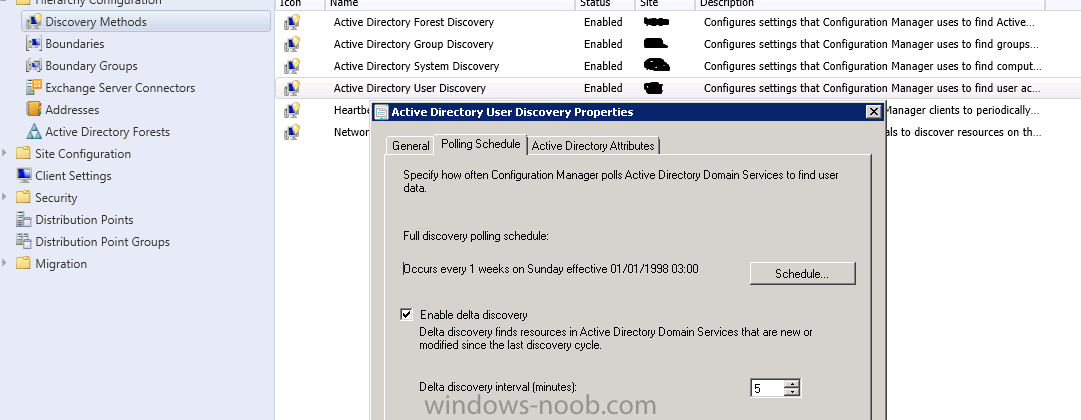
-
Install Windows Updates Using Task Sequence
Rocket Man replied to n00blar's topic in Configuration Manager 2012
You should not need the scan and wait for scan tasks in the sequence. Have you tried it without them with just the install software update task with mandatory updates as the option. -
Trying to deploy Win 8 ENT to HP Elitepad 900
Rocket Man replied to goudviske's question in Windows Deployment Services (WDS)
Just after successfully imaging 5 HP elitepad 900s' (UEFI) via PXE with windows 8 x86, all drivers and other software installed also with task sequence. Will try and post a basic guide of steps required if time is on my side... Rocket Man -
PXE Boot fails after SP1 Upgrade
Rocket Man replied to vincelewin's topic in Configuration Manager 2012
Is the WDS service running?