-
Posts
2925 -
Joined
-
Last visited
-
Days Won
79
Everything posted by Peter van der Woude
-

Task Sequence step "Restart Computer"
Peter van der Woude replied to jbudd0649's topic in Configuration Manager 2012
The task sequence will handle the reboot of installations itself, based on the exit code. -

Application and Package source locations
Peter van der Woude replied to KeithDib's topic in Configuration Manager 2012
Those are not standard PowerShell cmdlets... In that case you would need some additional code.. Another thing you could look at is this free tool by Coretech: http://blog.coretech.dk/kea/updated-version-of-the-package-source-changer/ -

Move Role Between DP's
Peter van der Woude replied to Unique01's topic in Configuration Manager 2012
Also good to know is that you won't loose compliance data with removing a software update point. -

SCCM 2012 - Collections Design recommendation?
Peter van der Woude replied to fr0zen's topic in Configuration Manager 2012
In ConfigMgr 2012 you could create something like that with limiting collections. The big question, at least to me, what will you be using those collections for? I like to create functional collections, instead of just overview collections.- 8 replies
-
- collection
- sccm2012
-
(and 1 more)
Tagged with:
-

New Clients install, but not receiving policy
Peter van der Woude replied to Josh's topic in Configuration Manager 2012
That's usually an indication that it hasn't been able to successfully communicate with the management point. Check the client log files like ClientIDManagerStartup, ClientLocation and LocationServices. -

Configuring Software Update Point within SCCM
Peter van der Woude replied to anyweb's question in Software Update Point
If you want the clients on the secondary site to use a local WSUS, then you should install WSUS on there and let the software update point handle the configuration. If you installed it on port 80/443 then make sure to configure that in the software update point configuration. -

Configuring Software Update Point within SCCM
Peter van der Woude replied to anyweb's question in Software Update Point
The software update point is only used for scanning. When you want the clients to also get their content from there, you should also install a distribution point and add the package, with the content of the updates, to it. -

Constantly re-installing Client?
Peter van der Woude replied to Unknownforce's topic in Configuration Manager 2012
Check the ccmsetup-ccmeval.log, maybe the evaluation task determined something was wrong. -

Deploying Visio Viewer
Peter van der Woude replied to DaaT's question in Deploy software, applications and drivers
Did you try the installer out-side of ConfigMgr? Just run it on a machine and see what happens, both like a user and as SYSTEM (use PSEXEC). -
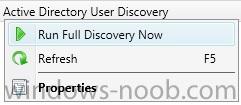
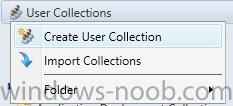
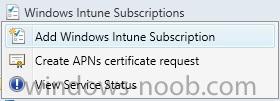
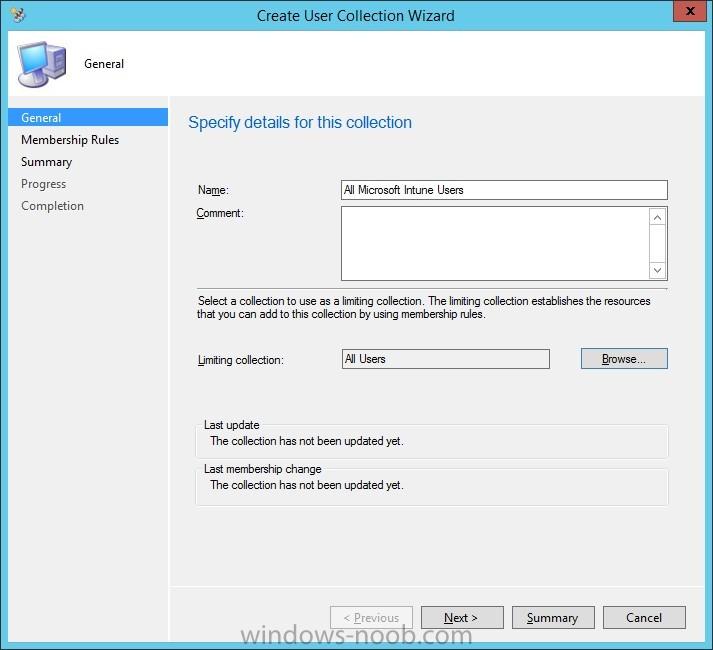
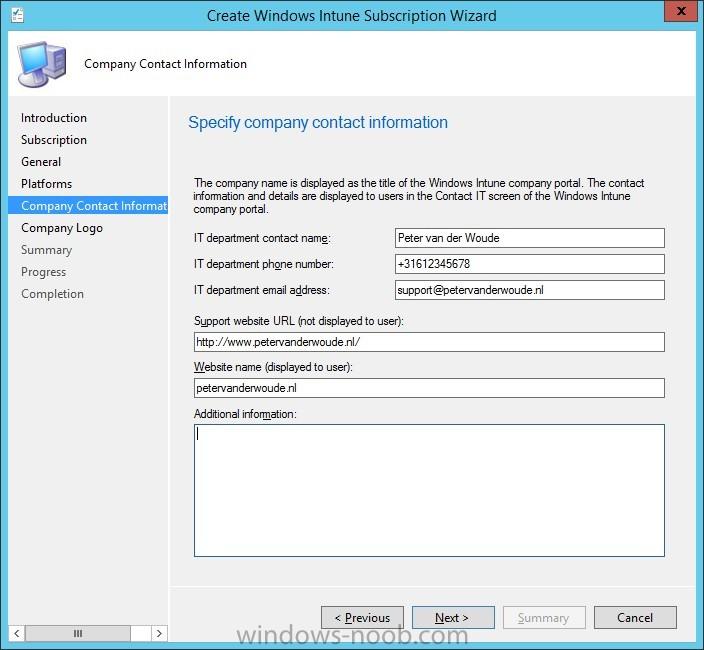
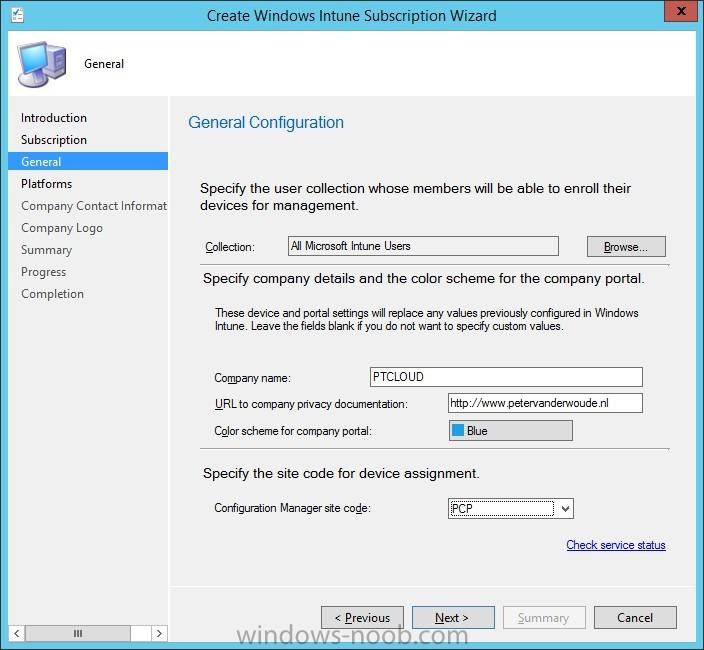
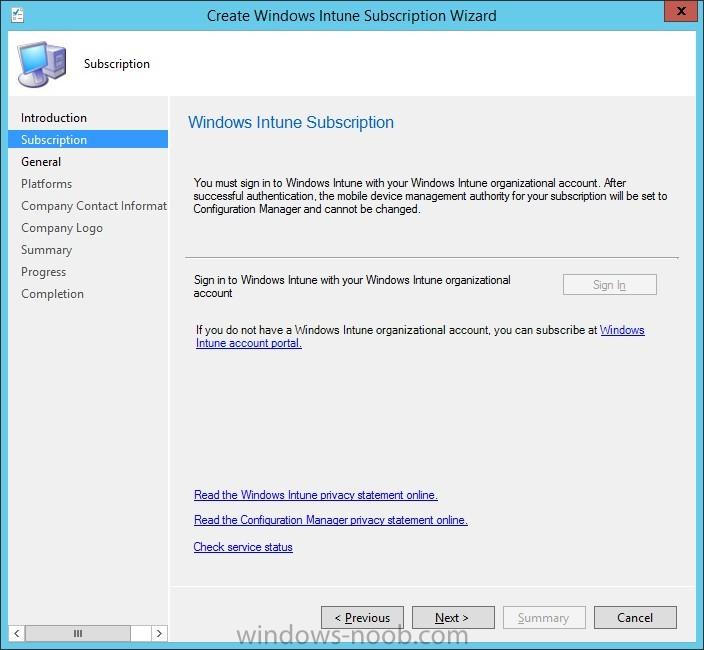
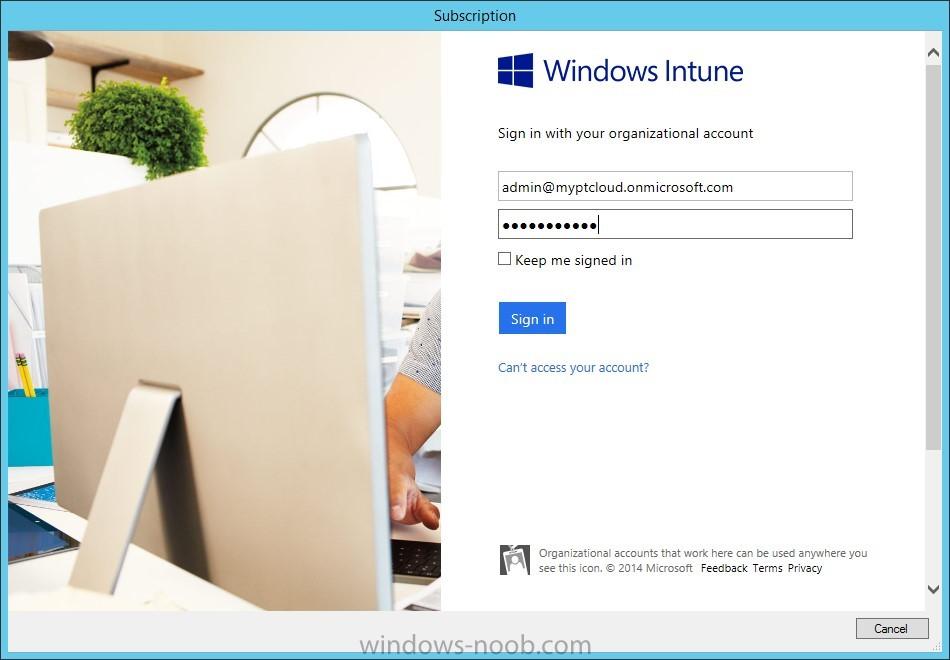
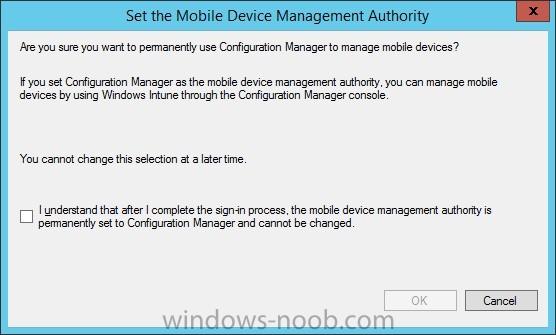
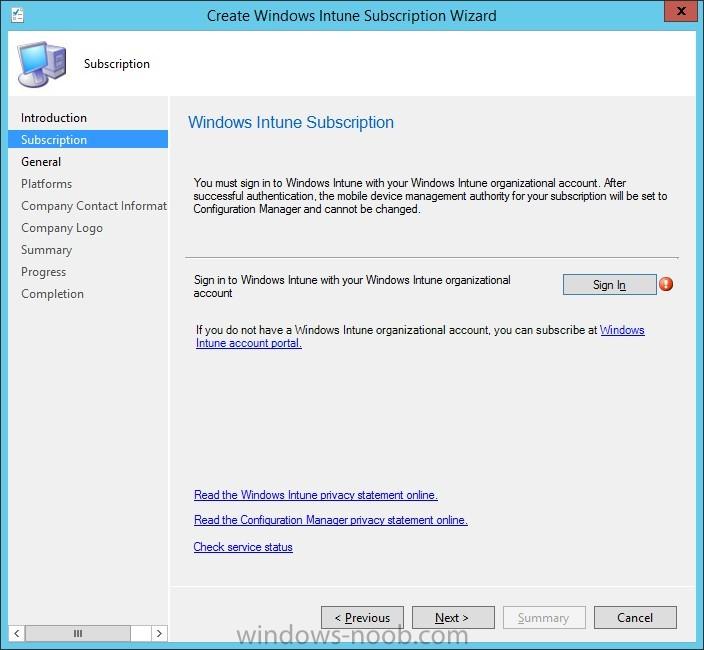
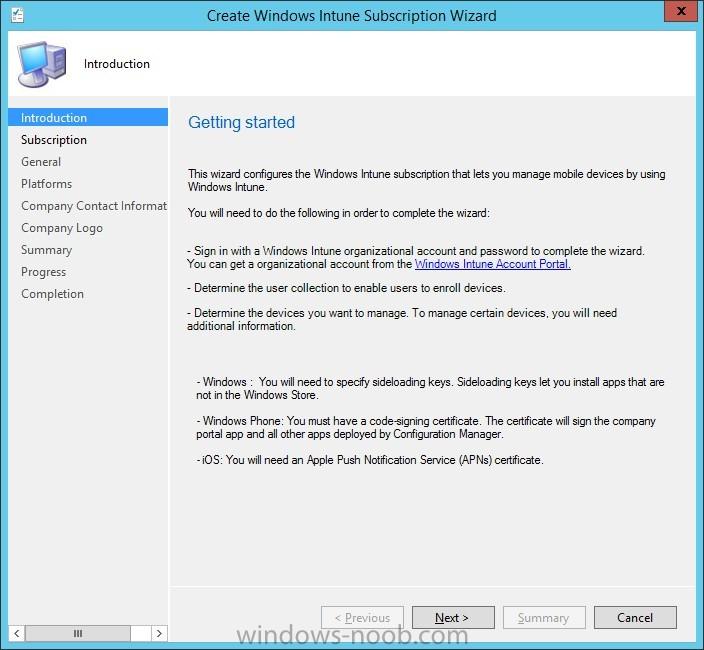
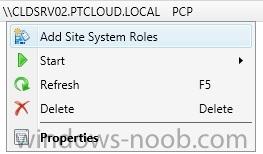
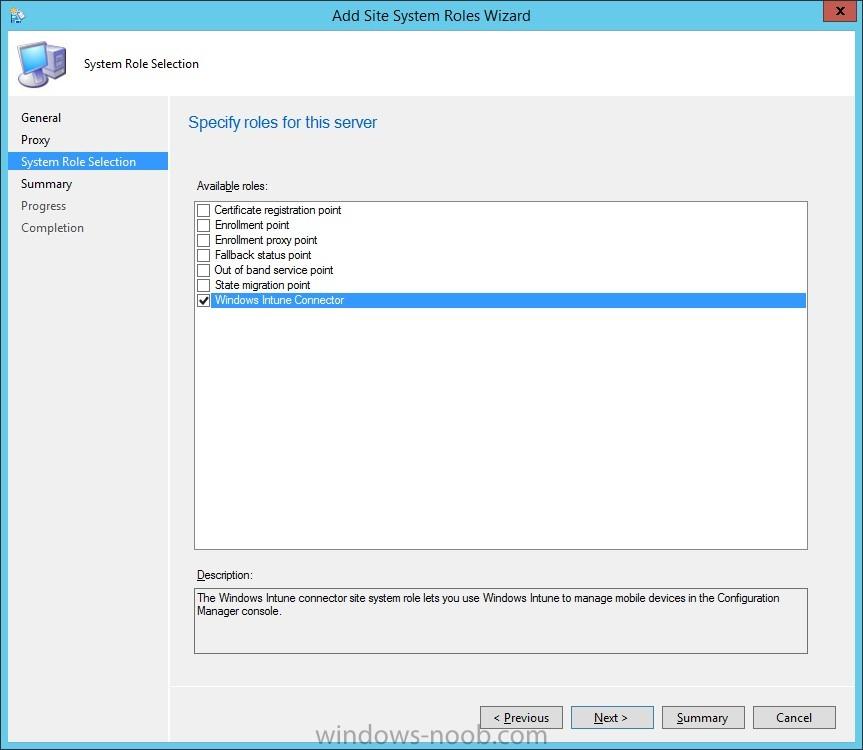
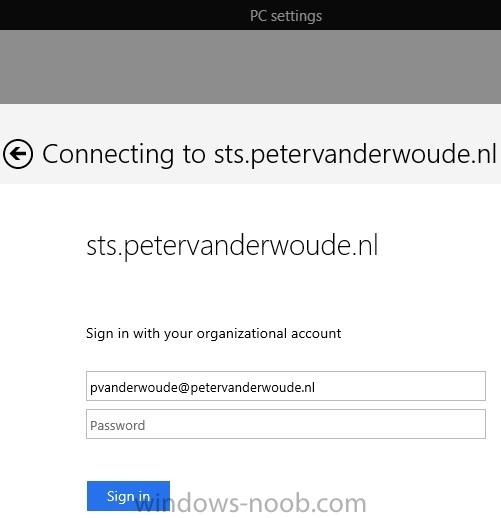
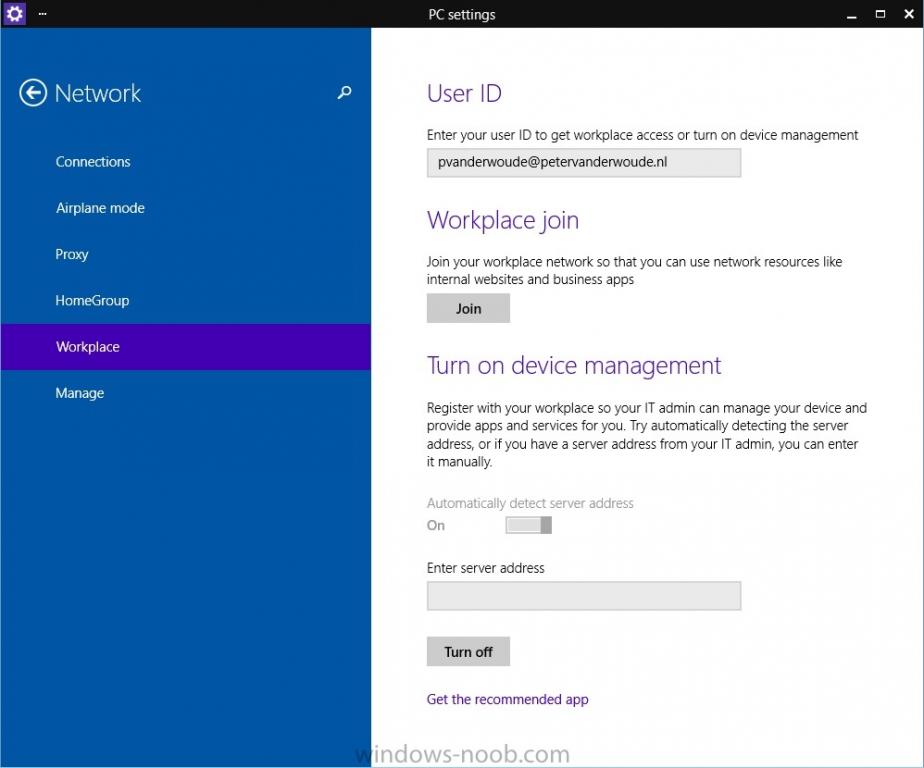
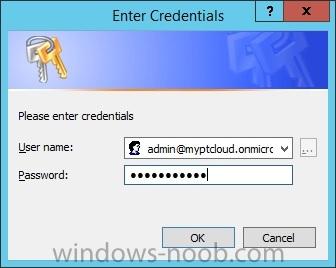
In the first part of this blog series I went through the introduction and the prerequisites, in the second part I went through the installation and configuration of AD FS and in the third part I went through the directory synchronization. This fourth part of the blog series will finally be about ConfigMgr and Microsoft Intune. During this part the last configurations will be done to get the required UPNs to ConfigMgr and to synchronize this information to Microsoft Intune. Synchronize new UPN to ConfigMgr To correctly synchronize the correct user information via Microsoft Intune, it is required to discover the most recent UPN changes to the users. Open the Configuration Manager console and navigate to Administration > Overview > Hierarchy Configuration > Discovery Methods, right-click Active Directory User Discovery and select Run Full Discovery Now.Create a Microsoft Intune collection To allow user to enroll their mobile device through Microsoft Intune it’s required to specify which user are allowed to perform this action. This is done by specifying a collection during the configuration of the Microsoft Intune connector. First we need to create this collection. Open the Configuration Manager console and navigate to Assets and Compliance > Overview, right-click User Collections and select Create User Collection. The Create User Collection Wizard will show. Provide a name like All Microsoft Intune Users and limit the collection to the All Users collection. Walk through the wizard and simply add a few users that a required to enroll their devices through Microsoft Intune. Add Windows Intune Subscription To integrate Microsoft Intune with ConfigMgr it’s required to add the subscription to ConfigMgr. Open the Configuration Manager console and navigate to Administration > Overview > Cloud Services, right-click Windows Intune Subscriptions and select Add Windows Intune Subscription. The Create Windows Intune Subscription Wizard will show. On the Getting started page, click Next. On the Windows Intune Subscription page, click Sign In. In the Set the Mobile Device Management Authority dialog box, select I understand.. and click OK. In the Subscription dialog box, specify the Microsoft Intune subscription details and click Sign In. Back on the Windows Intune Subscription page, click Next. On the General Configuration page, select the collection All Microsoft Intune Users (created in the previous step), provide some company details, specify the site code and click Next. On the Platforms page, click Next. On the Company Contact Information page, specify the contact details of the company and click Next. On the Company Logo page, click Next. On the Summary page, click Next. On the Completion page, click Close. Add the Windows Intune Connector role To connect Microsoft Intune with ConfigMgr the last step is to install the Windows Intune Connector. Open the Configuration Manager console and navigate to Administration > Overview > Site Configuration > Servers and Site System Roles, right-click \\<PrimairySiteServer> and select Add Site System Roles. On the General page, click Next. On the Proxy page, click Next. On the System Role Selection page, select the Windows Intune Connector and click Next. On the Summary page, click Next. On the Completion page, click Close. Verify the Single Sign-On in Microsoft Intune After integrating Microsoft Intune and ConfigMgr the last step is to verify that it’s all working. On a Windows device navigate to PC Settings > Network > Workplace and provide the on-premises credentials of a user that is a member of the All Microsoft Intune Users collection. Notice that this will also redirect to the on-premises AD FS for verifying the credentials. Notice after that a successful enrollment with the on-premises credentials.
-
- Microsoft Intune
- Configuration Manager
-
(and 3 more)
Tagged with:
-
Please check the SMSTS log file for more details about a specific error.
- 4 replies
-
- configmgr 2012 R2
- Software Packages
-
(and 1 more)
Tagged with:
-
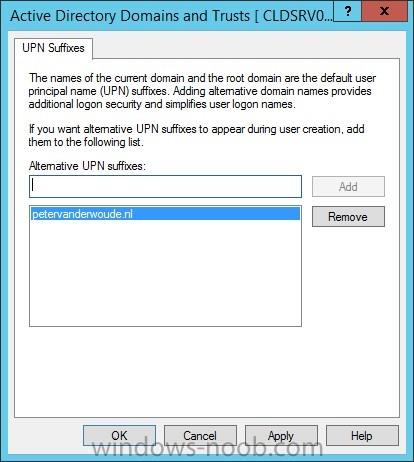
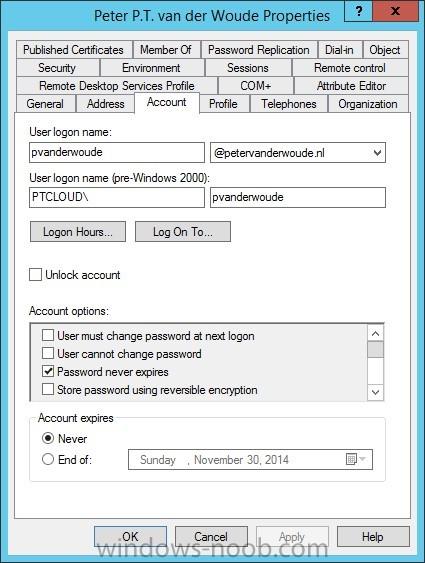
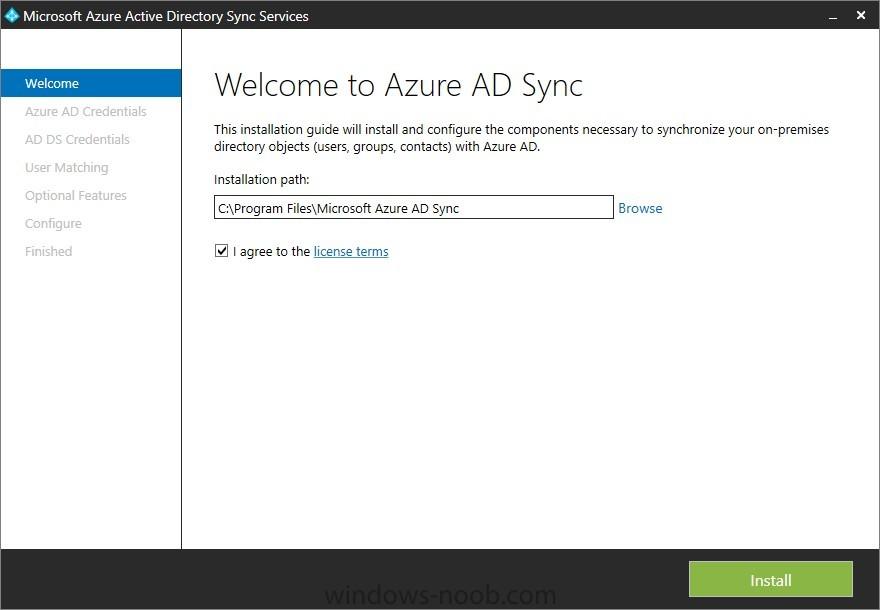
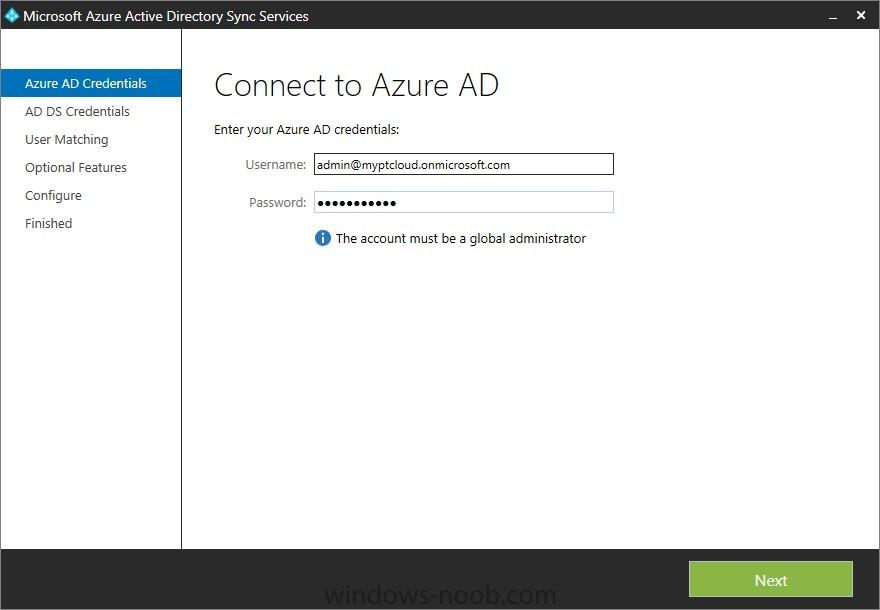
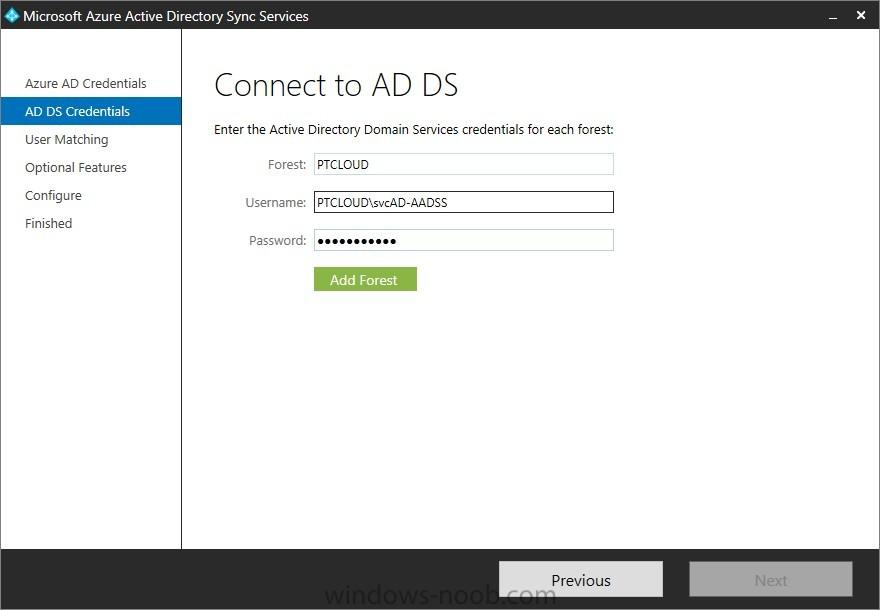
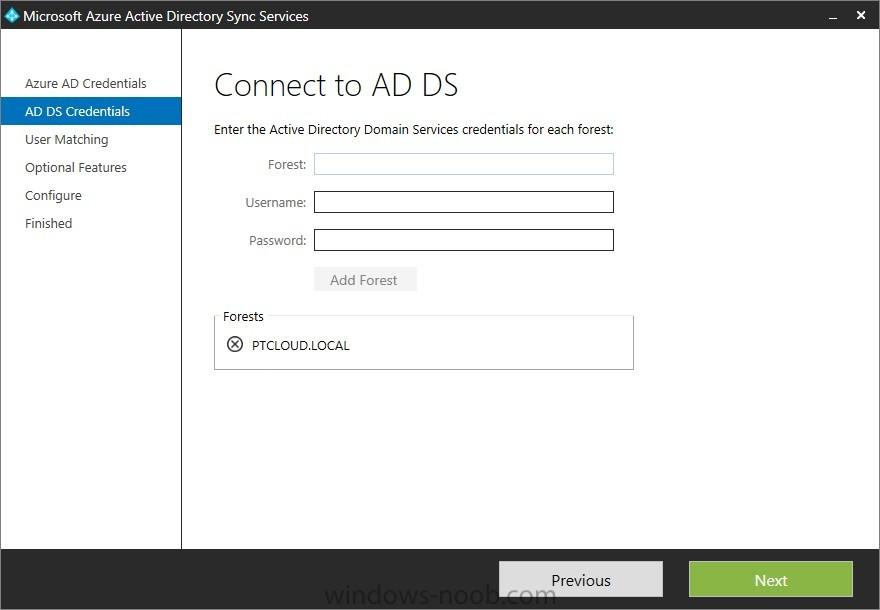
In the first part of this blog series I went through the introduction and the prerequisites and in the second part I went through the installation and configuration of AD FS. This third part of the blog series will be all about configuring, configuring and configuring. First it's required to add the public domain name to the Microsoft Online Services, then I'll add the public domain name as a UPN to the users and then I'll enable active directory synchronization. Enable Active Directory Synchronization The first thing is that I have to enable Active Directory synchronization in the Microsoft Online Services. This allows me to synchronize our on-premises users to the Azure AD. First connect to the Microsoft Online Services by using the following command, which will prompt for credentials. In the credentials dialog box provide the credentials of the Microsoft Intune subscription.Connect-MsolService –Credential $cred After that it’s possible to enable Active Directory synchronization by using the following command.Set-MsolDirSyncEnabled -EnableDirSync $true After using the command to enable Active Directory synchronization it’s required to confirm the action by simply answering with Y. To verify a successful configuration, simply logon to the Account portal and verify the Active Directory synchronization setting by navigating to Management > Users. It should display the following information. Add public User Principal Name to users To enable the user to use the public domain name to logon to their devices, and the Microsoft Online Services, it’s necessary to add the public domain name as their primary User Principal Name (UPN). These configurations will be done through PowerShell. To add a UPN for a forest use the following command. In that command the Identity is the forest name and the UPNSuffixes is the public domain name.Set-ADForest -Identity "PTCLOUD" -UPNSuffixes @{Add="petervanderwoude.nl"} To verify the success of the PowerShell action, simply open the Properties of one of the Active Directory Domains and Trusts and check the UPN Suffixes tab. To set the UPN as a user’s primary UPN use the following command. In that command the SearchBase is the OU that contains the required users and the UserPrincipalName is the public domain name.Get-ADUser -Filter * -SearchBase 'OU=NORMAL USERS,OU=USERS,OU=PTCLOUD,DC=PTCLOUD,DC=LOCAL' -Properties userPrincipalName | foreach { Set-ADUser $_ -UserPrincipalName "$($_.samaccountname)@petervanderwoude.nl"} To verify the success of the PowerShell action, simply open the Properties of one of the users and check the Account tab. Install and configure Microsoft Azure Active Directory Sync Services The next thing is to install and configure the Microsoft Azure Active Directory Sync Services. This tool will allow us to synchronize the on-premises user with the Azure AD. On the Welcome to Azure AD Sync page, specify an Installation path, select I agree to the License terms and click Install. On the Connect to Azure AD page, specify the credentials of the Microsoft Intune subscription and click Next. On the Connect to AD DS page, specify the information of the on-premises forest (see prerequisites) and click Add Forest. After the forest is added click Next. On the Uniquely identifying your user page, click Next. On the Optional features page, click Next. On the Ready to configure page, click Configure. On the Finished page, click Finish. Verify user synchronization After setting up the user synchronization it’s important to verify the success. In the Account portal, navigate to Management and click Users. In the Users overview it should start showing the synchronized users. Note: In my overview it shows a user with the public domain name UPN, a user without and the initial administrator.
-
- Microsoft Intune
- Configuration Manager
-
(and 4 more)
Tagged with:
-

Task Sequence has failed 0x00000002 (Software)
Peter van der Woude replied to Vini's topic in Configuration Manager 2012
How is it failing then and with what error? -
Go to the Content tab in the properties of the distribution point. Here you can redistribute everything that's on the distribution point.
-

Task Sequence has failed 0x00000002 (Software)
Peter van der Woude replied to Vini's topic in Configuration Manager 2012
You're getting an access denied on the action to add a user to the local administrators. Are you performing that action with a specific user that has not enough permissions? -
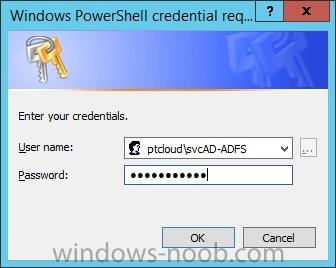
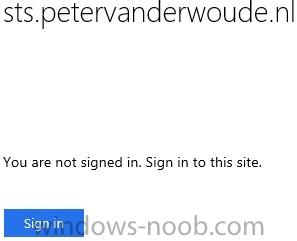
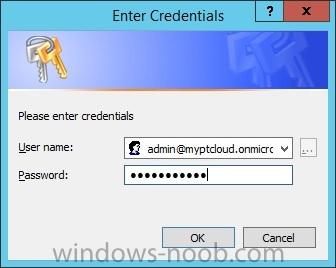
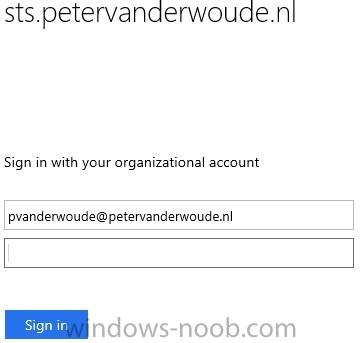
In the first part of this blog series I went through the introduction and the prerequisites. This second part of the blog series will be all about installing and configuring Active Directory Federation Services (AD FS) and the AD FS proxy, which is the Web Application Proxy (WAP) in Server 2012 R2. AD FS will be used to federate with Microsoft Azure AD for the authentication of the user’s on-premises. Install Active Directory Federation Services The first thing that’s required is to install is AD FS. This installation will be done through PowerShell on the CLDSRV01. To install AD FS use the following PowerShell command.Install-WindowsFeature Adfs-Federation -IncludeManagementTools To verify the success of the PowerShell action, simply look at the output of the action. Configure the federation server After installing AD FS it’s required to configure the federation server. This configuration will be done through PowerShell on the CLDSRV01. The first steps will get the required input for the command. Get the certificate thumbprint of the certificate (see prerequisites). To get this information run the command below. This will provide a nice overview of the thumbprints of the different certificates. Simply look for the one that belongs to the mentioned certificate.dir Cert:\LocalMachine\My To provide the credentials of the service account for AD FS run the following command and provide the credentials.$ADFSCred = Get-Credential To configure AD FS run the following command. In this command CertificateThumbprint is the thumbprint of the required certificate (first step) and ServiceAccountCredential is the supplied credentials (second step).Install-AdfsFarm -CertificateThumbprint "6532759C67678B50811739261B101B87916C1BC4" -FederationServiceName "sts.petervanderwoude.nl" -ServiceAccountCredential $ADFScred To verify the success of the PowerShell action, simply look at the output of the action. Install Web Application Proxy The next component that needs to be installed is WAP. This installation will be done through PowerShell on the CLDSRV00. One important thing to note here is that this server should be able to resolve the public federation service name to the CLDSRV01.PTCLOUD.LOCAL. This can be solved to either add an entry to the host file or by adding the information to DNS. To install WAP use the following PowerShell command.Install-WindowsFeature Web-Application-Proxy -IncludeManagementTools To verify the success of the PowerShell action, simply look at the output of the action. Configure Web Application Proxy After the installation of WAP it’s required to configure it to connect to the AD FS server. This will be done through PowerShell on the CLDSRV00. Get the certificate thumbprint of the certificate (see prerequisites). To get this information run the command below. This will provide a nice overview of the thumbprints of the different certificates. Simply look for the one that belongs to the mentioned certificate.dir Cert:\LocalMachine\My To perform the configuration of WAP run the following command in which CertificateThumbprint is the thumbprint of the required certificate (previous step) and FederationServiceName is the name of the configured federantion service. Also, this command will ask for the credentials with enough permissions to configure the federation services.Install-WebApplicationProxy –CertificateThumbprint "6532759C67678B50811739261B101B87916C1BC4" -FederationServiceName "sts.petervanderwoude.nl" To verify the success of the PowerShell action, simply look at the output of the action. Verify the AD FS Sign-In page After installing and configuring AD FS and WAP it’s very important to know for sure that it’s working. This testing can be done on any device connected to the Internet. Open the Internet Explorer and browse to https://sts.petervanderwoude.nl/adfs/ls/idpinitiatedsignon.htm Click Sign in and provide the required credentials and click Sign in again. This should change the displayed text to You are signed in. Note: Replace the public domain for the personal (or company’s) own public domain name. Create a trust between AD FS and Azure AD The next thing that’s required is to configure the federation with the Microsoft Online Services. To do this it’s required to add the public domain name to the Microsoft Online Services as a federated domain. This will allow us to use the public domain name for the various Microsoft Online Services. This configuration will be done through PowerShell on the CLDSRV02. First connect to the Microsoft Online Services by using the following command, which will prompt for credentials. In the credentials dialog box provide the credentials of the Microsoft Intune subscription.Connect-MsolService –Credential $cred After that it’s required to also connect with the on-premises AD FS by using the following command.Set-MsolADFSContext -Computer cldsrv01.ptcloud.local Now it’s possible to add a new federated domain, by using the following command.New-MsolFederatedDomain –DomainName petervanderwoude.nl A message will show that it’s required to verify the specified domain name, by adding a TXT record to the domain registar. Logon to the domain registar and specify the information about the TXT record. After specifying the TXT record it’s required to run the previous command again. This time to verify the domain name.New-MsolFederatedDomain –DomainName petervanderwoude.nl To verify the success of the PowerShell action, simply look at the output of the action. Another place to verify a successful configuration is to simply logon to the Account portal and verify the Single sign-on setting by navigating to Management > Users. It should display the following information. Verify the Single Sign-On configuration After installing and configuring AD FS and WAP it’s very important to know for sure that it’s working. Open the Internet Explorer and browse to https://portal.manage.microsoft.com/ Click Use another account and provide the required credentials and click Sign in. After specifying the public UPN of the user the page will redirect to the on-premises AD FS. Note: Replace the public domain for the personal (or company’s) own public domain name.
-
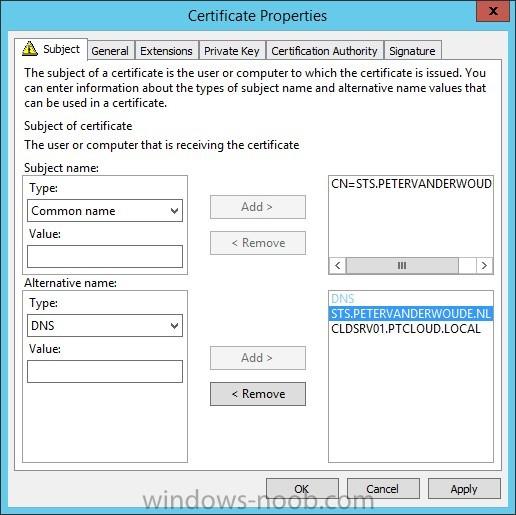
Introduction In this blog series I’m going to show how to setup a basic configuration of Microsoft Intune, integrated with System Center 2012 R2 Configuration Manager, in combination with and on-premises Active Directory Federation Services (AD FS) for a single sign-on experience. After successfully completing this blog series a user will be able to use his on-premises credentials to access the services of Microsoft Intune. As part of setting up single sign-on, it’s also required to set up directory synchronization. Together, these features integrate the local and cloud directories. It’s only required to set up single sign-on, Active Directory synchronization, and a registered domain on time for a Microsoft Online Service. If Microsoft Office 365 is already used, or any other Microsoft Online Service, then some of the steps, of this blog series, may be completed already. After setting up single sign-on, Active Directory synchronization, or a registered domain for Microsoft Intune, these items will be available for all Microsoft Online services. This information and configurations provided in this blog series are not meant for production environments. It’s purely meant for a lab setup to experiment with the possibilities. I divided this blog series in the following four parts. How to integrate Microsoft Intune and System Center 2012 R2 Configuration Manager with Single Sign-On – Part 1: Introduction and prerequisites;This first part is about what blog series will deliver and what the prerequisites are that need to be in place. How to integrate Microsoft Intune and System Center 2012 R2 Configuration Manager with Single Sign-On – Part 2: Install and configure Active Directory Federation Service;This second part is about installing and configuring AD FS, WAP and single sign-on. How to integrate Microsoft Intune and System Center 2012 R2 Configuration Manager with Single Sign-On – Part 3: Configure directory synchronization;This third part is about configuring the synchronization of the on-premises user accounts to the Azure AD. How to integrate Microsoft Intune and System Center 2012 R2 Configuration Manager with Single Sign-On – Part 4: Integrate ConfigMgr and Microsoft Intune;This fourth part is about integrate Microsoft Intune with ConfigMgr to leverage the single sign-on experience. After the last part of this series is done the status of the environment will be similar as to what is described by Niall in his first part of his series about How can I manage modern devices using System Center 2012 R2 Configuration Manager? - Part1. Basically the next parts of his series can be used to do the required following configurations. The only difference is that the environment will use an on-premises single sign-on experience. Prerequisites I would like to start this blog series with a small list of prerequisites that need to be in place for various different reasons. Also, these prerequisites will contain the servers that I’ll be using during this setup. In the following part I’ll be referring to the different server names to indicate were I’m performing the actions. Register a public domain name In this blog series I’ll be using the public domain name of petervanderwoude.nl. This domain name will be used for the single sign-on configuration. Simply replace every reference to this public domain name with a personal (or company) owned public domain name. Create a Microsoft Intune subscription In this blog series I’ll be using the Microsoft Intune subscription myptcloud.onmicrosoft.com. This subscription will be used for the single sign-on configuration. Simply replace every reference to this subscription with a personal (or company) owned subscription. Register a trial Microsoft Intune subscription here: http://www.microsoft.com/en-us/server-cloud/products/microsoft-intune/try.aspx Prepare the required servers In this blog series I will be referring to multiple servers. Even for a lab environment this should be the minimum number of server used. Of course it’s possible to user more servers to split more roles. Simply replace every reference to these server names with personal (or company) lab server names. CLDSRV00 (WORKGROUP)This server is Internet-facing and will be hosting the Web Application Proxy (WAP). CLDSRV01 (PTCLOUD.LOCAL)This server is the domain controller and will be hosting Active Directory Federation Services (AD FS). CLDSRV02 (PTCLOUD.LOCAL)This server is the ConfigMgr server and will be hosting the Azure Active Directory Synchronization Tool. Install the required Azure AD PowerShell Module In this blog series the Azure AD PowerShell Module is required on the CLDSRV02 to perform actions to manage the Microsoft Online Services. This module is available for download here: http://go.microsoft.com/fwlink/p/?linkid=236297 Create the required service accounts In this blog series I’m using the following service accounts. Of course the names can be adjusted to fit different naming conventions. Simply replace any reference to these service accounts with personal (or company) lab service accounts. svcAD-ADFS (domain user)This service account is used for running AD FS. svcAD-AADSS (domain user)This service account is used for the synchronization between the on-premise AD and the Azure Active Directory. Create the required DNS Records In this blog series the following public DNS records are required to be in place. EnterpriseEnrollment (CNAME);This record has to point to EnterpriseEnrollment.manage.microsoft.com and is used for the device enrollment of Windows Phone, Windows RT and Windows 8.1. STS (A);This record has to point to a personal (or company) owned public ip that is directed to WAP and is used to publicly register the AD FS service for access by public services. Create the required certificates In this blog series the following certificates are required to be in place. Web server certificate;This certificate is used during the configuration of AD FS (and WAP).I’ll use a certificate issued from an internal PKI. In this case it’s important to have a common name and to have the appropriate DNS names. This certificate needs to be installed on the CLDSRV00 and the CLDSRV01. Note: A self-signed certificate, or a certificate from an internal PKI will provide problems with devices that can’t install the root certificate.
-
- Microsoft Intune
- Configuration Manager
-
(and 2 more)
Tagged with:
-

Move package to another distribution point
Peter van der Woude replied to Unique01's topic in Configuration Manager 2012
PowerShell is probably the easiest method. Another method could be to go in the console and select the packages and sent them to the new distribution point (and remove them from the old distribution point).


