Andersson
-
Posts
106 -
Joined
-
Last visited
-
Days Won
7
Everything posted by Andersson
-
Office 365 training, very cool with federation sharing! Lync me @ jonas.andersson@lab910.onmicrosoft.com
-
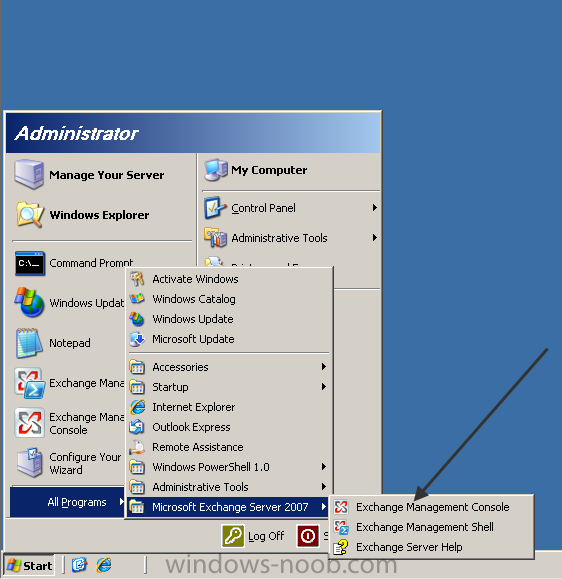
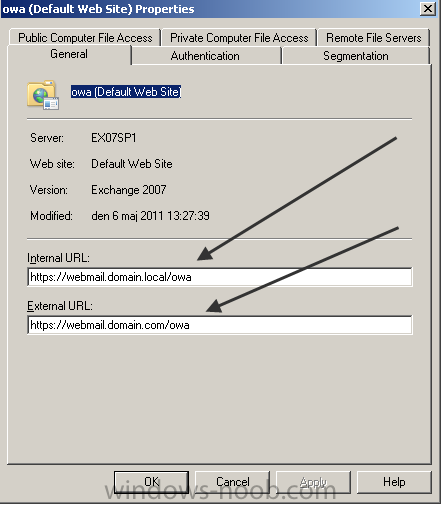
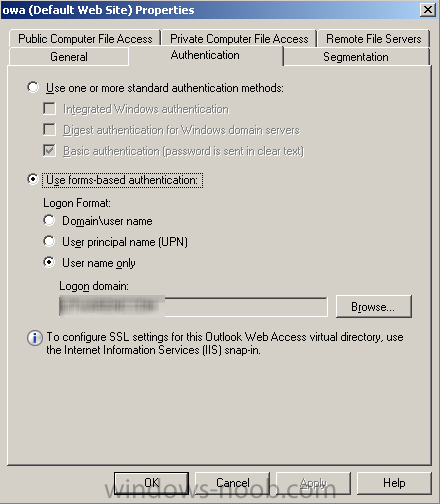
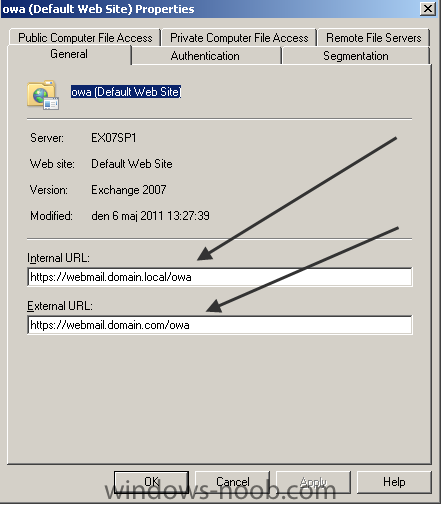
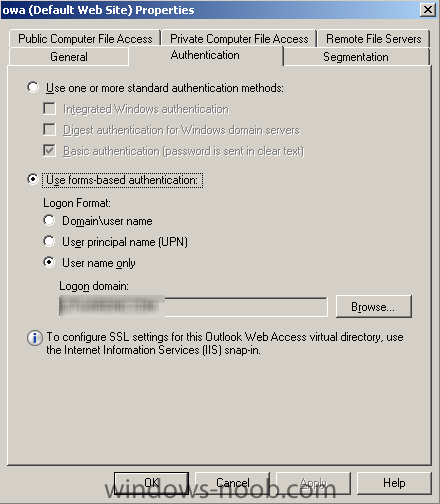
I got a request for some time ago about providing a basic step-by-step guide how to configure Exchange 2007 for OWA I suppose most of these request will be handling small installations and environments. Of course I will try to help you with that. Make sure that the Exchange 2007 machine is installed properly and works. By default there is a self-signed certificate installed, it's recommended to replace this with a 3rd part certificate. In the end of this guide I will provide some links how to create a certificate request and how to install the certificate into Exchange. Regarding the certificate's those will not be discussed in this guide, follow my publishing Exchange services link in the end of this article. Step 1. Startup "Exchange Management Console" (EMC). Step 2. Go to Server Configuration -> Client Access and select the tab Outlook Web Access. Right click and select Properties and type in the Internal and External URL for OWA. In my case I've used" https://webmail.domain.local/owa" as the InternalURL and https://webmail.domain.com/owa as the ExternalURL. Also go to the tab Authentication and select "Use form-based authentication" and choose "User name only" and browse for the domain. Step 3. Try to access the OWA internally from a client by starting Internet Explorer and type in: https://webmail.domain.local/owa. Now you should see a form based authentication logon screen. For being able to access OWA from external you will need to create an A record for the name webmail.domain.com and point it to a unique public IP address and open for HTTPS (443) and forward it to the Exchange server. For better security, you should publish the services using ISA/TMG. Here's a link to a blog post where I've written how to do that. Follow this link. The basic configuration for providing OWA is now completed. If you want the additional links for creating a certificate request and installing the certificate, check below J How to create the certificate request How to install the certificate If there's anything unclear, just post a question of give feedback on the guide so I can update it. Thanks for reading!

-
The guide will be published this weekend It can be found here: http://www.windows-noob.com/forums/index.php?/topic/3611-how-to-configure-outlook-web-access-for-exchange-2007/
-
You're welcome! Hope it will solve you "issue"
-
Yes, you will need an additional IP address for legacy The 2003 server is never going to be shown in the EMC I suppose you're servers doesn't have any firewall in between? If they have, make sure that 443 is open between and that you are able to initiate HTTPS sessions, can be tested with telnet And if there's anything unclear, just post and I'll try to help you But make sure you read the links I posted in my earlier post, they will help you a lot
-
Hi What do you mean with, the traffic will go? You will need to create an A record for legacy in your public DNS and point it to your 2003 FE server and then change the mail to point to your new CAS 2010 server (or array if that's used) You will need to include the mail.domain.com, autodiscover.domain.com, legacy.domain.com and casarray.domain.local in the certificate names You will need to change that in the firewall so it receives on the mail. ip and forwards it to the 2010 server Also you will need an additional ip address for the legacy name and that should be forwarded to 2003 server I'll post two links below you should read through http://technet.microsoft.com/en-us/library/ee332348.aspx http://technet.microsoft.com/en-us/library/bb310763.aspx
-
How did you solve the issue? Can be helpful if someone else get into same issue If you want to read more about the proxy and redirections check this link: http://technet.microsoft.com/en-us/library/bb310763.aspx
-
Hi Have you been able to solve the issues? If not, How are the mail flow configured? When you have migrated the mailboxes to the new server you will need to publish the CAS server instead of your 2003 server
-
Hi Here's a link to a basic but very good transition guide, going through each step.. Check it, if you have any further questions, just post in the forum http://msexchangegeek.com/2010/01/30/rapid-transition-guide-from-exchange-2003-to-exchange-2010/ Hope this will help you
-
Hi You can have 2 or 3 servers and deploy all roles on them (HUB/CAS/MBX) and then use the DAG feature for mailbox availability, then configure to use CASARRAY for the client access role You will need a hardware load balancer, since you can't use both Windows Failover clustering and Windows NLB on the same servers Here's a nice link where you can read about the high availability features http://technet.microsoft.com/en-us/library/dd638137.aspx
-
Hi I can provide you a guide about that, give me some time Are you using certificates? UC/SAN or single name certificate?
-
Hi Give us the full details about the setup and configuration How many servers? Roles installed? Patch level etc Run these commands and post the results get-OwaVirtualDirectory | fl
-
Hi Have you read through this link? http://technet.microsoft.com/en-us/library/bb310763.aspx It will give you all details about redirection and proxying.. Hope it will help you
-
A time ago I had a little problem with an Exchange 2007 (SP1) installation. The server I was using was prepared with Windows 2008 R2 Standard and I was told that this should be supported if Exchange 2007 is using SP2. Well, with that said I could install Exchange 2007 including SP1 if I used Compatibility mode. But when I should update it to SP2 it wouldn’t run the installation even if I used the Compatibility mode. The only option that was available for me was to uninstall Exchange 2007, but the uninstallation told me that this wasn’t supported and failed right away. I did that dramatic thing to power off the server, reinstall Windows and this time it was with Windows 2008 including SP2 because I knew this is working really well. The nice thing here is that I reinstalled the server, gave it the same hostname and ip address, joined it to the domain. But what about Exchange? In Active Directory it already exists so it cannot be installed again? Maybe you know this but if you don’t, it’s a really nice feature to recover an Exchange server using setup.com /recoverserver (This recovery switch could also be applied on Exchange 2010) It will then checks Active Directory for the information and recover almost all information, so in maybe 2 hours I was back on track J An article that describes the installation problem of Exchange 2007 on a Windows 2008 R2 server http://itknowledgeexchange.techtarget.com/windows-server/no-exchange-2007-on-windows-2008-r2-%E2%80%93-but-why/
-
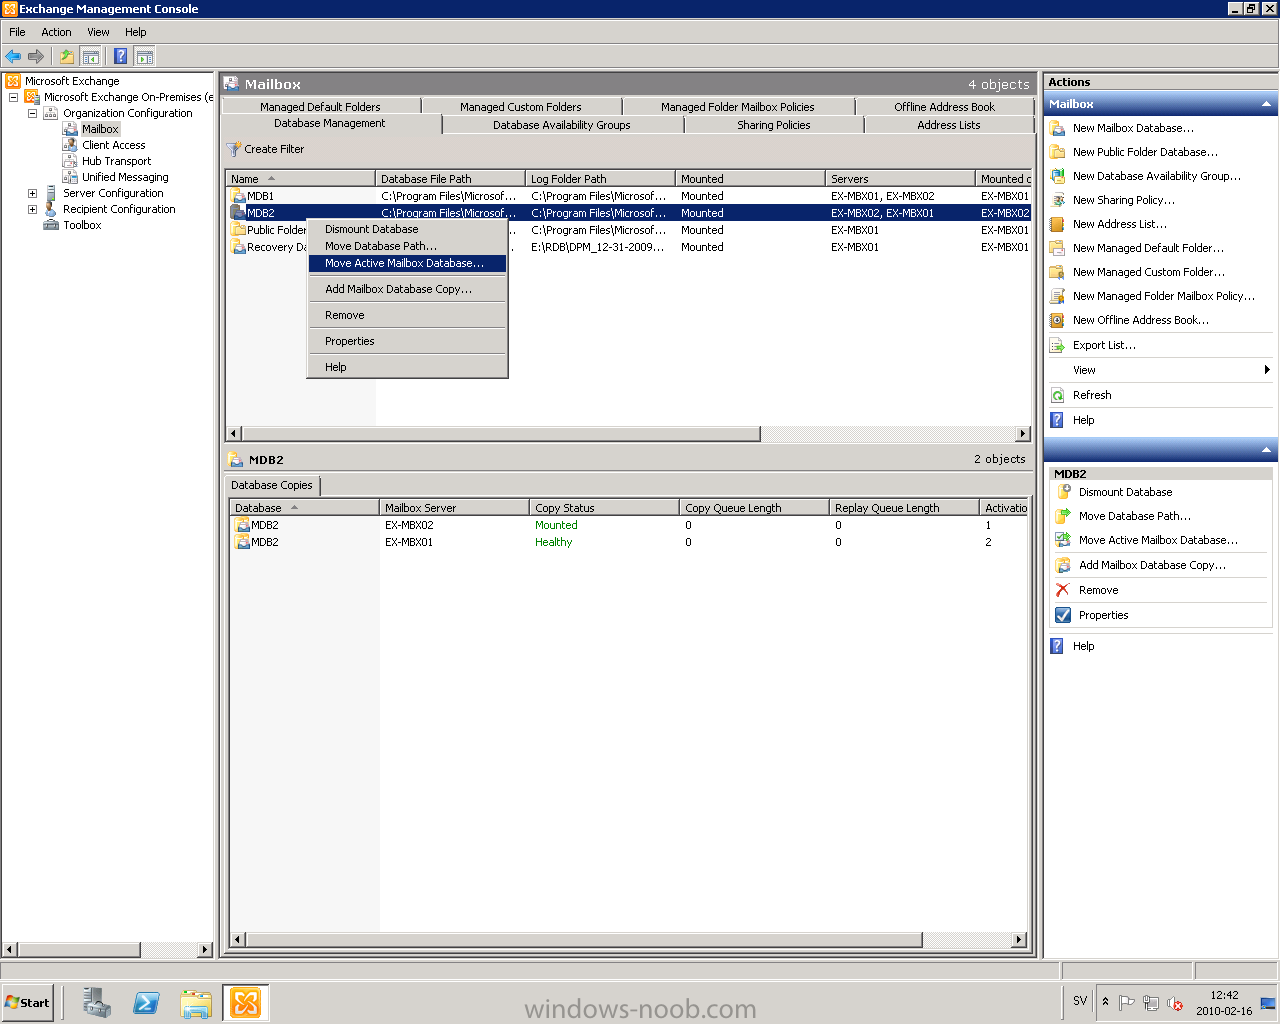
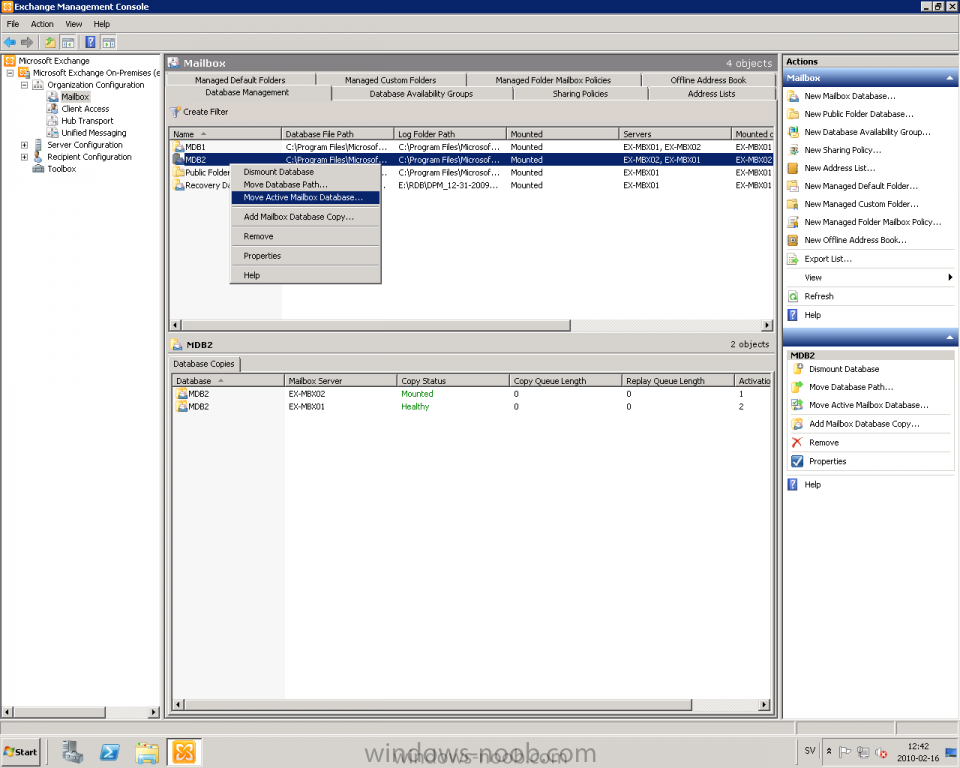
A little introduction The HA functions in Exchange have been changed a little bit; LCR, CCR, SCC and SCR are now away and replaced by D.A.G. I think it's a very cool and great feature with Exchange 2010, maybe the best J it makes it able to create a copy of the database to a different server(s). You are able to have more than one copy of it, so your server1 holds an active copy of DB1, server2 and server3 can hold this database as passive if server1 is broken, up to 16 copies. The requirement is to run Exchange 2010 on a Windows 2008 (R2) Enterprise Server because it uses some components/api's of the failover cluster service. How to To create a "DAG", go to Organization Configuration, choose Database Availability Groups, right click and select 'New Database Availability Group…' type in a name for it, specify a Witness Server (usually the CAS/HUB server) and point out the Witness Directory like C:\fsw. It can be used on other servers to, don't forget to add the Exchange Trusted Subsystem security group to local admins on the server that should act as FSW and allow WMI if the firewall is enabled. When it's created, right click the newly created DAG and choose 'Manage Database Availability Group Membership…' select Add button and add in the mailbox servers that should be part of the DAG. The IP address for the DAG cannot be set in the GUI so it has to be done in PowerShell with the following command: Set-DatabaseAvailabilityGroup DAGNAME –DatabaseAvailabilityGroupIpAddresses IPADDRESS Now it's time to add the other server to hold a passive copy of the database, it done by either Management Console or PowerShell. I prefer to do it in GUI. Go to Organization Configuration and select Mailbox, and choose 'Database Management' tab. Now select the database that you want to make a passive copy of, right click and choose 'Add Mailbox Database Copy…' a wizard is shown with a browse button, click that one and select the server that should hold the passive copy of the database. If you want to change which server that has the active database, just select the database and choose 'Move Active Mailbox Database' and a wizard is shown. A picture is shown below how to move the active mailbox database to another server
-
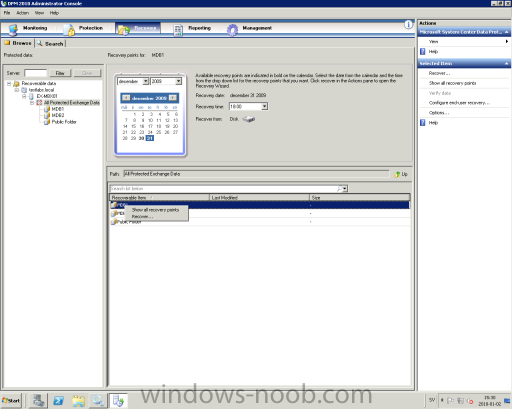
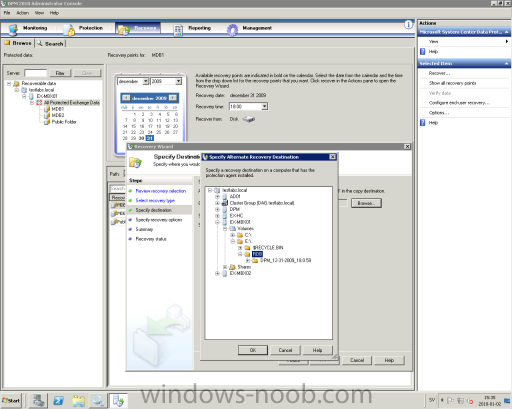
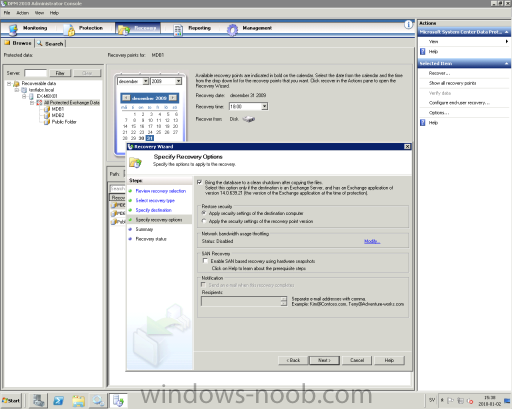
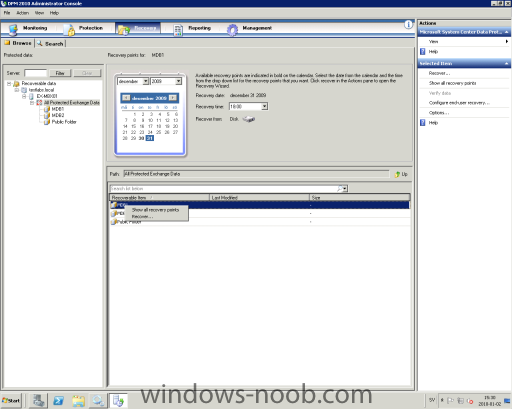
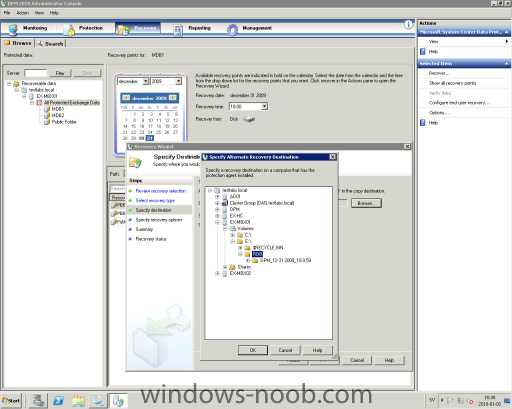
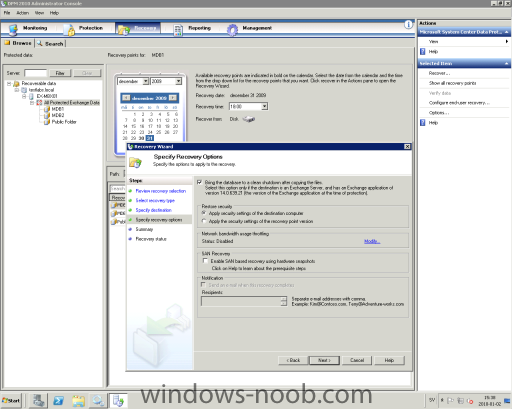
Prerequisites An RDB must be created. The database and log files containing the recovered data must be restored or copied into the RDB folder structure that was created when the RDB was created. The database must be in a clean shutdown state. Because an RDB is an alternate restore location for all databases, all restored databases will be in a dirty shutdown state. You can use Eseutil /R to put the database in a clean shutdown state. (Text copied from technet) Step 1 Start up DPM 2010 and go to the Recovery section, select the appropriate database, also make sure to select a date very the user mailbox should be recovered from. Right click the database and select "Recover". Check so that the date and time are correct and press "Next". Select "copy to network folder" and select "Next". Copy destination, select the appropriate server and folder press "Next". On the next selection window we got a very nice option to select, it's called "Bring the database to a clean state after copying the files". Select that one and click "Next" and press "Recover" to start the job. Step 2 Log onto mailbox server (or any of the Exchange 2010 servers), startup Exchange Management Shell and run the following command to create a Recovery Mailbox Database. With this command we point out the database we just recovered in Step 1. "New-MailboxDatabase -Name "RDB" -Server EX-MBX01 -EDBFilePath "E:\RDB\DPM_12-31-2009_18.0.59\MDB1\Program Files\Microsoft\Exchange Server\V14\Mailbox\Mailbox Database 0091898942\Mailbox Database 0091898942.edb" –Logfolderpath E:\RDB\DPM_12-31-2009_18.0.59\MDB1\Program Files\Microsoft\Exchange Server\V14\Mailbox\Mailbox Database 0091898942\ -Recovery" To check the database user contents run the following command "Get-MailboxStatistics –Database "RDB" If you want to check the state of the database run the following command "eseutil /mh '.\Mailbox Database 0091898942.edb'" Step 3 Log onto mailbox server (or any of the Exchange 2010 servers), startup Exchange Management Shell and run the following command to restore the user mailbox. "Restore-Mailbox -Identity jonand -RecoveryDatabase "RDB" Confirm Are you sure you want to perform this action? Recovering mailbox content from mailbox 'Jonas Andersson' in the recovery database 'RDB' to the mailbox for 'Jonas Andersson (Jonas.Andersson@testlabs.se)'. This operation may take a long time to complete. [Y] Yes [A] Yes to All [N] No [L] No to All [?] Help (default is "Y"): The following text is copied from TechNet (can also be very use full!) This example bulk restores all the mailboxes in the mailbox database DB1 that are also present in the recovery database RDB. "Get-Mailbox -Database DB1 | Restore-Mailbox -RecoveryDatabase "RDB" Done!
-
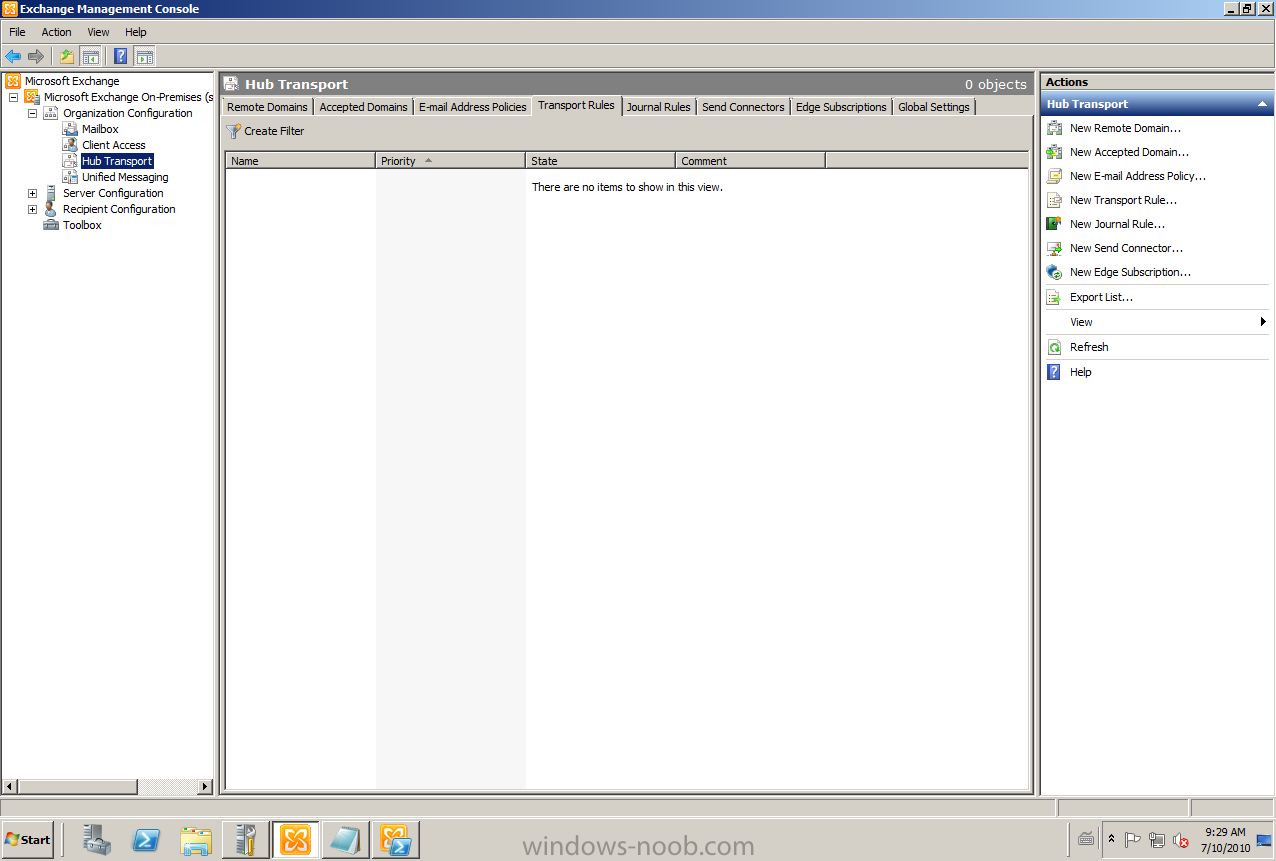
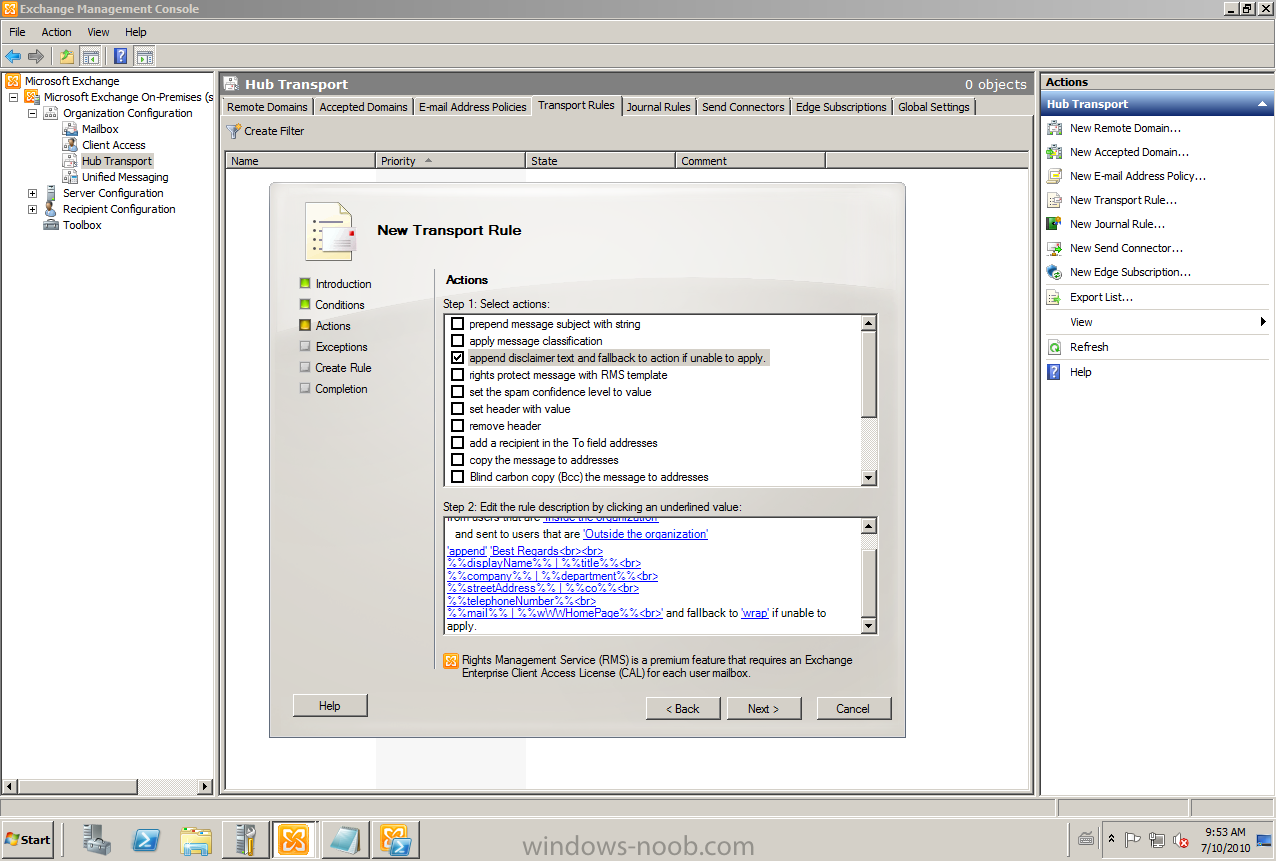
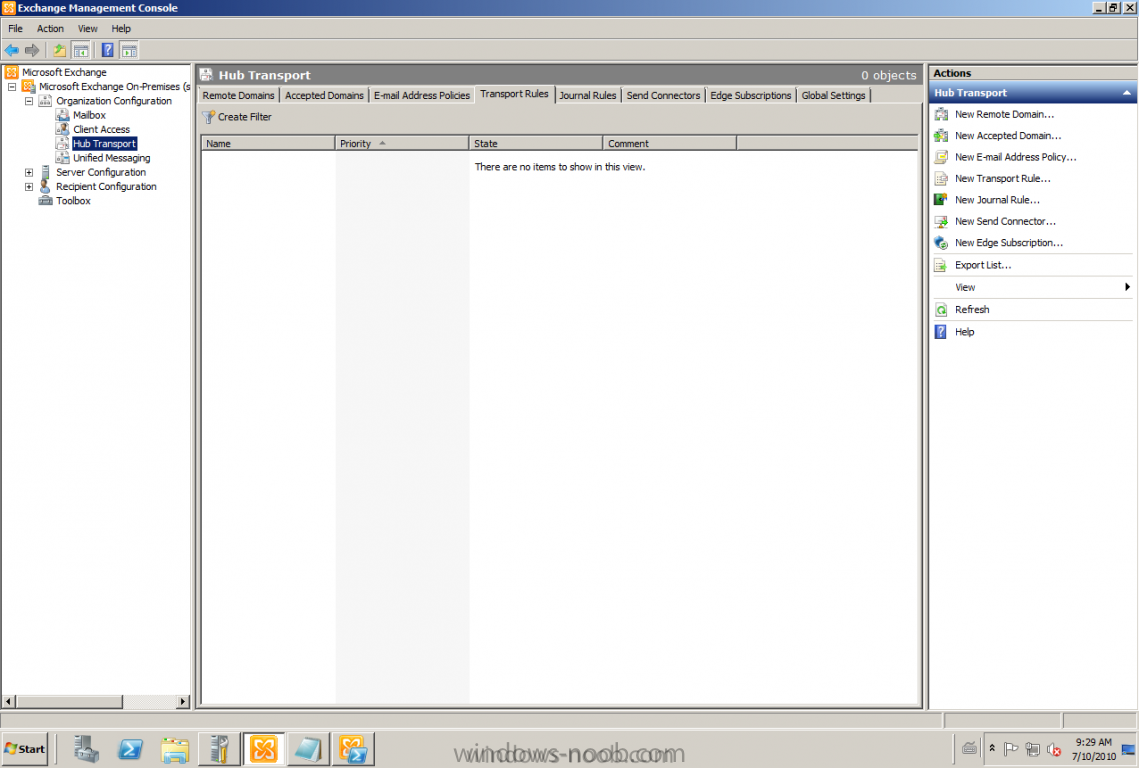
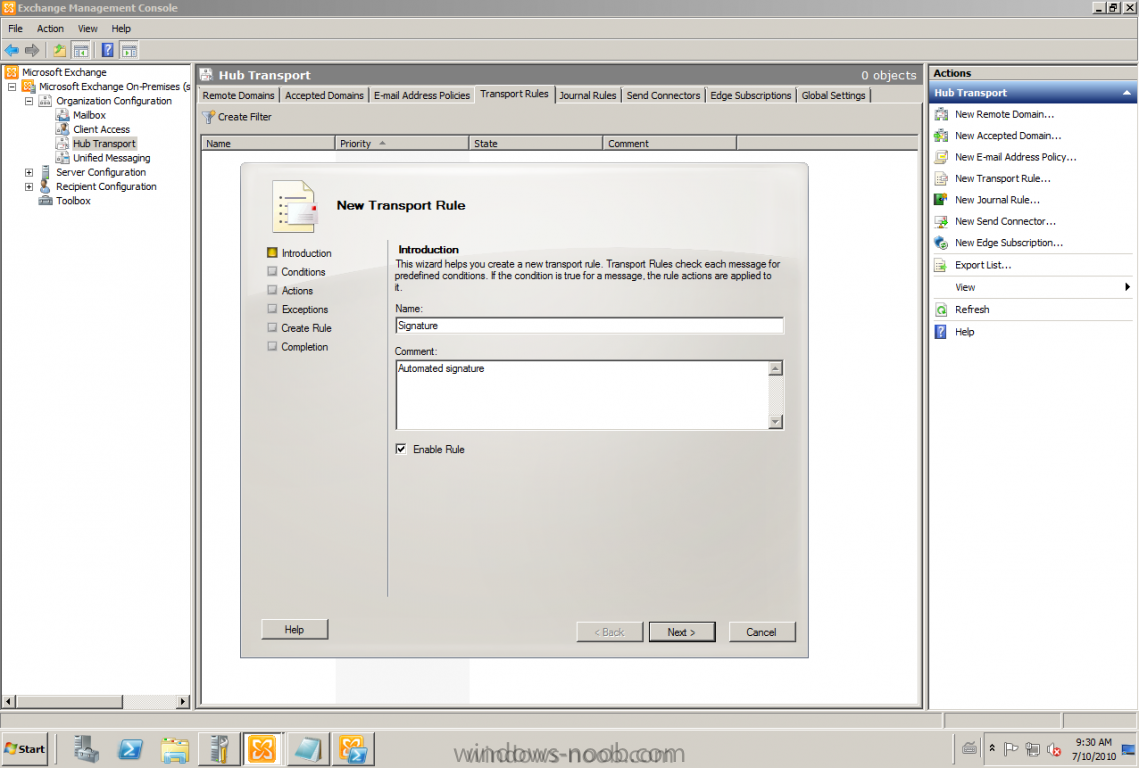
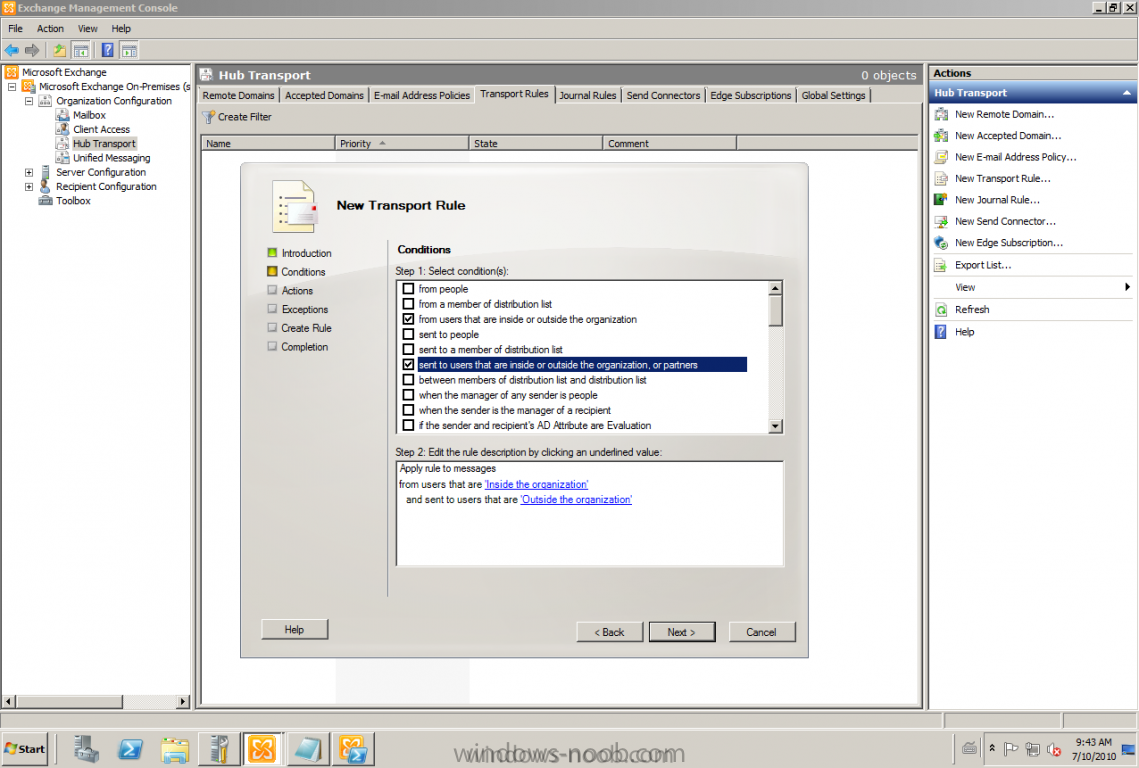
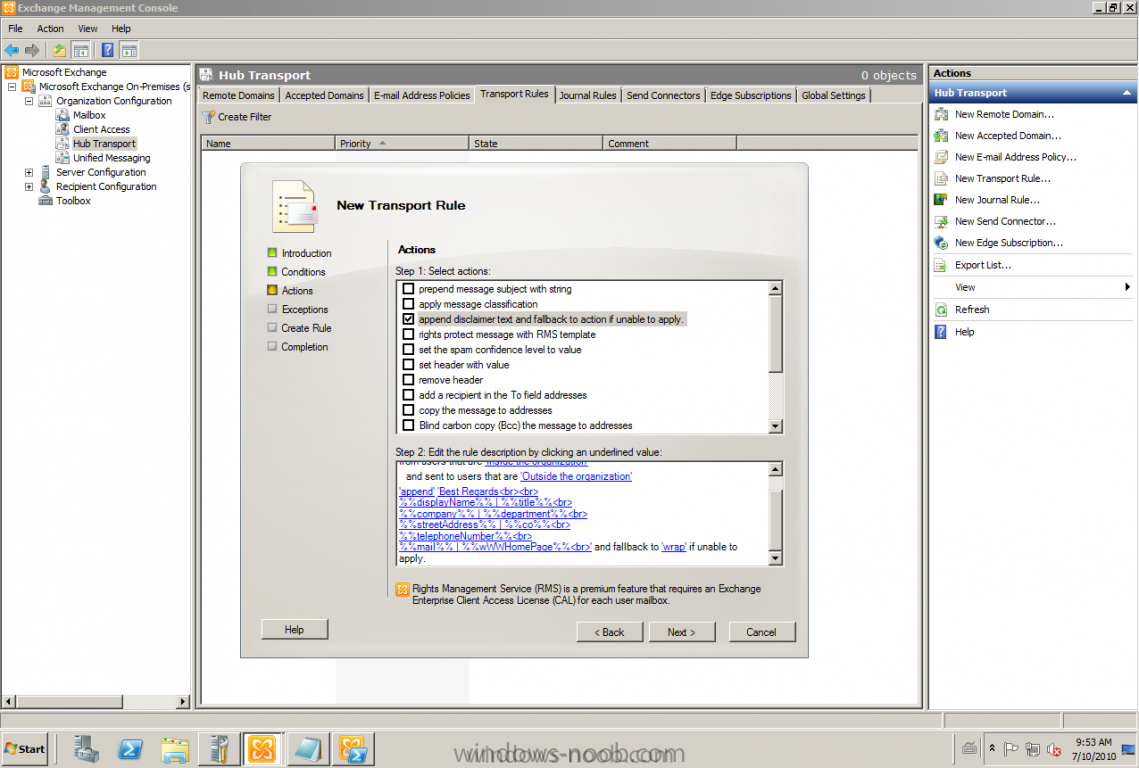
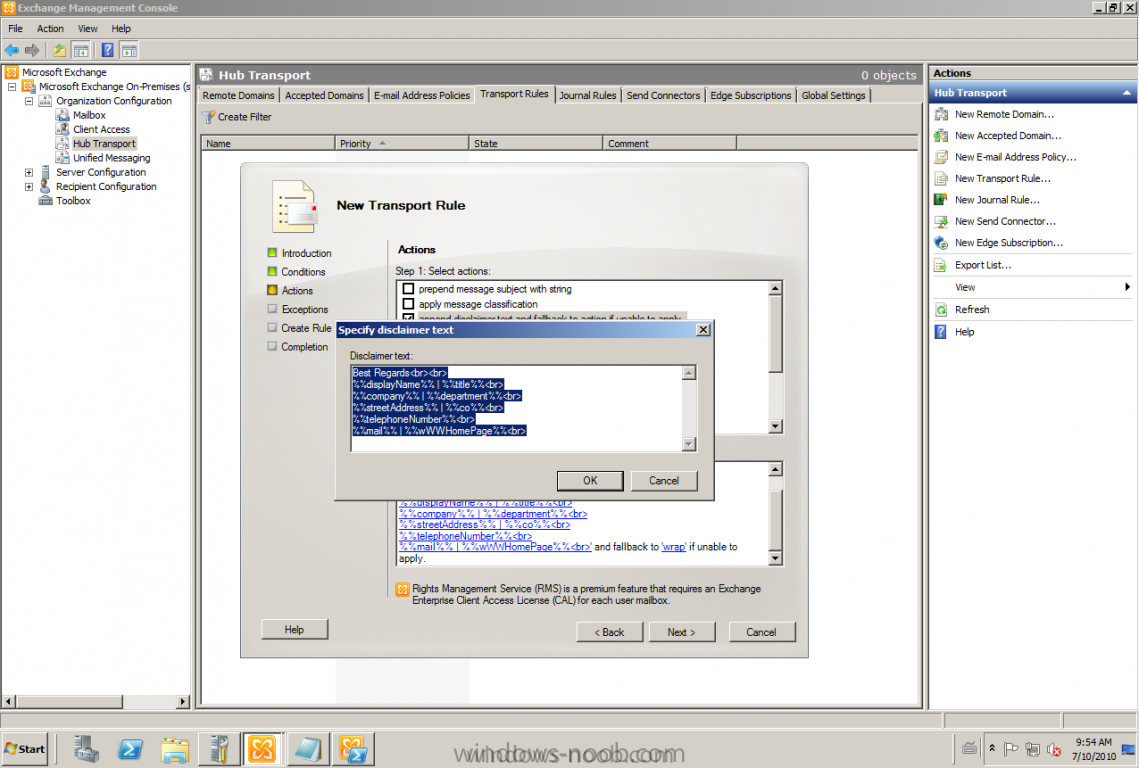
After some requests and questions from customers that want to use any type of signature and of course the less 3rd part products the better and lower costs. This could be done with the built-in tools and services! There are a lot of posts on Internet how to do this, but I want to show you by myself, that's why this post will be published. This task is a pretty basic thing to accomplish with a Transport Rule, if you want to try it by yourself just follow my text and pictures. Start by logging onto any of your Exchange 2010 servers and start Exchange Management Console (EMC) Go to Organization Configuration -> Hub Transport -> Transport Rules Create a new Transport Rule The conditions; Apply this rules to messages from users that are Inside the organization and sent to Outside the organization. Actions; Append disclaimer text Then it's time for editing the Disclaimer text, the nice thing here is that the AD attributes can be used. Let's show an example. If the text on the picture is too small, here's the example: Best Regards<br><br> %%displayName%% | %%title%%<br> %%company%% | %%department%%<br> %%streetAddress%%<br> Finish :-)
-
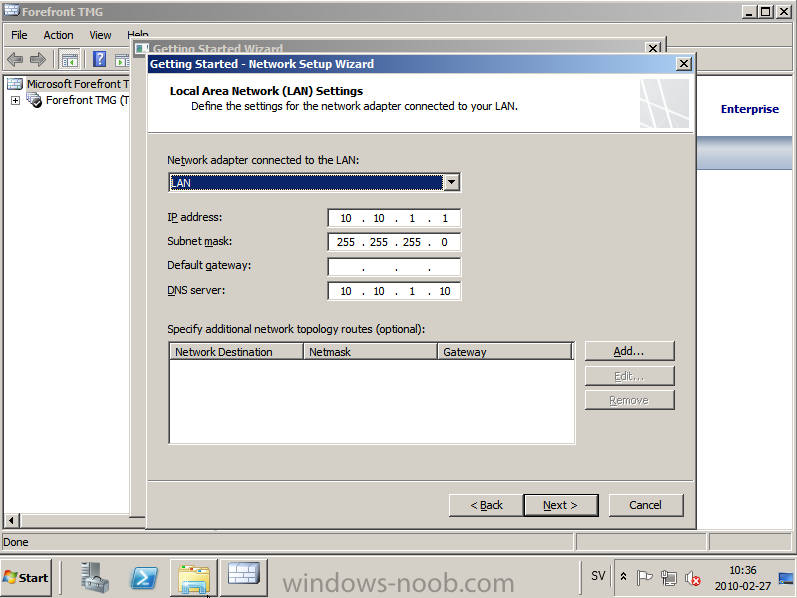
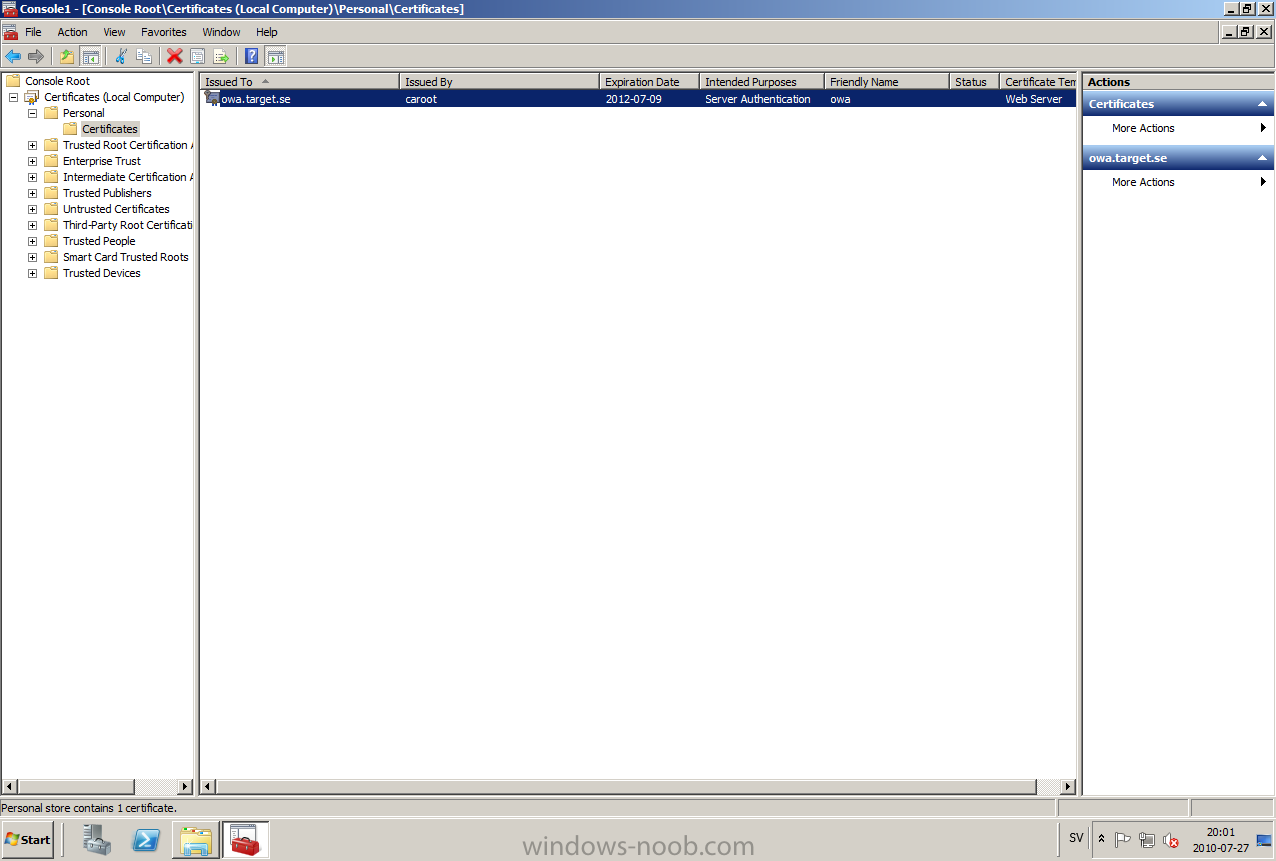
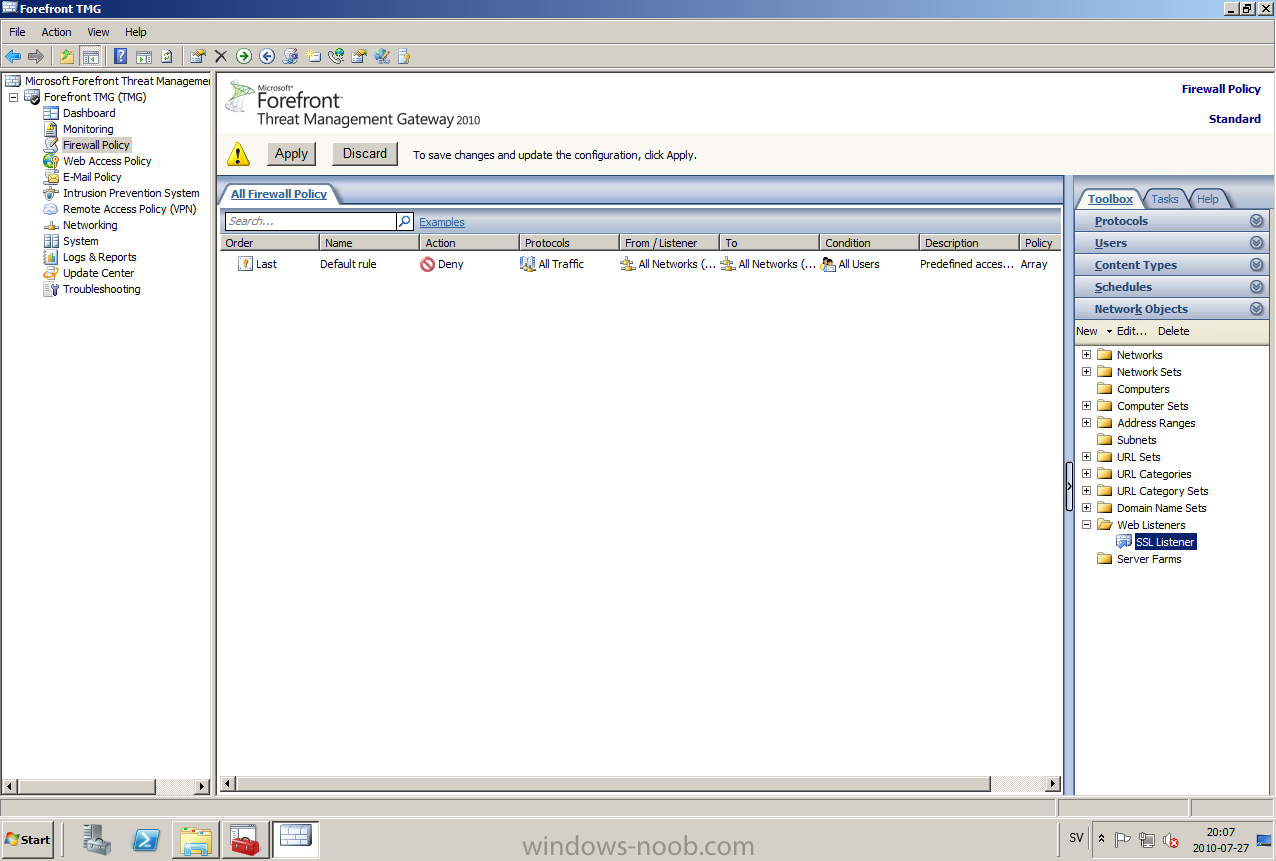
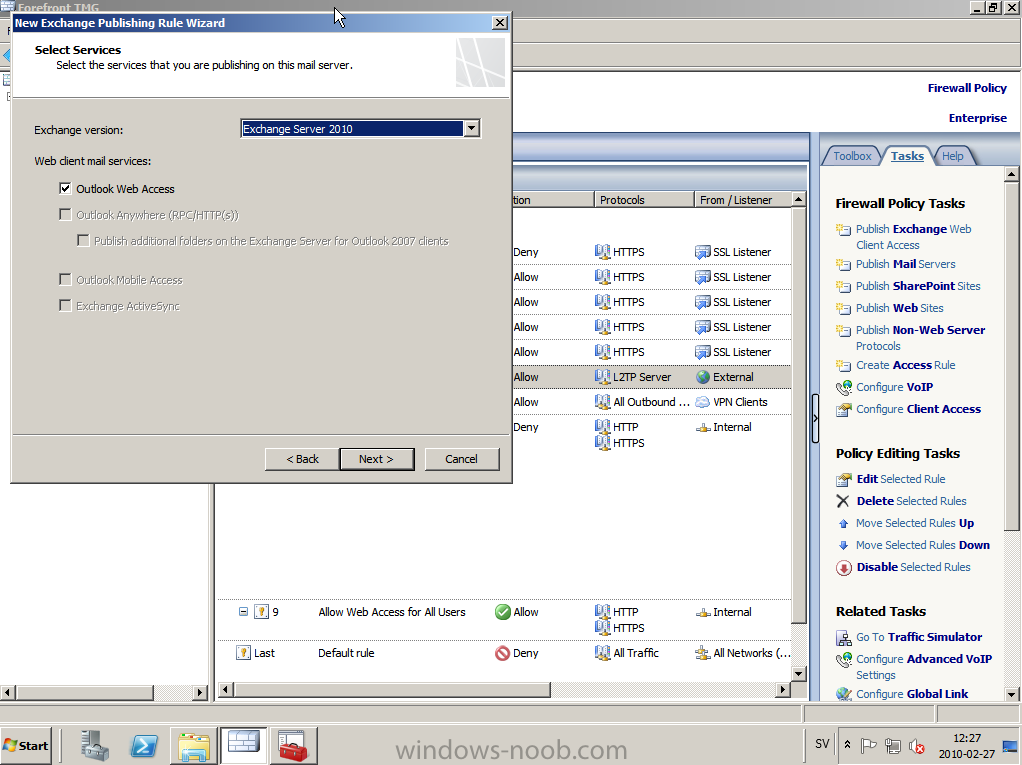
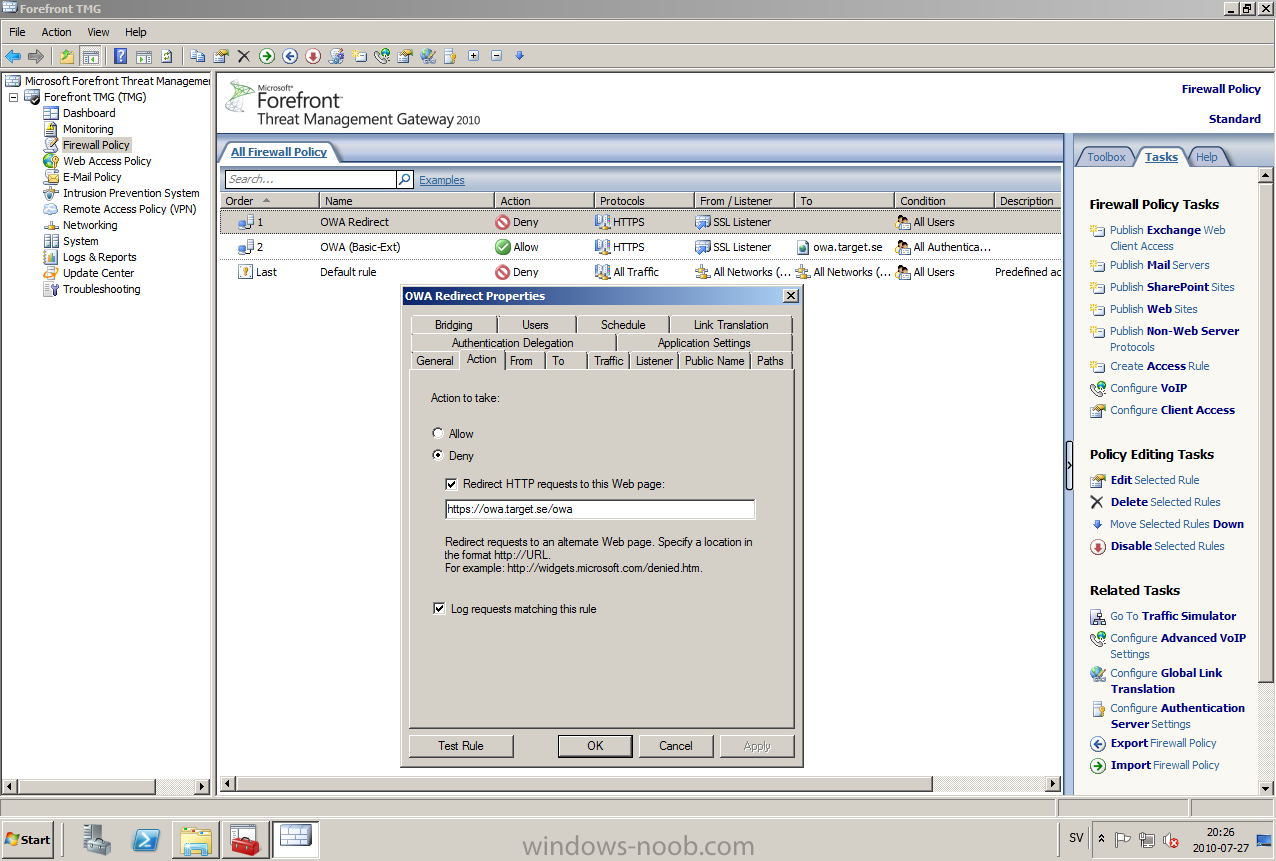
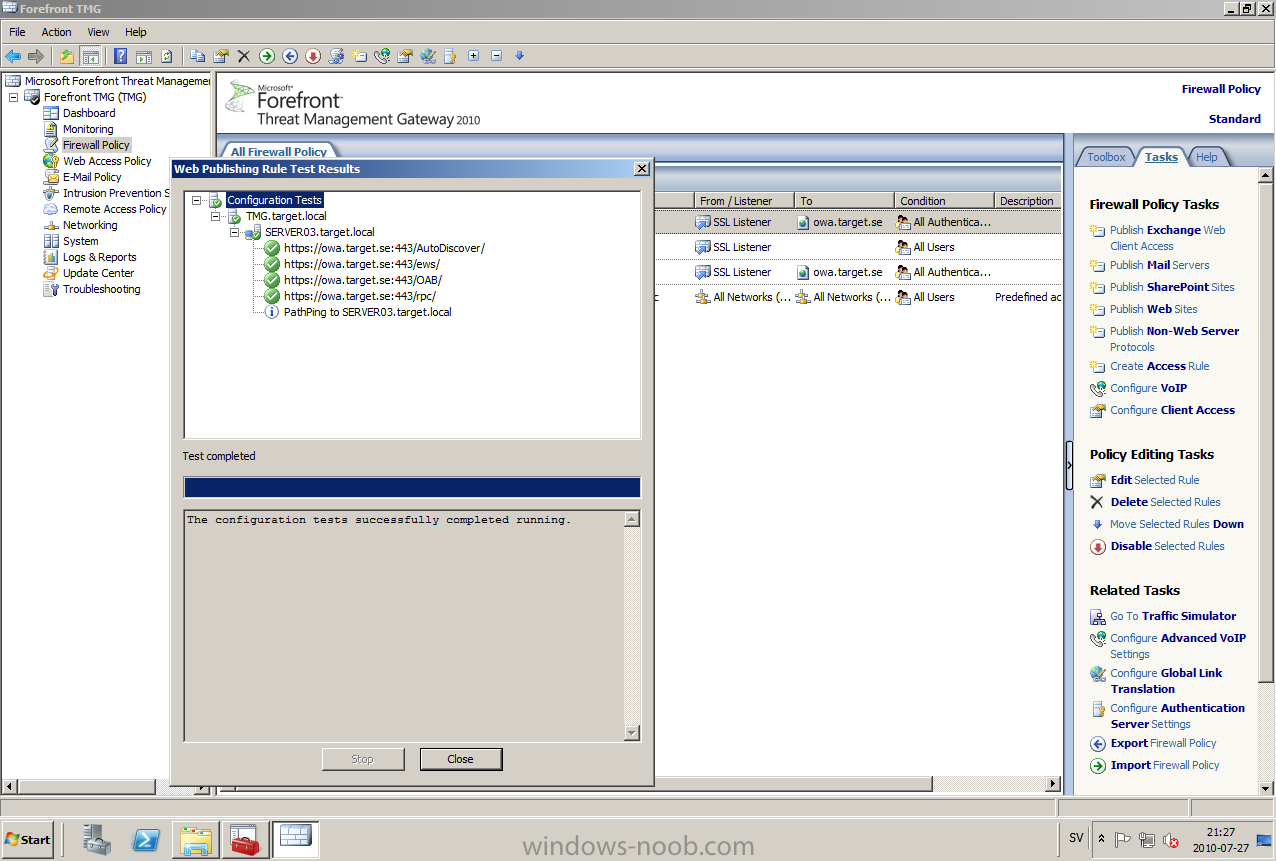
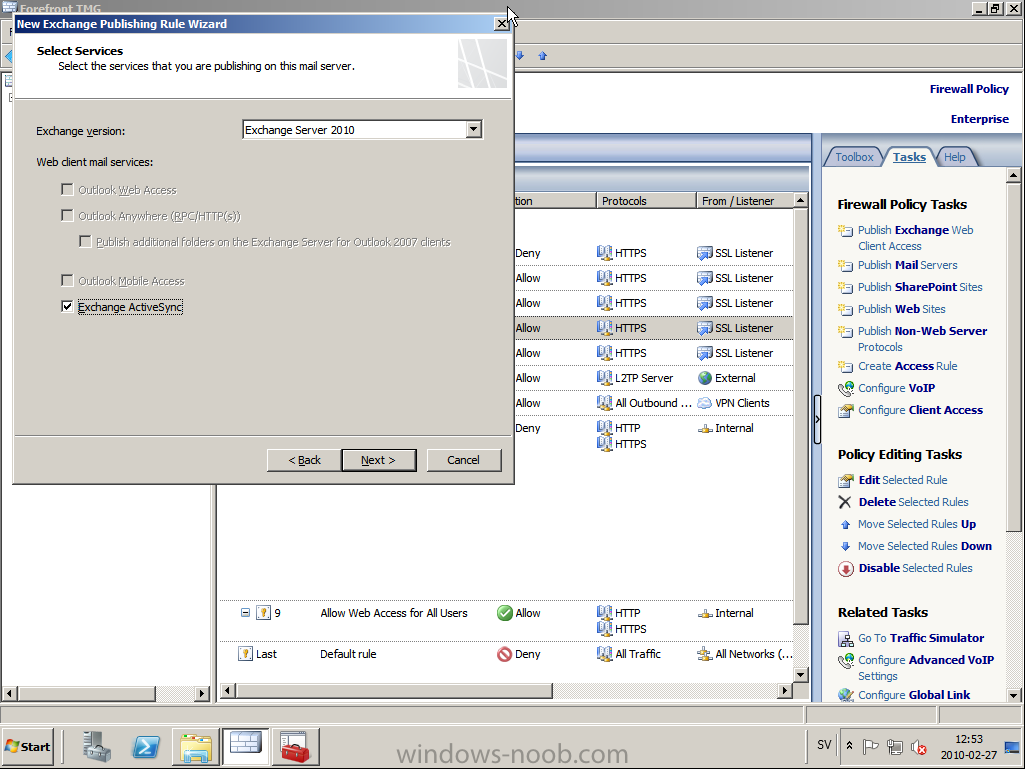
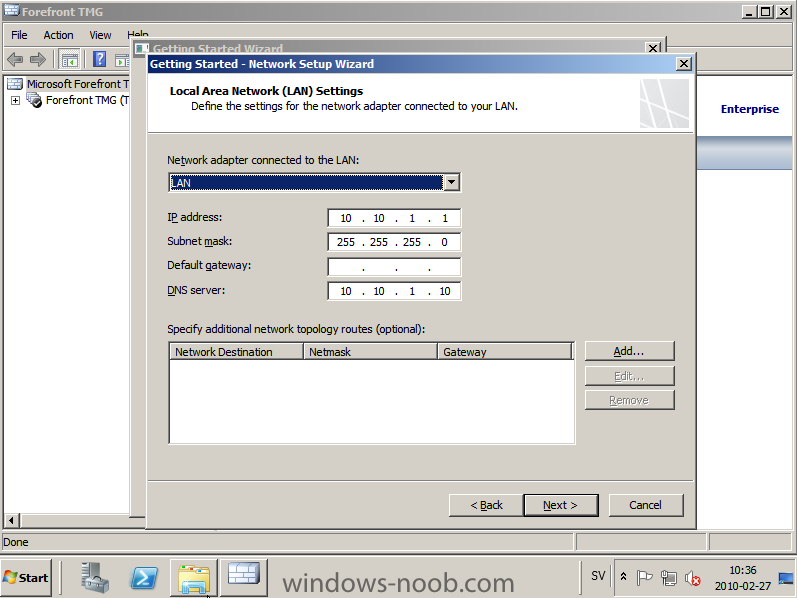
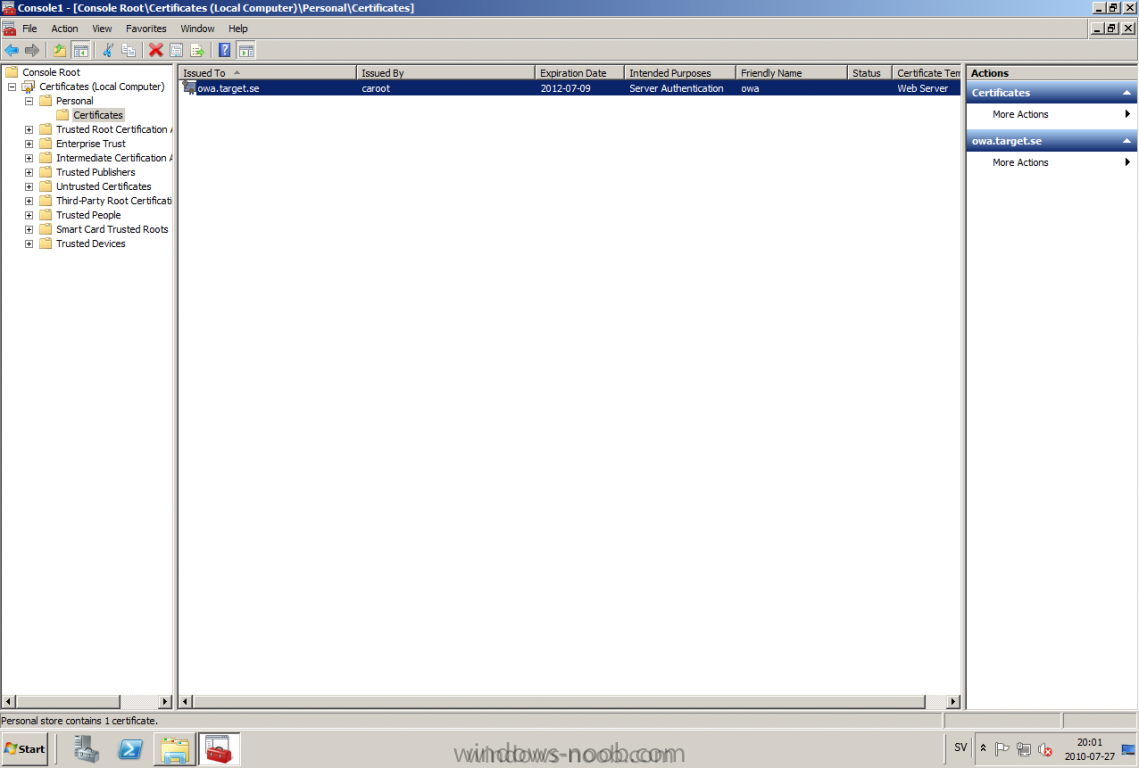
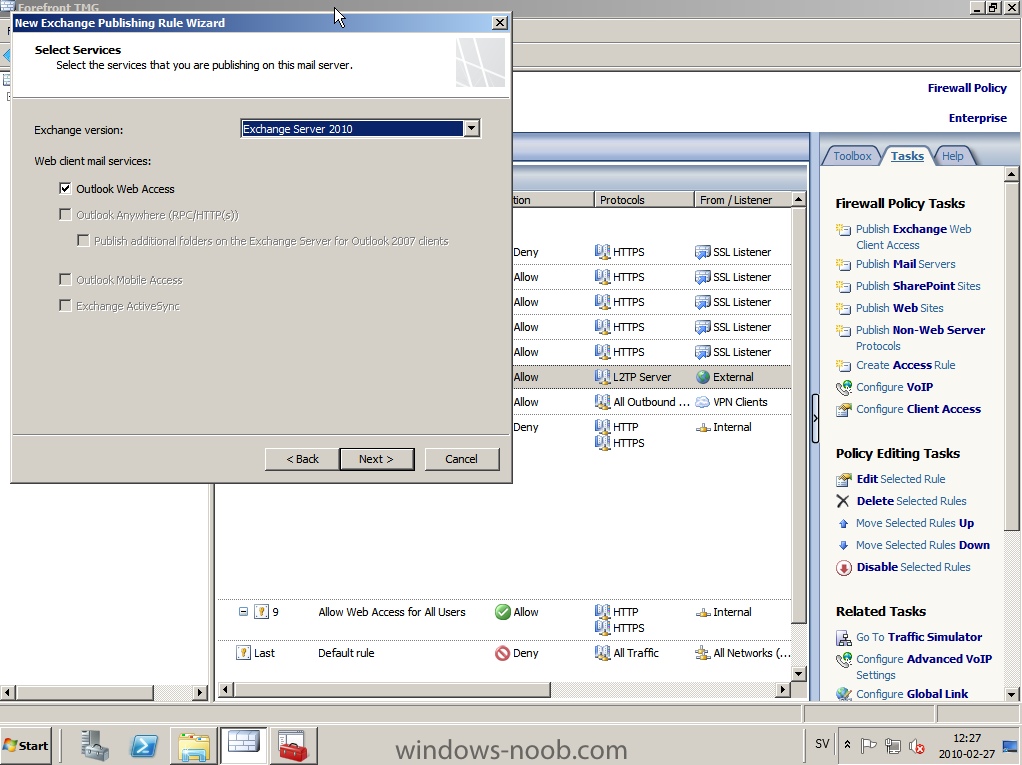
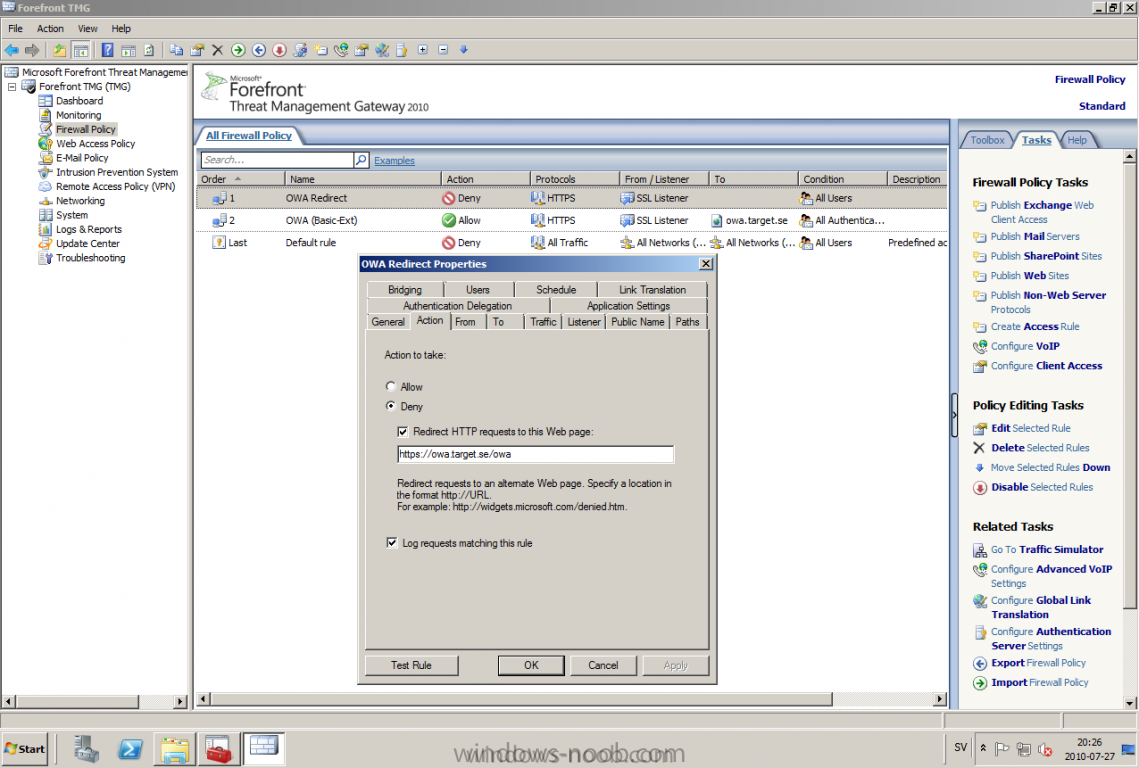
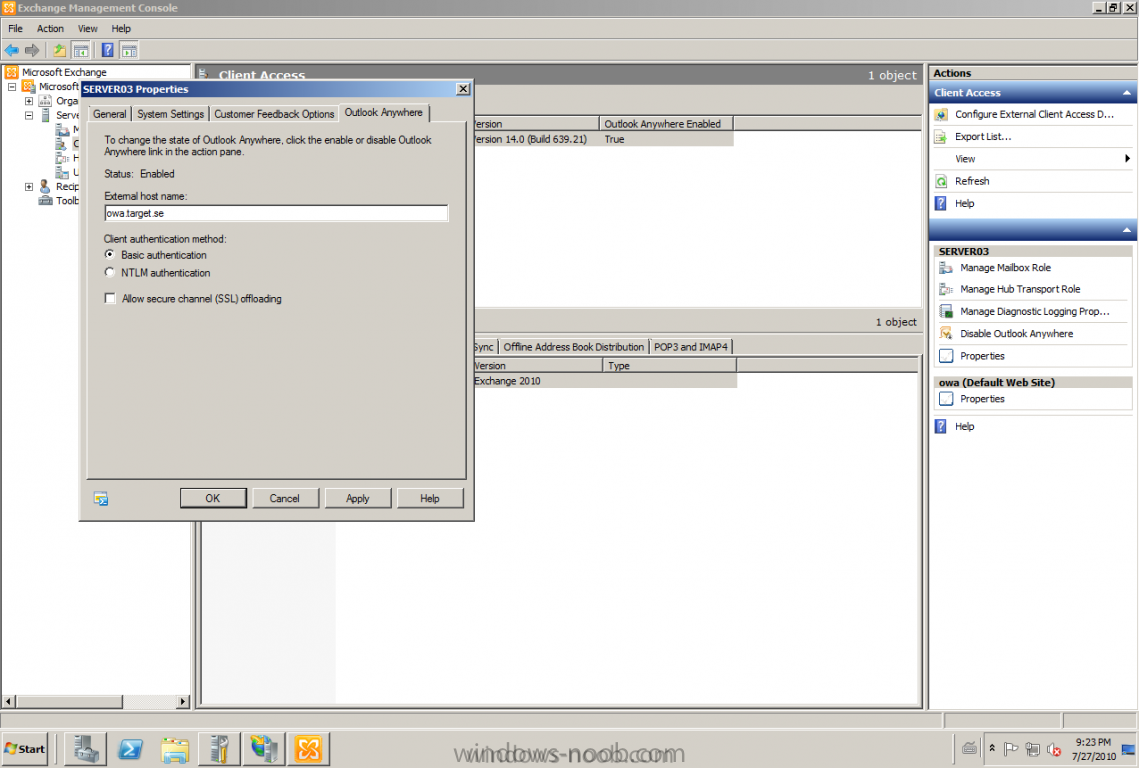
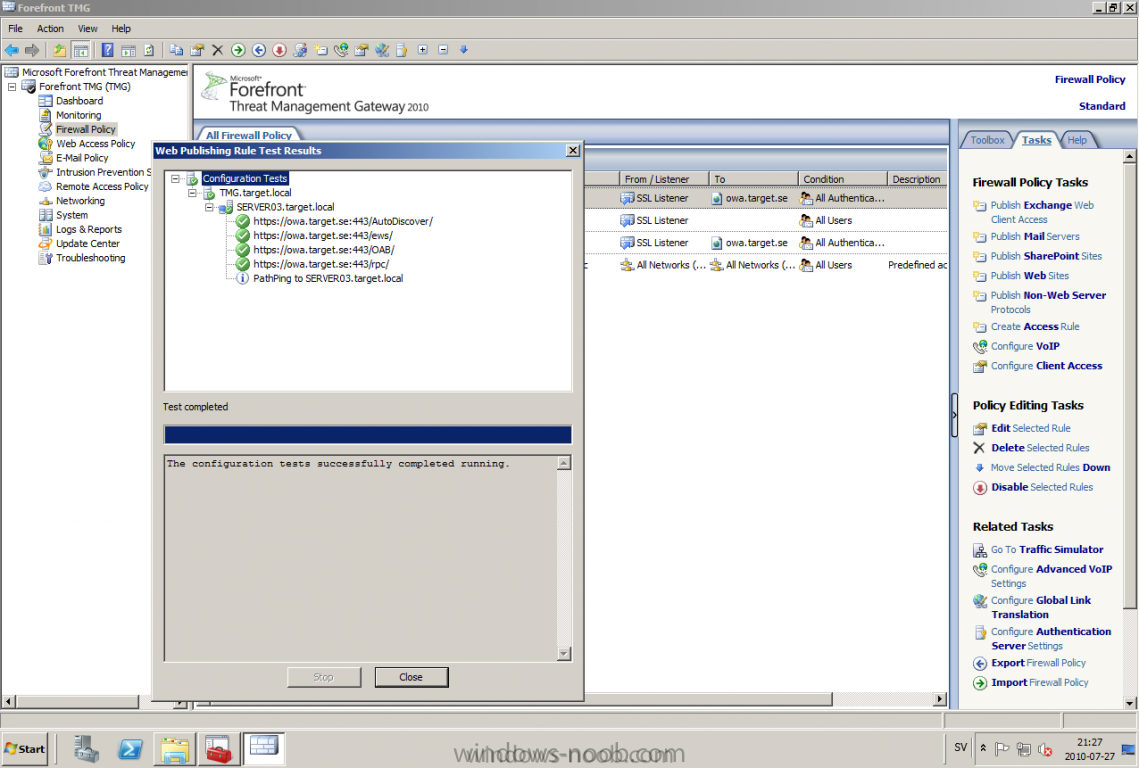
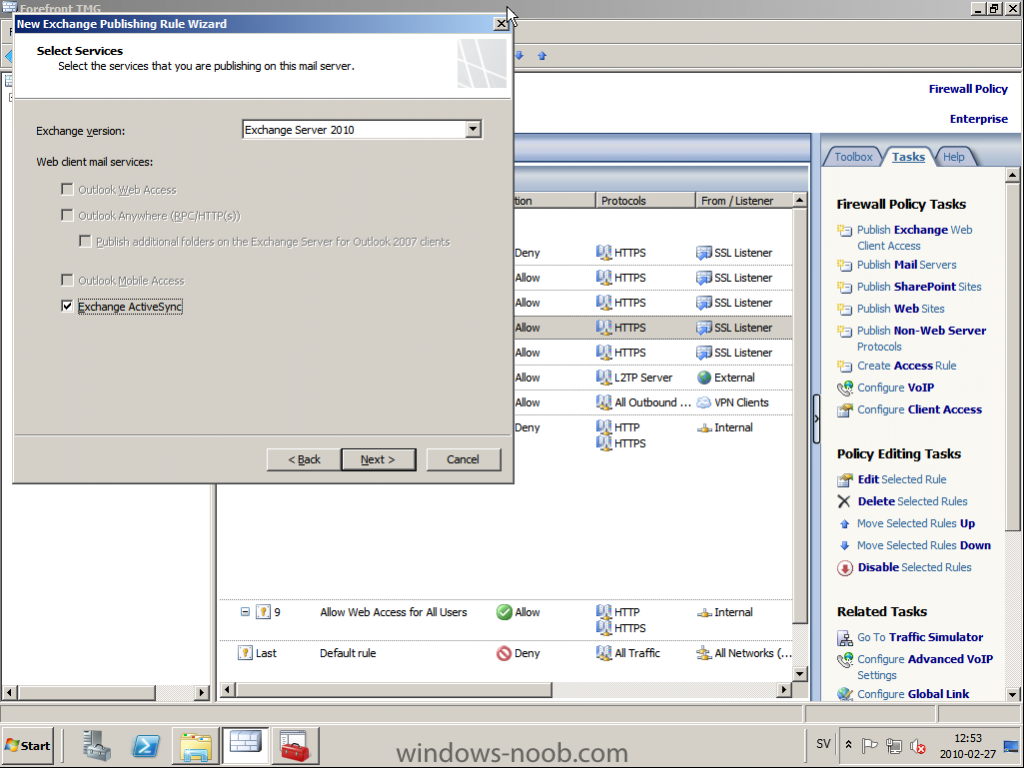
Published: 2010-03-01 (on testlabs.se/blog) Updated: 2010-07-27 Version: 1.1 Installation This will be a complete walkthrough to setup up certificate based on a CA server on a DC. My environment looks like this 1 x Windows 2003 (DC/DNS/CA) 1 x Forefront TMG 1 x Exchange 2010 CAS/HUB/MBX Everything is running as virtual machines in VMware Workstation. My TMG server is installed with Windows 2008 R2 x64 with 2 Nics (E1000), running with an internal Nic setup IP: 172.16.2.18 Subnet: 255.255.255.0 DNS: 172.16.2.11 (pointing to the DC) The external Nic is setup with IP: 192.168.0.1 Subnet: 255.255.255.0 DNS: External IP Default Gateway: Pointing to my external gateway On the TMG server in the hosts file I have edited it with notepad and pointed out the CAS server 172.16.2.12 owa.target.se Just to get the name resolution working fine with the rule and certificate. First thing to do is to import the certificate that is generated from the CAS server; in my case it's a CA server on the DC that generated this certificate. Best practice is to buy the certificate from a 3rd part that is trusted root in most devices (godaddy.com, digicert.com, comodo.com, verisign.com etc). The certificate import is easy, start a mmc console and add certificates for the local computer. Go to Personal and right click, choose import and point at the file. When it's done it should look like below. Next step is to create the Web listener, it will be done in TMG Console under Firewall Policy, choose Toolbox and right click Web Listeners to create a new web listener. Give it a friendly name, I called it "SSL Listener", set it up to require SSL, select the sources where it should listen to traffic from. In my case I listen on External and Internal, also select a specific IP address on the External and Internal interface. Next screen select 'Assign a certificate for each IP address and point out the imported certificate. The authentication setting that will be used is called HTML Form Authentication, make sure that Windows (Active Directory) is selected. In the SSO (Single Sign On) type in the .domain.local if you want to use the function. (Or else you will need to logon two times for using the OWA.) When the creating is completed it should look like below. Don't forget to apply the changes. OWA Next step is to create the publishing rule; it will be done under the Tasks tab called 'Publish Exchange Web Client Access'. A wizard will start, setup a friendly name like OWA (Basic) and select the appropriate Exchange version, in my case it's Exchange 2010. Select the option 'publishes single server' and require SSL. In the setting regarding internal site name, give it the external site name (owa.target.se) and select the option below and browse for the CAS server. In the public name, give it your external site name (owa.target.se). Next thing it to select the newly created web listener, for authentication delegation settings; select Basic Authentication and finally All Authenticated Users. OWA Redirect A nice one to complete the publishing of the OWA is to create a 'Publish Web Sites' rule and set it to deny, publish it as a single server and require SSL. Point out the internal site name to be the external site name (owa.target.se) and browse for the CAS server. In the path selection just type / as will indicate the whole site. For the public name, type in the external site name (in my case; owa.target.se) to work. Select the web listener and the authentication method should be set to 'No delegation, and client cannot authenticate directly'. Remove the All Authenticated Users and replace it with All Users. Open up the rule after it is created, go to the Action tab and select the option 'Redirect HTTP requests to this web page' and type in 'https://owa.target.se/owa'. This rule is created so the end-user can reach the OWA without typing in /owa in the addressbar. Now this is completed and should look like below. Outlook Anywhere Next to do is to publish Outlook Anywhere, it will be done thru the same wizard. Select the appropriate Exchange version and the function you want to publish, in this case it's the Outlook Anywhere (earlier called RPC over HTTP(s) Publishing using Basic Authentication Just like the publishing rule above this is a single server publishing rule and it requires SSL. And point out the internal site name like before, it should be the external site name (owa.target.se) and browse for the CAS server. The public name should be the external site name (owa.target.se). Then select the web listener that has been created earlier. Basic authentication is used as the authentication method. Verify that the correct authentication method is selected in Exchange Management Console (EMC), if using Basic it should look like this. Also, verify the rules in TMG by selecting the rule and press "Test Rule" It should then look like below, if you have any issues it will give you the info in clear text like authentication methods is not correctly configured, like a mismatch. Time for verification so the publishing rule works for Basic Auth by using Outlook Anywhere function and typing in address: owa.target.se that points to TMG. It seems to work fine ActiveSync This is almost the same as above, besides ActiveSync will use Basic as the Authentication method. So the next to do is to publish the ActiveSync function, it will be done thru the same wizard. Select the appropriate Exchange version and the function you want to publish, in this case it's the ActiveSync function. Just like the publishing rule above this is a single server publishing rule and it requires SSL. And point out the internal site name like before, it should be the external site name (webmail.testlabs.se) and browse for the CAS server. The public name should be the external site name (webmail.testlabs.se). Then select the web listener that has been created earlier. Basic is used as the authentication method. Sometimes in testing purposes you need to turn of spoof detection, or else it will not work. I have had that problem, if you need to turn it off, check this link http://support.microsoft.com/kb/838114 Copy and paste from the link above; Click Start, click Run, type regedit, and then click OK. Locate and then click the following registry subkey: HKEY_LOCAL_MACHINE/SYSTEM/CurrentControlSet/Services/FwEng/Parameters If the Parameters subkey is not displayed, follow these steps to create this subkey: Click the FwEng subkey. On the Edit menu, point to New, and then click Key. To name the key, type Parameters, and then press ENTER. Right-click Parameters, point to New, and then click DWORD Value. To name the value, type DisableSpoofDetection, and then press ENTER. Right-click DisableSpoofDetection, and then click Modify. In the Value data box, type 1, and then click OK.

-
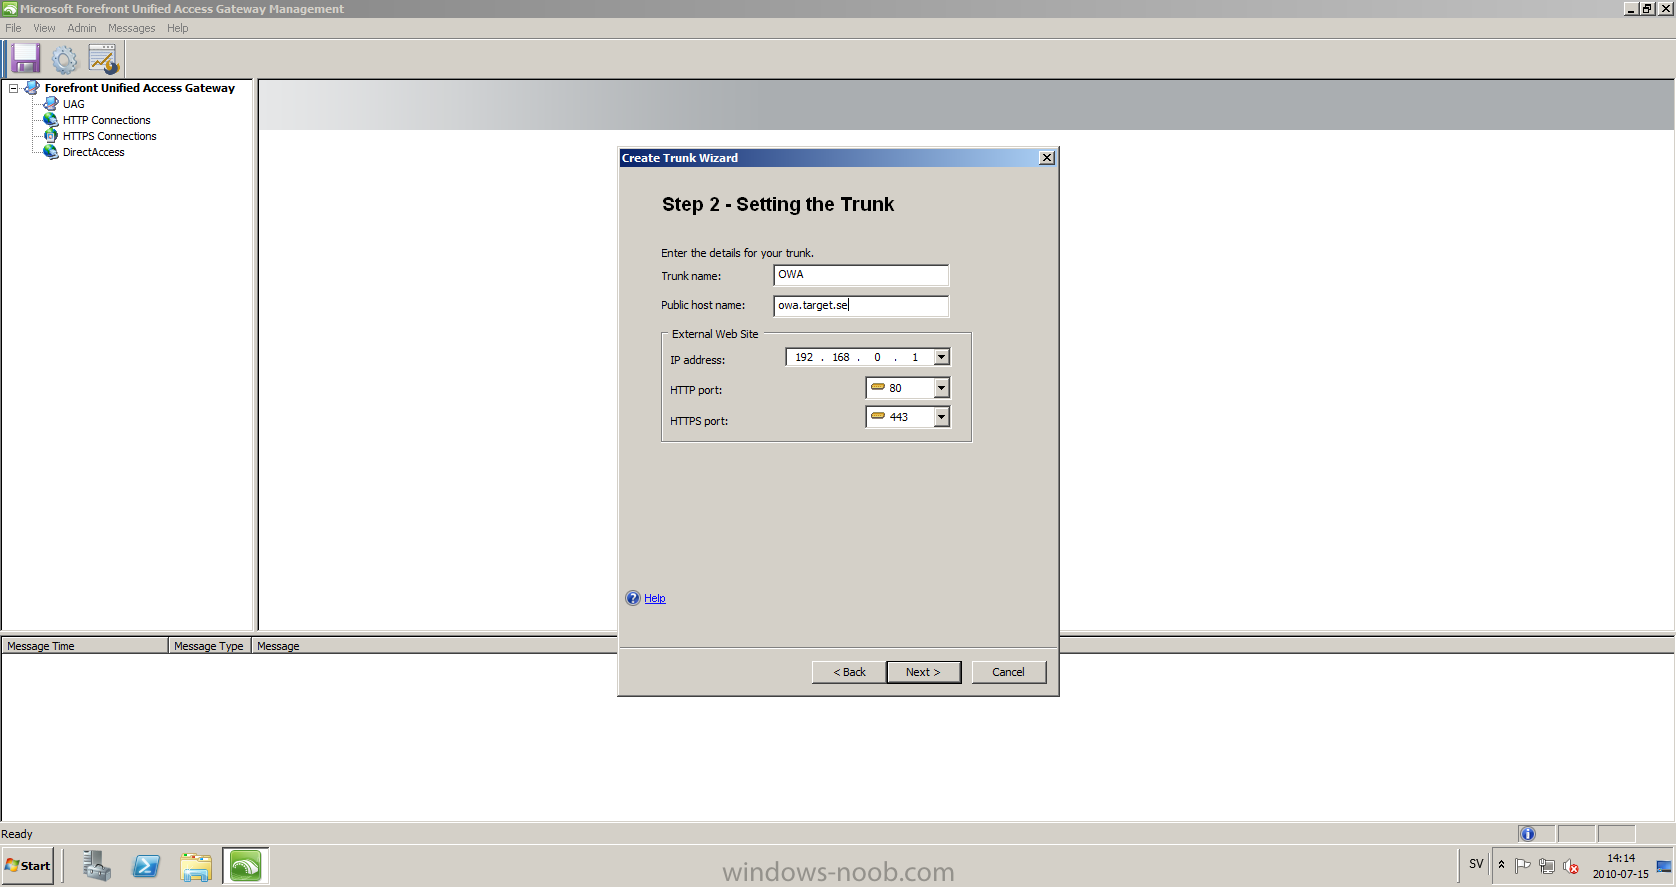
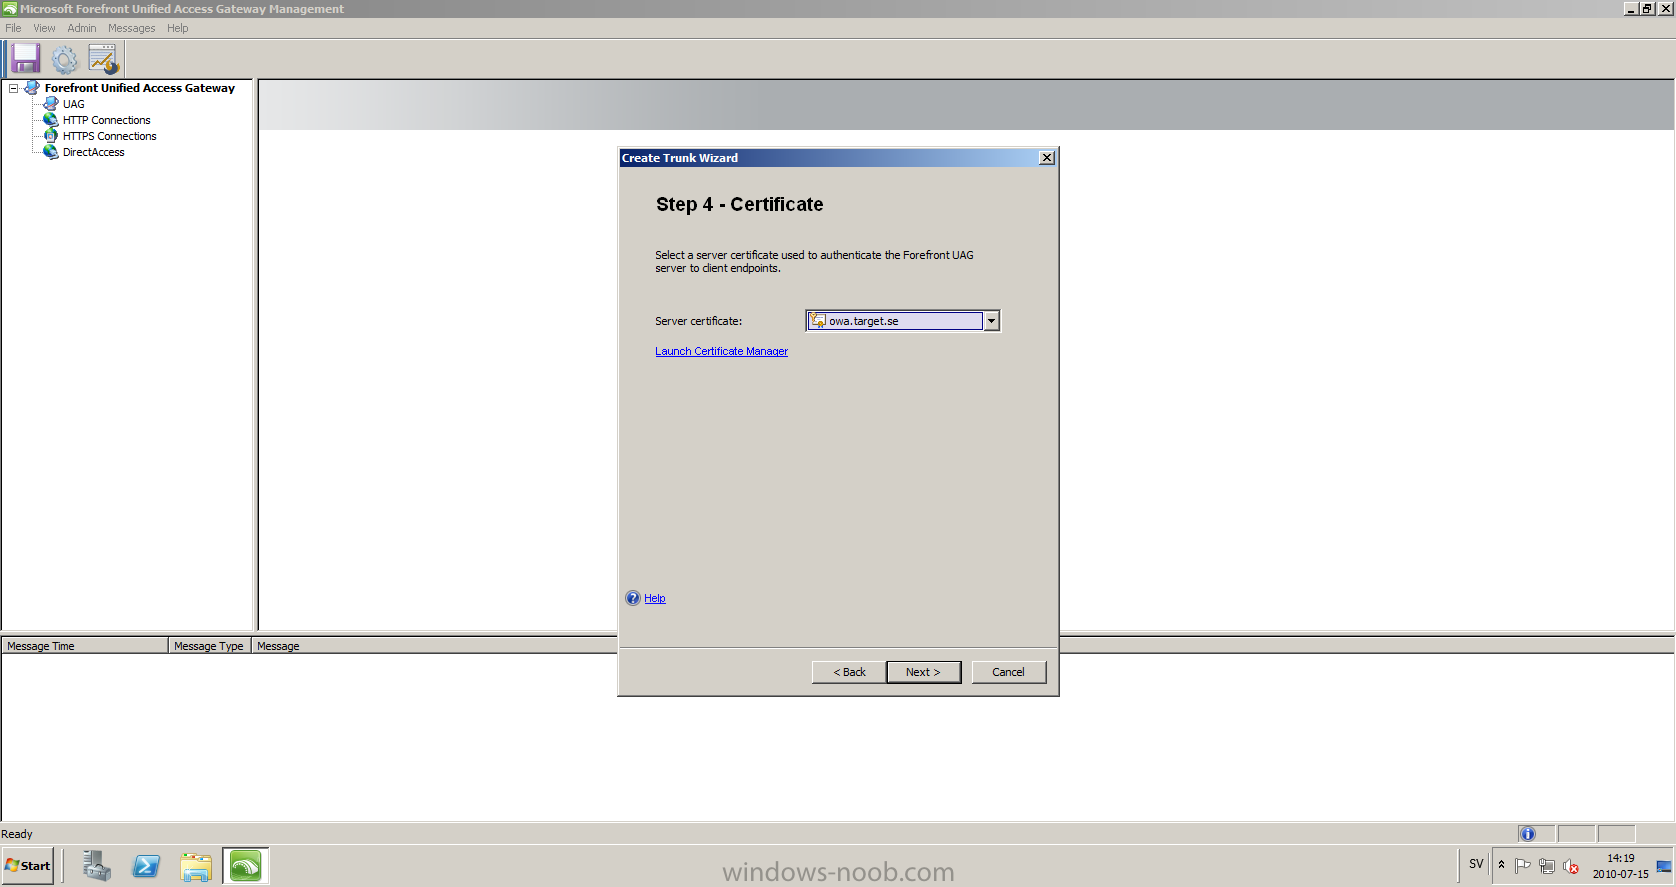
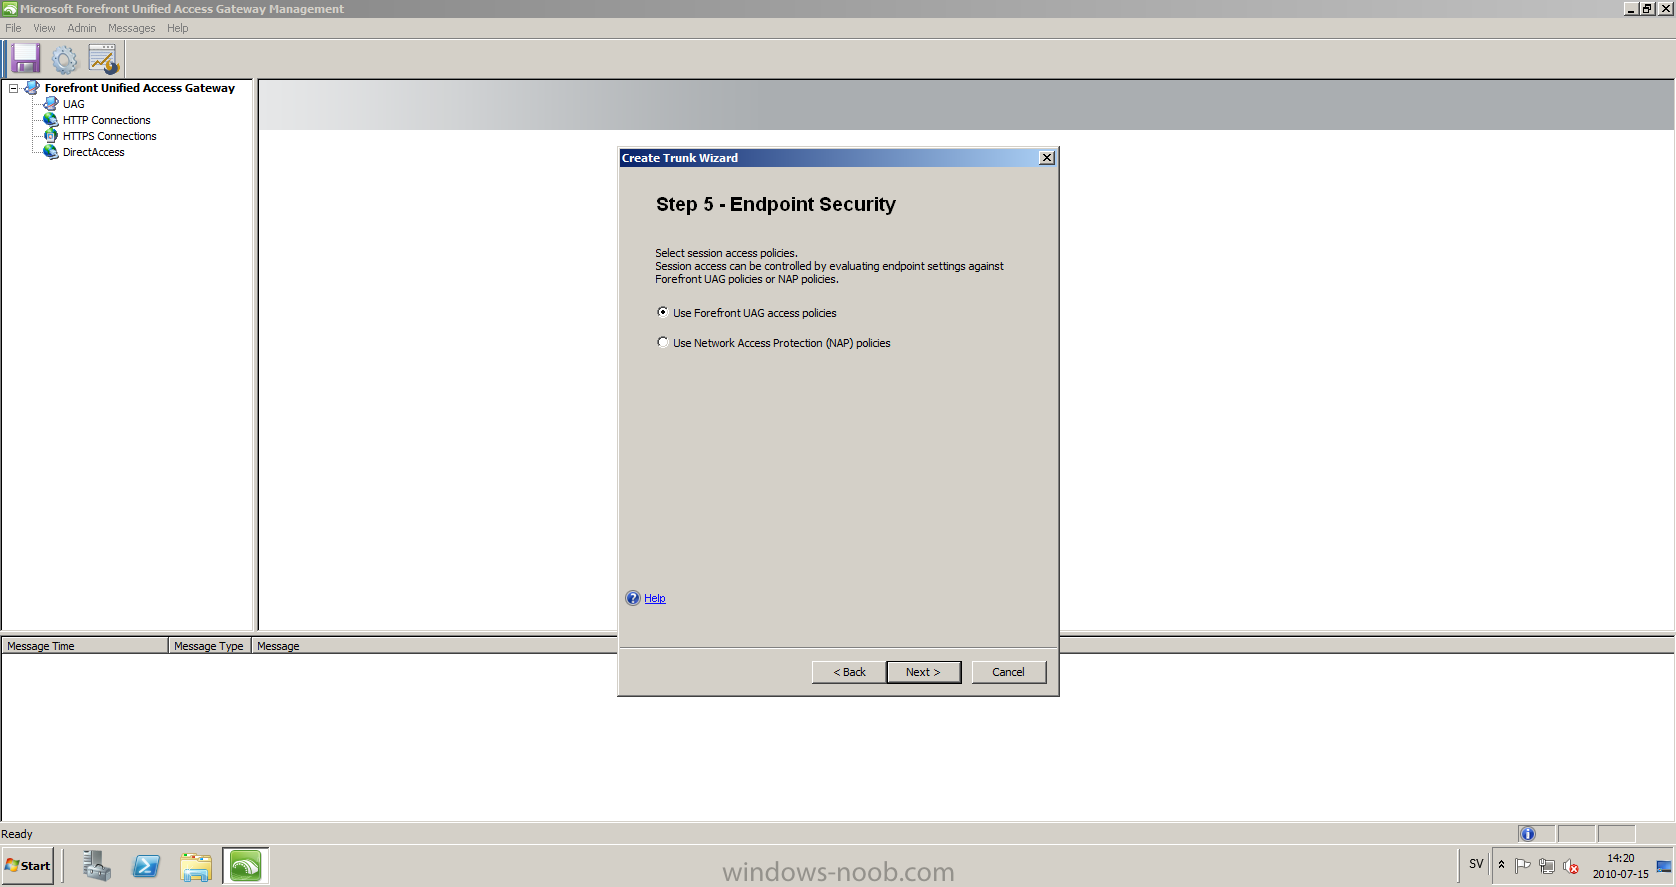
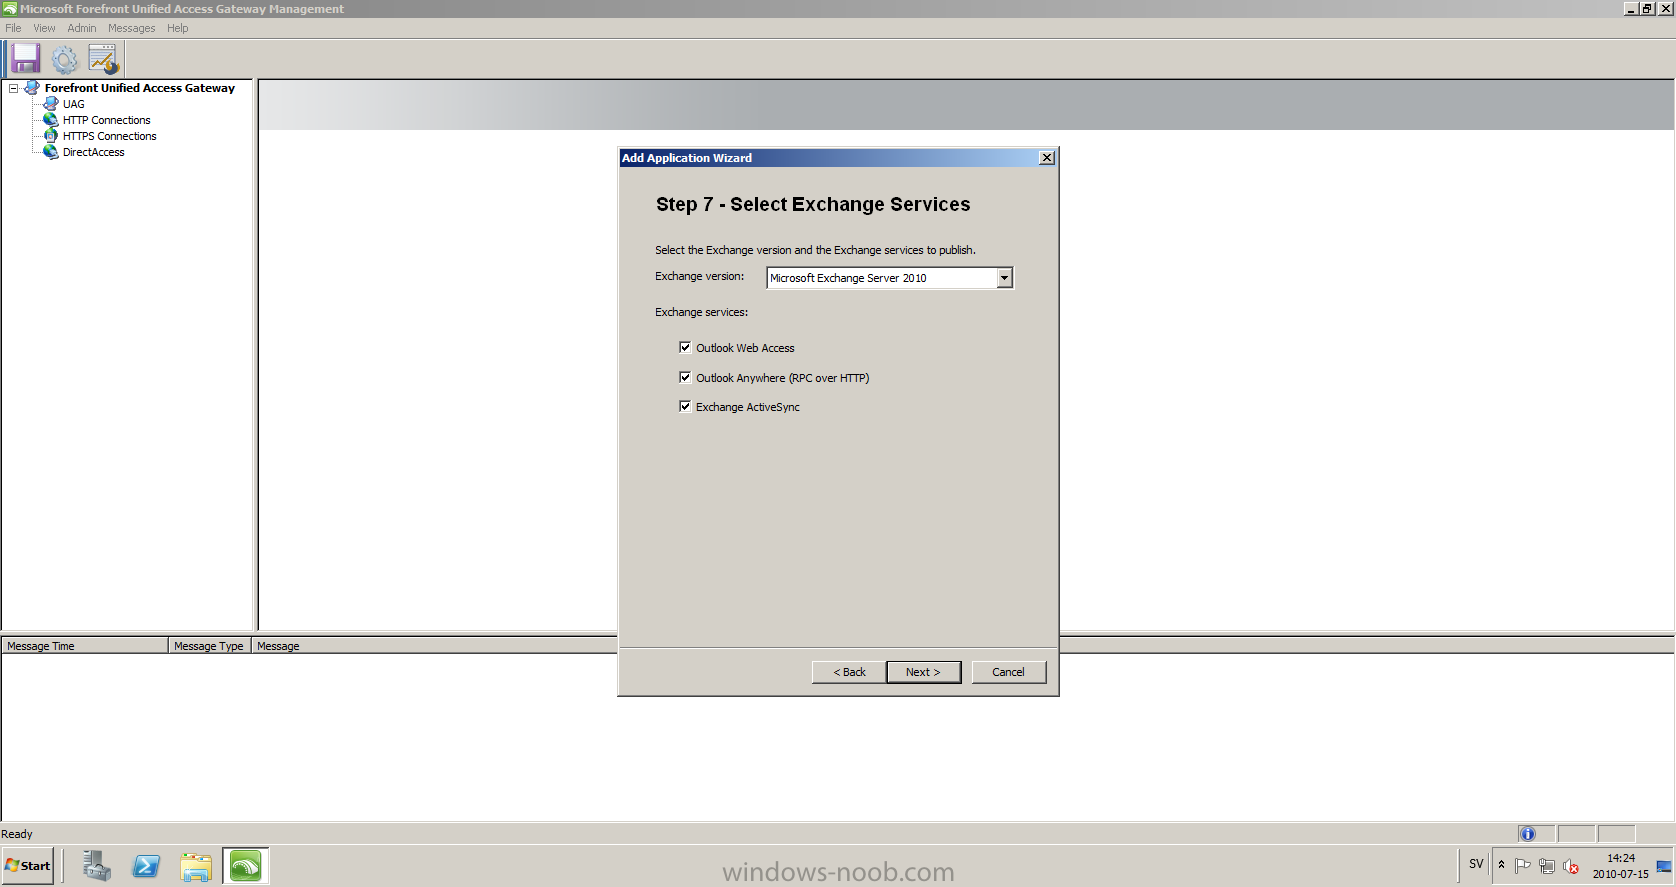
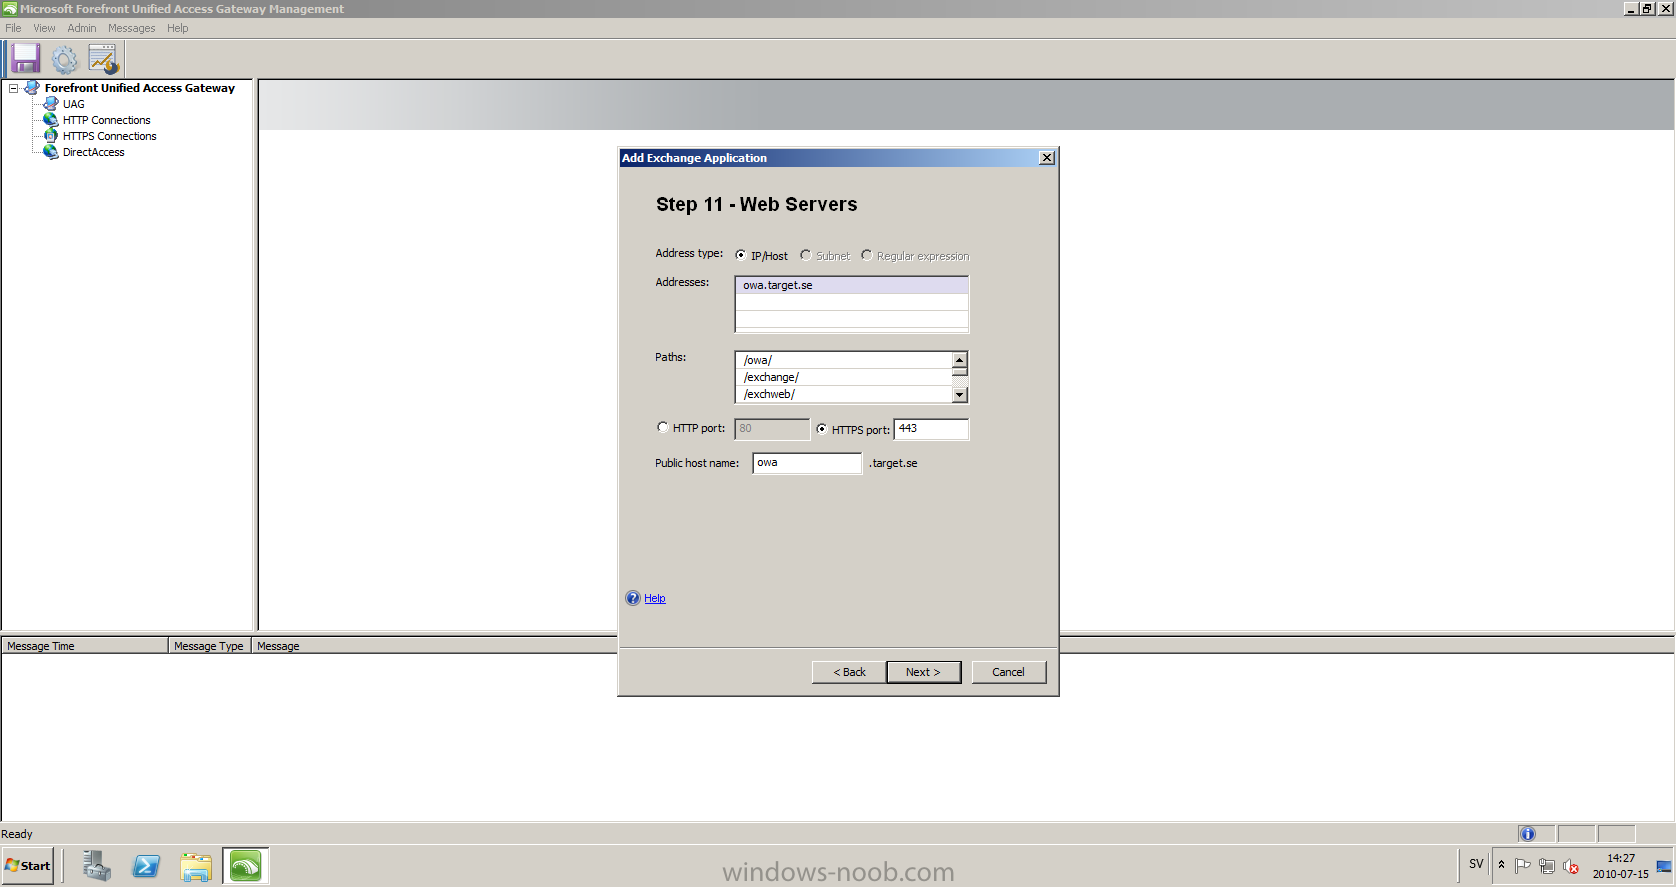
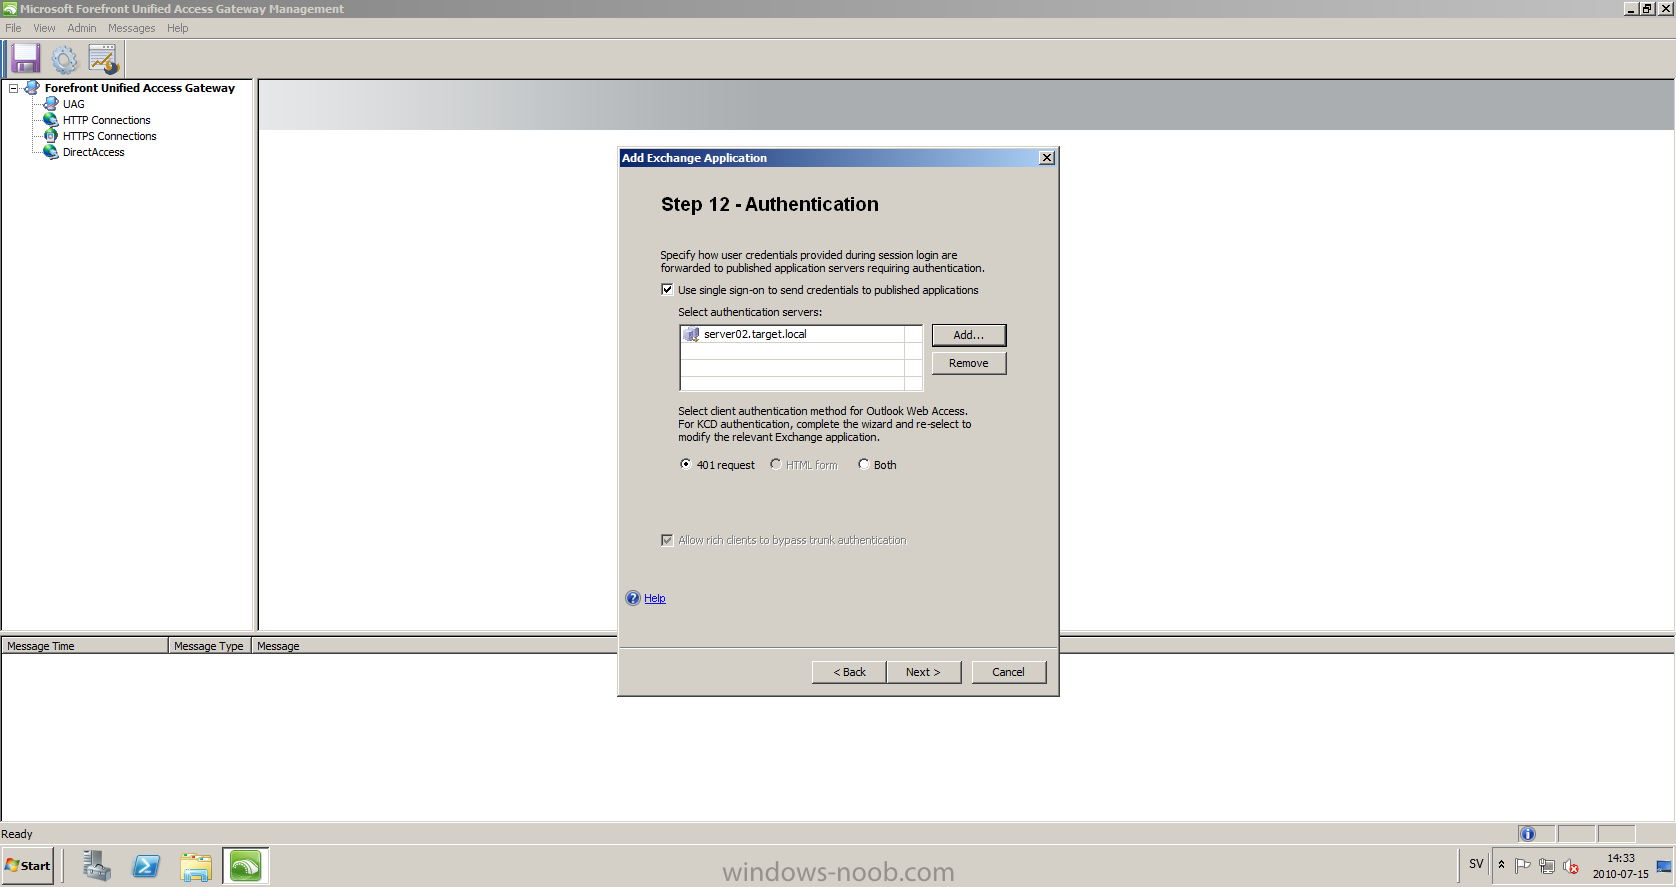
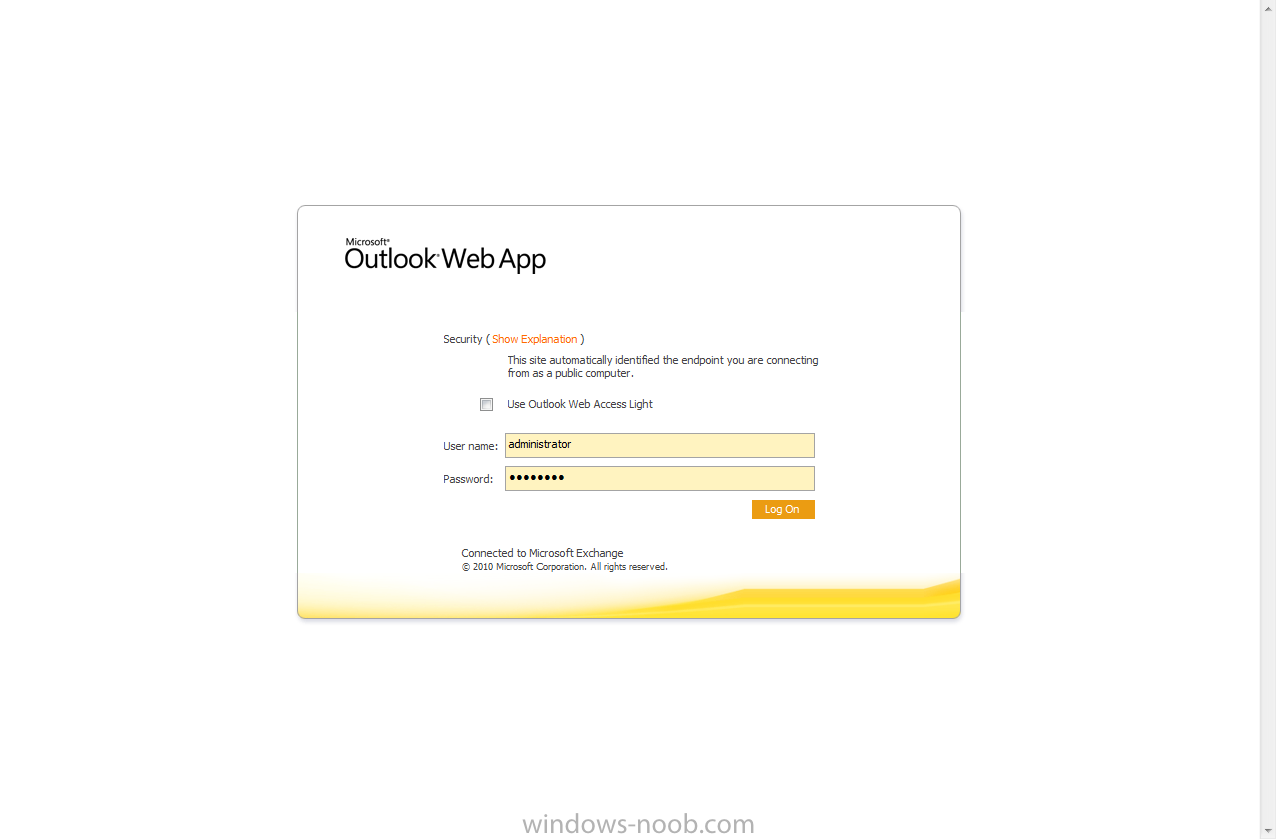
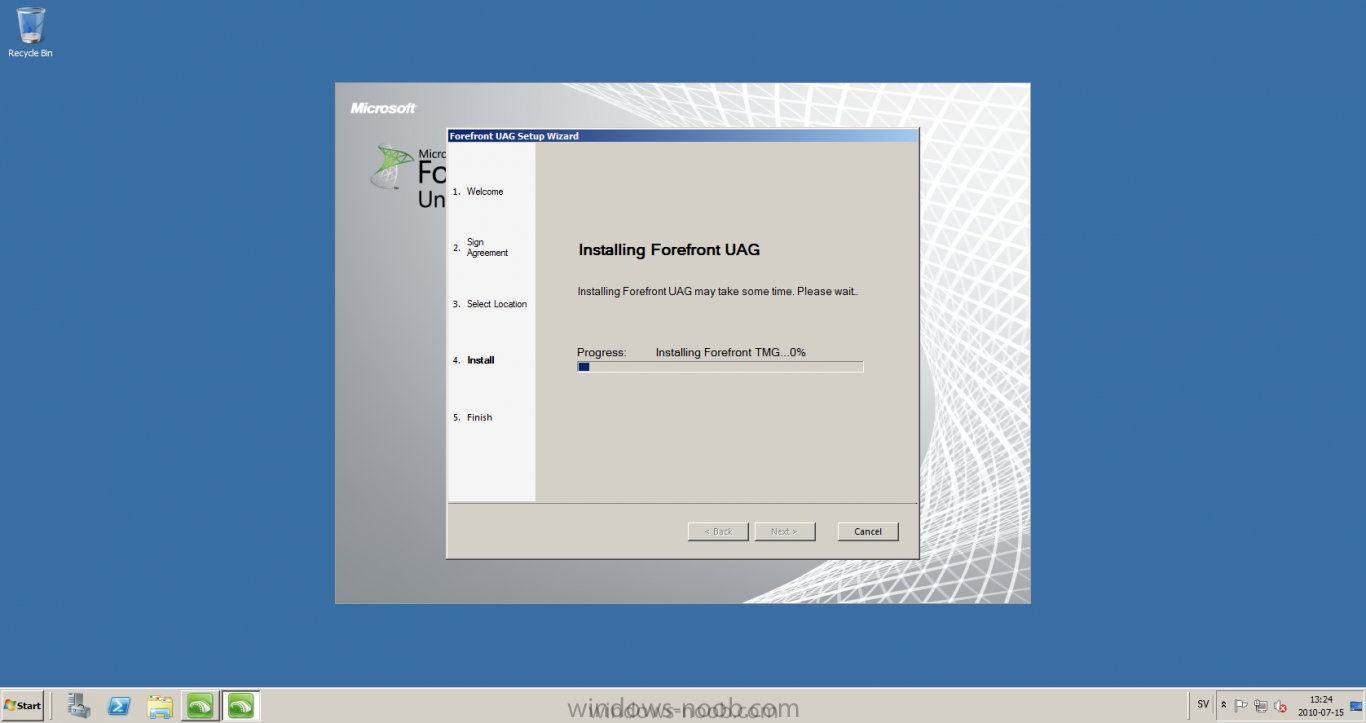
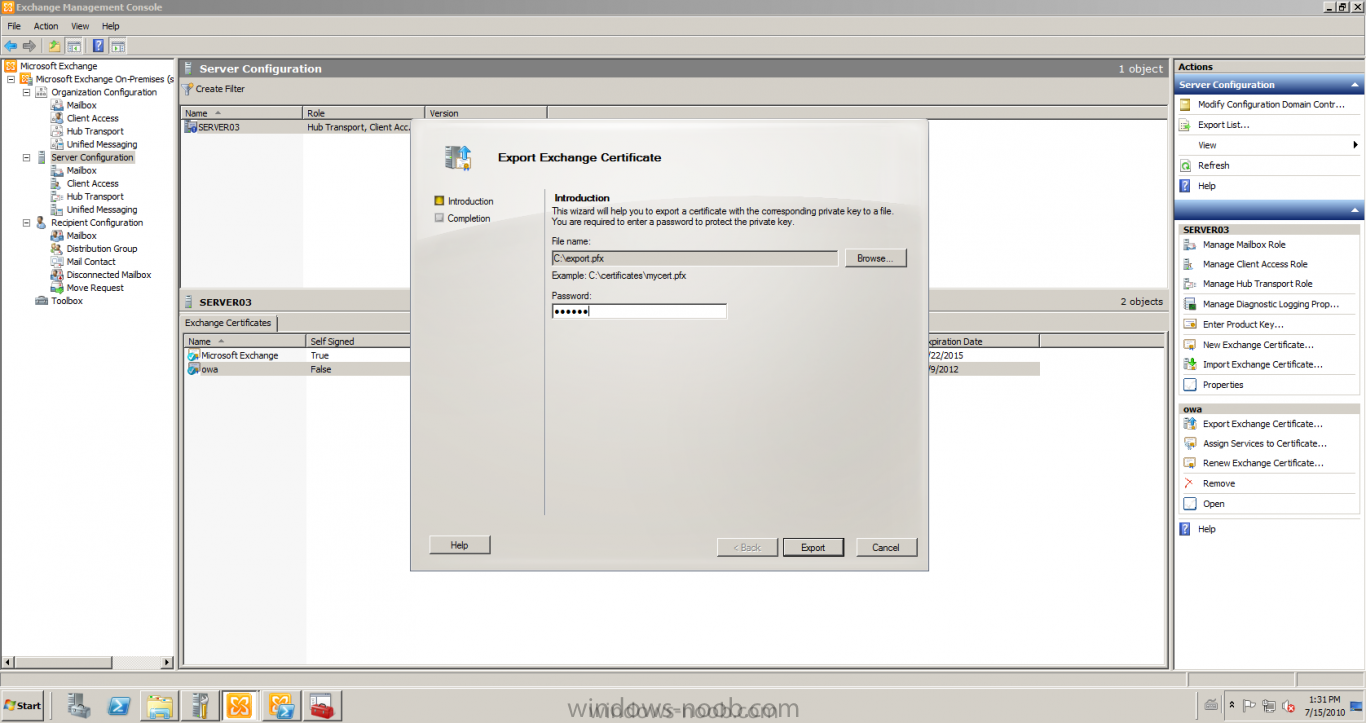
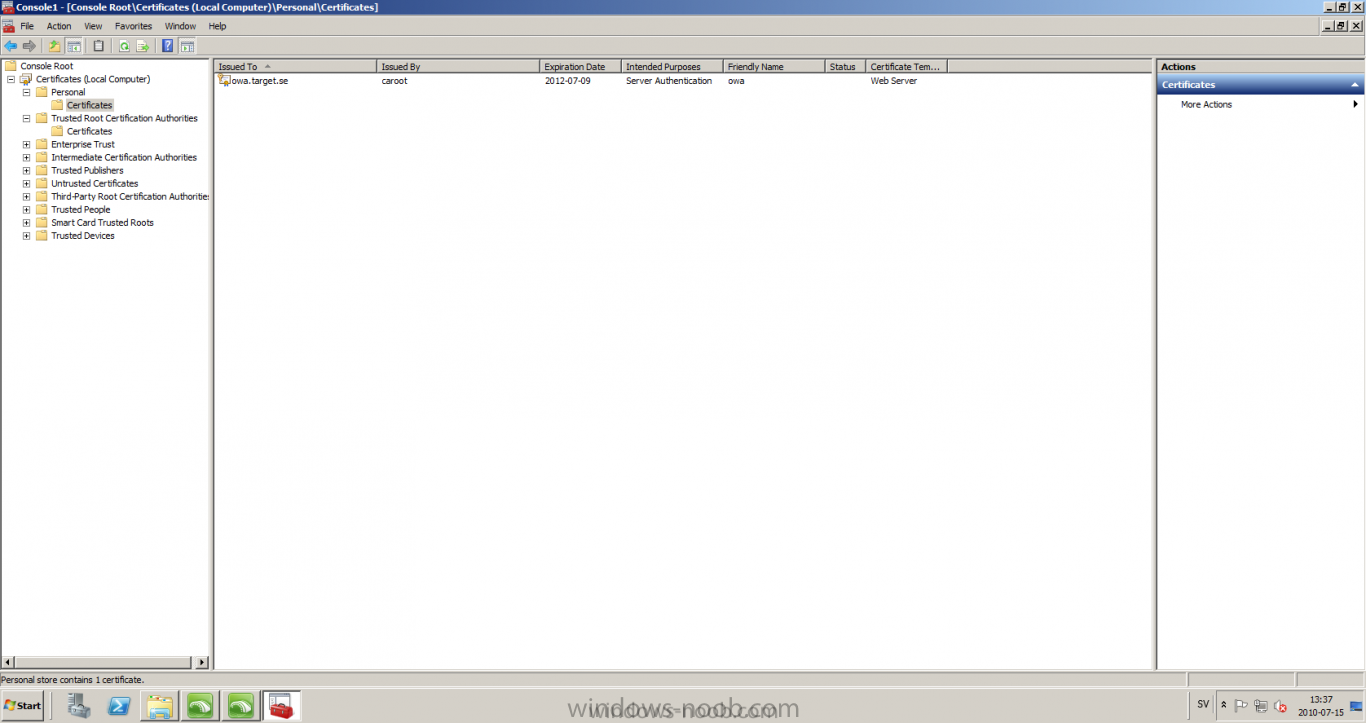
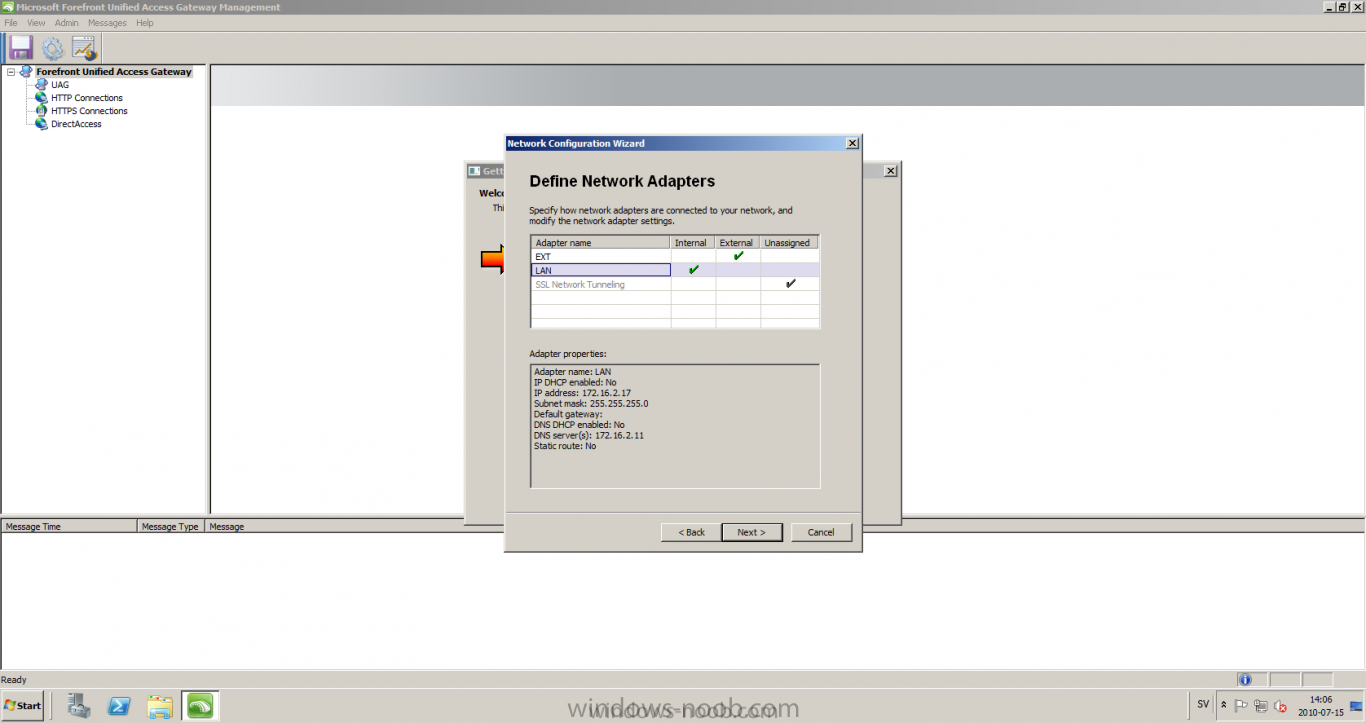
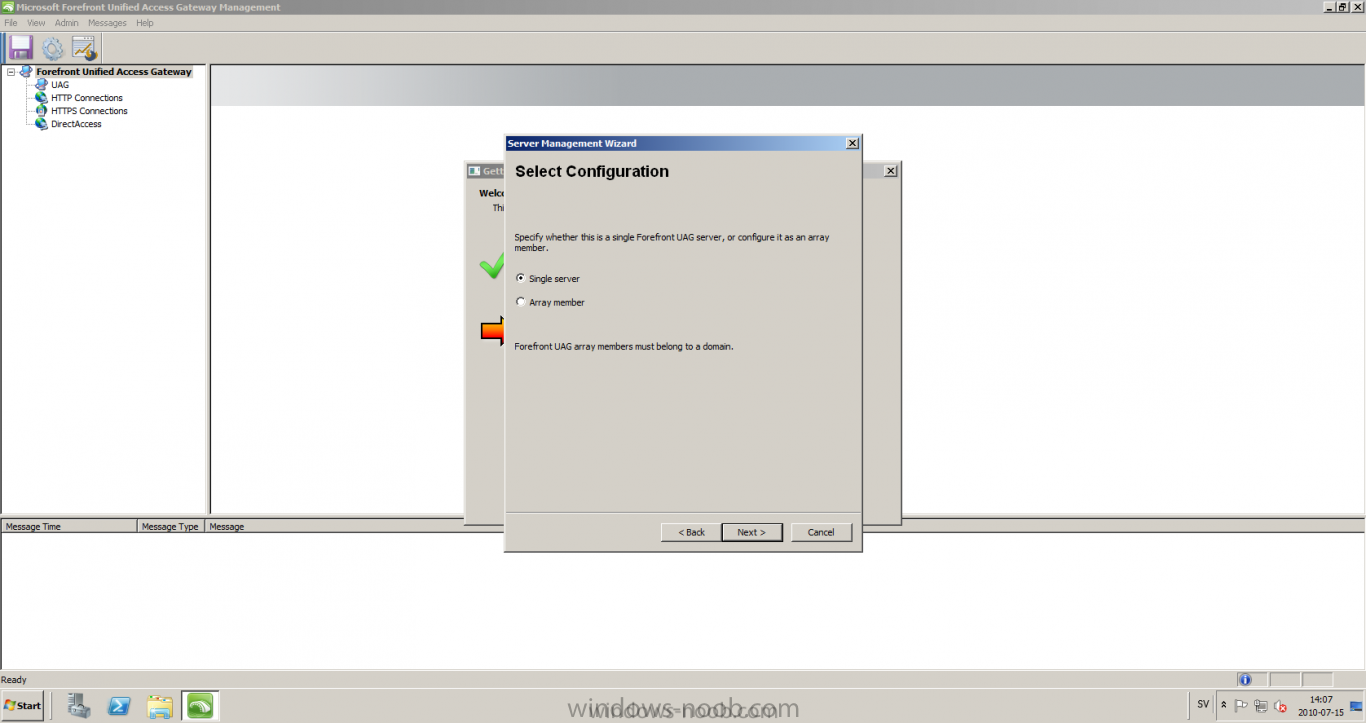
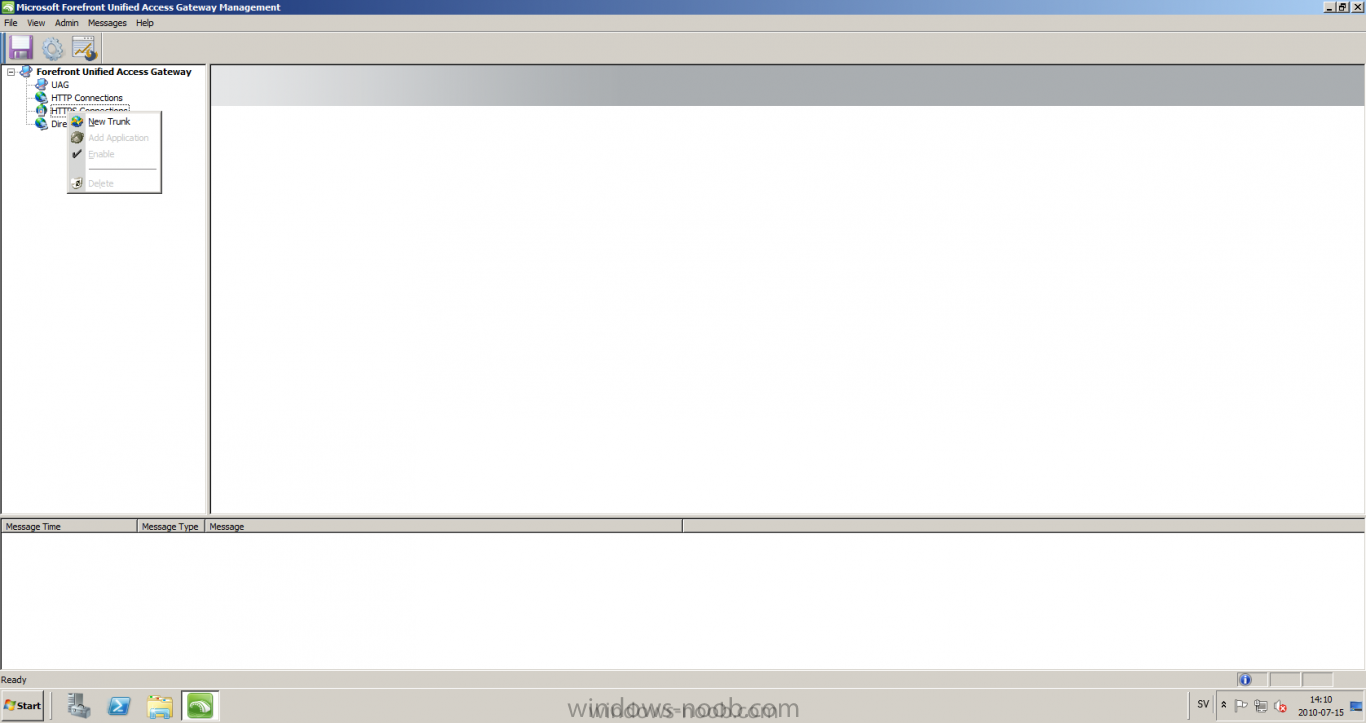
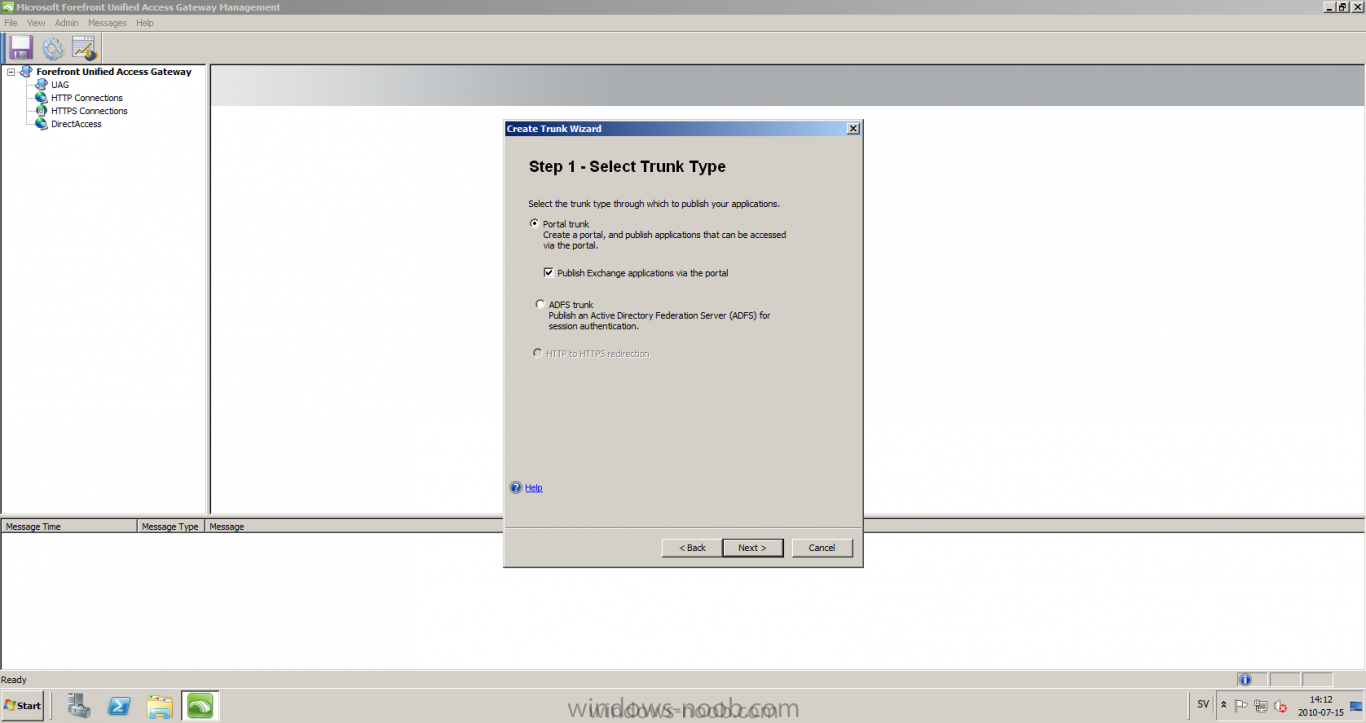
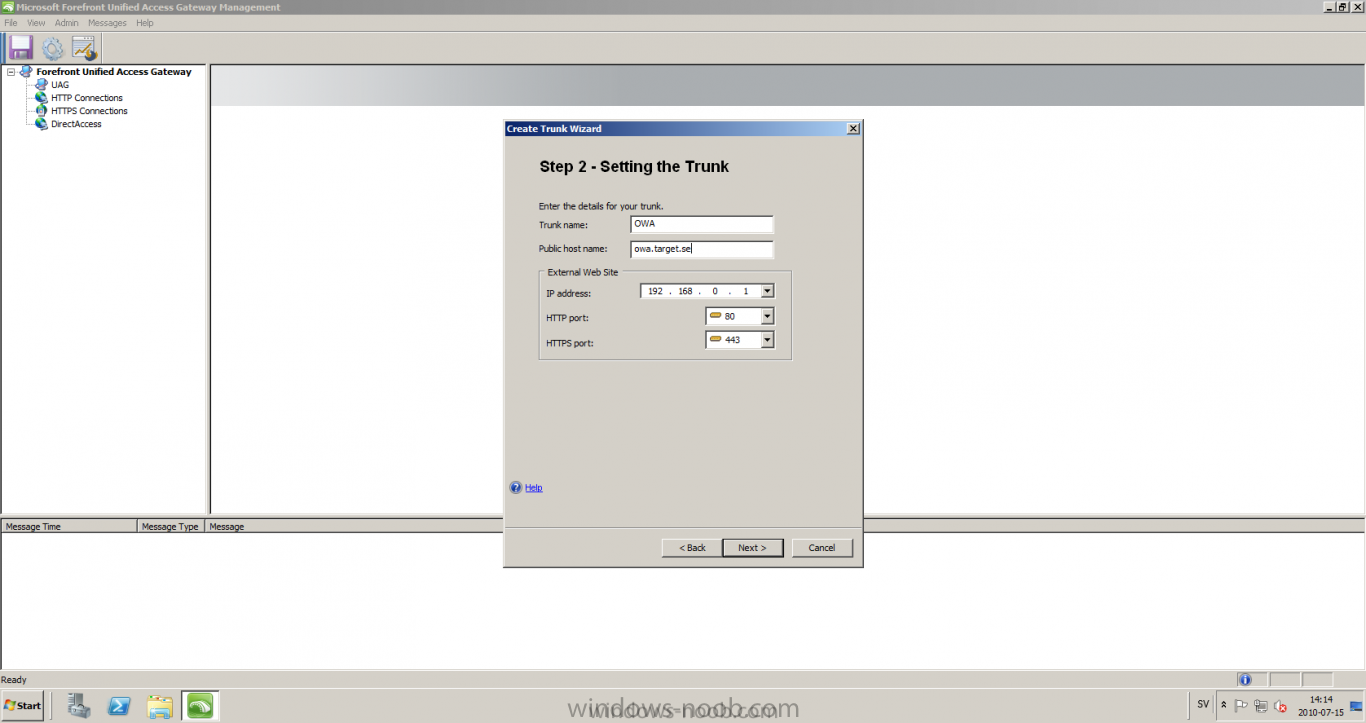
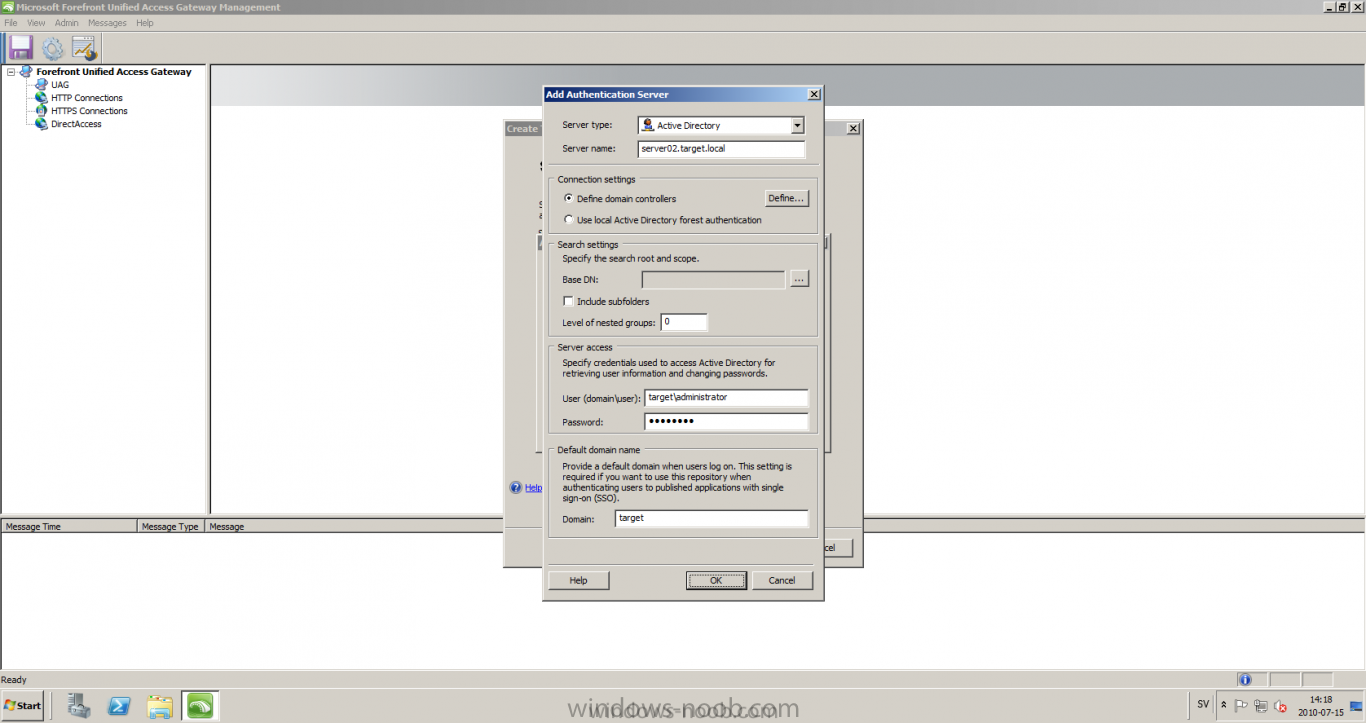
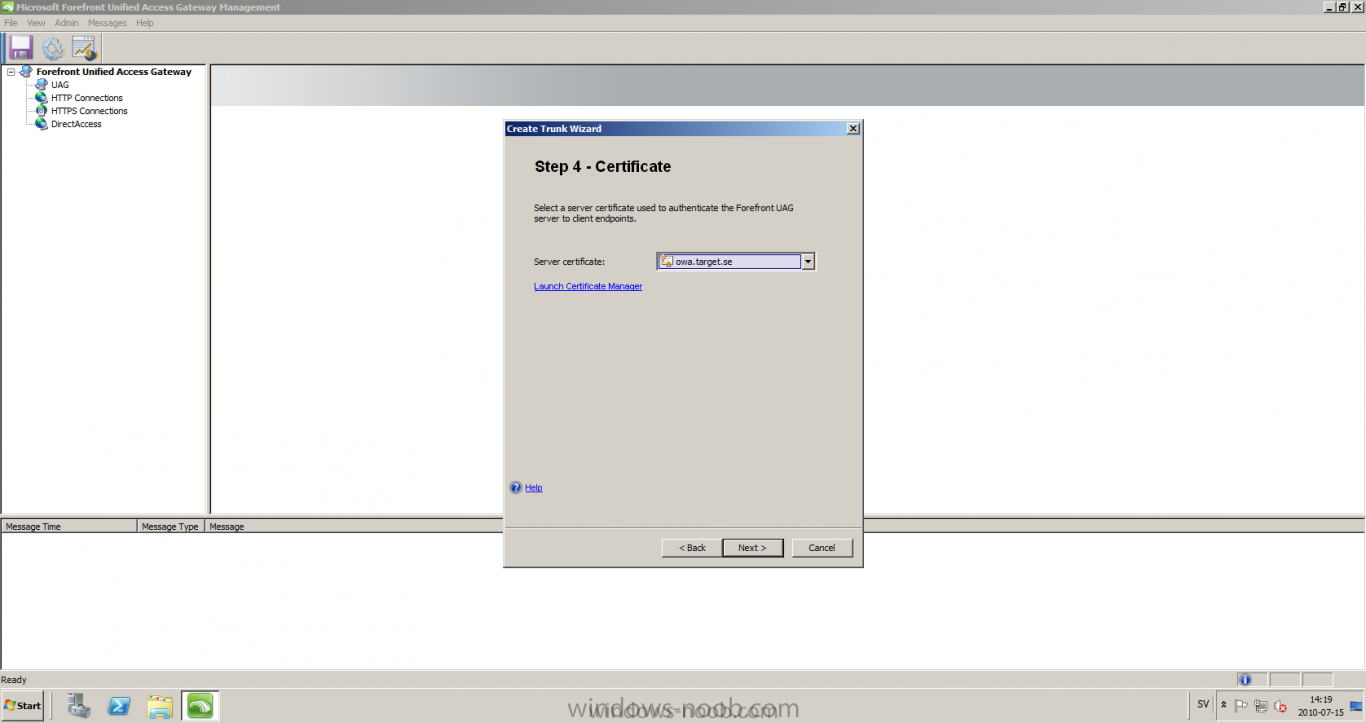
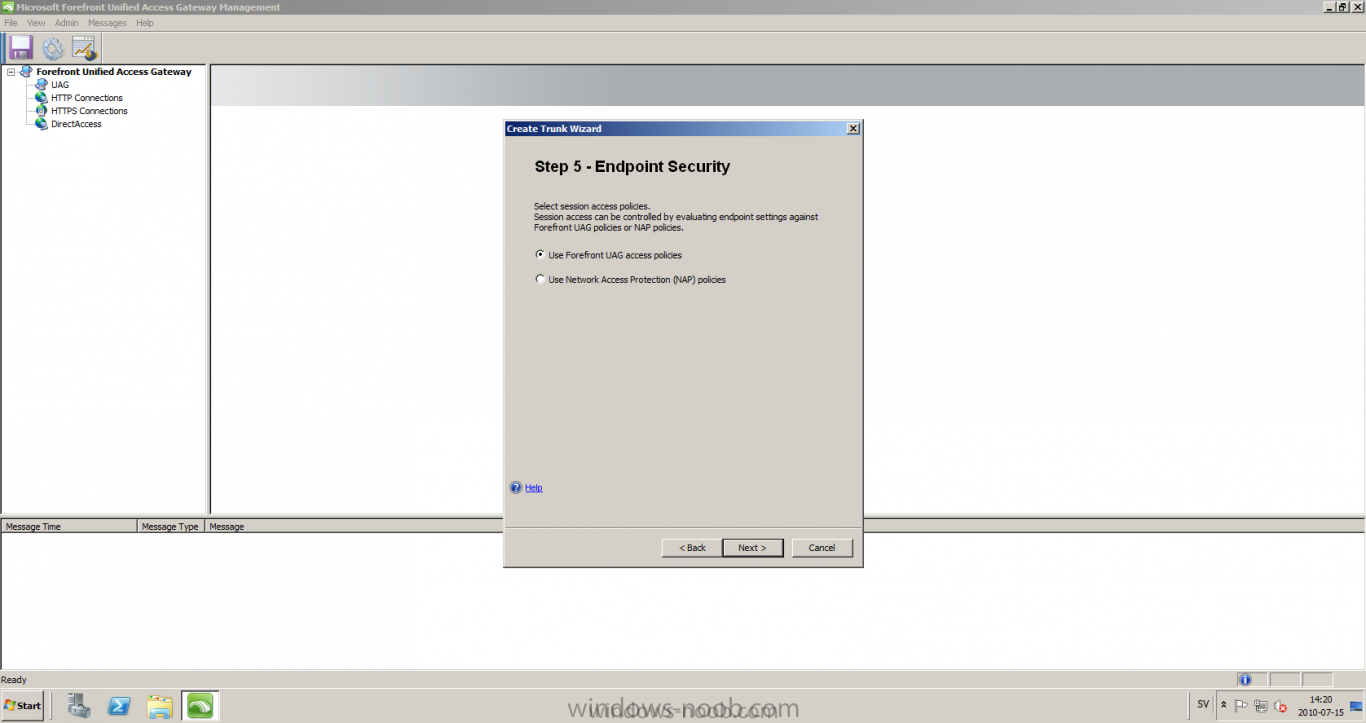
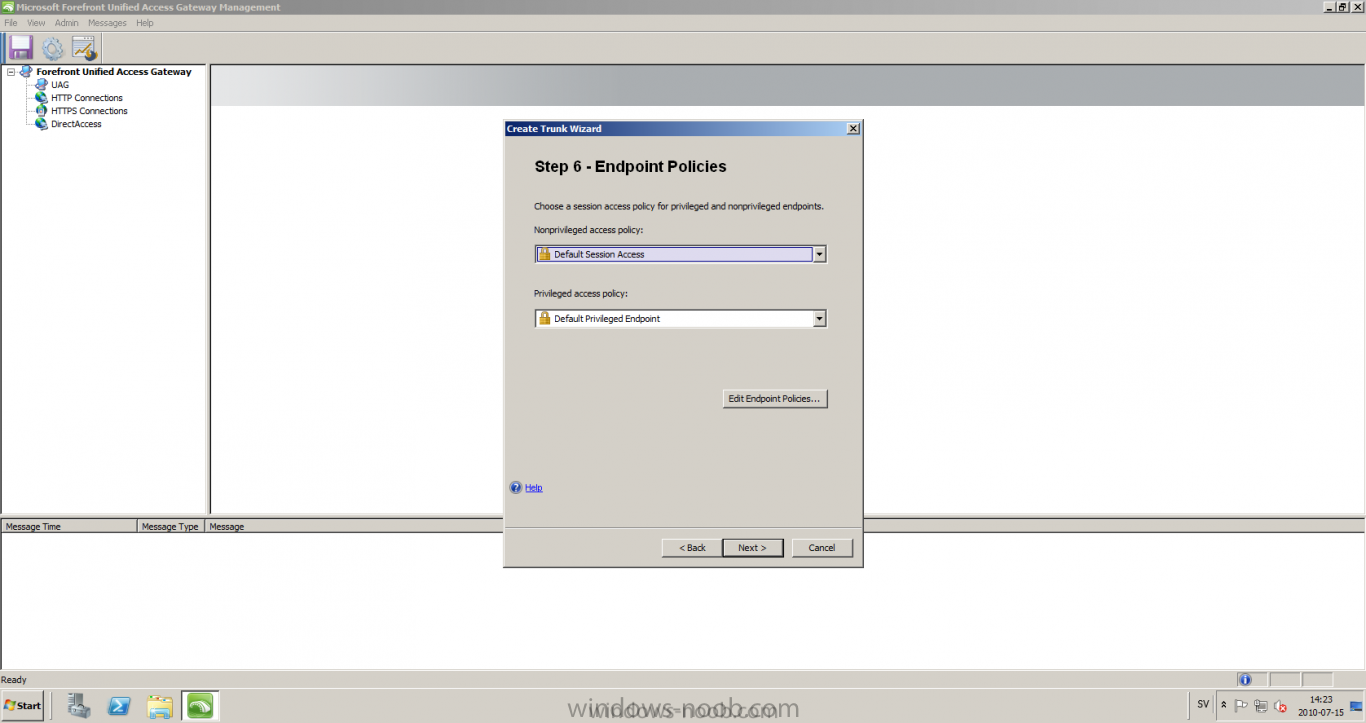
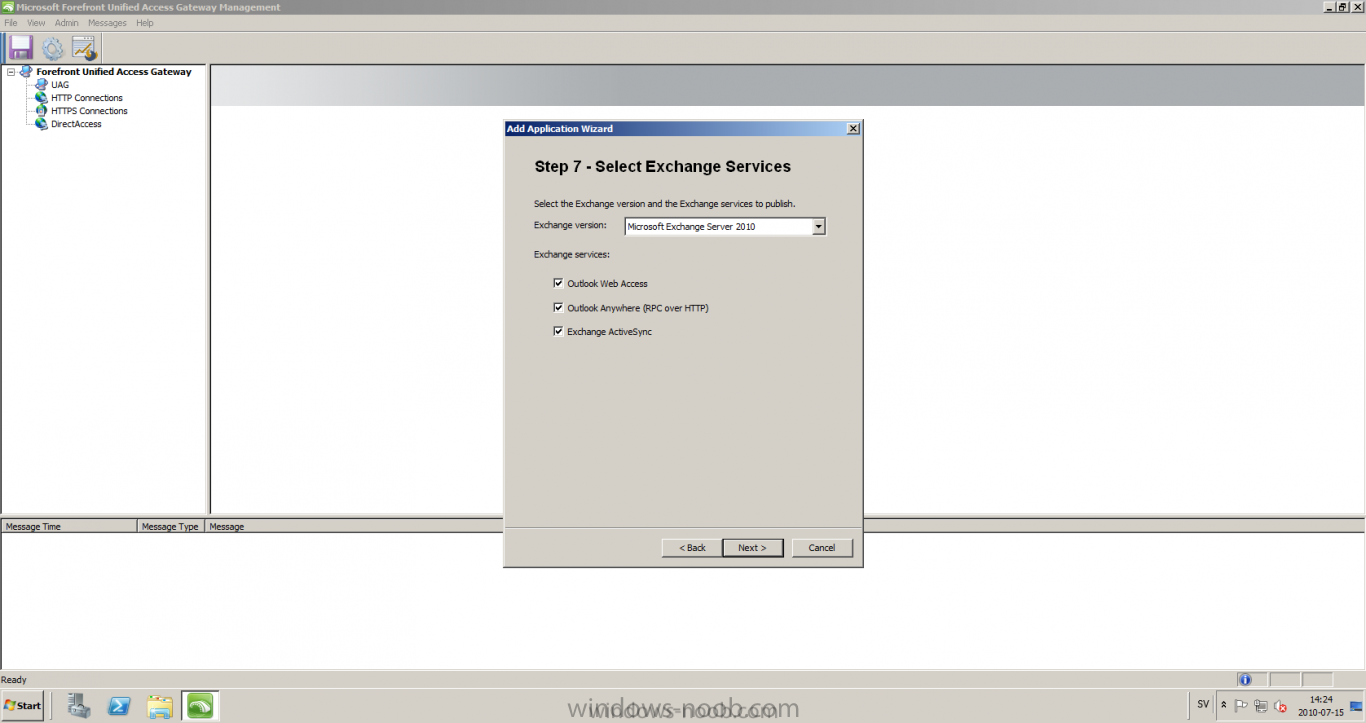
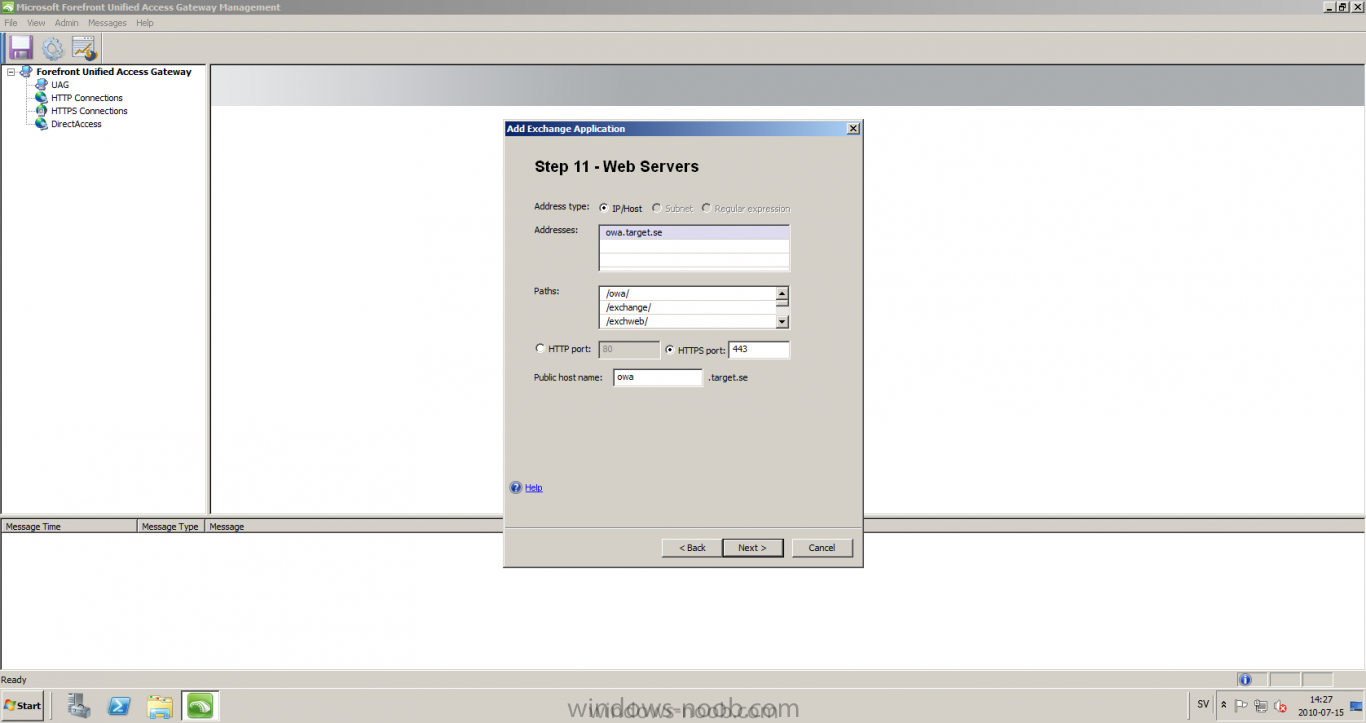
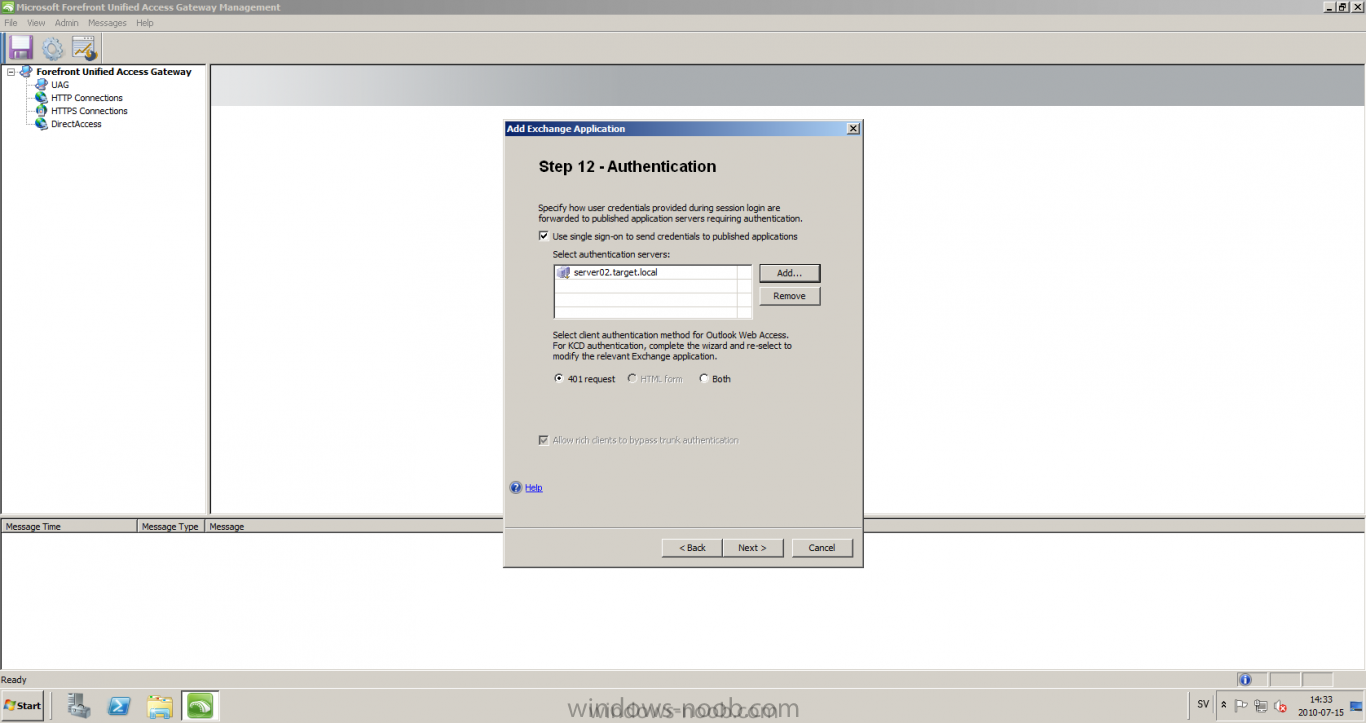
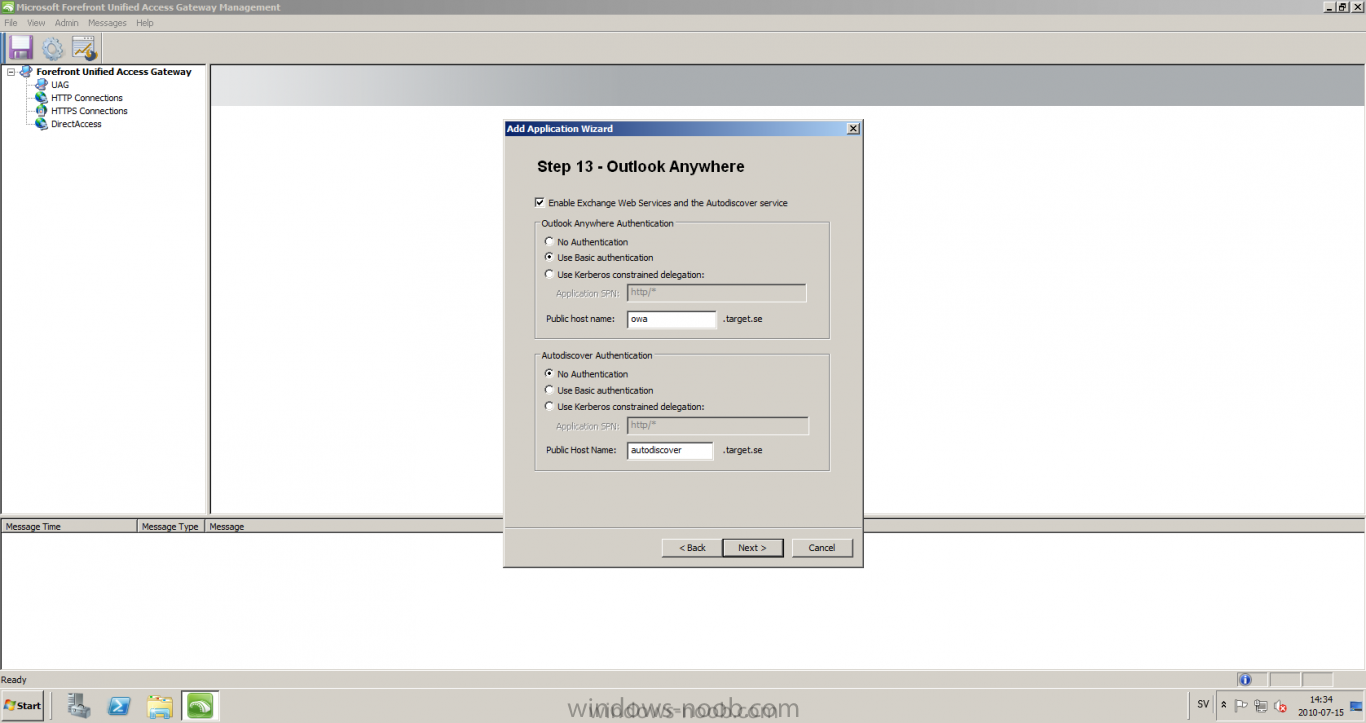
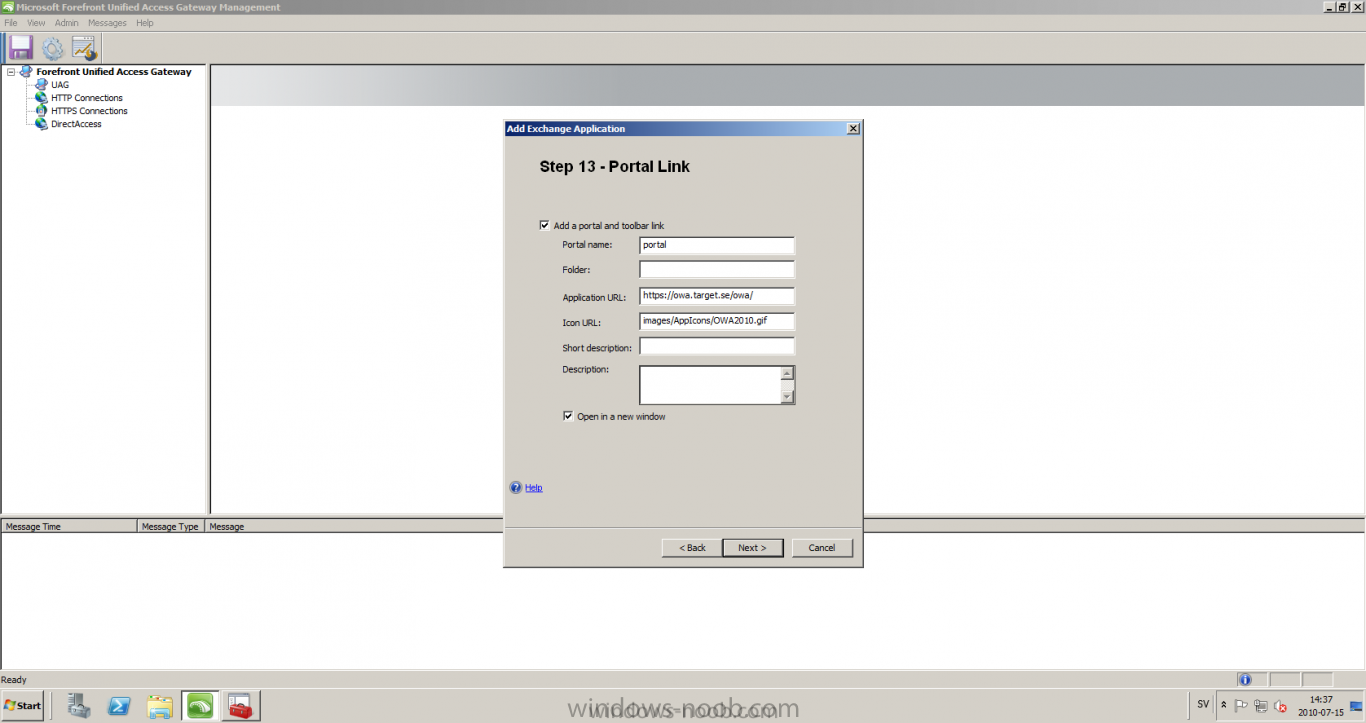
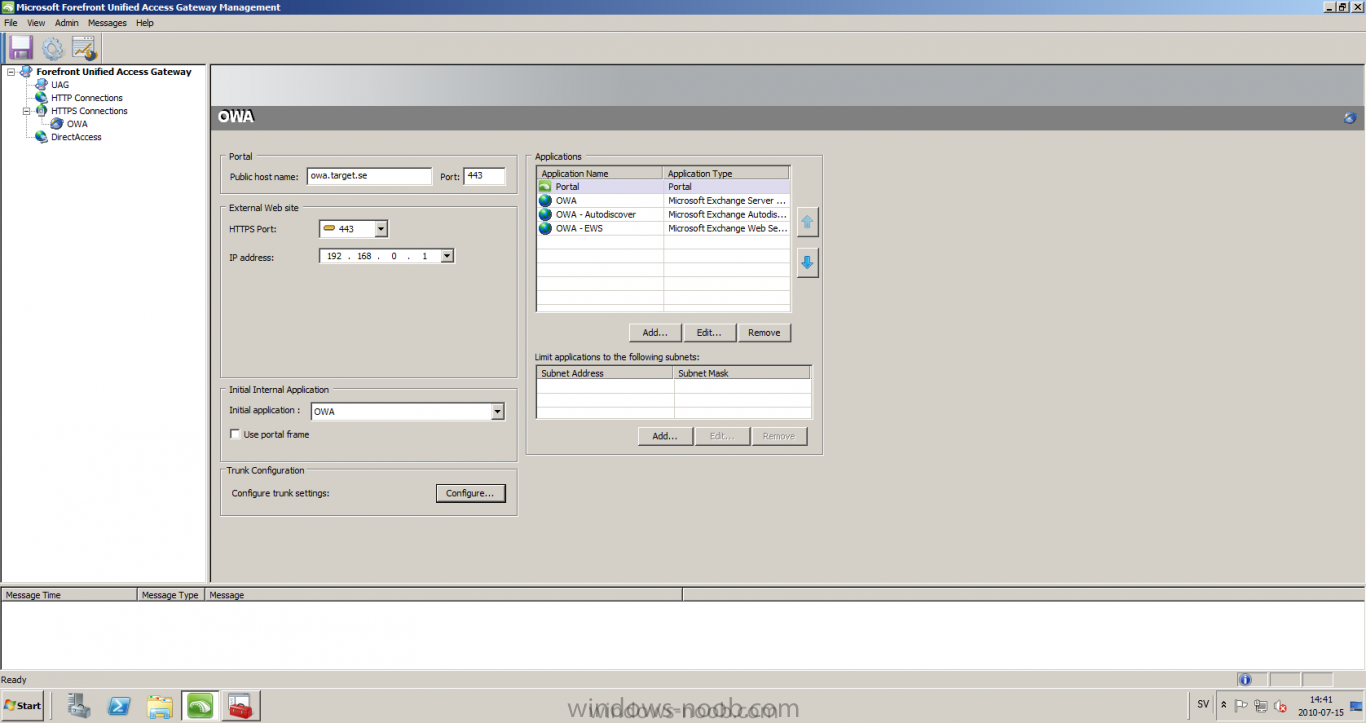
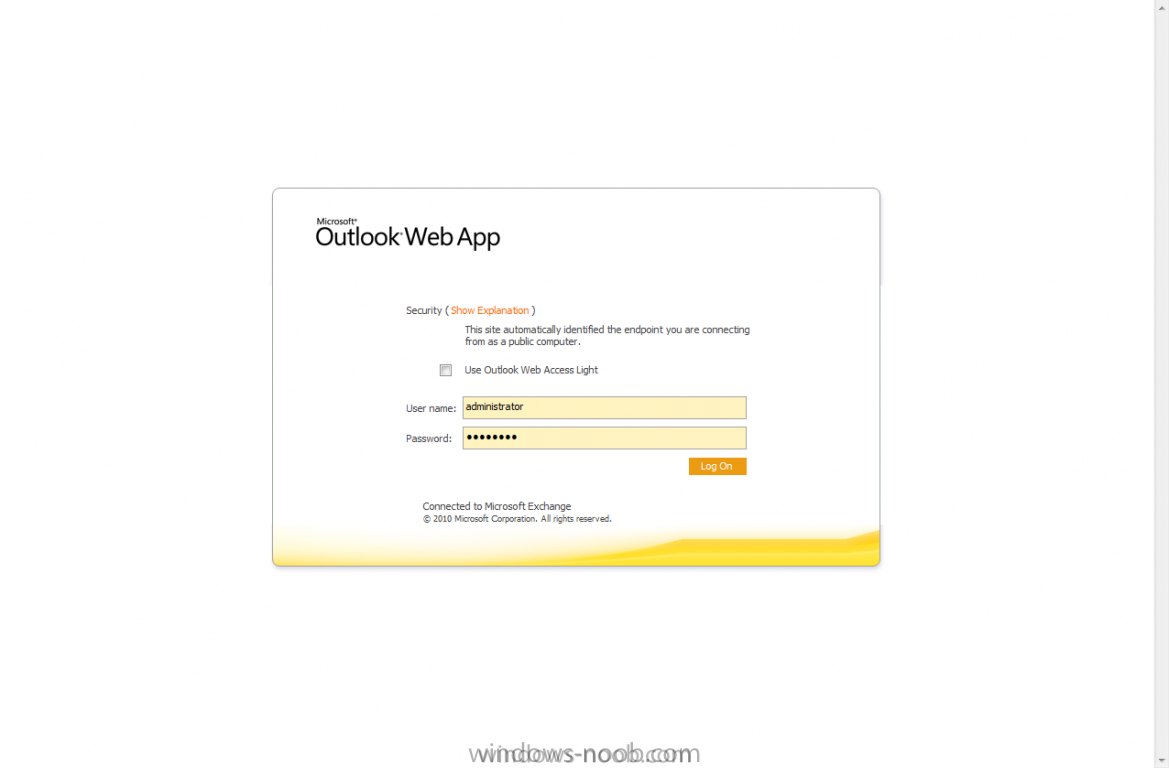
Published: 2010-07-18 (on testlabs.se/blog) Updated: - Version: 1.0 Installation This will be a complete walkthrough to setup up certificate based on a CA server on a DC. My environment looks like this 1 x Windows 2003 (DC/DNS/CA) 1 x Forefront UAG 1 x Exchange 2010 CAS/HUB/MBX Everything is running as virtual machines in VMware workstation. Just to mention, this is done in a lab and no reality allocation with memory, the machines are just for this post and not serving any production environment. Before doing anything with UAG we need to configure the network with correct ip addresses. My UAG server is installed with Windows 2008 R2 x64 with 2 Nics (E1000), running with an internal Nic setup IP: 172.16.2.17 Subnet: 255.255.255.0 DNS: 172.16.2.11 (pointing to the DC) The external Nic is setup with IP: 192.168.0.1 Subnet: 255.255.255.0 DNS: External IP Default Gateway: Pointing to my external gateway On the TMG server in the hosts file I have edited it with notepad and pointed out 172.16.2.12 owa.target.se Just to get the name resolution to working fine with the rule and certificate. It time to launch the installation wizard for Forefront UAG It will take some time for the installation to finish. The first thing to do when the installation is done is to export the certificate from my Exchange server and import it on the UAG server. For creating and requesting certificates on Exchange, have a look at this link: http://www.digicert.com/exchange-ssl-certificate.htm The export and import of the existing certificate is really easy, start Exchange Management Console (EMC) and go to Server configuration, select the certificate and right click, choose export exchange certificate. The certificate import is easy, go to the UAG server and start an mmc console and add the snapin for certificates (computer) for the local computer. Then select Personal and right click on that and select all tasks -> import and point out the certificate that was just exported from Exchange server. When it's done it should look like below. Notice: If you're using own CA server like I do in this example, make sure that the trusted root certificate is installed on UAG server before you're trying to import the certificate. Configuration First time when UAG is started, it will give you a wizard and configure the network settings for it. Define the internal ip addresses. Configuration selection, in my case I only have one server so I select single server. Then after these steps it's time to active these settings. Now it's time for the configuration of the UAG Start with creating a HTTPS trunk by right clicking the HTTPS connections I will create a HTTPS trunk just for this purpose. The trunk type should be set to "portal trunk" and select to publish exchange applications via the portal. Step 2, give the trunk a name and a public name, this name should match the name on the certificate and in my case I was also adding this name into the hostfile of the UAG server. My name in the lab is: owa.target.se We need to add an authentication server (AD server) so I did like the picture below shows. Select the server and then go further to next step. It's time to choose the correct certificate so the name matches each other, in my case it's: owa.target.se. Step 5 will be to select endpoint security, I don't have any NAP servers so I'll select Forefront UAG. Step 6, Endpoint policy's, let the default policy's stay there Step 7, select Exchange version and which services that should be published. Step 8, Configure Application Give it a friendly name. Step 9, Select Endpoint Policies Let the default policy's stay there. Step 10, Deploying an Application Select to Configure an application server Step 11, Select Web servers In address field I type in; owa.target.se, or could be fqdn of the server. This name will be resolved on the UAG to my Exchange server since it's added to the host file. Double check so the Public host name is configured correctly; owa.target.se Step 12, Authentication In here I select 401 request, with that means the UAG will check the credentials and if they are correct the users will be authenticated and forwarded to the correct instance. Step 13, Outlook Anywhere, the authentication method I will use is; Basic Authentication Double check so the public host name is correct For autodiscover I will use; Basic Authentication Step 13 (14), Portal Link (Yes I know, it's the same number as before, but it's says so in the application) Portal name; portal Application URL; https://owa.target.se/owa Step 15, Authorization Select Authorize all users When all steps are configured it will look like this Don't forget to save and active the settings, or else it will not work :-) Verifying It's time for the testing of the solution with a Windows 7 machine. On the Windows 7 machine in the hosts file I have edited it with notepad and pointed out 172.16.2.17 owa.target.se This is done since I don't have target.se as a DNS zone internally so the client can find the UAG/publishing portal. Let's start IE and go to https://owa.target.se/owa I went successfully into the OWA Successfully authenticated and logged on! Feel free to give feedback on the post, hope it will help someone
-
You're welcome! Just post a question if there is anything else you are wondering about
-
Hi crunch This can be done on properties of the mailbox databases, and it's an easy process to do it Here's a KB on how to http://technet.micro...XCHG.80%29.aspx A little tip is to not configure the option for receiving mails, I wouldn't recommend to use that option. Instead use the warning and prohibit send options
-
Start Regedit. Start > Run > regedit Navigate to your private database. You can find it under: HKEY_LOCAL_MACHINE\SYSTEM\CurrentControlSet\Services\MSExchangeIS\\Private-GUID. Right click and create; New DWORD Value Create the DWORD with name: Database Size Limit in GB with the value 75. This sets the Maximum size limit to 75GB to the database. That’s maximum for Exchange 2003 Standard Edition, Enterprise is unlimited. Restart the Microsoft Exchange Information Store for the change to take effect, this is done through the services pannel: Start > Run > services.msc. Find the Microsoft Exchange Information Store and restart it.
-
Some companies do not like the idea of displaying the server name in SMTP connections. We can change the banner information used by a Receive Connector using the cmdlet. Set-ReceiveConnector ‘<Connector Name>’ -Banner “220 Mail Server” We can control the number of protocol errors in a single session. The default value is 5, to configure it to 2 we can use the following cmdlet: Set-ReceiveConnector ‘<Connector Name>’ -MaxProtocolErrors 2 When you suspect you have a problem with the receive connector it’s a good idea to start the verbose logging and check the logs, they are default placed in: “C:\Program Files\Microsoft\Exchange Server\TransportRoles\Logs\ProtocolLog” To achieve this, it can be done either in EMC; under Server configuration, HUB Transport, select server and the Receive Connector or it can be done with EMS; Set-ReceiveConnector -Identity ‘<Connector Name>‘ -ProtocolLoggingLevel Verbose In most case the default permission when creating an internal relay connector works well, but observe that sometimes it won’t work, then use the verbose logging to check. Get-ReceiveConnector ‘<Connector Name>’ | Get-ADPermission To give higher permissions the command; Set-ADPermission can be used or use Adsiedit.msc, find the Receive Connector and give the user/group the missing permissions. Make sure to select; Submit Messages to Server Submit Messages to any Recipient Bypass Anti-Spam Accept routing Headers For the connections that won’t work in the normal way, create a new connector and don’t choose any permission, also start the verbose logging. Then use adsiedit after creating a group in AD with the users that should be able to relay/use the connector. Of course anonymous can also be chosen but it’s not very secure! Thanks for reading!
-
Many times the question comes up in forums how to create a relay connector that works just like it did in Exchange 2003. At that time it was like…. If the IP address was in the list, that IP was able to relay no matter what. In Exchange 2007/2010 it’s not working that way.. Now we need to create a receive connector, give it a proper name (like Relay Connector) and also set an extra security setting on it. Here are the commands that I usually use to create the relay connector New-ReceiveConnector -Name ‘Relay Connector’ -Usage ‘Custom’ -Bindings ‘*0.0.0.0:25′ -RemoteIPRanges ‘type in the address that should be able to relay’ -Server ‘*Servername’ Get-ReceiveConnector -Identity ‘Relay Connector’ | Add-ADPermission -User “NT AUTHORITY\ANONYMOUS LOGON” -ExtendedRights “ms-Exch-SMTP-Accept-Any-Recipient” * 0.0.0.0 – If you’re going to use NLB for this relay connector, type in the NLB (VIP) IP address in here, with 0.0.0.0 it will receive mail on all available ip addresses * Servername – Type in the Exchange HUB server name in here With this connector the sender doesn’t need to authenticate so it means that no matter what it is that’s going to send mail with the connector, it will work. Sometimes a server/device can’t authenticate like a SAN etc, then this will be nice to use.
-
If Exchange Server 2003 tries to route a message to a heavily loaded external SMTP system such as a virus firewall, it can receive a Server Busy error. In these situations, the Exchange transport goes into a state known as ‘glitch retry’. In this state, Exchange Server 2003 waits 60 seconds before attempting to resend the message, and it repeats this process three times before resorting to other actions. If external SMTP servers are consistently busy, reduce the glitch retry wait time to prevent mass message queuing. To configure the glitch retry interval in Exchange Server 2003 Open a registry editor, such as Regedit.exe or Regedt32.exe. Navigate to: HKLM\System\CurrentControlSet\Services\SMTPSvc. Right-click SMTPSvc and select New | Key. Name the new key Queuing. Right-click Queuing and select New | DWORD Value. Name the new DWORD value GlitchRetrySeconds. Double-click GlitchRetrySeconds to edit its value data. Change the Base to Decimal. In the Value data field, enter the number of seconds that Exchange Server 2003 should wait before attempting to resend a message. Click OK to save the change, and then close the Registry Editor. Restart the Simple Mail Transfer Protocol (SMTP) service for the change to take effect.