Andersson
Established Members-
Posts
106 -
Joined
-
Last visited
-
Days Won
7
Everything posted by Andersson
-
Hi After reading and answering in MS forum I can tell you all that this is a very common question that need to be clarified. Before Exchange 2010 was released there was a built-in function that handled the co-existence for OWA. A little background check, Exchange 2003 and 2007 could co-existence by pointing to the Exchange 2007 CAS server(s) and use /exchange. In Exchange 2010 this function is removed and replaced by “Legacy”. What to think about when you are planning for a co-existence? You need to add the legacy.domain.com name to the certificate that will be used on the CAS server(s). Change the external URL on Exchange 2007 (OWA) by using EMC or EMS. http://technet.microsoft.com/en-us/library/bb123515(EXCHG.80).aspx Set-OwaVirtualDirectory -ExternalUrl ‘https://legacy.domain.com/owa’ -Identity ‘CASSERVER\owa (Default Web Site)’ If Exchange 2003 is used with co-existence you have to do this from Exchange 2010 EMC or EMS from Server Configuration -> CAS -> Outlook Web App. Select Exchange 2003 and type in legacy.domain.com as the external name. Or using cmdlet; Set-OWAVirtualDirectory -Exchange2003URL ‘https://legacy.contoso.com/exchange’ -Identity ‘CASSERVER\OWA*’ Make sure that Windows Integrated is used on the OWA sites (NTLM) so it will be single sign on. Add a DNS record for legacy.domain.com to point to Exchange 2003/2007 server. Final step will be to change the firewall rules so it instead of pointing to the old server, point it to the Exchange 2010 CAS server(s). I hope this will help someone! If using this example in your organization, make sure to test it before using it. No warranties, use at your own risk. Also, here’s a helpful link from TechNet: http://technet.microsoft.com/en-us/library/ee332348.aspx
-
In this scenario when have a single Exchange 2003 standard server installed and installed a new server with Exchange 2007 standard with CAS/HUB/MBX role (multi-role server). Our problem was that we had too many users that used OWA and ActiveSync so we couldn’t be without this function. I this case we had 3 different solutions to choose between. 1. Use two different IP addresses; one for the Exchange 2003 OWA/AS and one for the Exchange 2007 OWA/AS 2. Use a front-end firewall like ISA server or something else to publish the correct server 3. Install a new server that act as Exchange 2007 CAS server. Option 1 was not a good choice because we don’t want to change anything on the end-user’s side like webmail address or ActiveSync settings. Option 2 was a good idea but the customer didn’t want that type of solution and didn’t got the license for ISA. Option 3 was the best choice in our solution, with this one we didn’t need to change the DNS record or any settings on the end-users. The only thing to change was the firewall rules. When we had the Exchange 2003 (2003 Standard) and Exchange 2007 (2007 Standard) in place we did a decision to install a third Exchange server to act as the traditional “Front-end” server, with Exchange 2007 it’s called Client Access Server (CAS). We imported a 3rd part certificate for IIS service thru PowerShell and configured the OWA to answer on the correct inside and outside web address. Then we thought it was just to go… But it wasn’t! We had 2 test users, let’s call them testuser1 and testuser2. They we’re located at different servers to check so everything worked well. It was checked against the internal webmail address: https://hostname.domain.local/owa (can only be used if the mailbox is located at the 2007 server) so we used instead https://hostname.domain.local/exchange (this should be used if the mailbox CAN be located at the 2003 server). If the mailbox is not located on the 2003 server it will redirect the end-user to the 2007 OWA instead. After a couple of retries, it didn’t work so well… I searched the MS newsgroups and other resources like teamblog and google of course :-) Almost without any luck! Until I found out what was the problem, thanks to a colleague of mine that found an article on google on it. If the original 2007 server was installed with “all” roles CAS, HUB, MBX after an uninstallation of the CAS role the server is not in correct state to support the coexistence. The solution: In our case was to just disable the ‘Require SSL’ on the Default Web Site on the HUB, MBX server after removing the CAS role and restarted the WWW services ‘iisreset’. On the link I found they were also running some PowerShell commands, but I didn’t need that. I will include them to: Get-OwaVirtualDirectory -server ServerName | Remove-OwaVirtualDirectory New-OwaVirtualDirectory -Name “Exchange” -owaversion Exchange2003or2000 -VirtualDirectoryType Mailboxes -WebSiteName “Default Web Site” New-OwaVirtualDirectory -Name “exadmin” -owaversion Exchange2003or2000 -VirtualDirectoryType exadmin -WebSiteName “Default Web Site” New-OwaVirtualDirectory -Name “public” -owaversion Exchange2003or2000 -VirtualDirectoryType PublicFolders -WebSiteName “Default Web Site” After this the redirection started to work as it should. I completed the mission with a redirection in IIS so that the request to the server/site goes straight to /exchange.
-
Sometimes it’s nice to change the default automatic logoff time for any reason. Firstly, it is necessary that you understand the ‘Public’ and ‘Private’ options on the OWA logon page: Public is the default option for security reasons. If you log in to OWA using this option, your username will not be saved and your session will terminate after 15 minutes. Private is intended for private computers. Selecting this option will cause your username to be remembered for subsequent visits to the site (you must, however, retype your password each time). Your session will also timeout after 8 hours, not 15 minutes. The server this change is going to be done is at the server that handles OWA, yes you’re right. It’s the CAS server. HKEY_LOCAL_MACHINE\SYSTEM\CurrentControlSet\Services\MSExchange OWA The CAS looks for two DWORD entries within that key: PublicTimeout and PrivateTimeout. If one or both of these keys is not present, the session for which the key is omitted uses its default logoff value. To modify the timeout in some way, you can edit or create one or both of the above keys. Set them as DWORD entries. When editing these values, choose the ‘Decimal’ option and enter a value from 1 to 43 200. The value is in minutes, meaning you can cause session to last anywhere from 1 minute up to a maximum of 30 days. Having made the changes, restart IIS on the CAS server(s) for the changes to take effect. iisreset /noforce Done!
-
This is an easy step-by-step guide how to upgrade the legacy policies when transition from Exchange 2000 or 2003 to 2007 or 2010 there's a need for upgrading the email address policies. Also remember, this is example without any guarantee! Don't forget! Before running these commands make sure that you remove mailbox management policy, or else you will get problems. Get-EmailAddressPolicy | where { $_.RecipientFilterType -eq "Legacy" } | Set-EmailAddressPolicy –IncludedRecipients AllRecipients Set-AddressList "All Contacts" -IncludedRecipients MailContacts Set-AddressList "All Groups" -IncludedRecipients MailGroups Set-AddressList "All Users" -IncludedRecipients MailboxUsers Set-AddressList "Public Folders" -RecipientFilter { RecipientType -eq 'PublicFolder' } Set-GlobalAddressList "Default Global Address List" -RecipientFilter {(Alias -ne $null -and (ObjectClass -eq 'user' -or ObjectClass -eq 'contact' -or ObjectClass -eq 'msExchSystemMailbox' -or ObjectClass -eq 'msExchDynamicDistributionList' -or ObjectClass -eq 'group' -or ObjectClass -eq 'publicFolder'))} They work like a charm :-) (Check the formating..)
-
Here's a list with published articles made by me, both How-to-guides and issues that I've run into How to guides Migration article serie Part 1: Overview http://www.windows-noob.com/forums/index.php?/topic/9293-part-1-migrations-overview/ Part 2: Prerequisites for Domino/Notes migrations http://www.windows-noob.com/forums/index.php?/topic/9294-part-2-prerequisites-for-dominonotes-migrations/ Part 3: Migrating Domino/Notes to Exchange 2013 On-premise http://www.windows-noob.com/forums/index.php?/topic/9295-part-3-migrating-dominonotes-to-exchange-2013-on-premise/ Part 4: Migrating Domino/Notes to Office 365 http://www.windows-noob.com/forums/index.php?/topic/9296-part-4-migrating-dominonotes-to-office-365/ Part 5: Migrating Resources Mailboxes, Mail-In databases and Groups http://www.windows-noob.com/forums/index.php?/topic/9297-part-5-migrating-resources-mailboxes-mail-in-databases-and-groups/ Part 6: Prerequisites for Coexistence between Domino and Exchange 2013/Office 365 http://www.windows-noob.com/forums/index.php?/topic/9298-part-6-prerequisites-for-coexistence-between-domino-and-exchange-2013office-365/ Part 7: Configuring Coexistence Manager for Notes with Exchange 2013 On-premise http://www.windows-noob.com/forums/index.php?/topic/9467-part-7-configuring-coexistence-manager-for-notes-with-exchange-2013-on-premise/ Part 8: Configuring Coexistence Manager for Notes with Office 365 http://www.windows-noob.com/forums/index.php?/topic/9696-part-8-configuring-coexistence-manager-for-notes-with-office-365/ PowerShell Bulk import PST files http://www.windows-noob.com/forums/index.php?/topic/9299-bulk-import-pst-files/ Migration preparation script http://www.windows-noob.com/forums/index.php?/topic/8253-migration-preparation-script/ Exchange 2013 script – automatic installation of prerequisites http://www.windows-noob.com/forums/index.php?/topic/9292-exchange-2013-script-automatic-installation-of-prerequisites/ Exchange 2013 RTM Complete guide on configuring KEMP VLM load balancer for Exchange 2013 http://www.windows-noob.com/forums/index.php?/topic/6849-complete-guide-on-configuring-kemp-vlm-load-balancer-for-exchange-2013/ Exchange 2013 Preview Part 1: How to install preview/beta of Exchange 2013 http://www.windows-n...allation-guide/ Part 2: How to do the basic configuration of Exchange 2013 http://www.windows-n...-configuration/ Part 3: Configuring Site URL's, Databases and Outlook Anywhere http://www.windows-n...tlook-anywhere/ Part 4: Configure DAG, Cas Array and Public Folders http://www.windows-n...public-folders/ Basic guides A little how-to-guide about how to install Exchange 2010 SP1 http://www.windows-n...hange-2010-sp1/ Basic Configuration of Exchange 2010 SP1 http://www.windows-n...hange-2010-sp1/ Update the legacy email address policy's on Exchange 2007/2010 after migration from Exchange 2000/2003 http://www.windows-n...ddress-policys/ How to guide for configuring Exchange 2007 OWA http://www.windows-n...-exchange-2007/ How to install and configure Exchange 2010 Edge Server role http://www.testlabs....rt-server-role/ Client Access Configuration of the OWA automatic logoff time on Exchange 2007 http://www.windows-n...ic-logoff-time/ How-to get the Coexistence between Exchange 2003 and 2007 to work http://www.windows-n...d-2007-to-work/ How-to configure Coexistence between 2003 and 2010 http://www.windows-n...-2003-and-2010/ How-to publish OWA with UAG http://www.windows-n...shing-owa-2010/ How-to publish Exchange services (OWA, EAS and OA) with TMG http://www.windows-n...-forefront-tmg/ Transport How-to configure the glitch retry internal in Exchange 2003 http://www.windows-n...-exchange-2003/ How-to create a relay connector http://www.windows-n...elay-connector/ Troubleshooting and managing receive connector http://www.windows-n...eive-connector/ How-to generate signatures automatically http://www.windows-n...-exchange-2010/ Mailbox Configure the database size limit after applied SP2 to Exchange 2003 http://www.windows-n...-exchange-2003/ High Availability and Disaster Recovery Exchange 2010 restore using EMC Networker http://www.testlabs....-emc-networker/ Protect Exchange Databases using DPM 2010 http://www.testlabs....using-dpm-2010/ Install and create backup jobs with Symantec Backup Exec 2010 R3 for Exchange 2010 SP1 http://www.windows-n...p-exec-2010-r3/ Restore scenarios using Backup Exec 2010 R3 with Exchange 2010 SP1 native tools http://www.windows-n...tore-scenarios/ http://www.testlabs....tore-scenarios/ A guide about how-to restore single user mailbox using DPM 2010 (Beta 2) http://www.windows-n...-dpm-2010-beta/ How-to create a Database Availability Group (DAG) http://www.windows-n...lability-group/ Do a recovery installation for Exchange 2007 and 2010 http://www.windows-n...-2007-and-2010/ Migration How-to perform a Cross-forest Migration http://www.testlabs....gration-in-lab/ Quest articles How-to install and configure Quest MessageStats http://www.testlabs....ab-environment/ How-to migrate from IBM Lotus Domino to Exchange 2010 with Quest Notes Migrator for Exchange http://www.testlabs....-in-lab-part-1/ http://www.testlabs....-in-lab-part-2/ How-to install and configure Quest Coexistence Manager for Notes http://www.testlabs....93-part-1-of-2/ http://www.testlabs....93-part-2-of-2/ Issues that I've posted articles about I couldn't do a failover since the content index was in failed state http://www.testlabs....ailover-dag-db/ After installation of Exchange 2010 HUB/CAS and MBX server the database doesn't show up http://www.testlabs....80%99t-show-up/ Entourage issues with Exchange 2007 on Windows 2008 http://www.testlabs....n-windows-2008/ Common question about why Outlook 2003 can't connect to mailbox located on Exchange 2010 server http://www.testlabs....0-outlook-2003/ Problems sending mail to internal distribution lists http://www.testlabs....ribution-lists/ Error in System Manager when trying to manage the Public Folders http://www.testlabs....ncorrect-error/ Problems with Folder Hierarchies within Public Folders, usually because these haven't been moved to the new administrative group http://www.testlabs....public-folders/
-
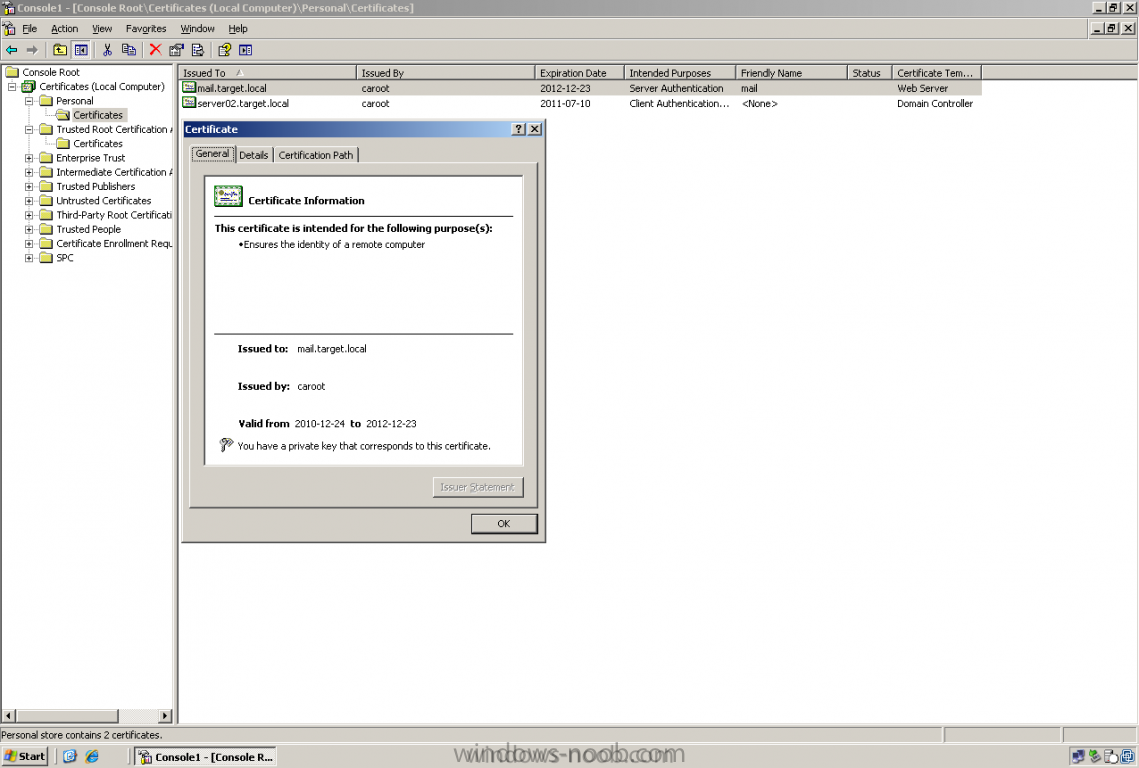
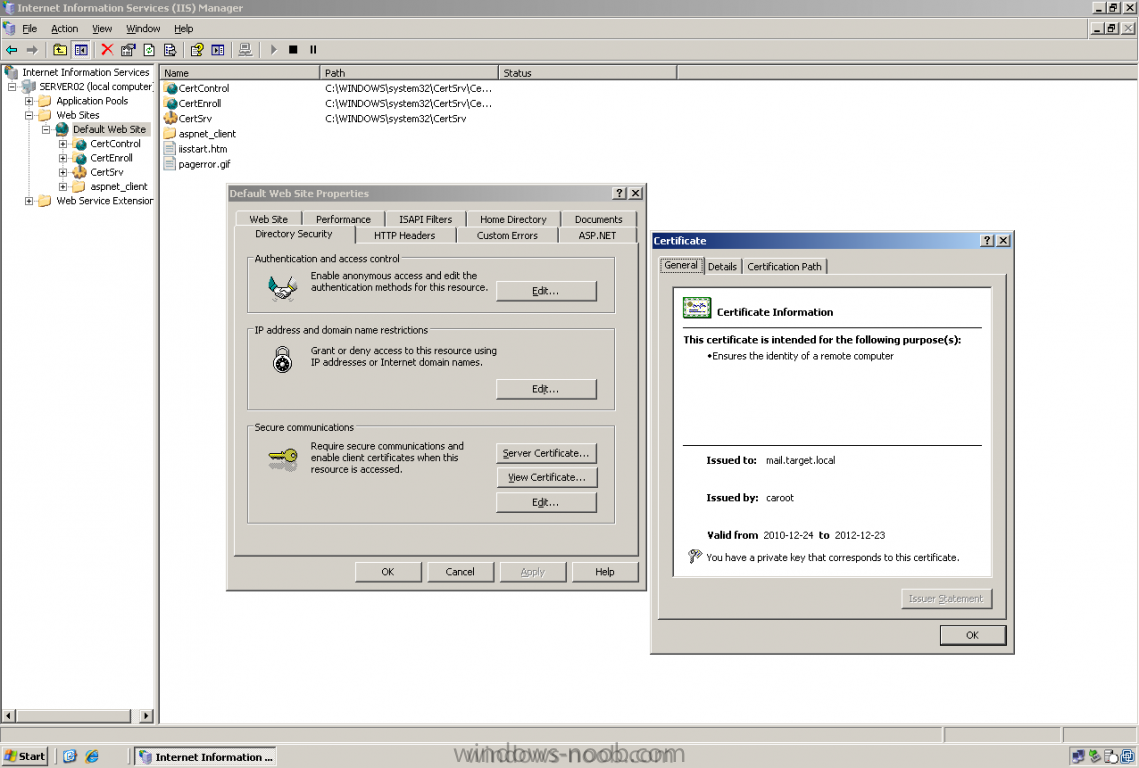
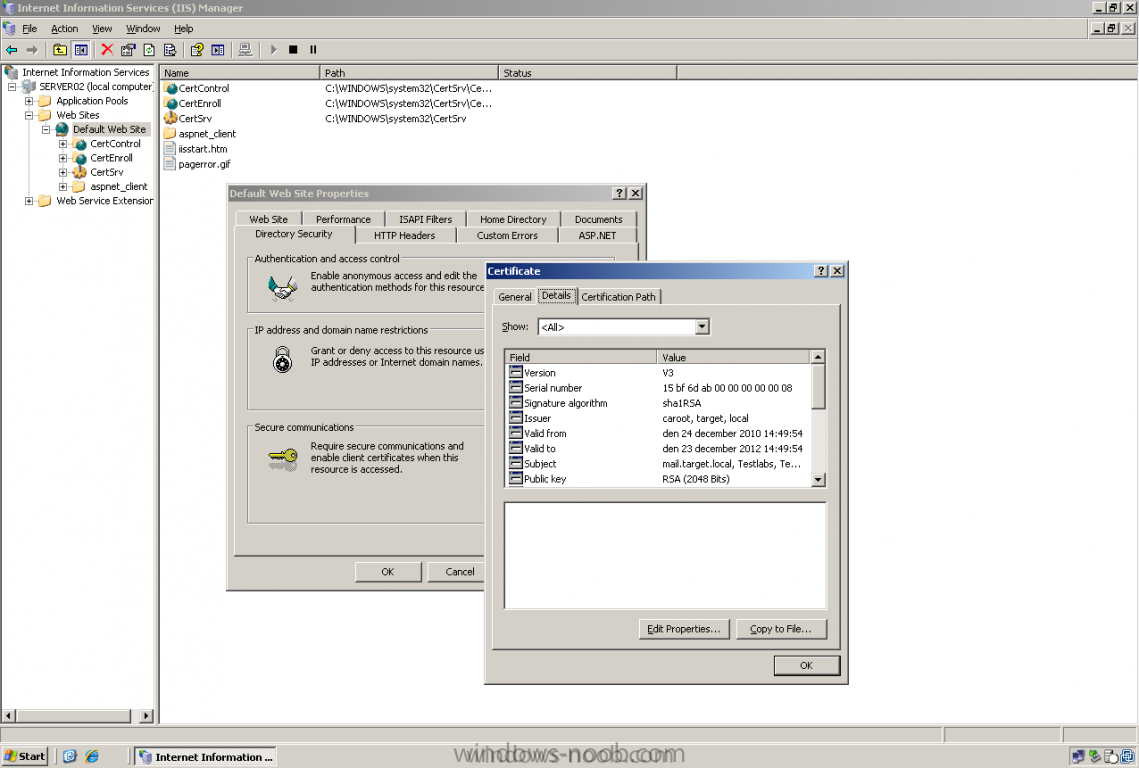
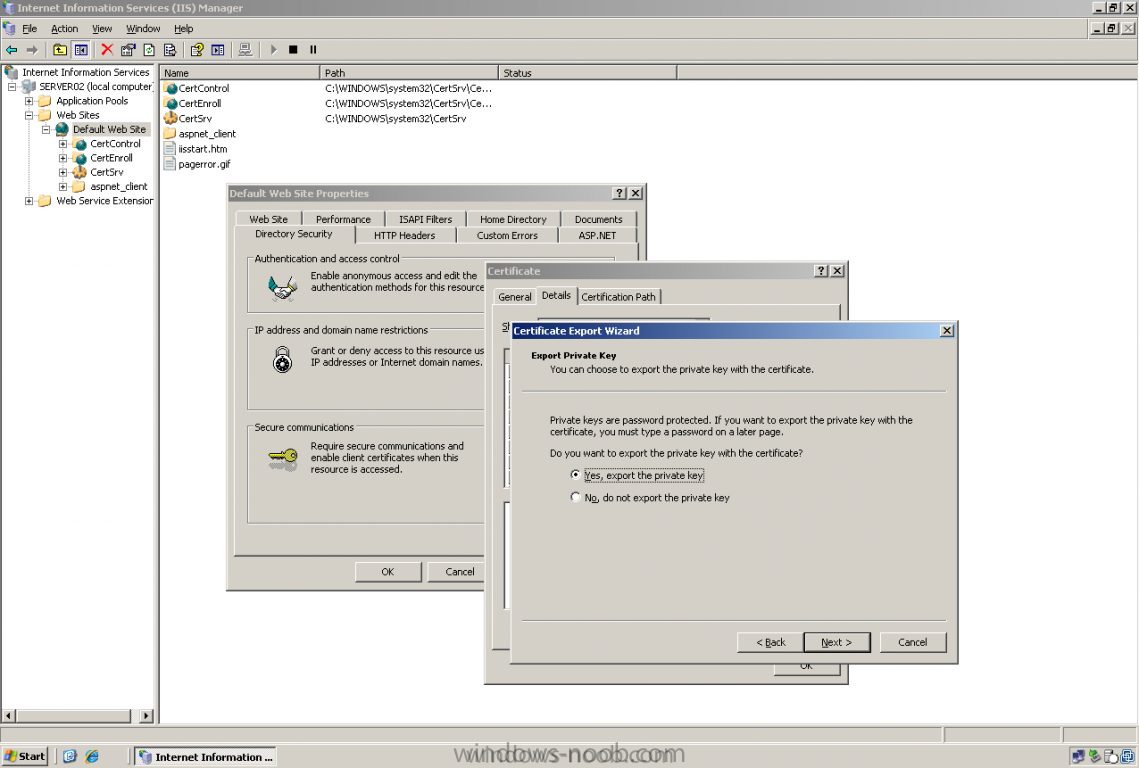
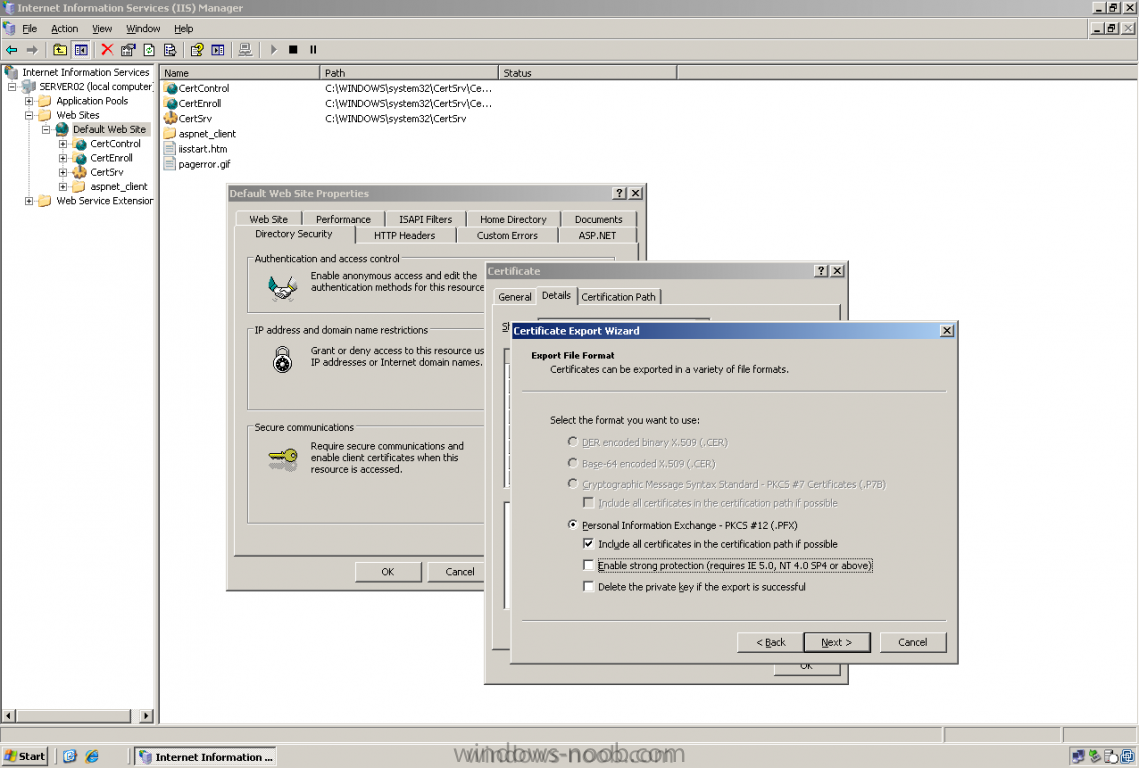
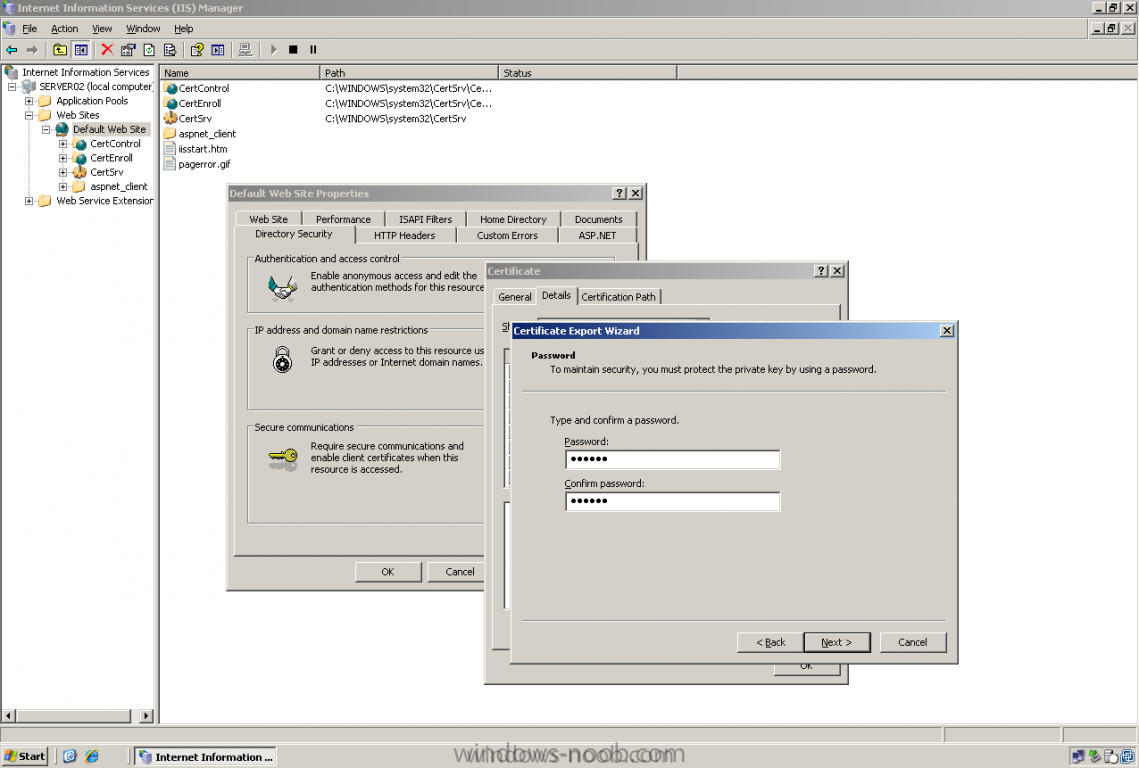
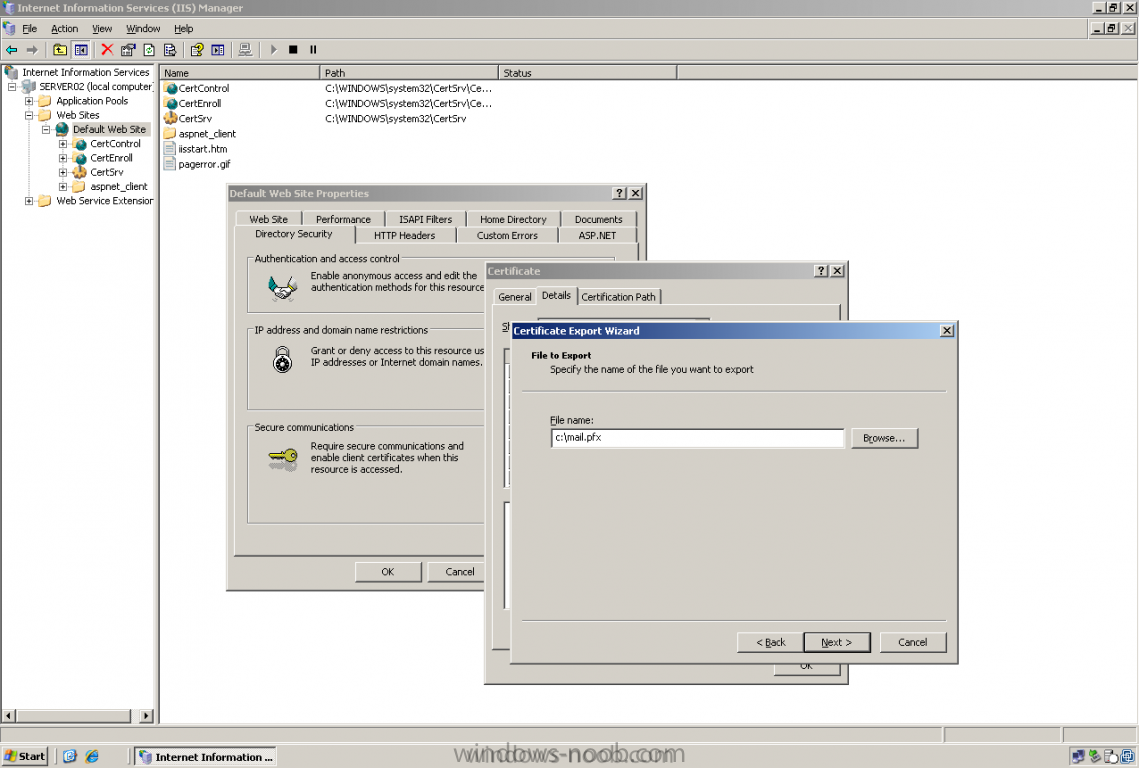
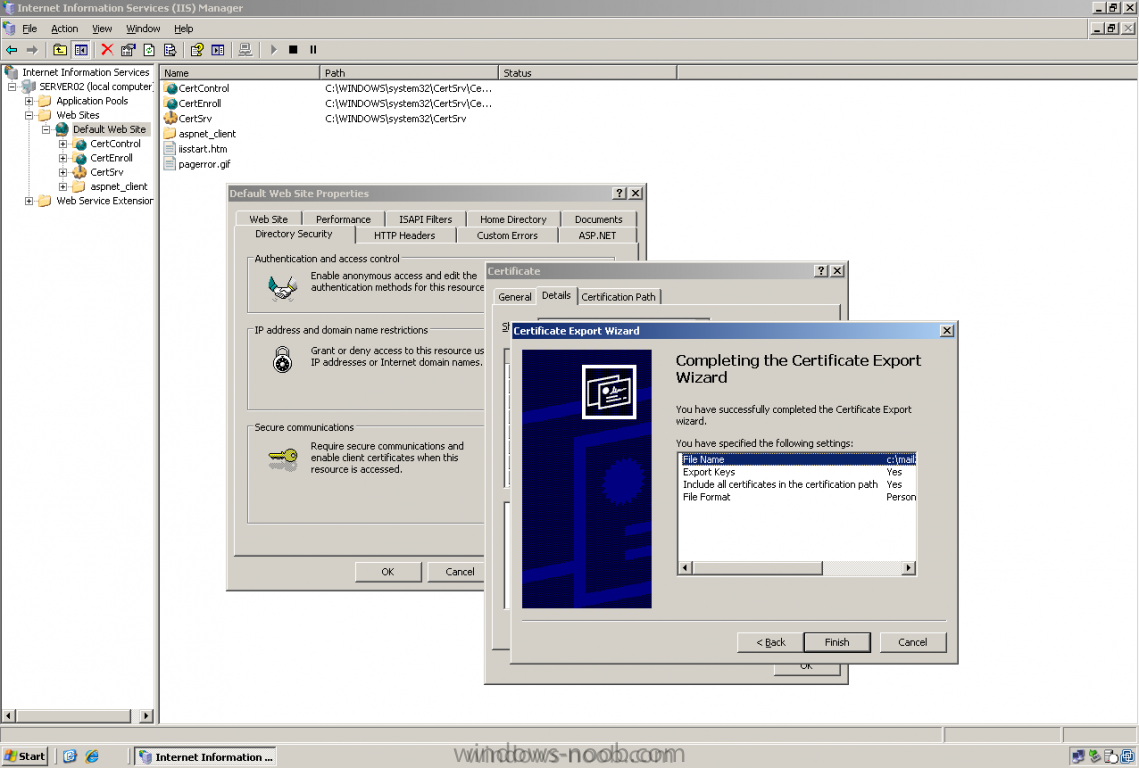
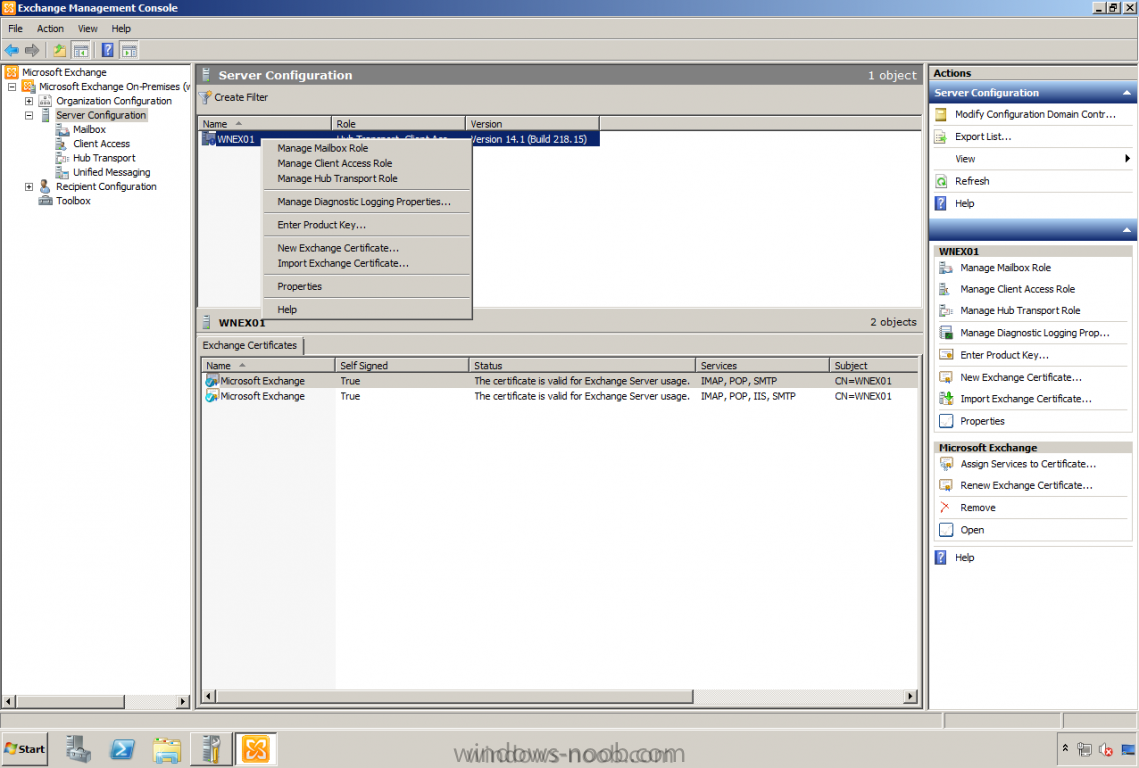
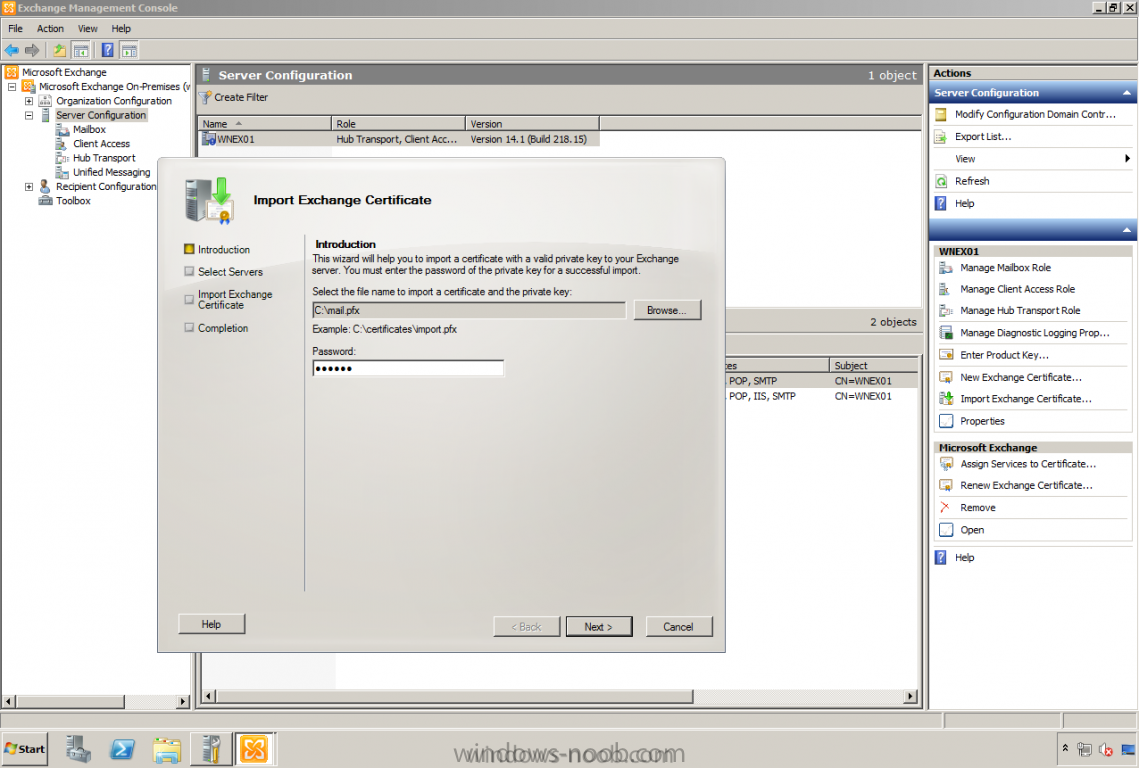
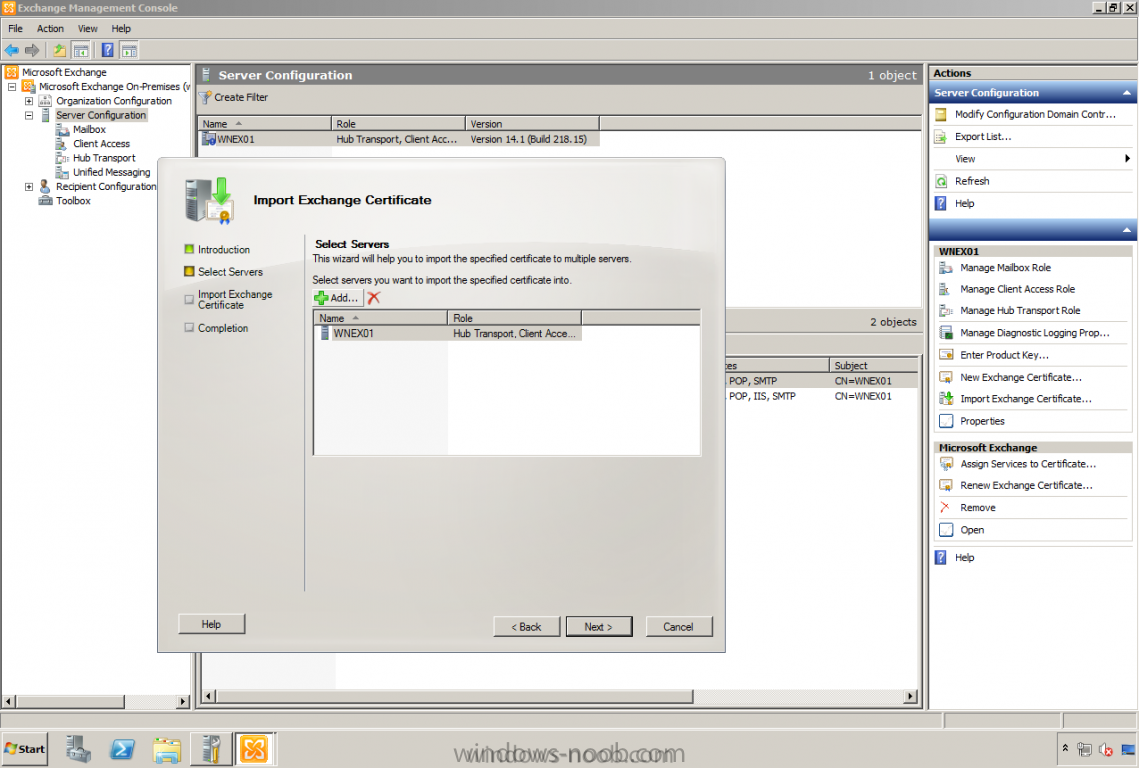
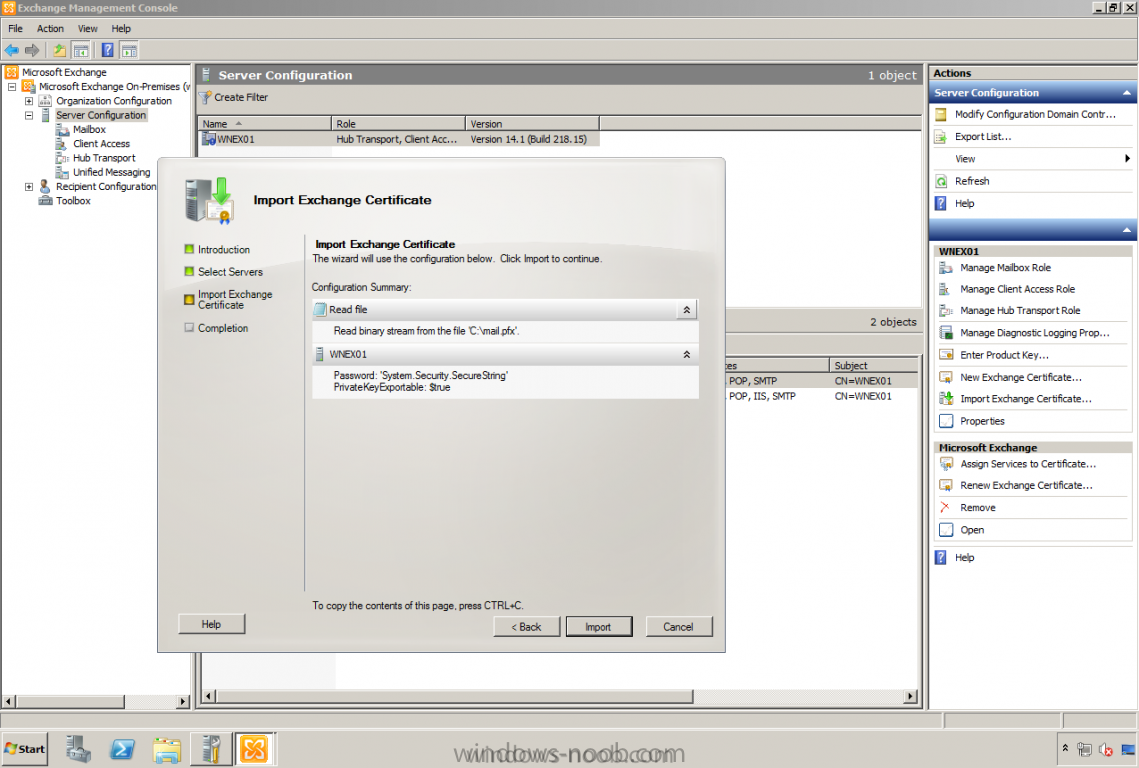
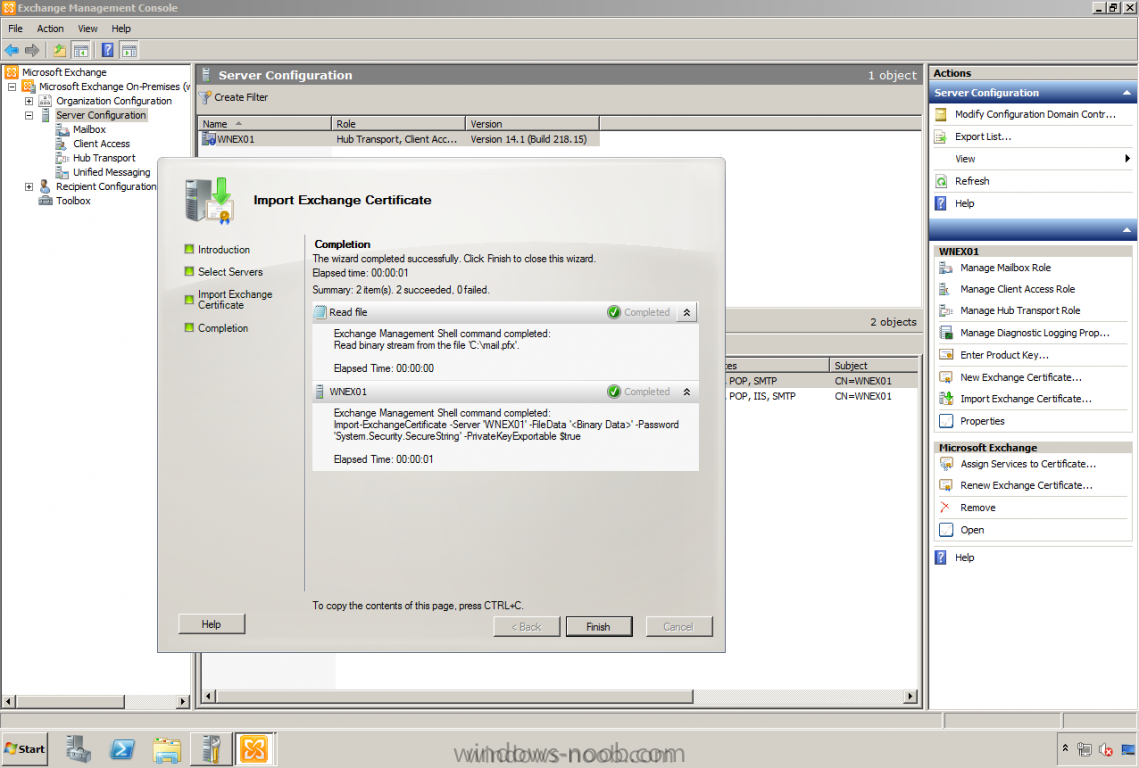
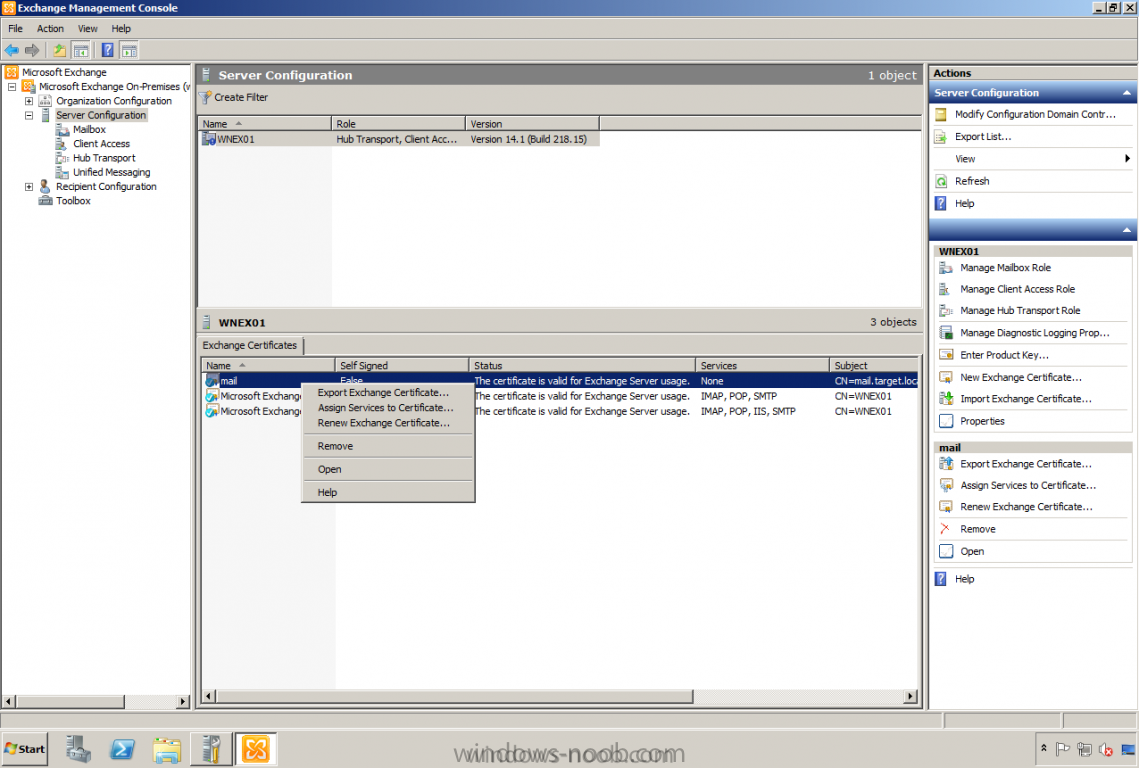
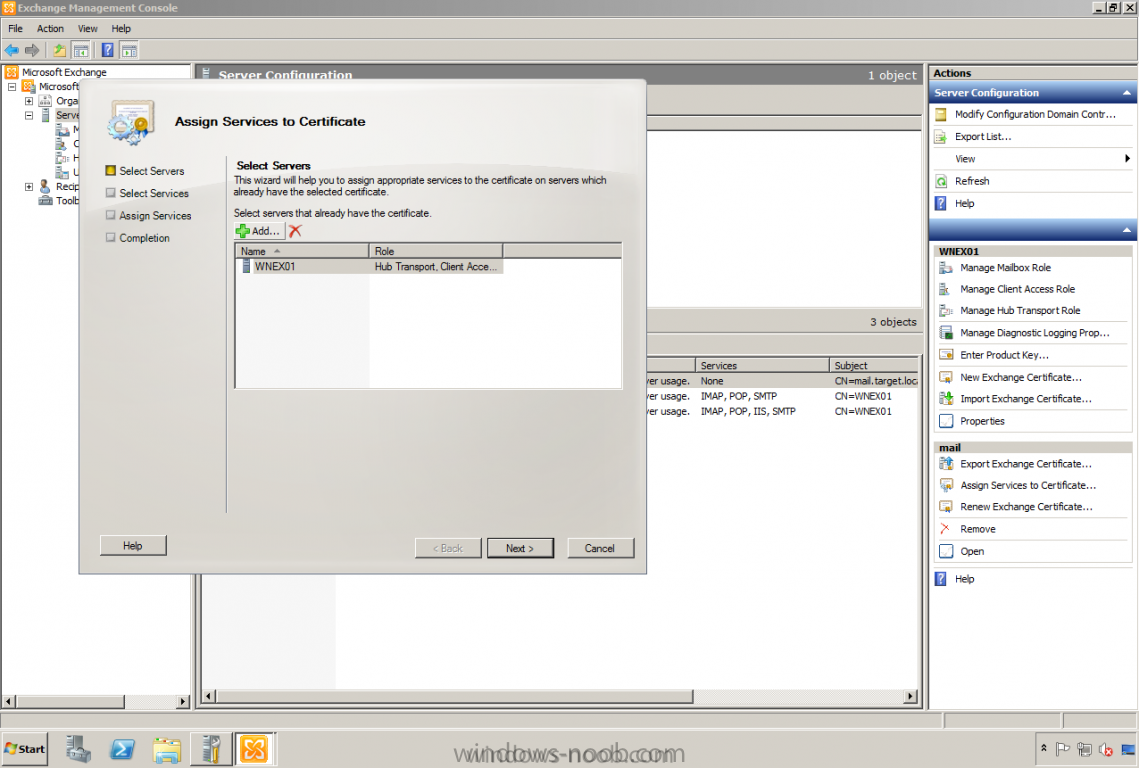
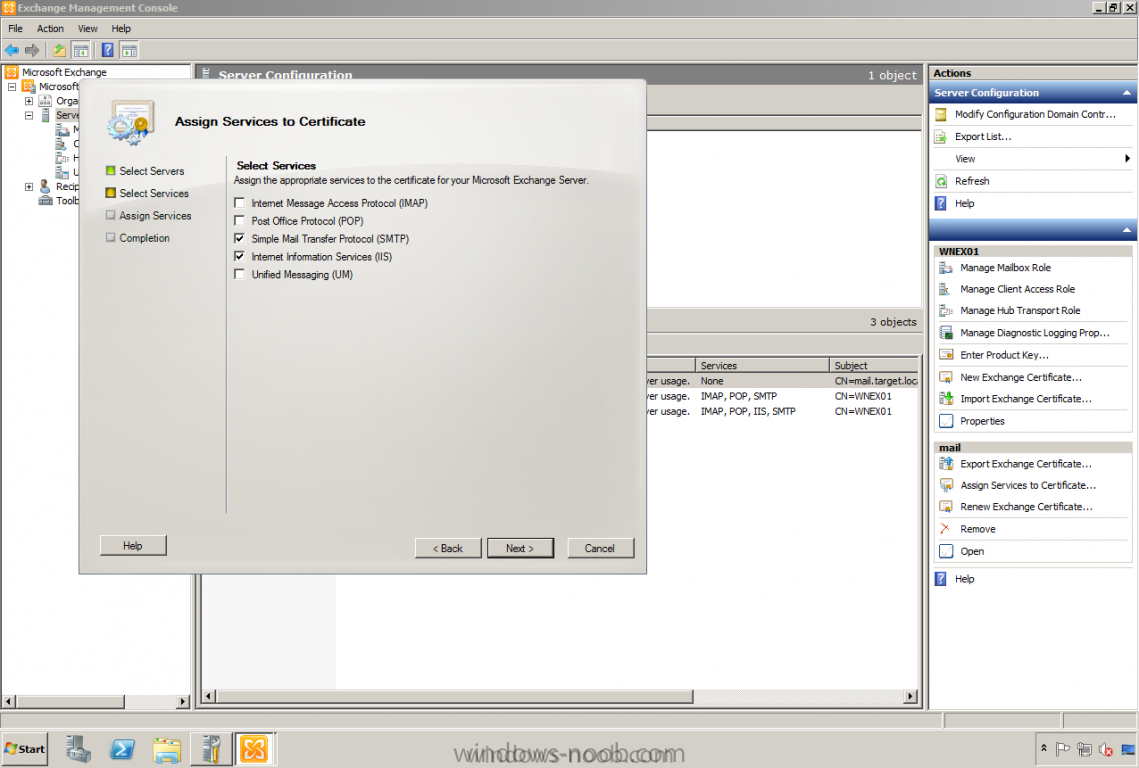
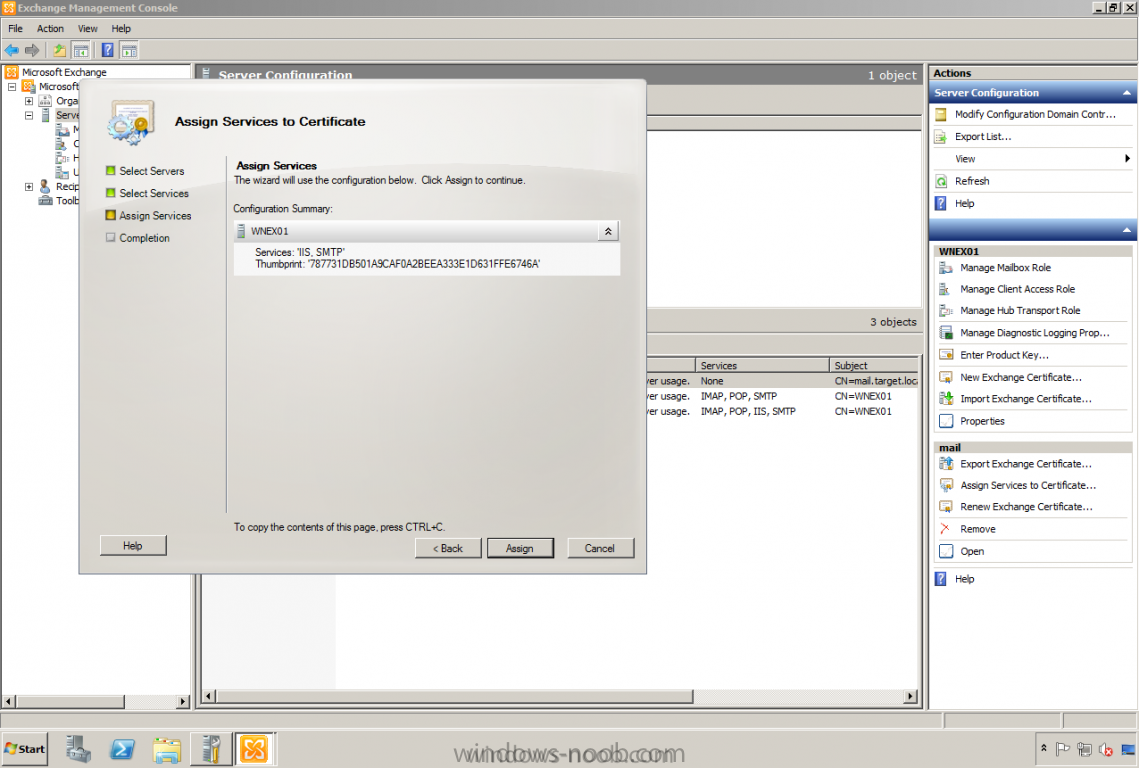
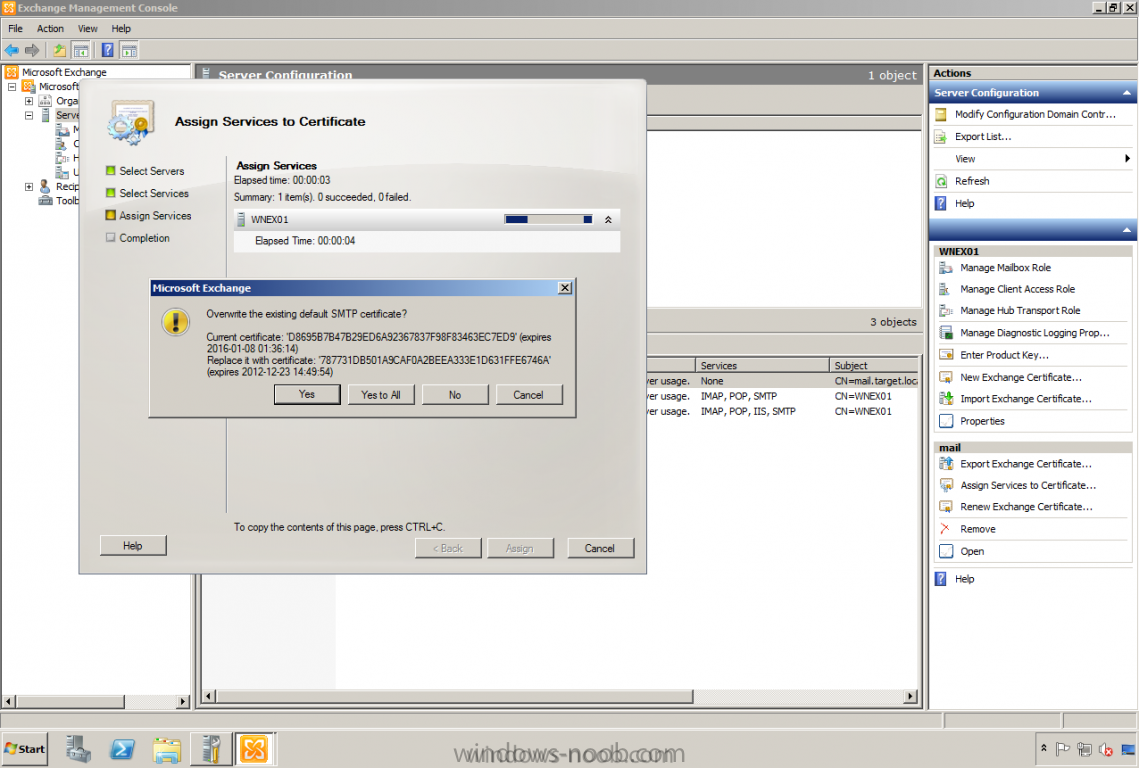
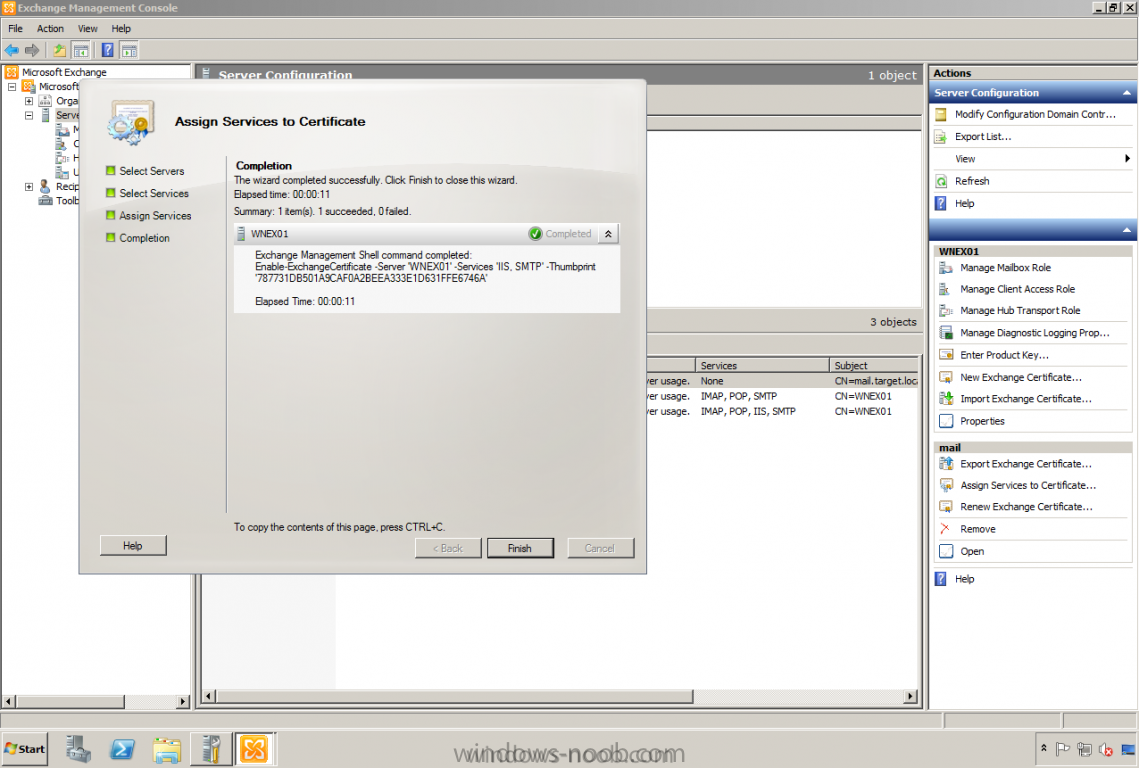
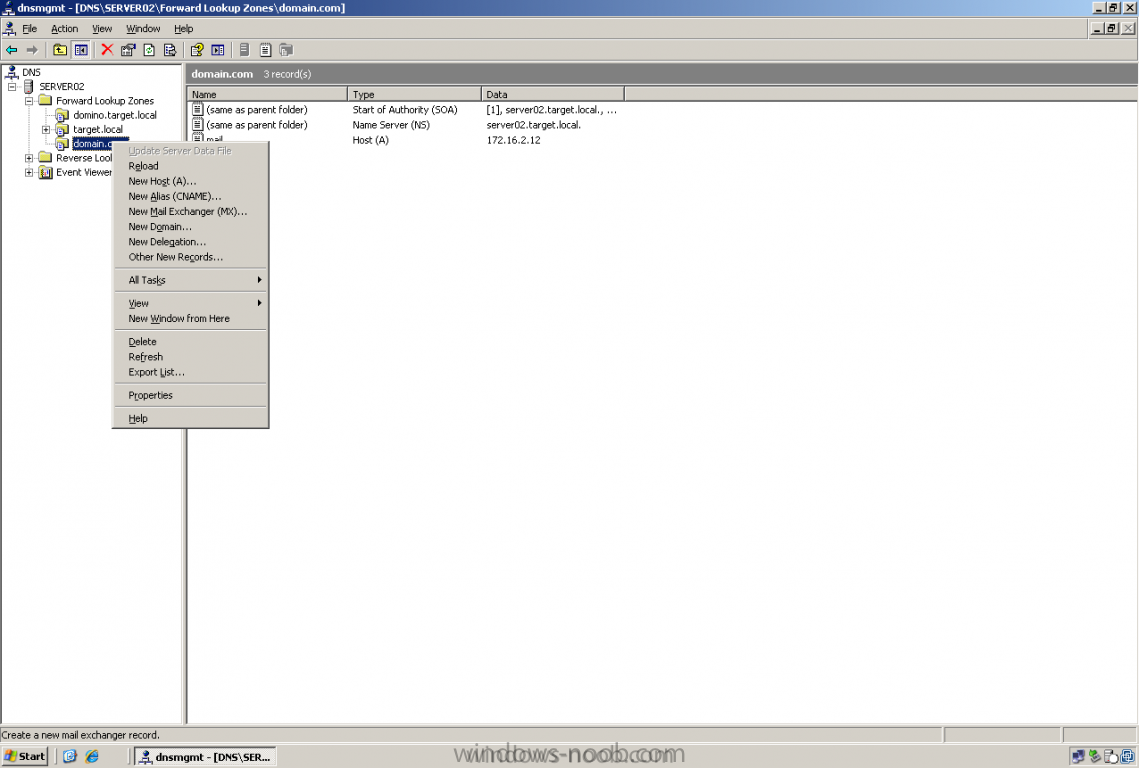
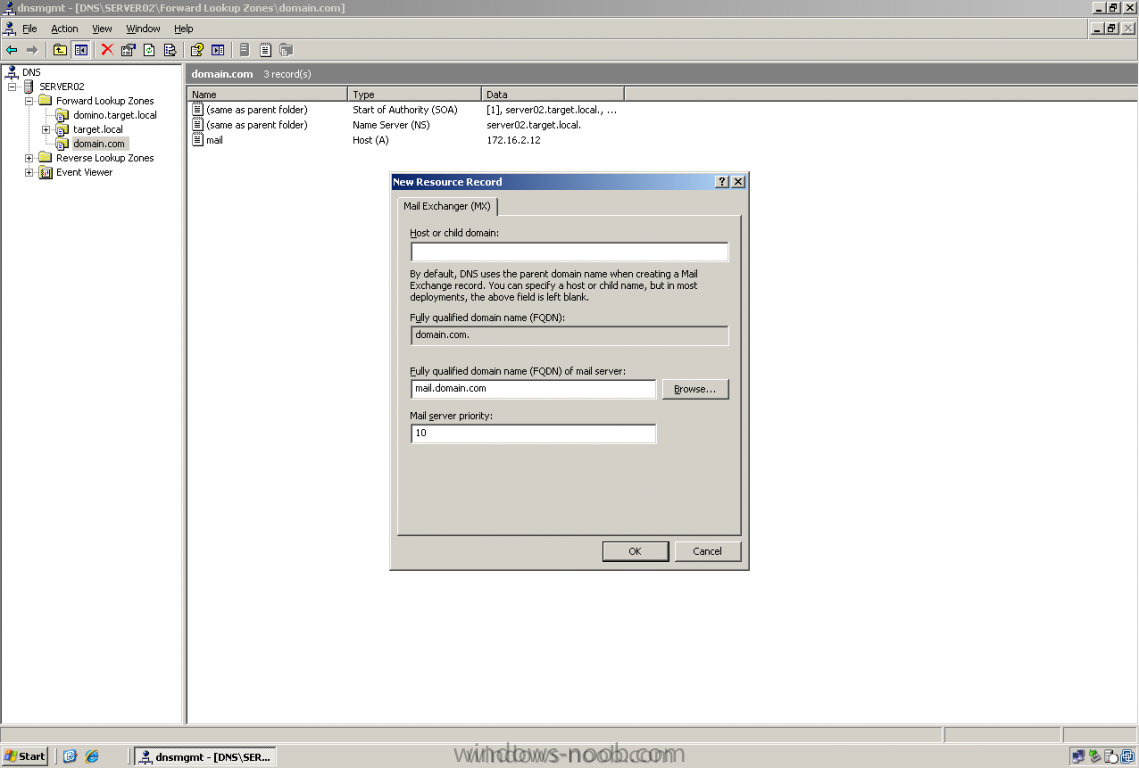
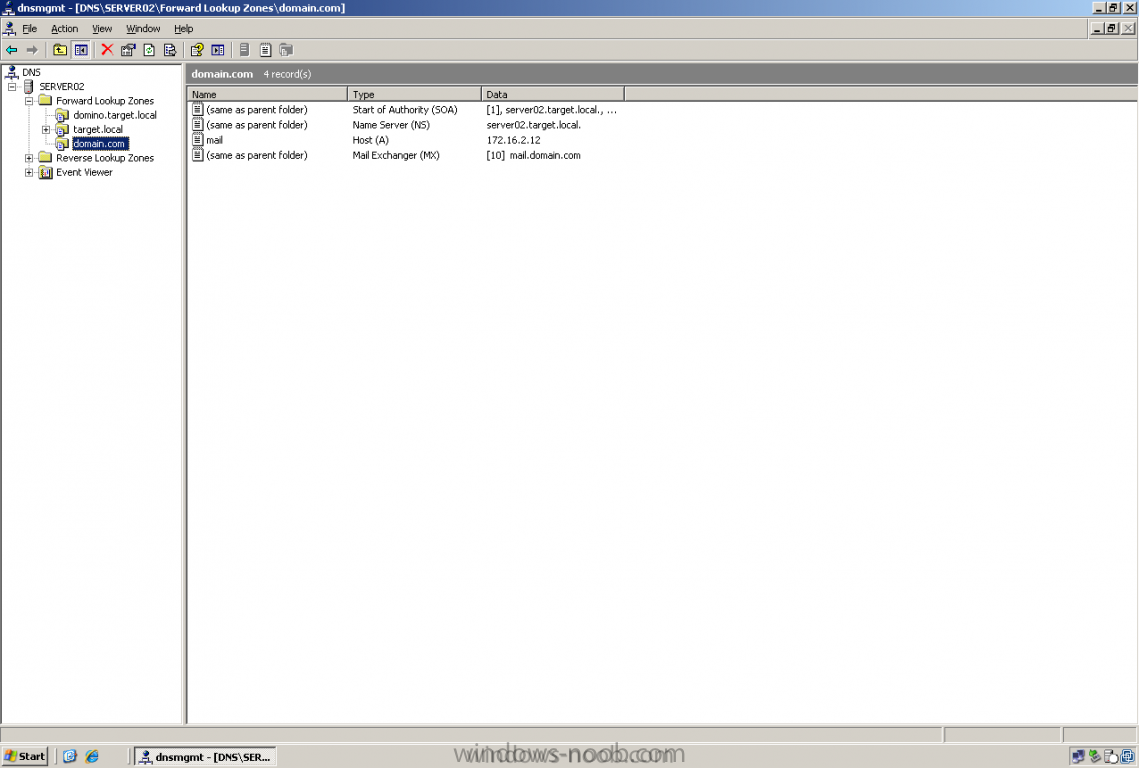
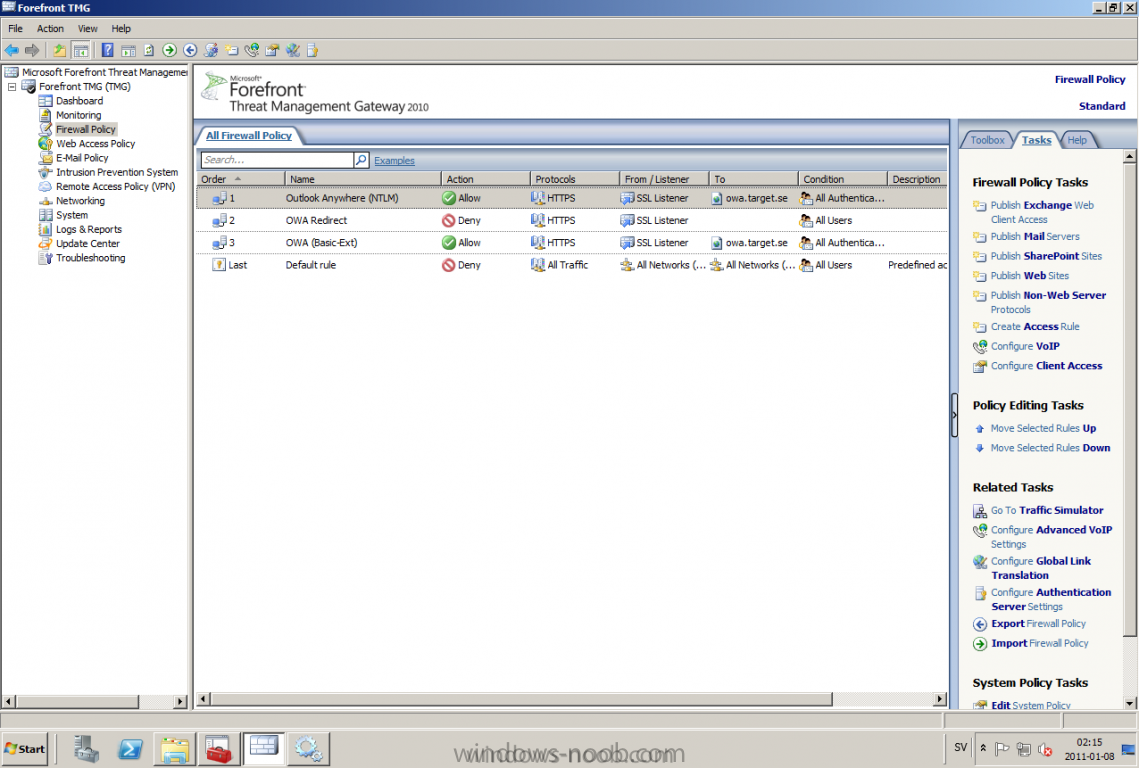
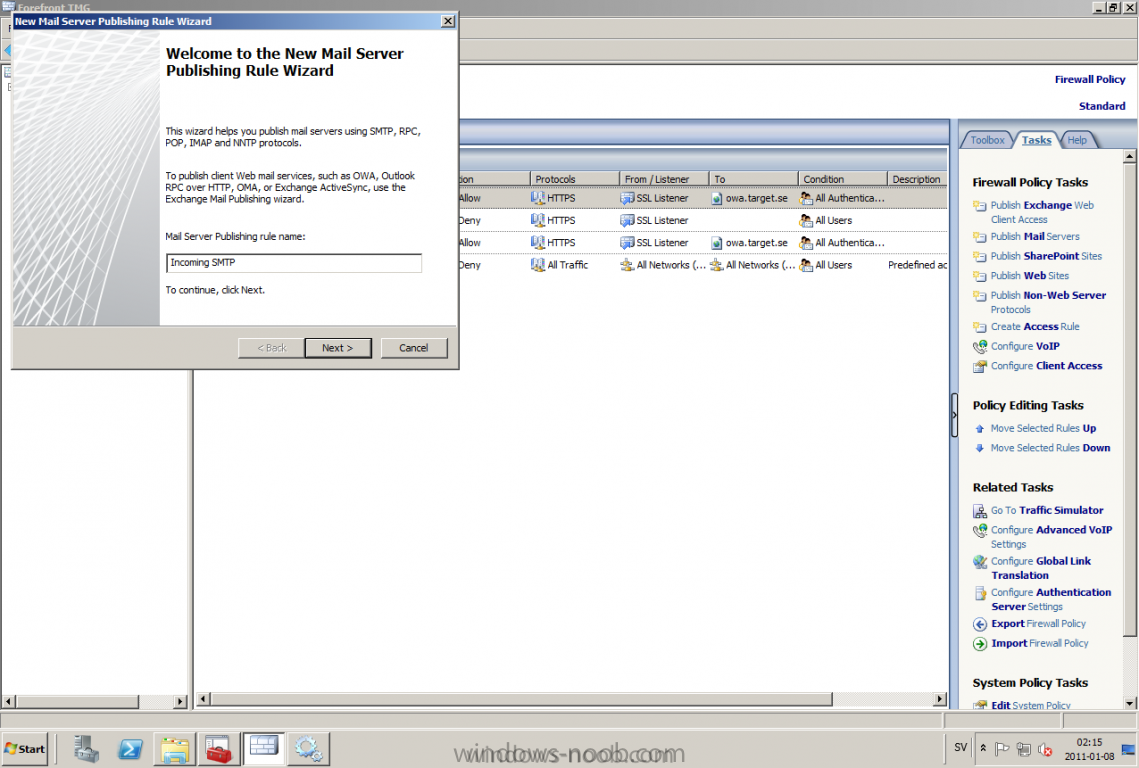
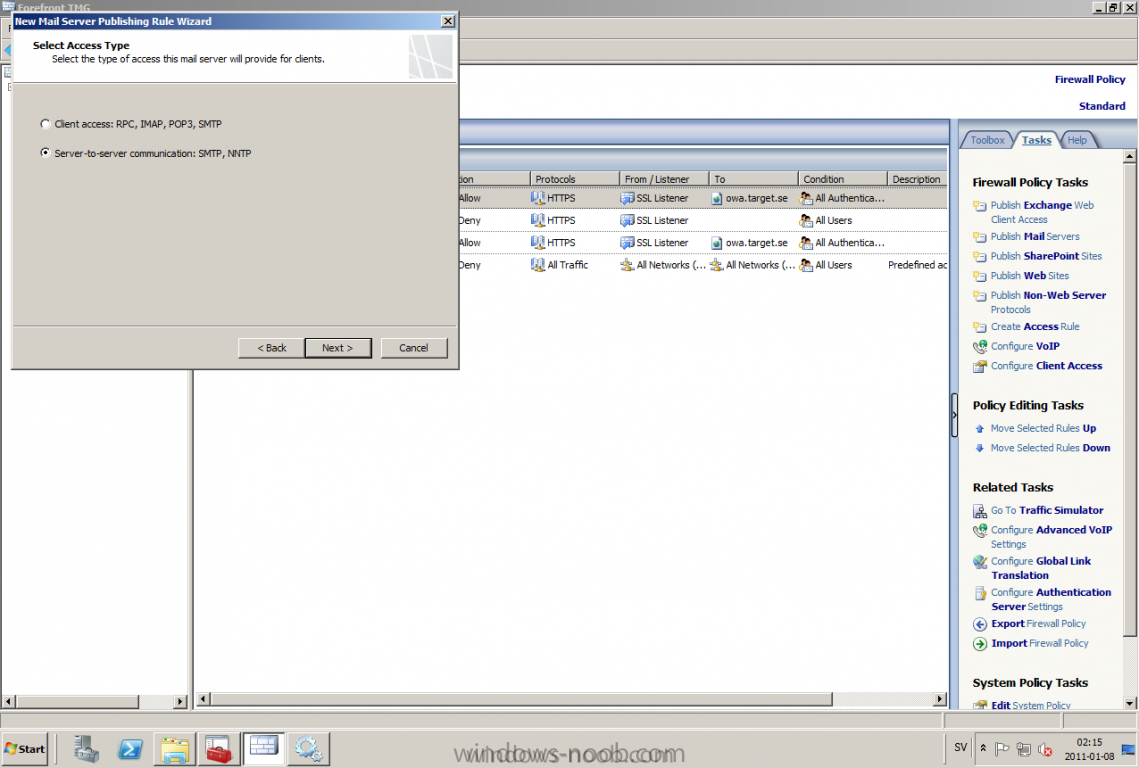
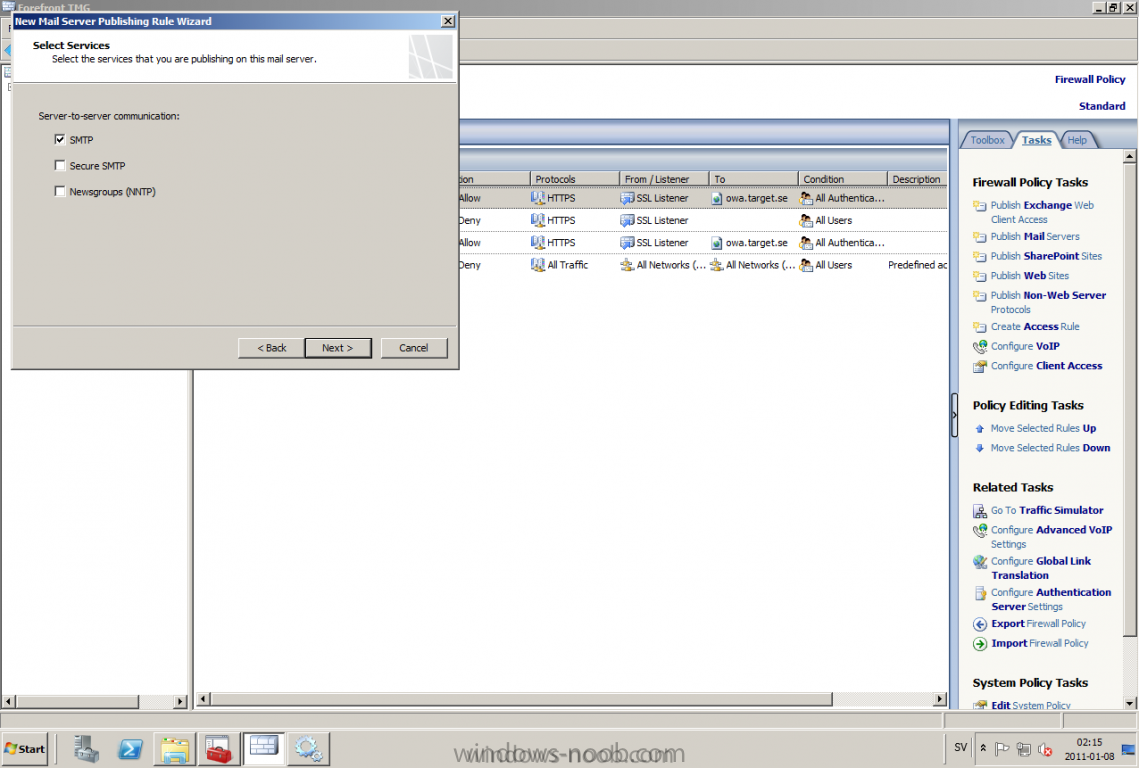
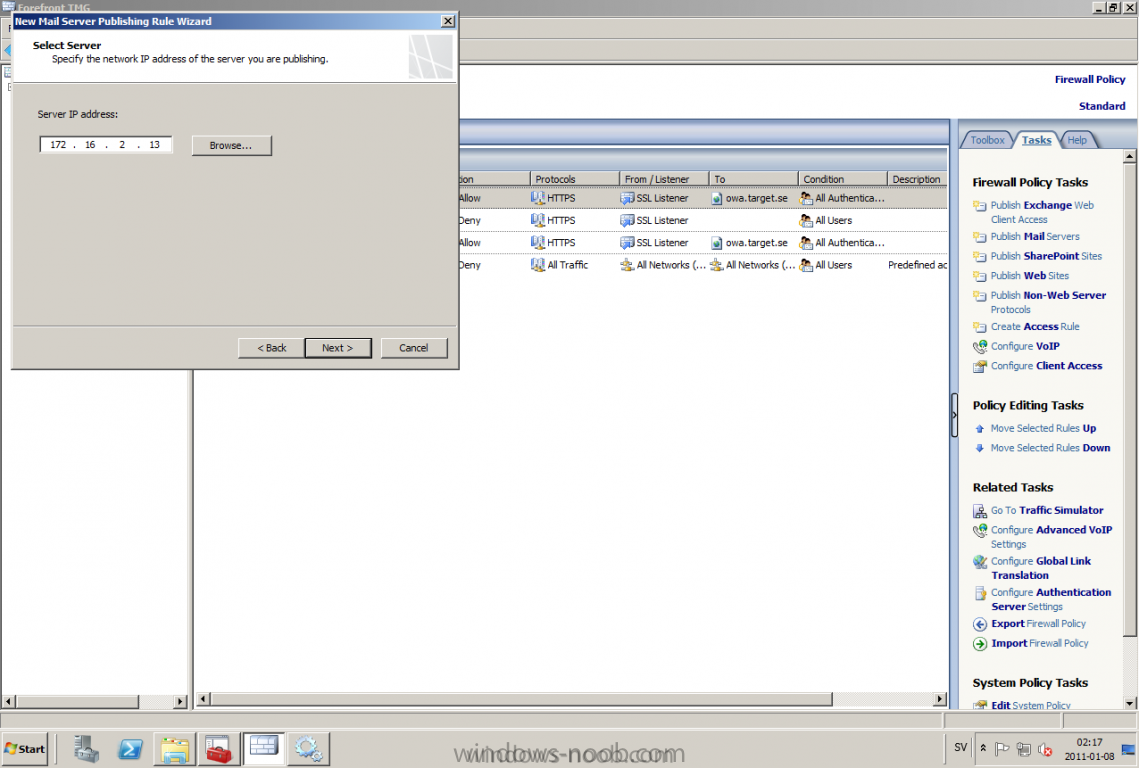
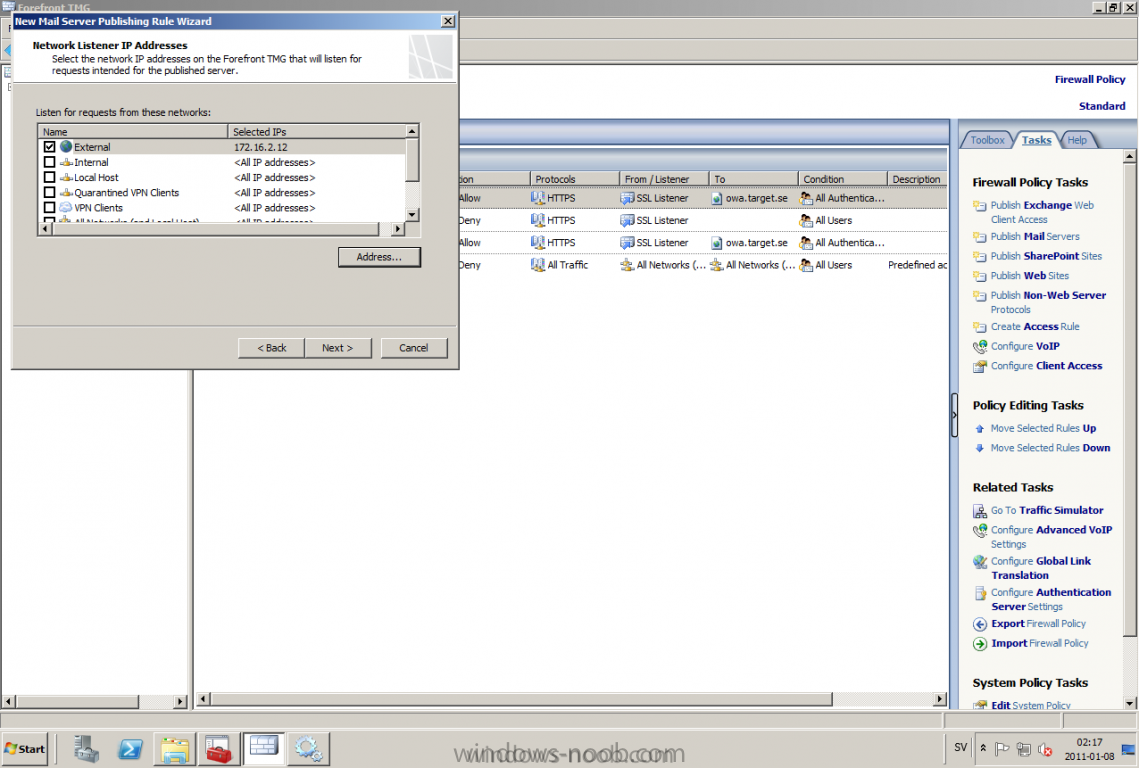
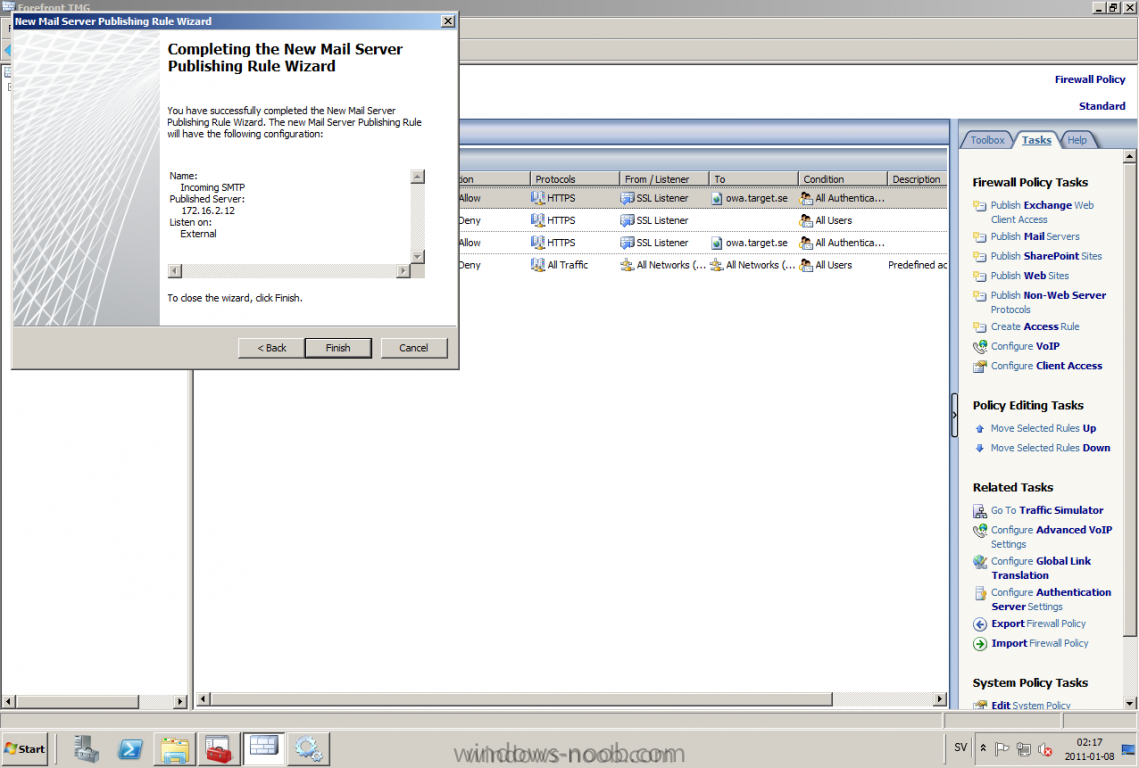
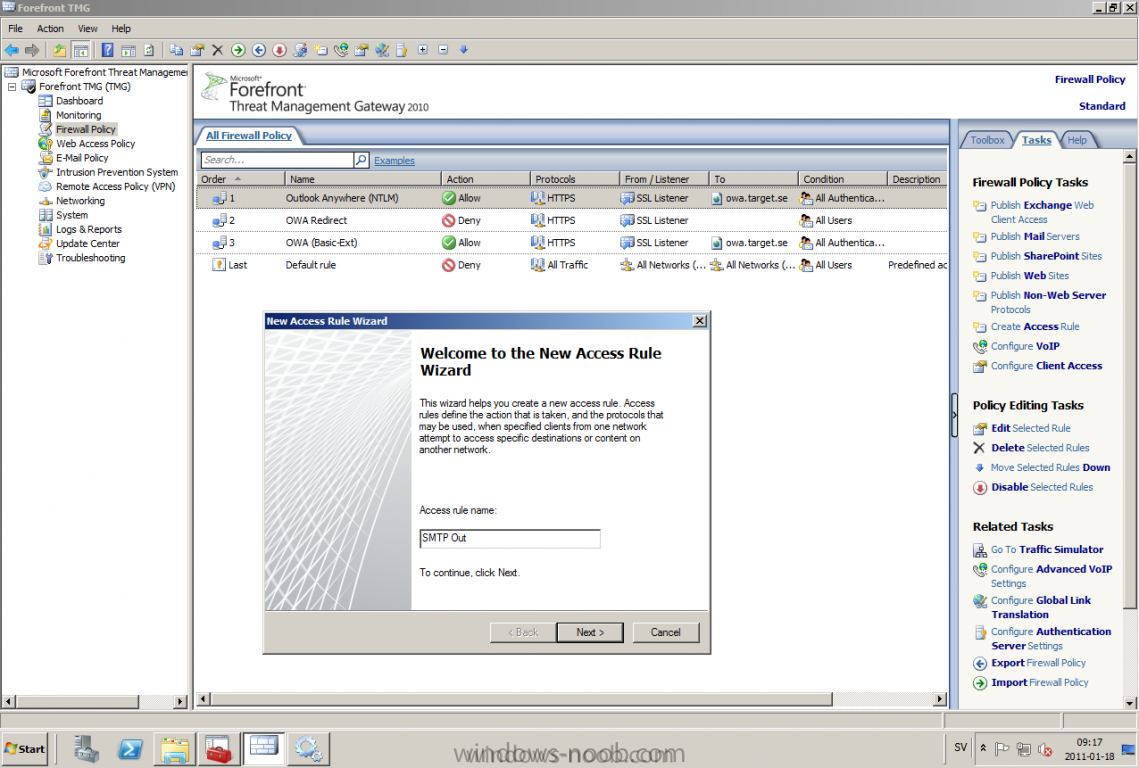
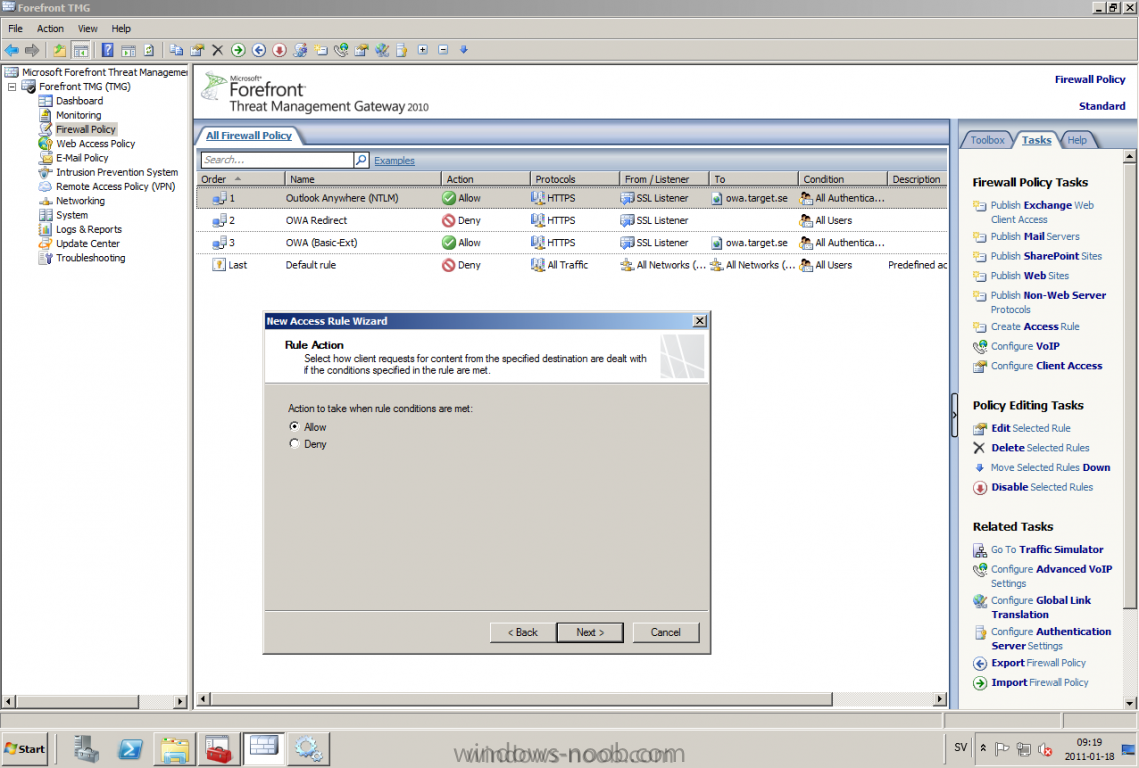
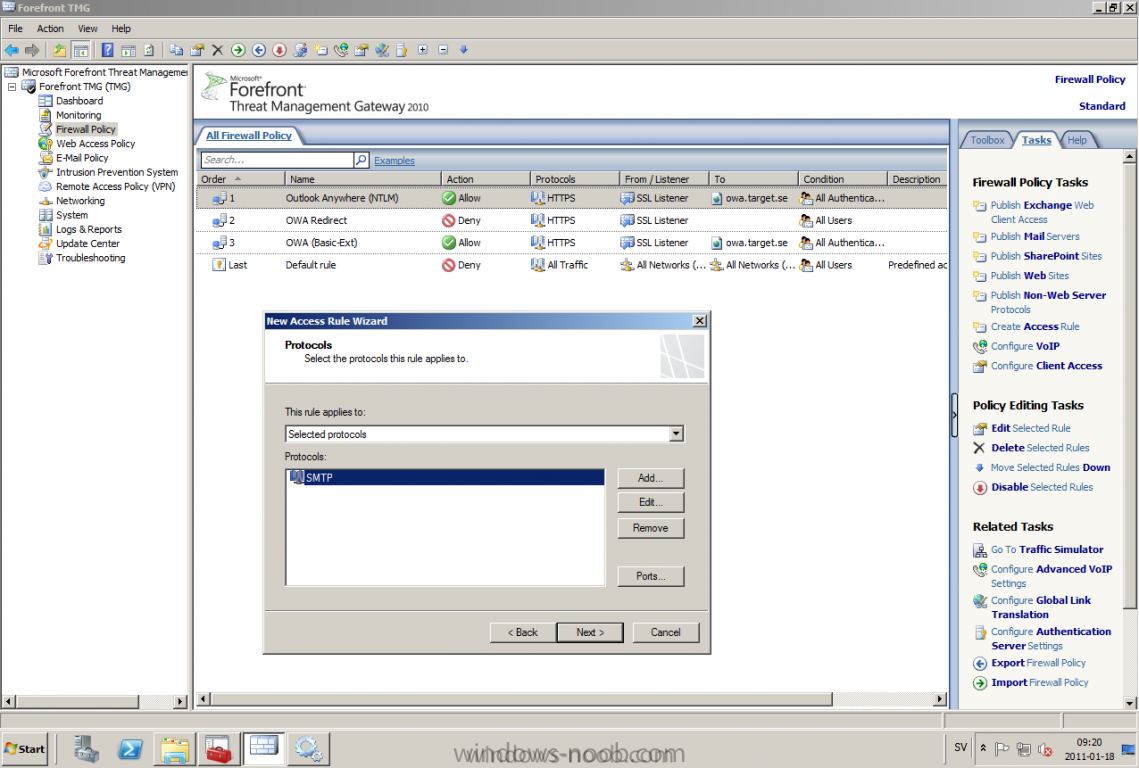
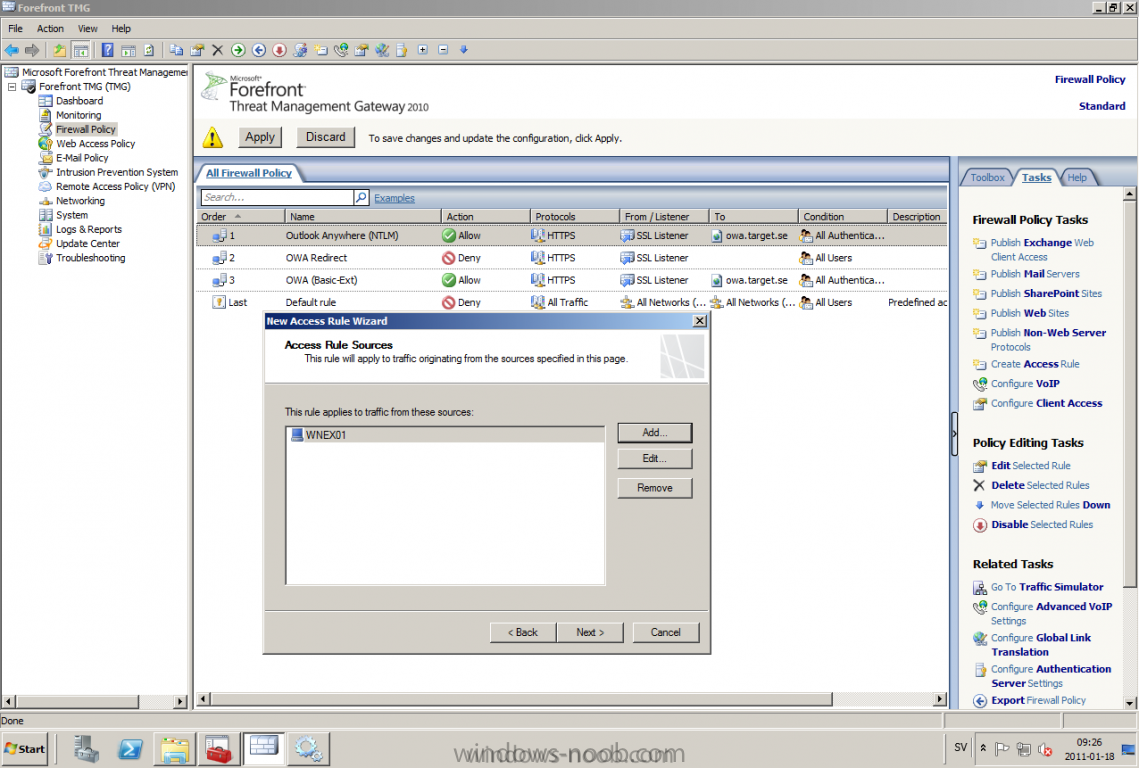
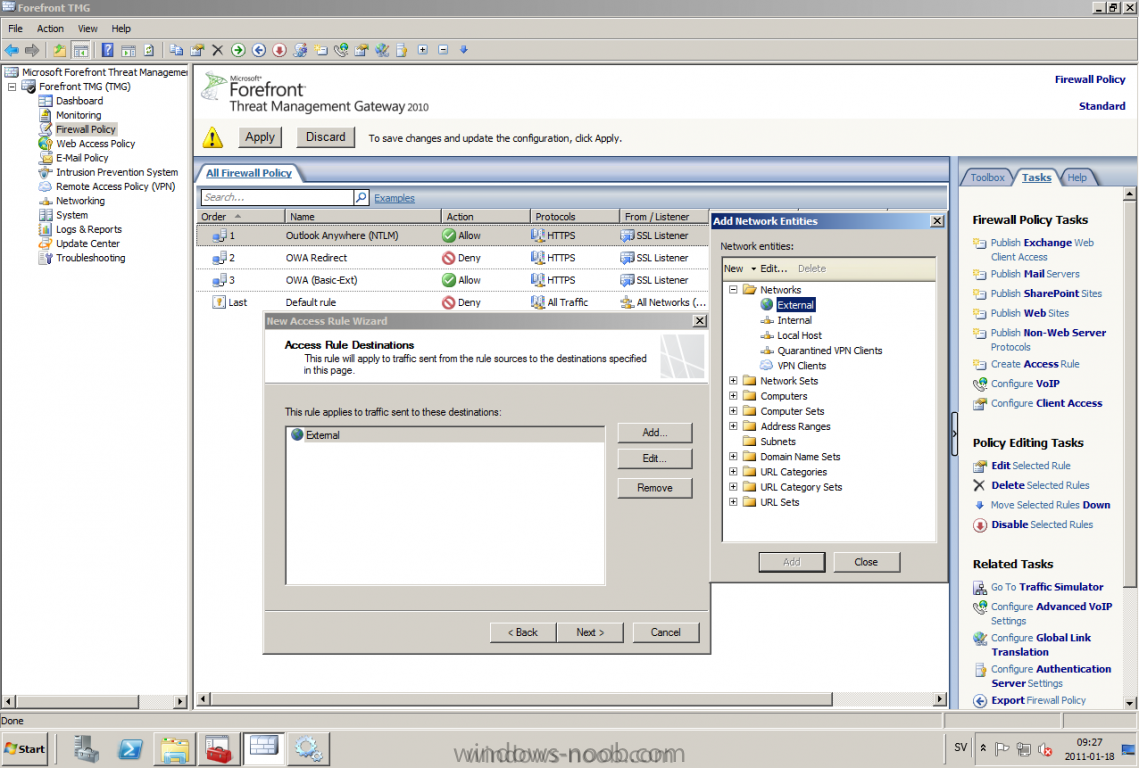
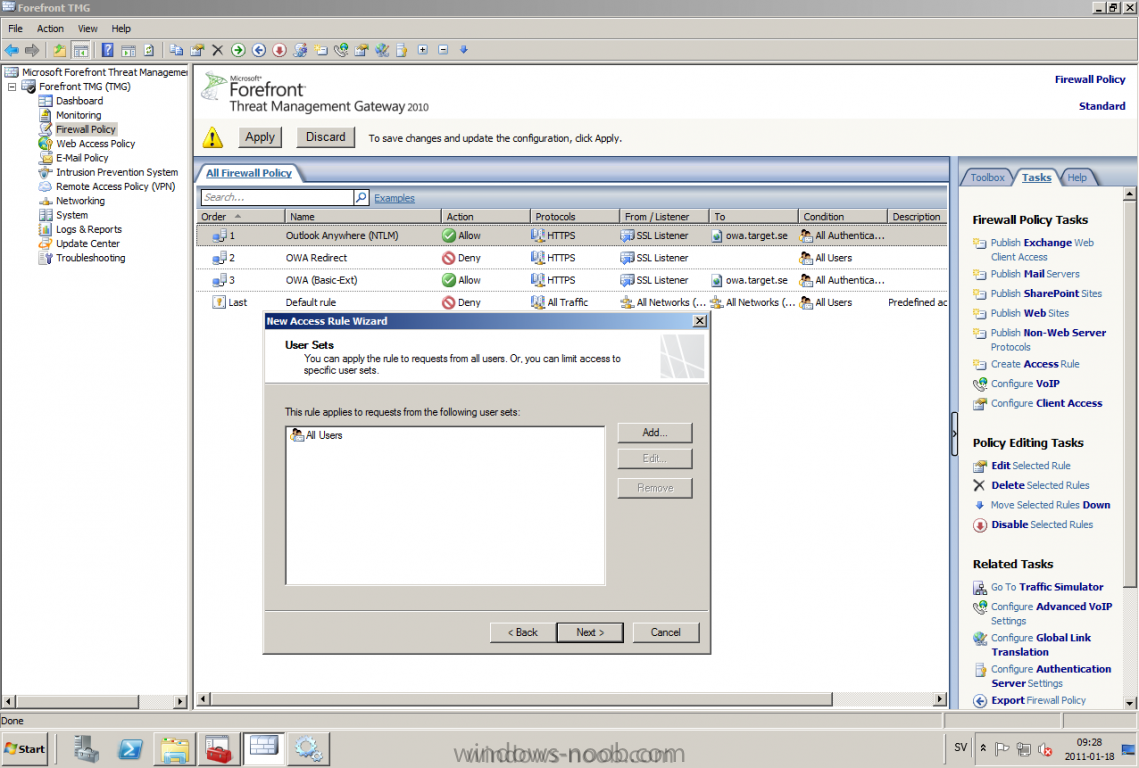
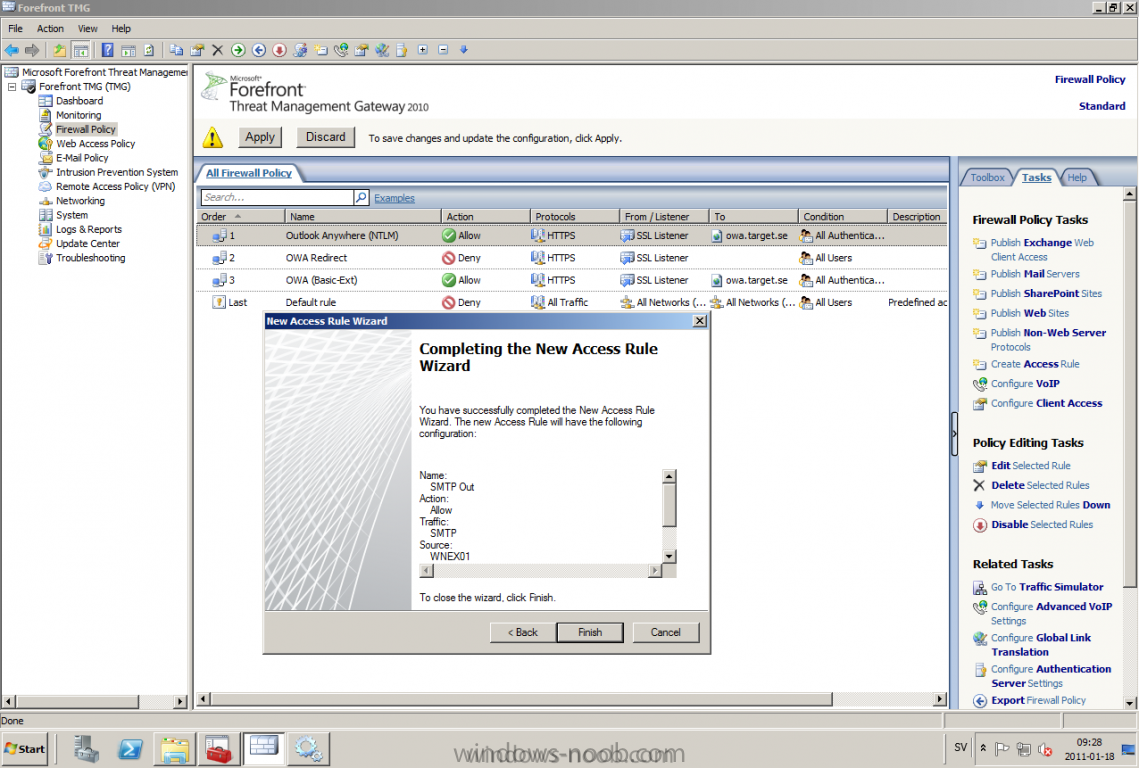
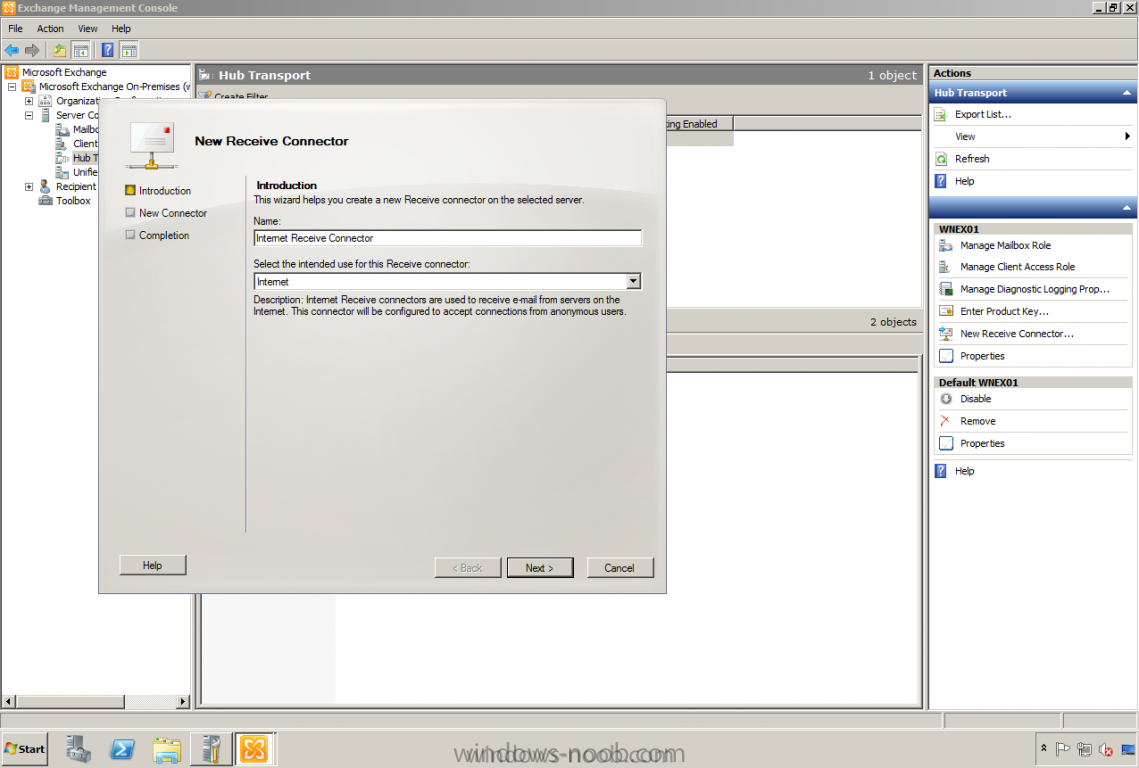
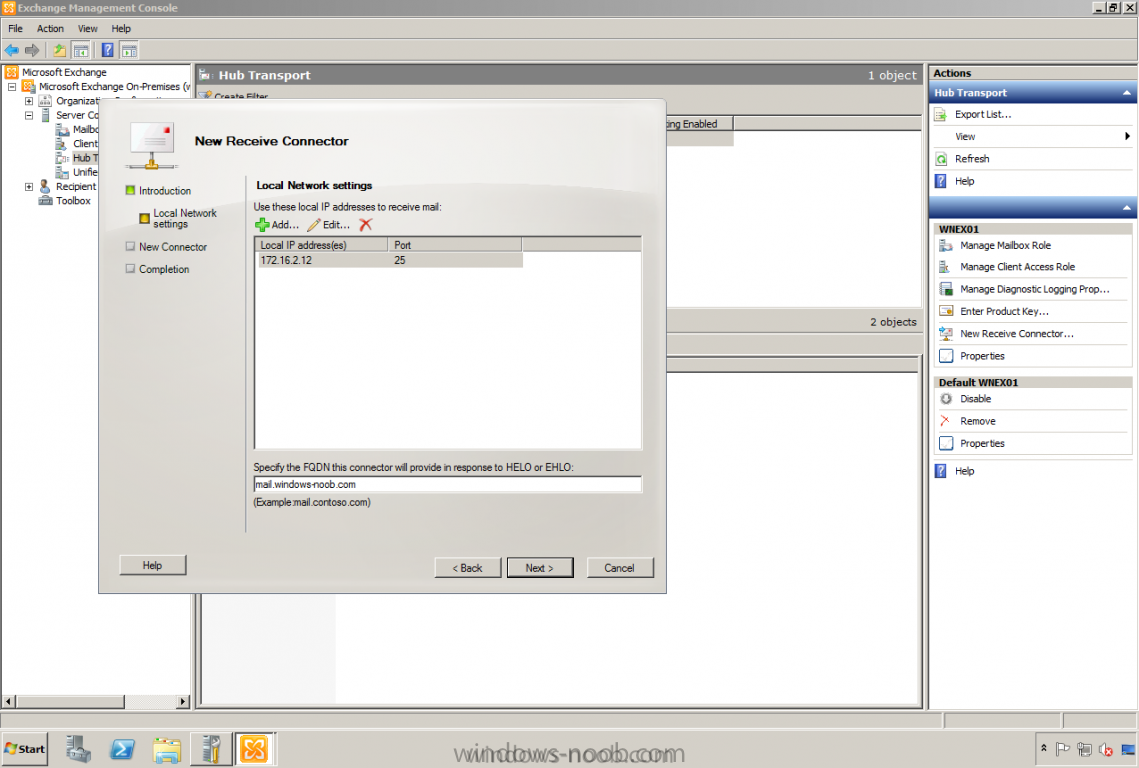
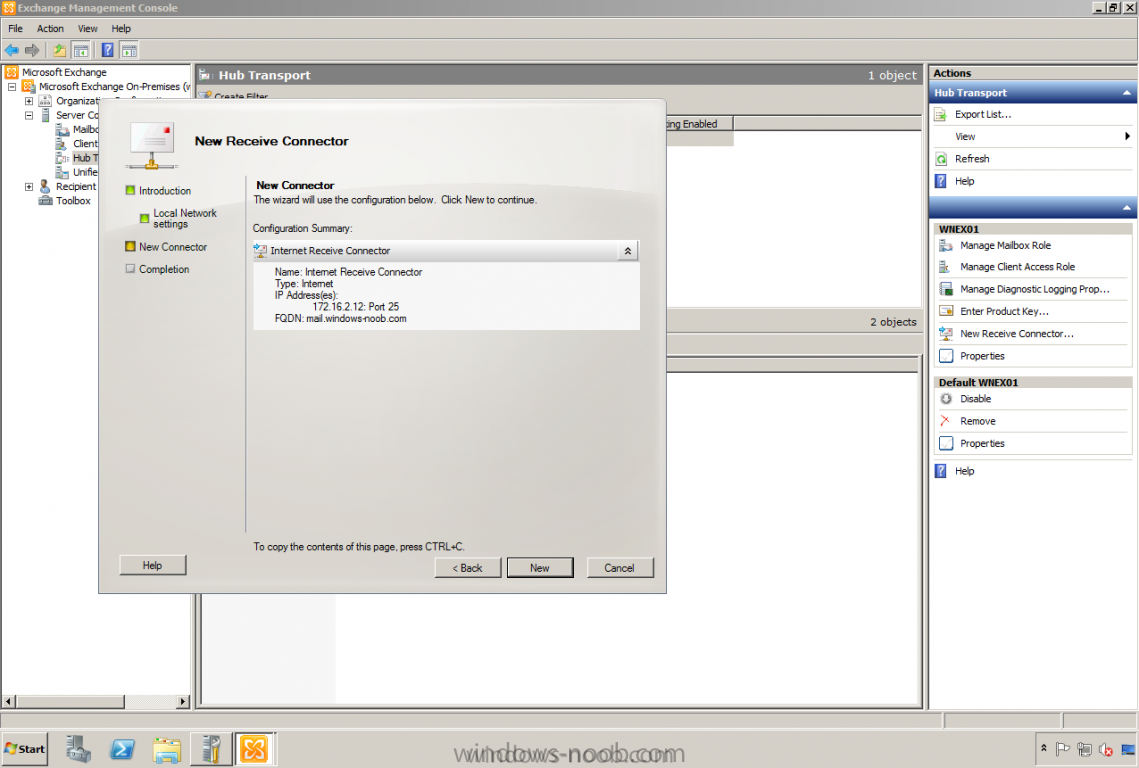
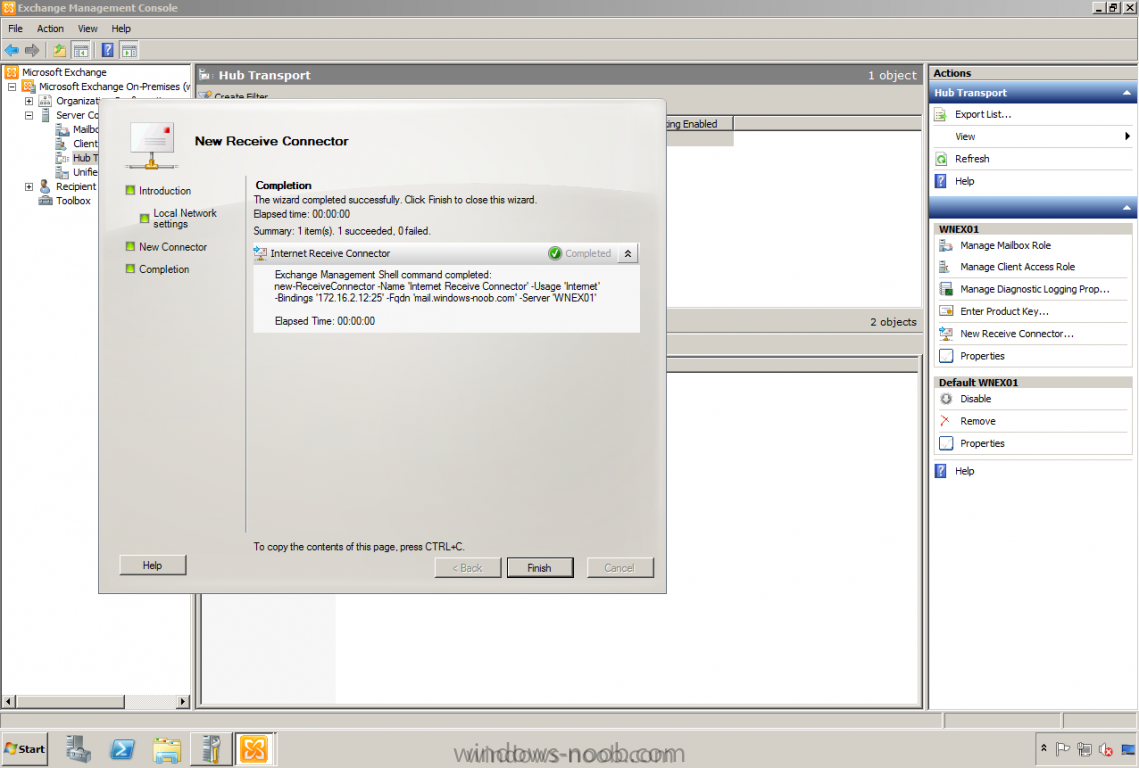
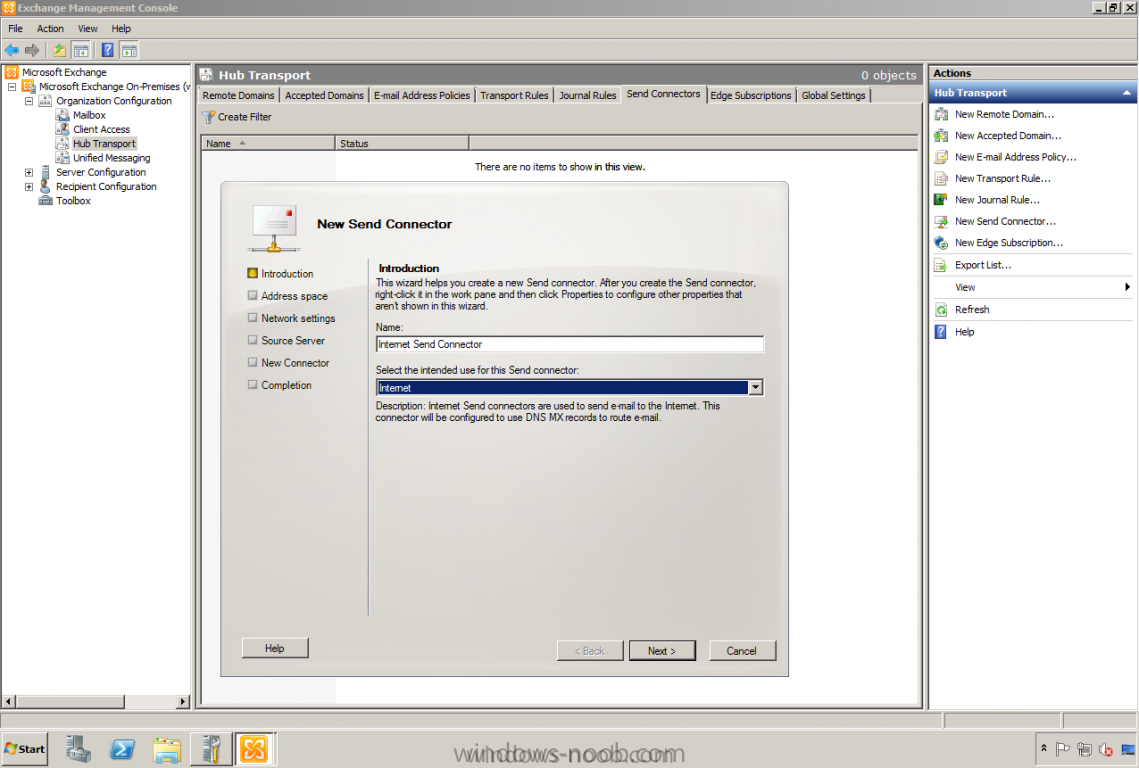
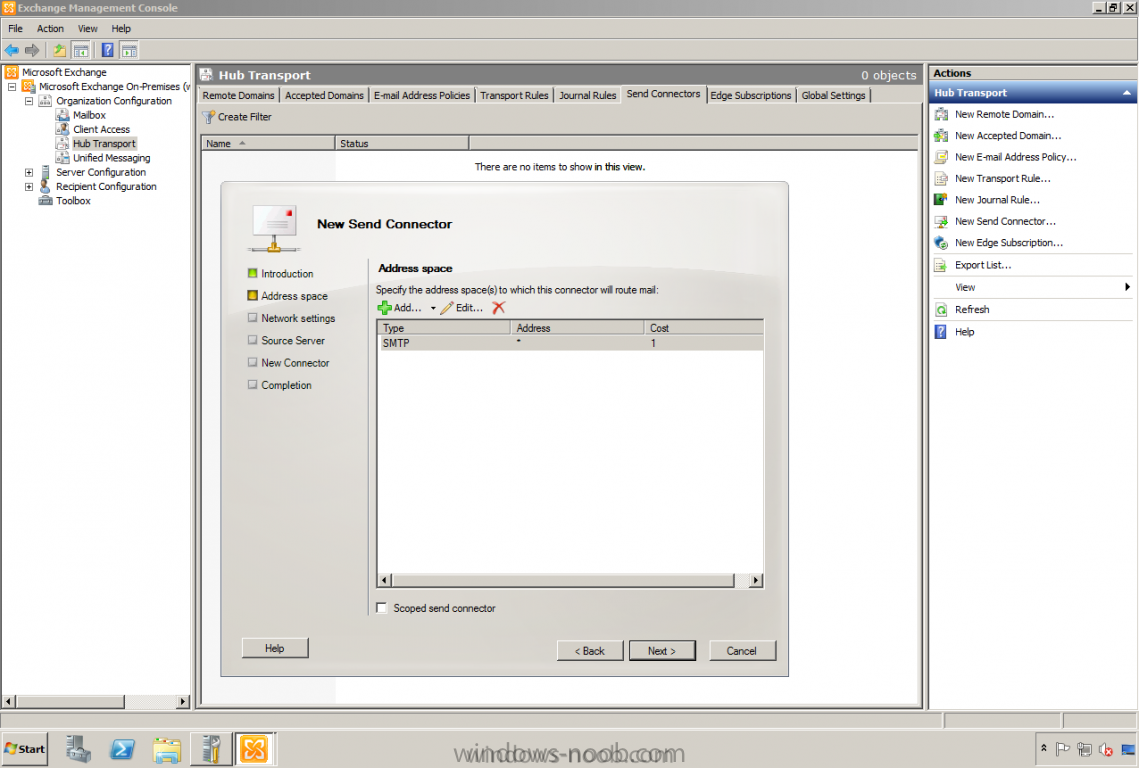
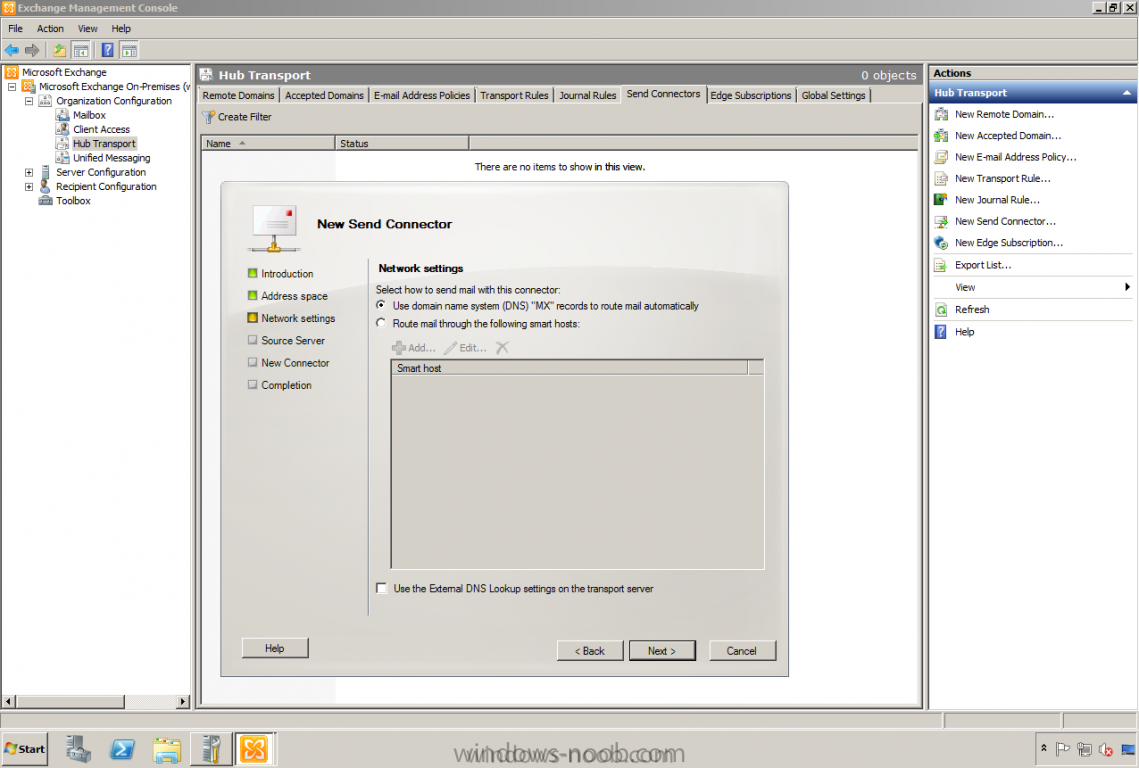
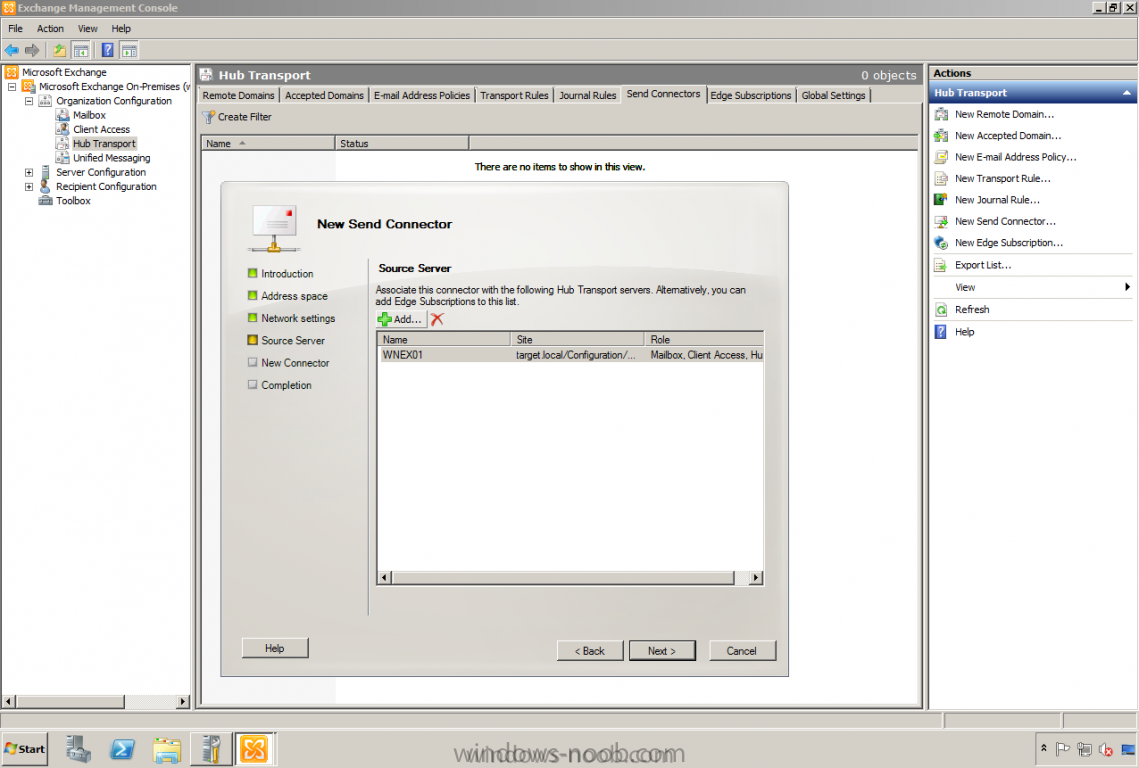
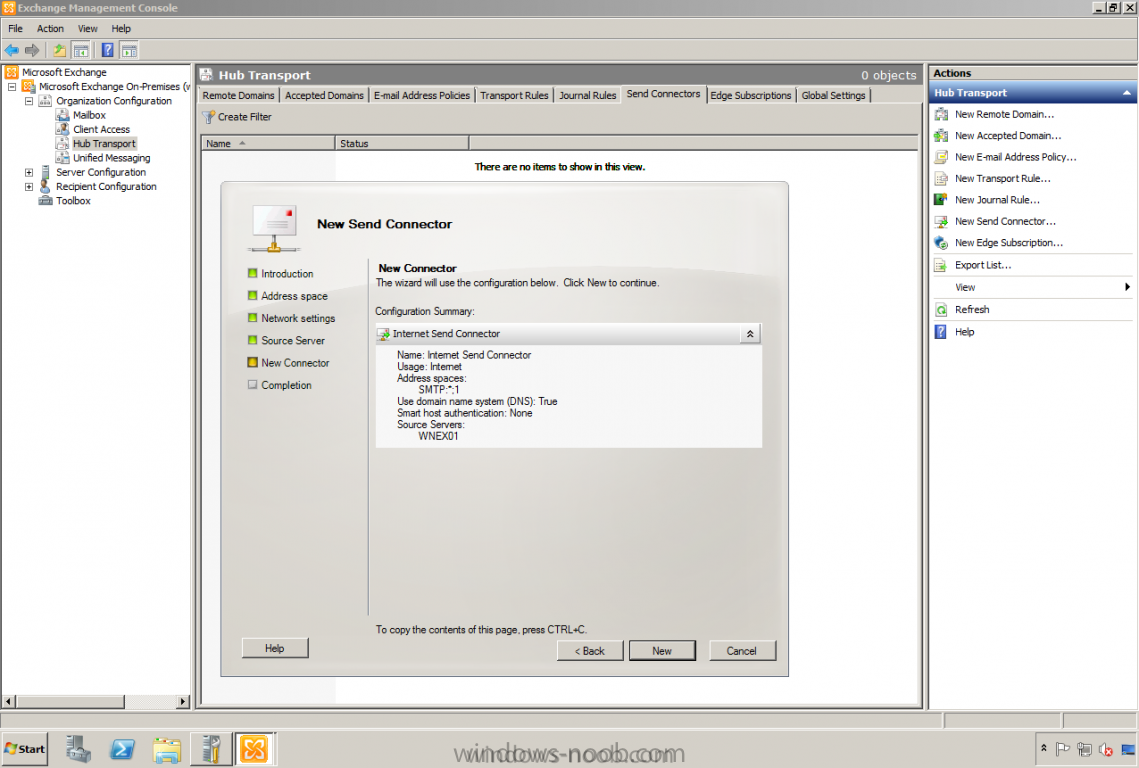
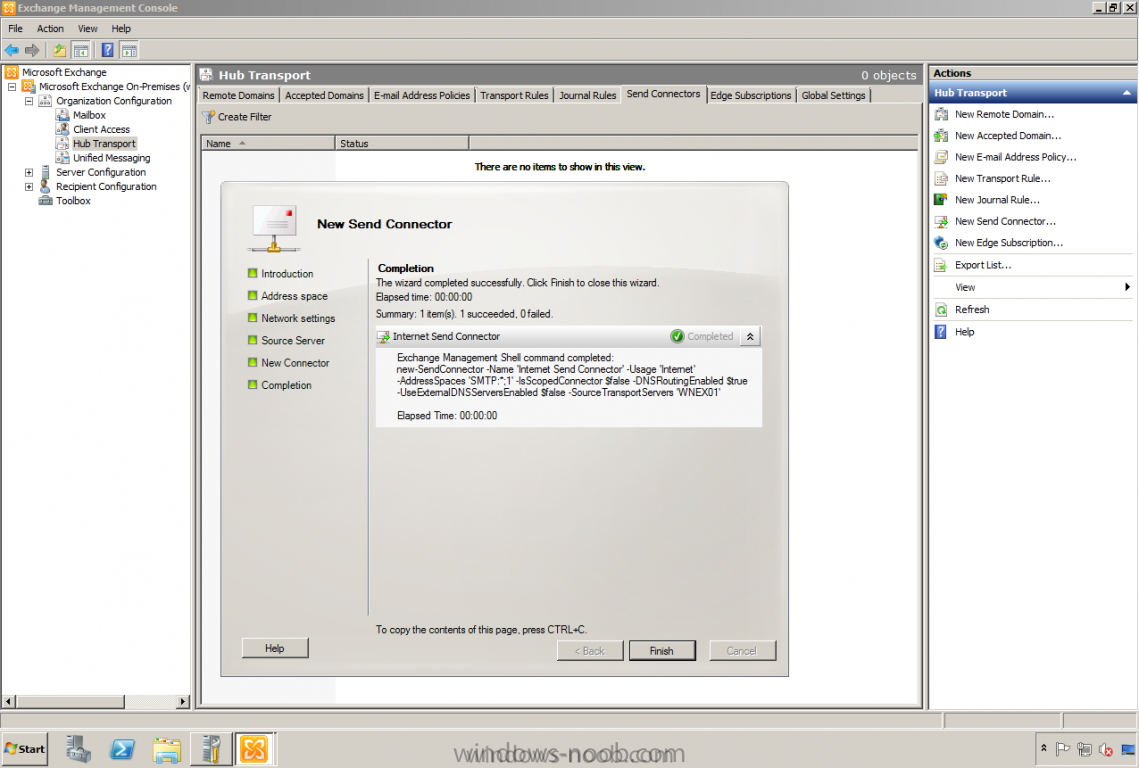
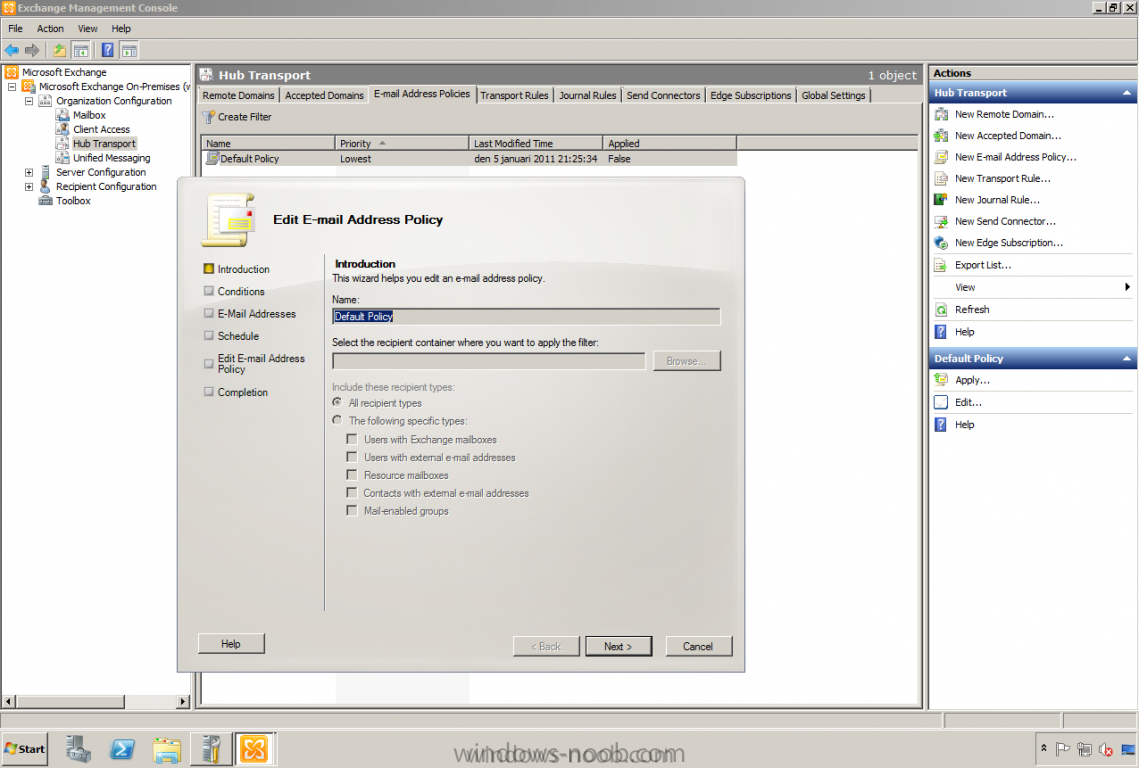
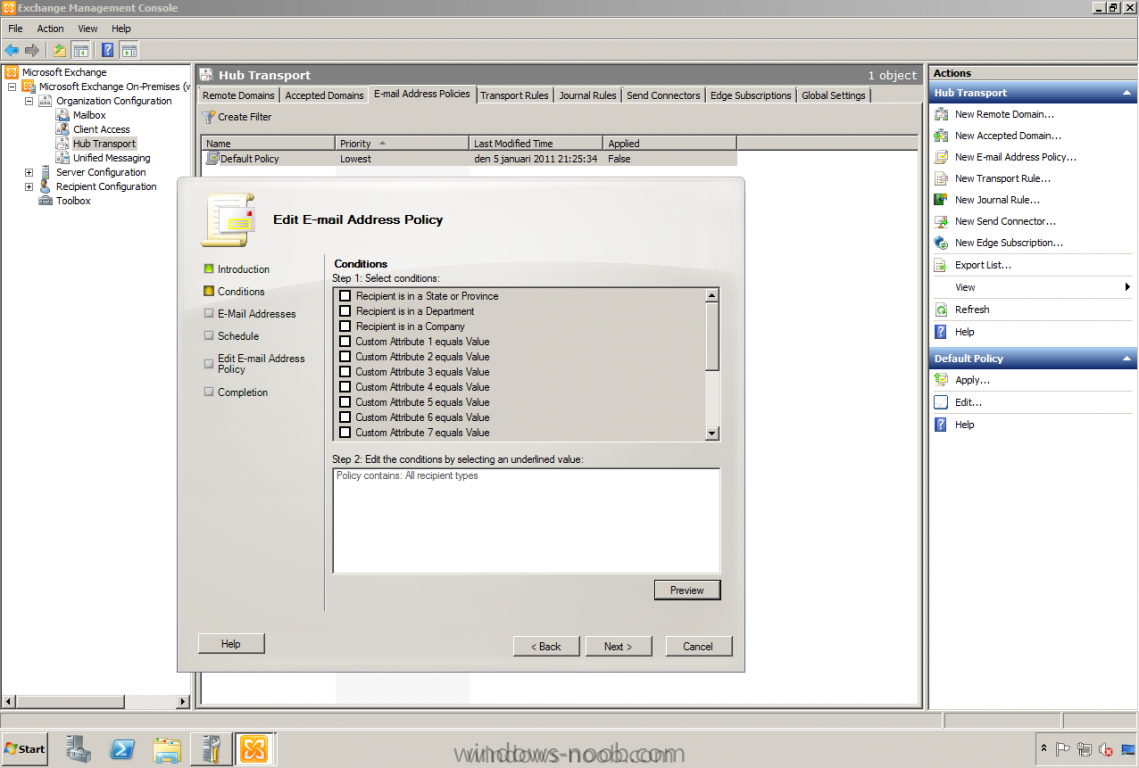
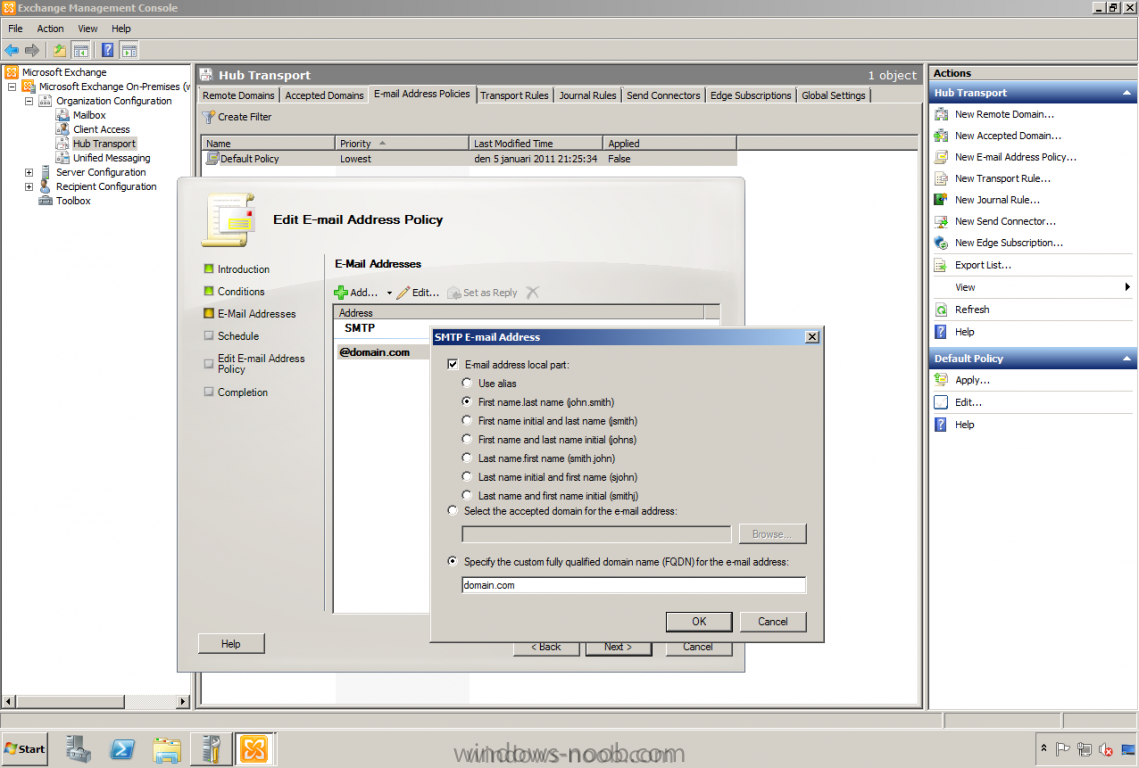
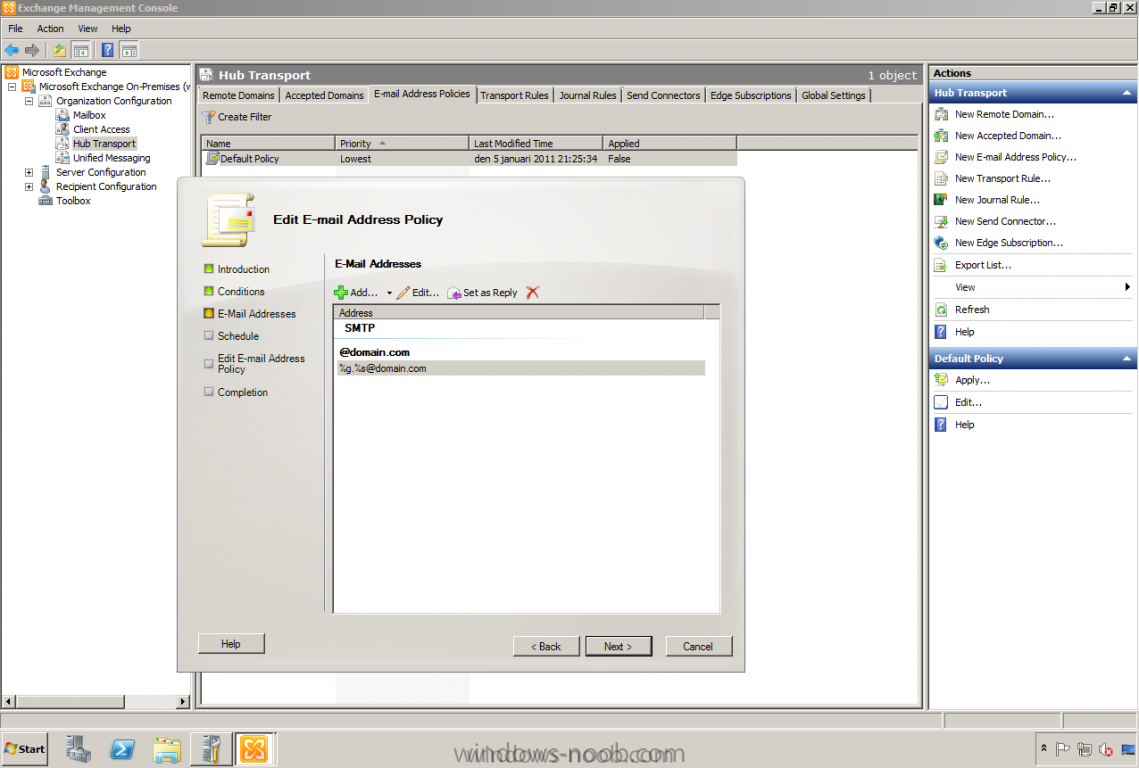
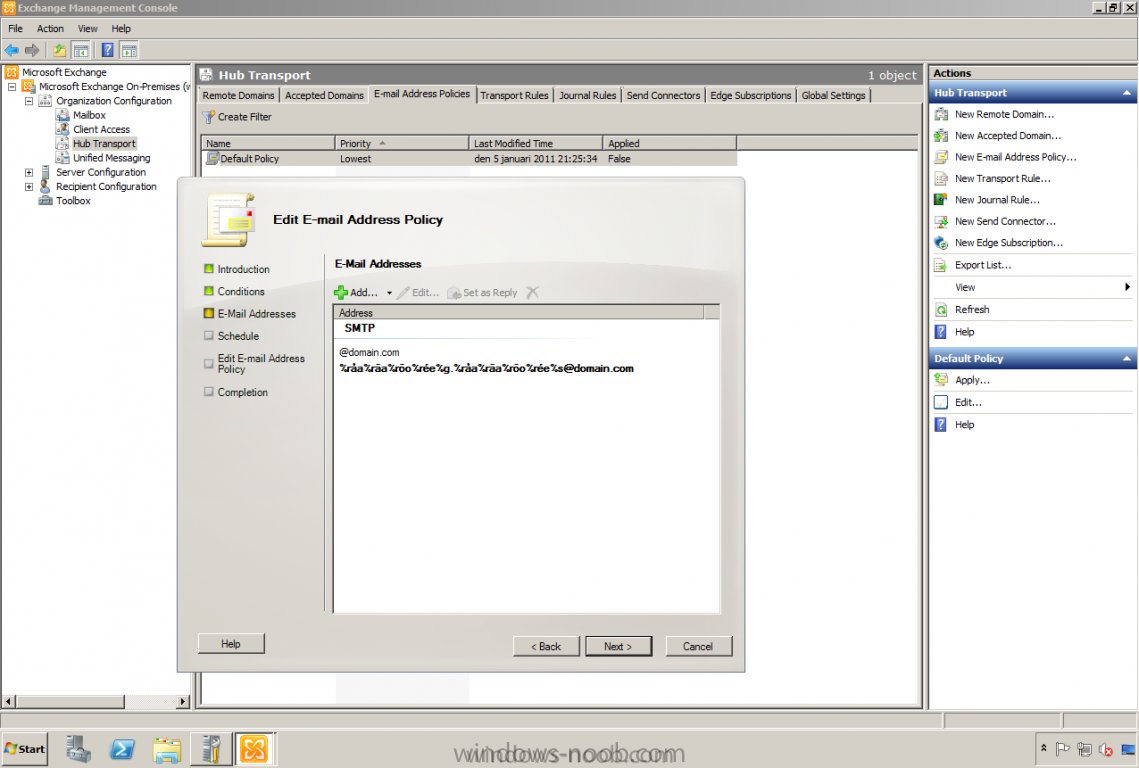
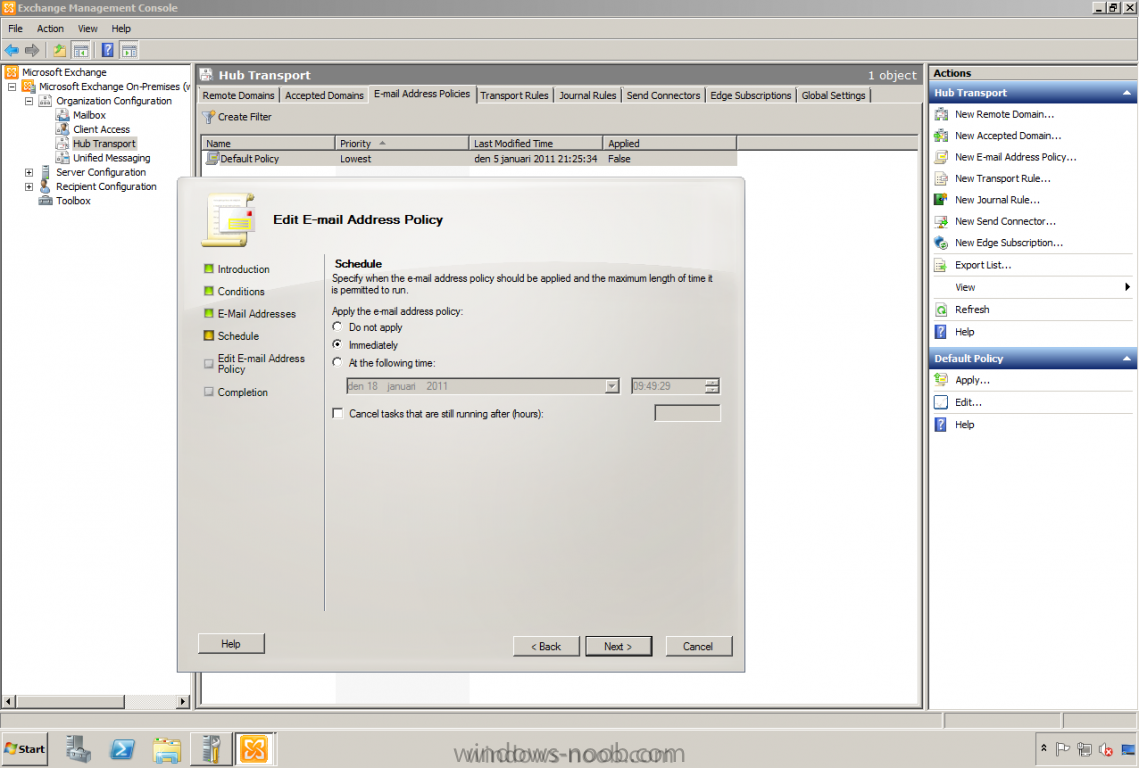
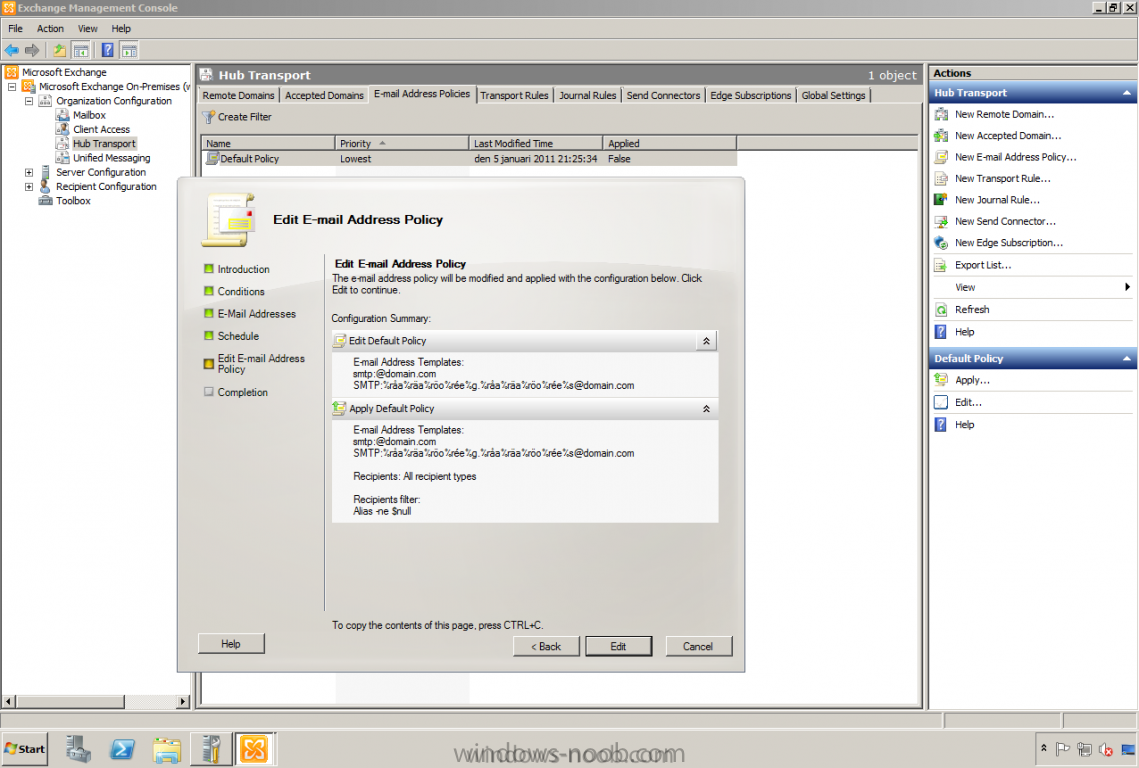
Published: 2011-01-18 Updated: - Version: 1.0 Please note that this guide is designed to get you up and running in a LAB Environment as quickly as possible. This guide is provided as is without any guarantee, if you find any errors please report them in the forums. The purpose with this how-to-guide is to give those administrators around the world an insight in how to configure a default/basic installation to work with basic functionality. Let's get started… In the previous post I successfully installed Exchange 2010 so let's take it from there. Here are a couple of things that we need to know from the beginning.. · Certificate o Using own certificate server (CA) or buying from 3rd part? o Using single name certificate or going with SAN/UC certificate? · Mail flow? o Is there any existing mail server or gateway? · DNS settings o MX records? · Firewall rules o Who handles the firewall? What rules need to be configured? · Send/Receive connectors o Configuration? · Email address policy o Configuration? Mail flow All those points above needs to be investigated before starting the configuration of Exchange. The mail flow and firewall rules hangs together, if you don't handle the firewall yourself, be a nice friend to the firewall guy/girl! That's where we should start, investigate if there are any existing rules for incoming SMTP (port 25) traffic allowed and if there are, where do they go? Let's say they goes to an existing Exchange 2003 server, also investigate if there are any other rules pointing to this server. Most commonly there would be a firewall rule for HTTPS (port 443) to this server as well, this is used for Outlook Web App (OWA), ActiveSync (EAS) and Outlook Anywhere (OA). So let's say those two rules are allowed and pointing to the "legacy" Exchange 2003 server. There is no need to change anything right now, one consideration is that the best would be if we can use a new public IP address for the new server so they can both be published. Or else the users won't be able to use OWA, EAS and OA. But if there aren't so many users and not so much mail data to be migrated, I would recommend doing this over a weekend with a "big-bang" and then switch the server to the new one. Then you won't need an extra public IP address or those other coexistence configurations.<br style=""> <br style=""> Certificates With this consideration we need to check if there are any existing certificates on the Exchange 2003 server and if that can be used on our new server. This is done by starting a MMC console, selecting certificates and choosing computer (local), go to personal and check if there are any. The picture below shows the certificate that's installed. Also check if IIS is using this certificate, it's done in the IIS manager (mmc console). Right click Default Web Site and select the tab "Directory Security". If there is any certificate it should be located under "Secure communications" and the "View certificate…" should be available to click on. In my example below it shows the certificate that's installed. Let's export this certificate so it can be used on Exchange 2010 server. This is done by viewing the certificate and selecting the tab "Details" and pressing "Copy to file…". Select "Yes, export the private key". Press Next. Select the option "Include all certificate in the certification path if possible". Press Next. Set a password for the certificate file. Press Next. Check the path. Press Next. Press Finish. The certificate is now exported, this should be copied to the new Exchange 2010 server. When the certificate is copied to the Exchange server, start up the Exchange Management Console. Go to server configuration and right click the Exchange server and select "Import Exchange certificate". Press the browse button and select the certificate file and type in the password for it. Press Next. Make sure that the Exchange server is selected. Press Next. Press Import. Press Finish. Right click the imported certificate, click "Assign services to certificate". Make sure that the Exchange server is selected. Press Next. I will use this certificate for the following services: SMTP and IIS. Make your selection and press Next. Press Assign. Press "Yes to all". Press Finish. So let's say that the migration will be done over a weekend since we have about 100 users and 50 GB mail data. The migration is going to be started at Friday at 17.00 when the office(s) have been closed and the end-users have gone home over the weekend. DNS Settings If this is a migration there is certainly an already configured MX record that points to the firewall. But if there aren't anyone created, this needs to be done for the SMTP domains that we should be able to use. We need to have an A record pointing to the external IP address, let's say my external IP in this case (what the picture shows) is: 172.16.2.12. Then an MX record should be created and pointing to that A record. In a Windows DNS it's done like this. Right click the appropriate DNS zone and choose "New Mail Exchanger (MX)". Browse to the record pointing to the external IP address and set a priority to the MX record. If we only have one record it doesn't matter, I will set it to 10. It looks like this when it's completed. Firewall configuration Let's continue to configuring the firewall rules for allowing incoming SMTP traffic to the Exchange server. In my environment I'm using a Threat Management Gateway (TMG) server for taking care of the traffic. Start up the Forefront TMG Management. Give it a friendly name. Press Next. Select "Server-to-Server communication". Press Next. Mark SMTP. Press Next. Type in the IP address of the mailserver. Press Next. Check the box for External. Press Next. Press Finish. This could also be achieved by using the new feature in TMG called E-mail policy. A firewall rule for outgoing SMTP traffic needs to be added. Select "Create Access Rule" in the action panel and give the rule a friendly name. Make sure the rule is "Allow". Press Next. Select the SMTP protocol, make sure it's the SMTP and not SMTP Server. Press Next. Create a computer object and select this one. Press Next. Select External as the destination. Press Next. Make sure "All Users" is selected. Press Next. Press Finish. Don't forget to Apply the rules, or else they won't take action. Send/Receive connectors Another thing that needs to be configured is the Receive and Send Connectors. The receive connector is used to receive mails and the send connector is to send mails, that's pretty obvious. Receive connectors is found in EMC under Server configuration, Hub transport. There is "Client WNEX01" and "Default WNEX01". The default one can either be used or we can create a new one, it's pretty up to you. A recommendation if the server is published like this way, I would create a new receives connector so the correct name is included. The receive name should match the send connectors name. Let's start and create a new receive connector. Make sure the IP address is selected and type in the appropriate FQDN name for the connector. Press New. Press Finish. It's time for the send connector to be created so we can be able to send mails. Go to Organization configuration, Hub transport and select the tab Send Connector. Select New Send Connector and type in a friendly name and select Internet as usage. In the address space, make sure the address is * so you will be able to send mails to all domains using this connector. Next thing to choose between is the use for how the mails should be sent. Using DNS or Smarthost, in most cases the smarthost is used, if the customer have a SMTP Gateway/Spam solution etc. Or if the mails needs to be sent through the ISP, if not the DNS method can be used. Make sure that your firewall has a rule for that, or else it won't work. Make sure the server is selected as a source server (HUB) Press New. Press Finish. Email address policy To could be very helpful to have in place, it's configured under Organization configuration and Hub transport, select the tab for Email address policy. Choose Edit on the default policy. Press Next. Press Next. Press the Add button and select how the addresses should be created, I've selected firstname.lastname@domain.com. Press OK. It will look like this Since in a Swede, we have some characters that are not so nice to have in an email address. We want to filter them out. Just press the address you want to edit or mark it and press F2. In my case it will look like this: %råa%räa%röo%rée%g.%råa%räa%röo%rée%s@domain.com And I'm setting this as the reply (primary) address as well. Press Next. Apply the policy immediately. Press Next. Press Edit. Maybe there are some more additional steps that might be interesting for you to read about. Just send a comment or a post :-) Thanks for reading and I hope it did gave you some good information.
- 1 reply
-
- 1
-

-
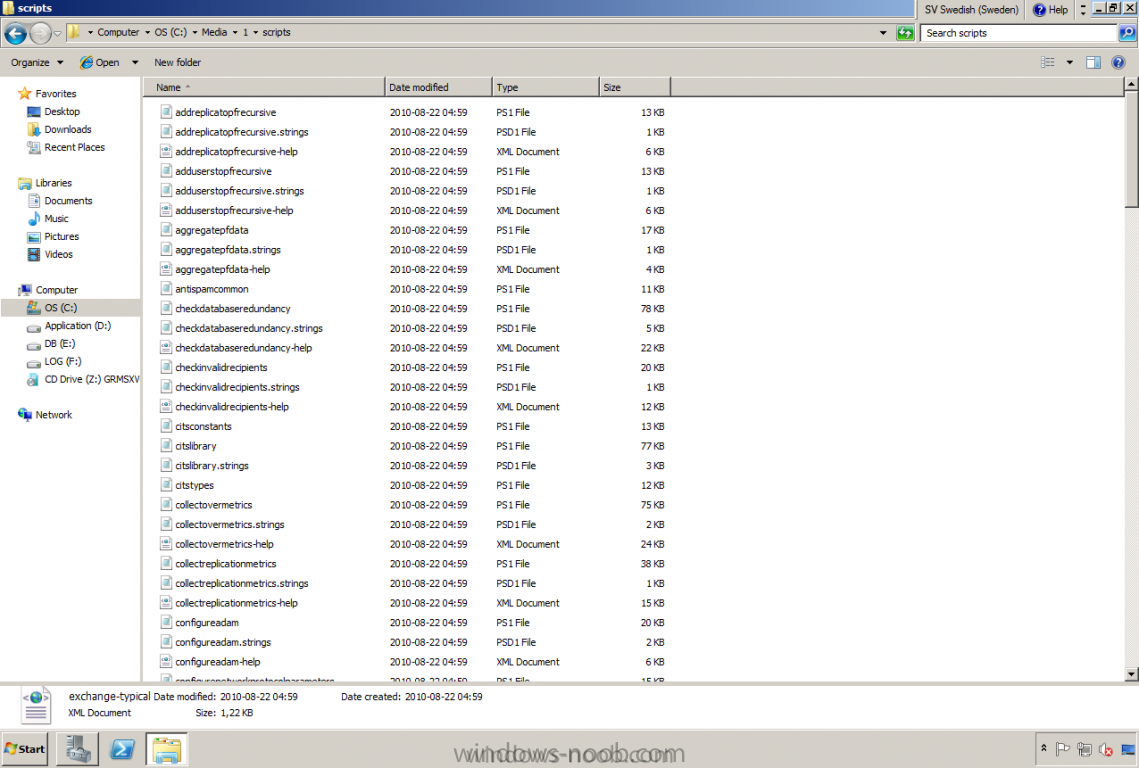
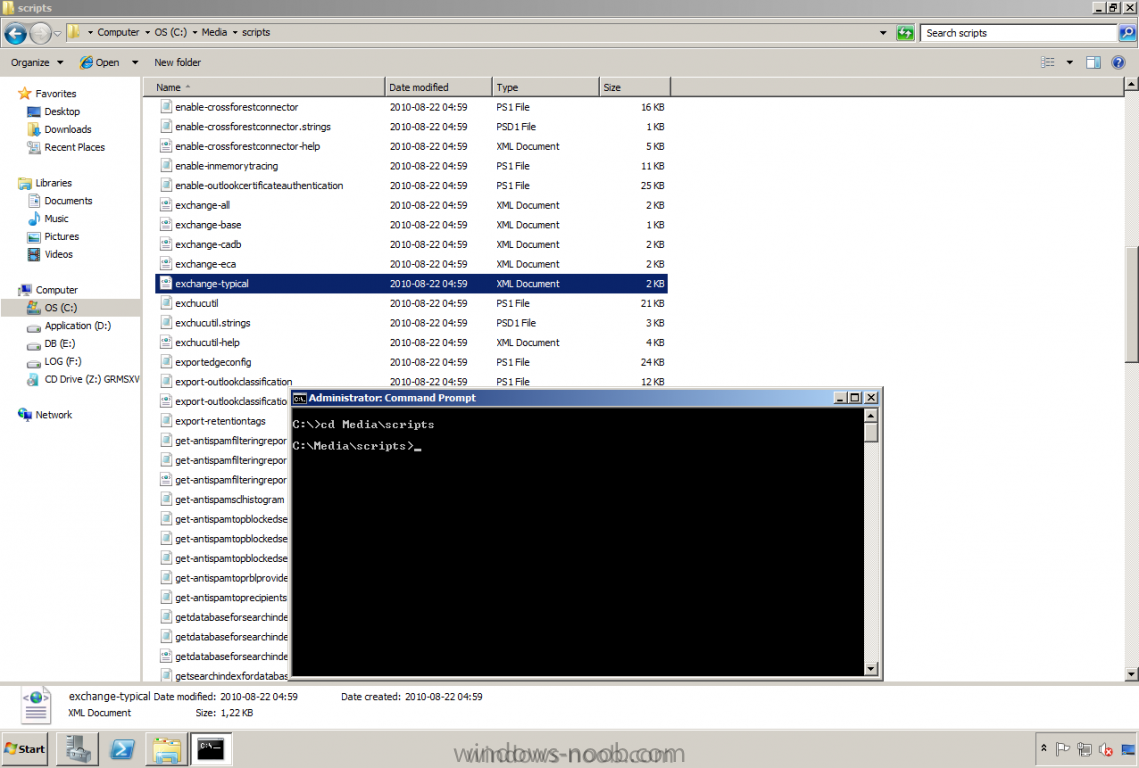
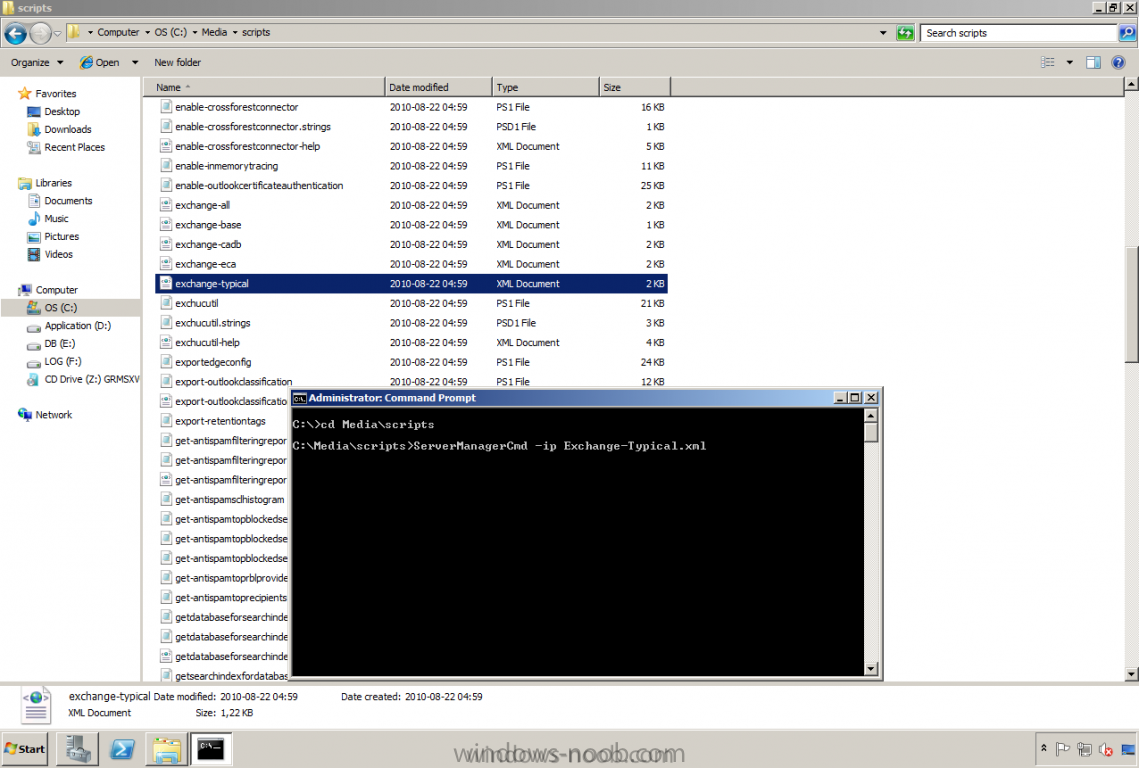
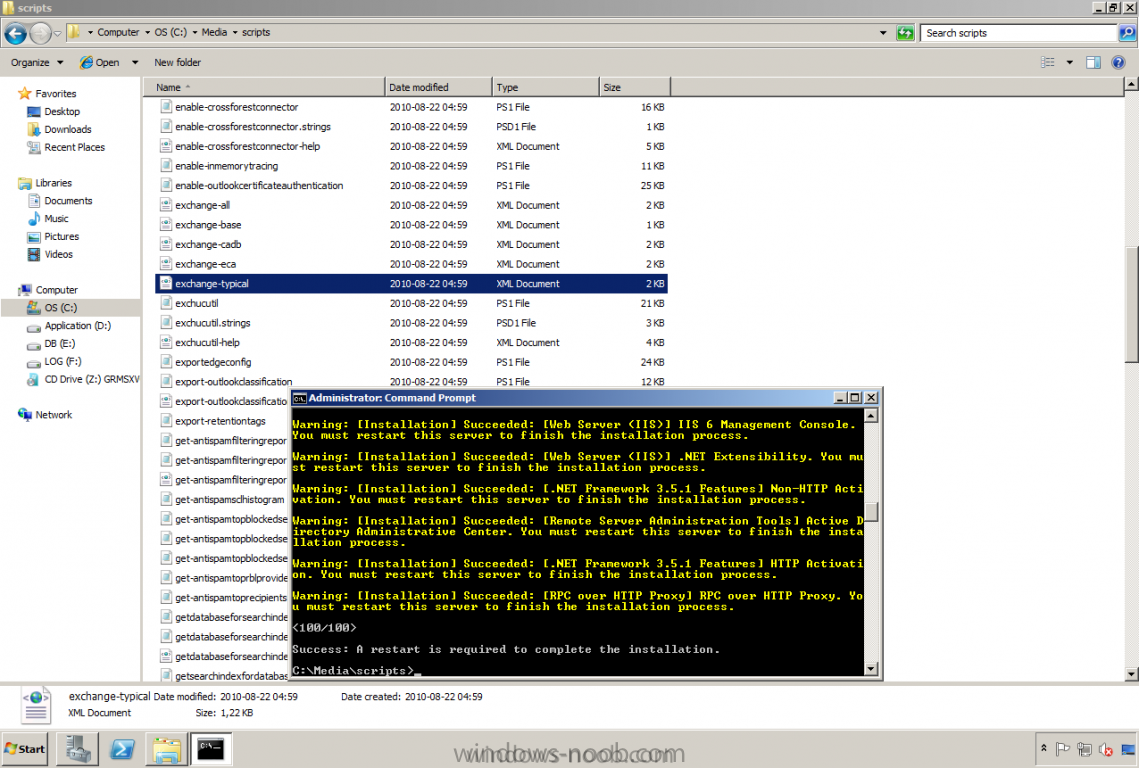
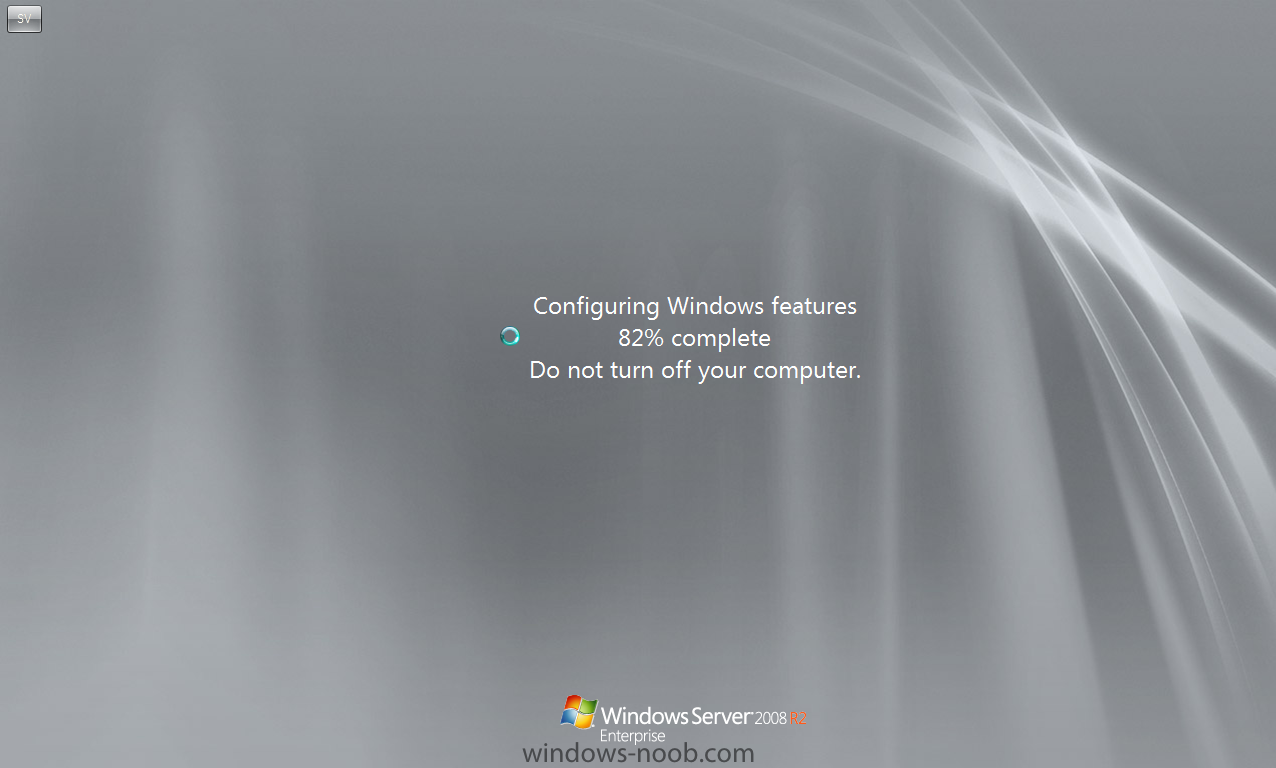
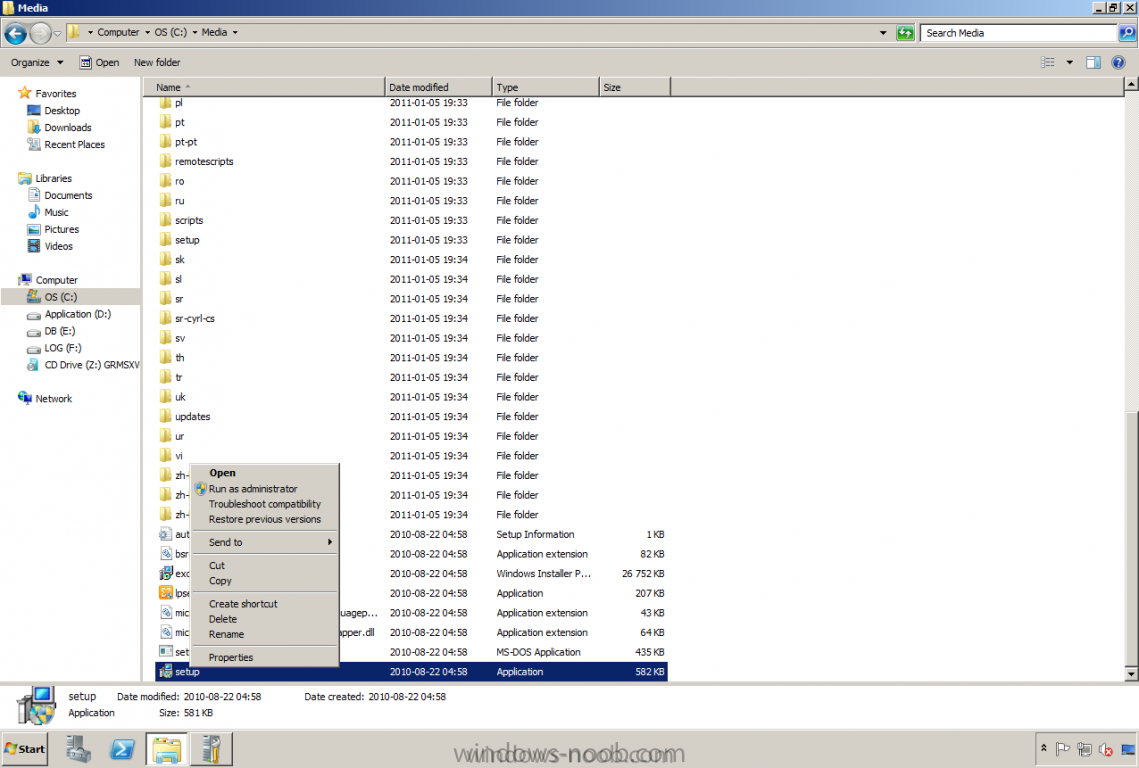
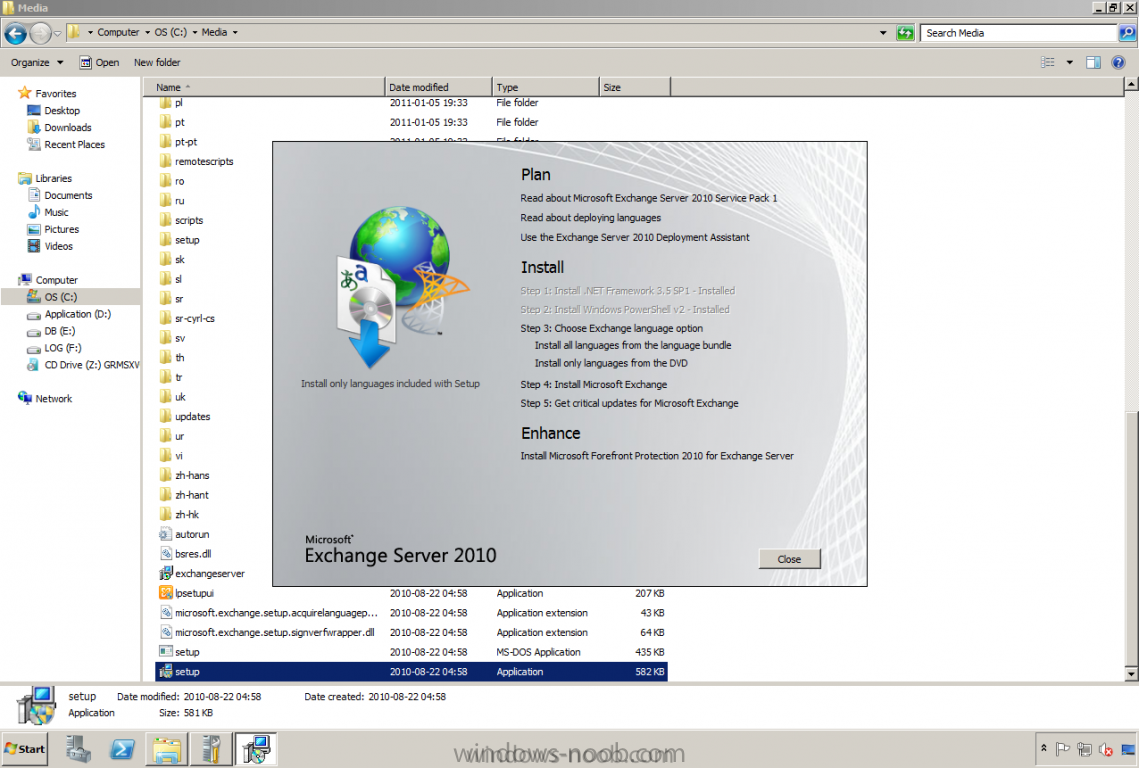
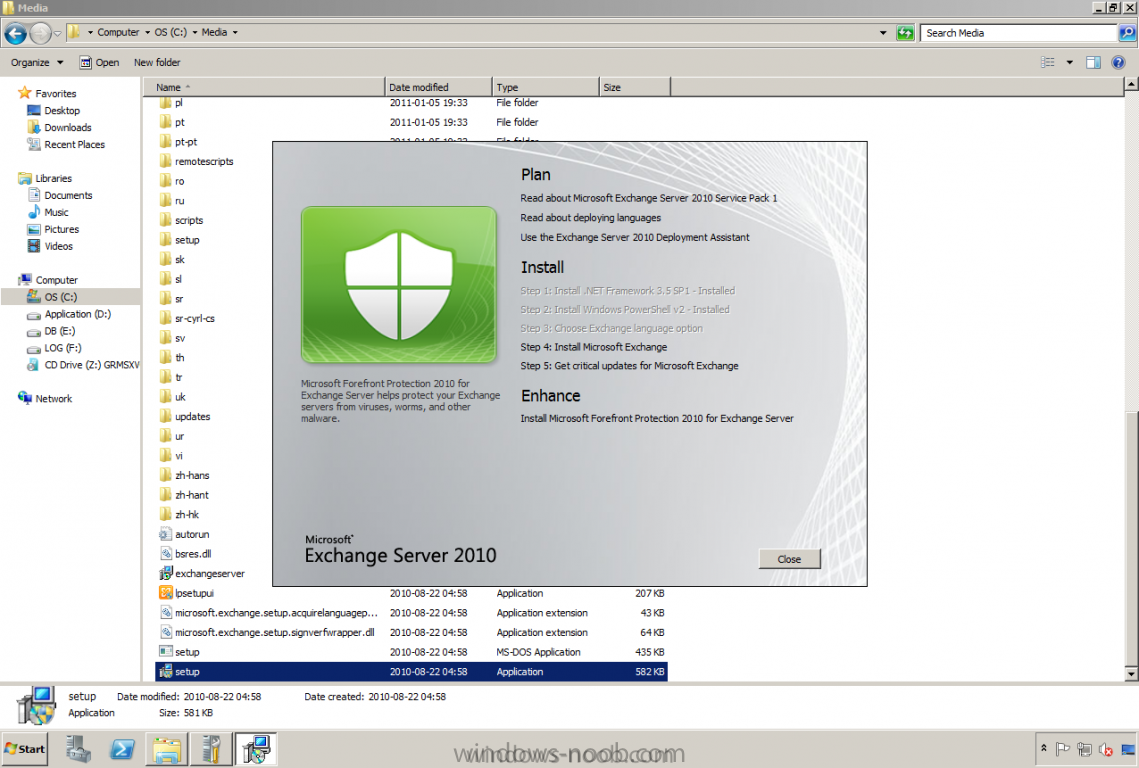
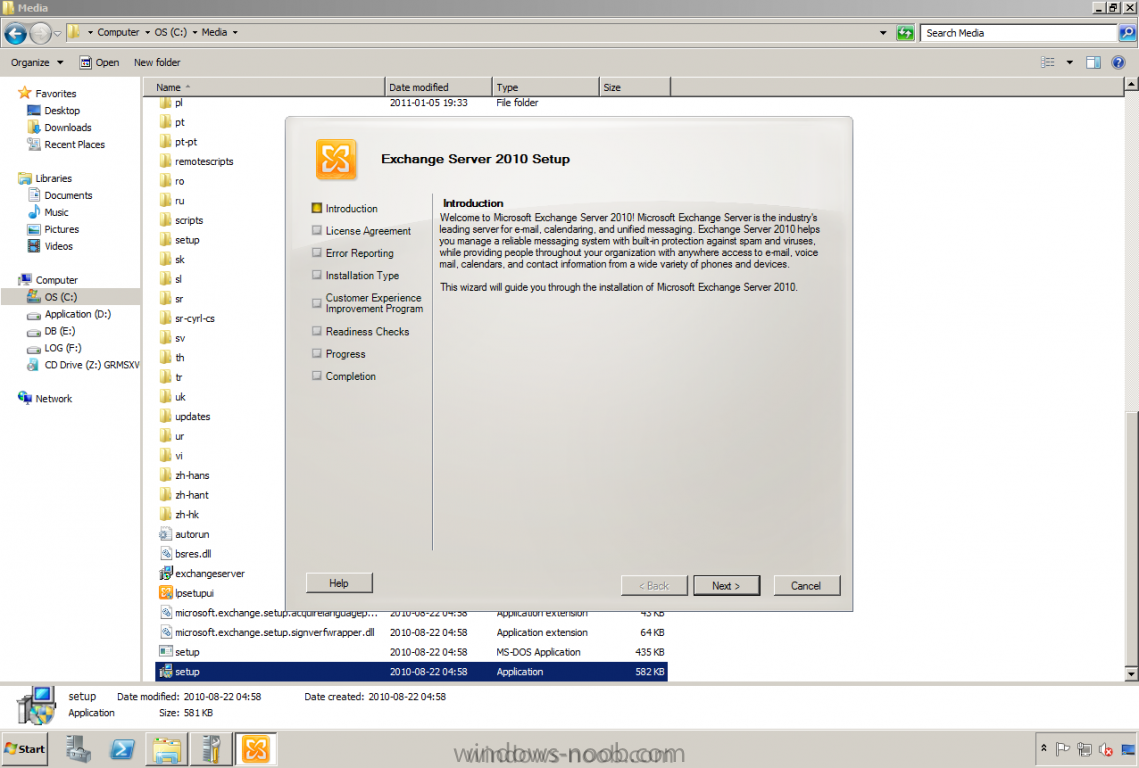
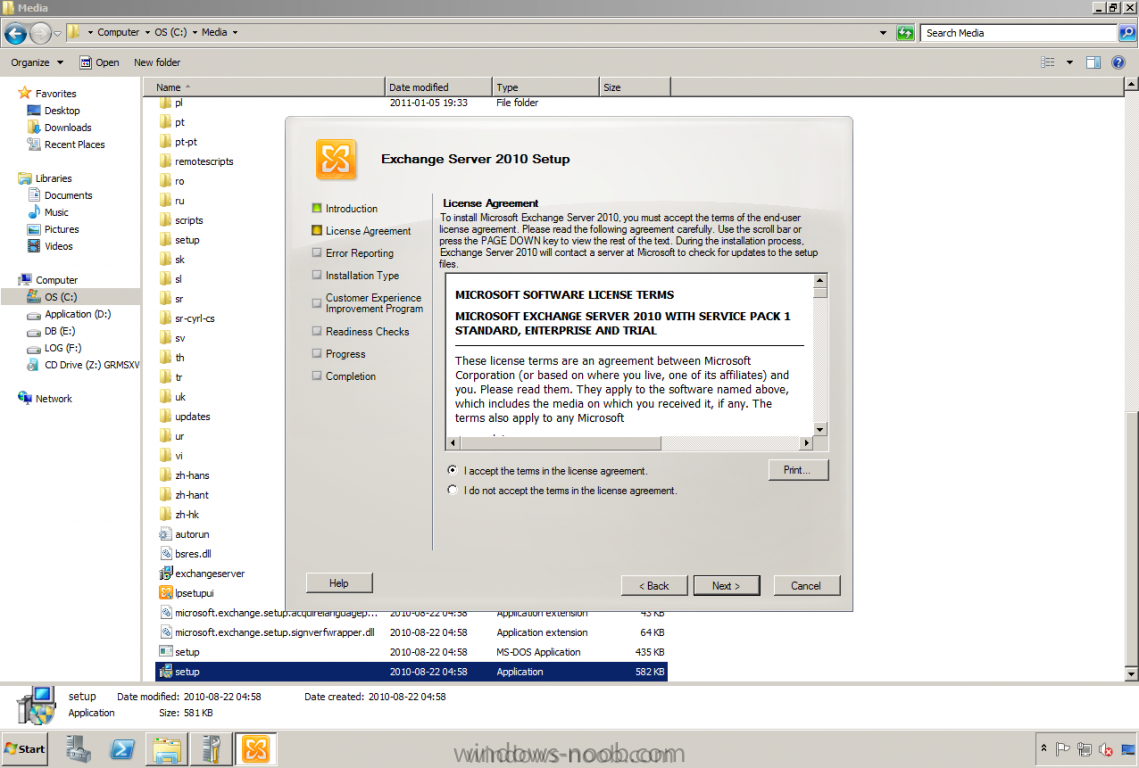
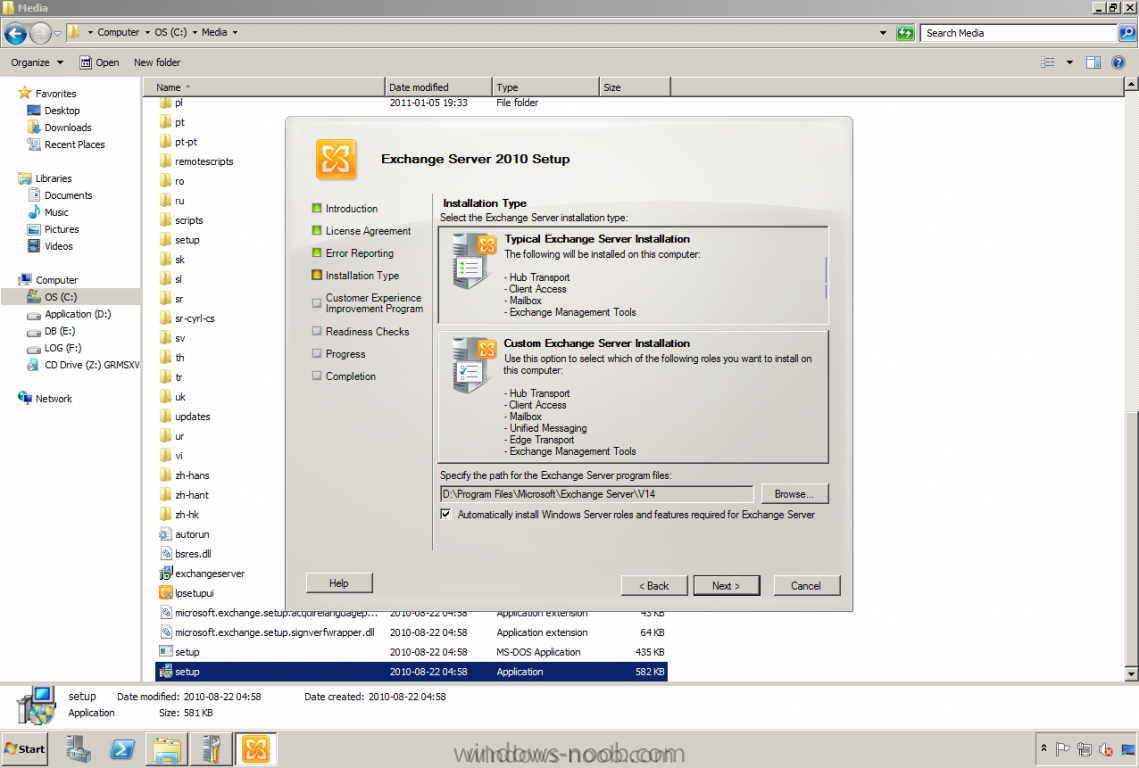
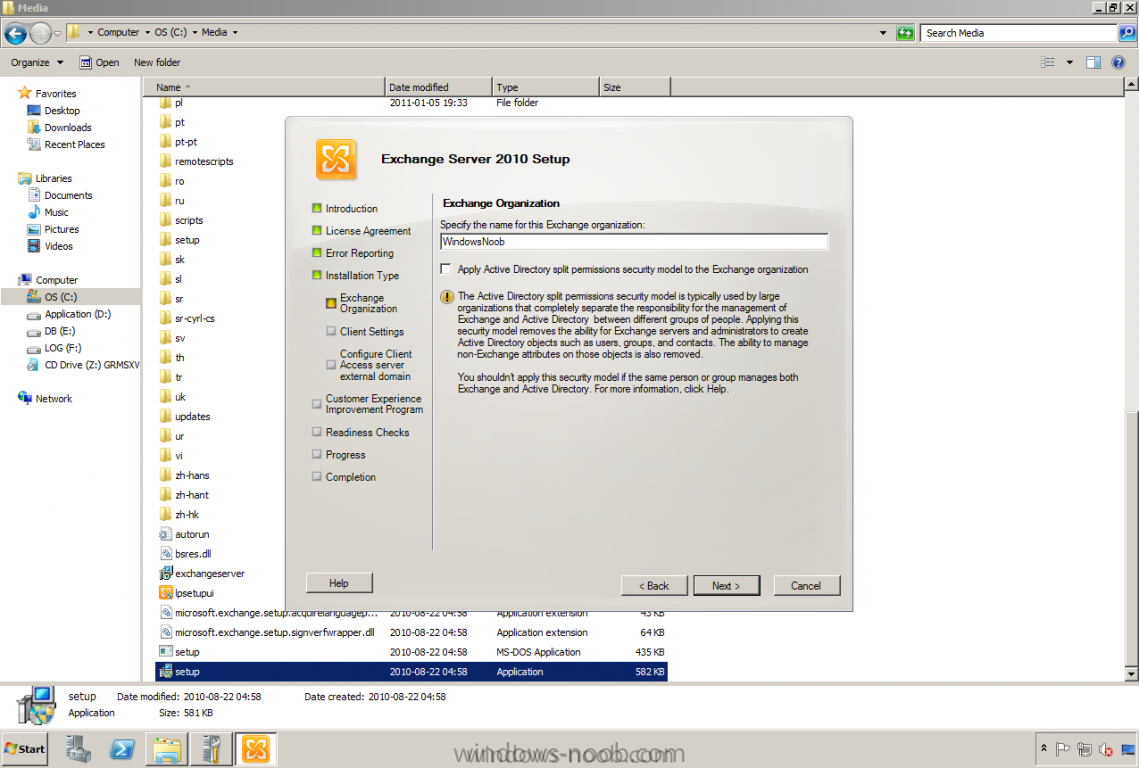
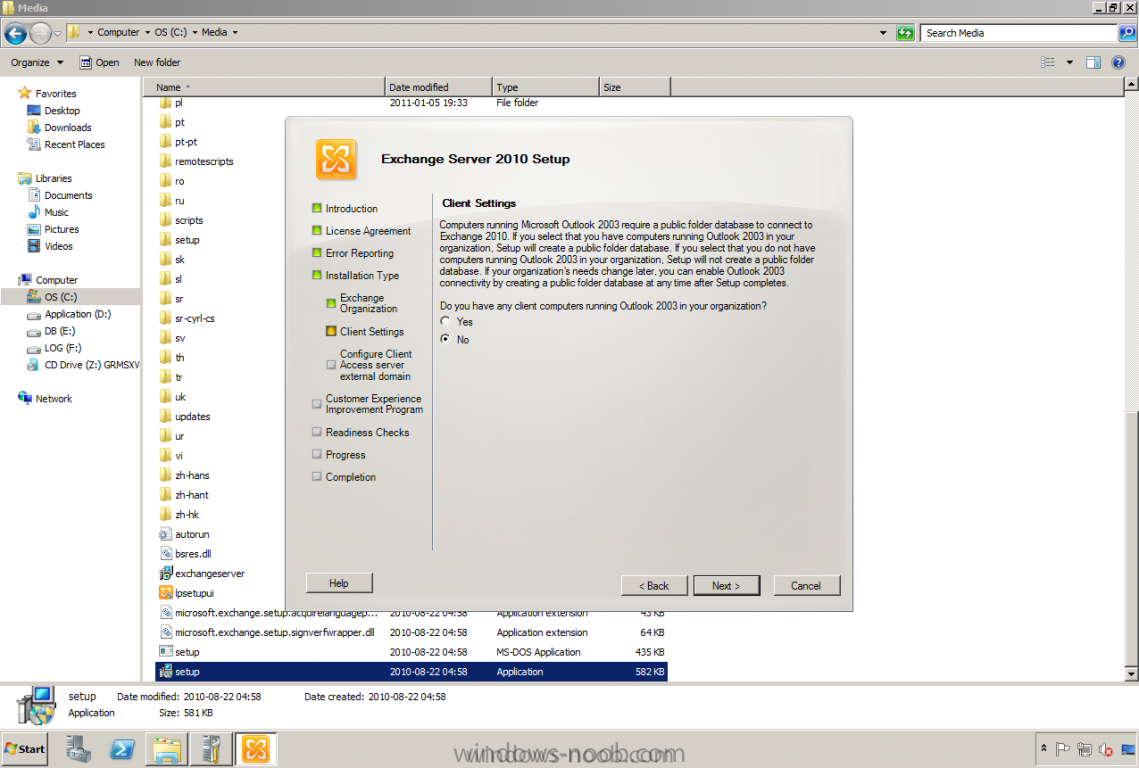
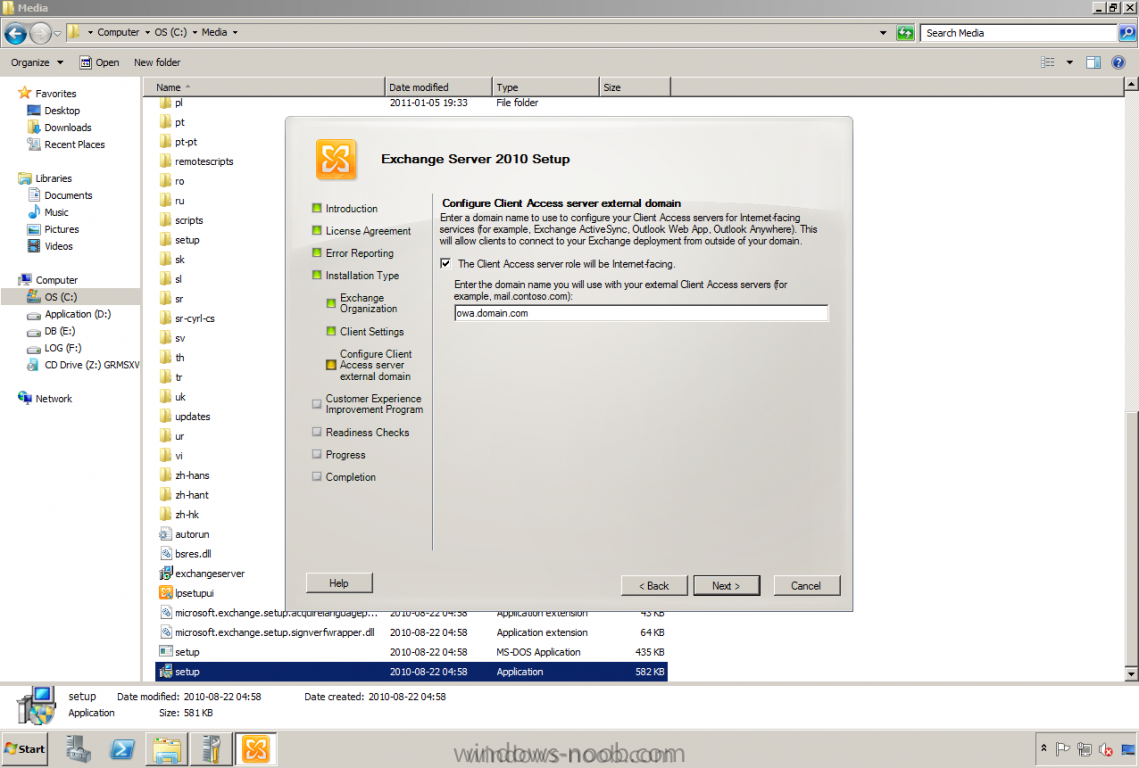
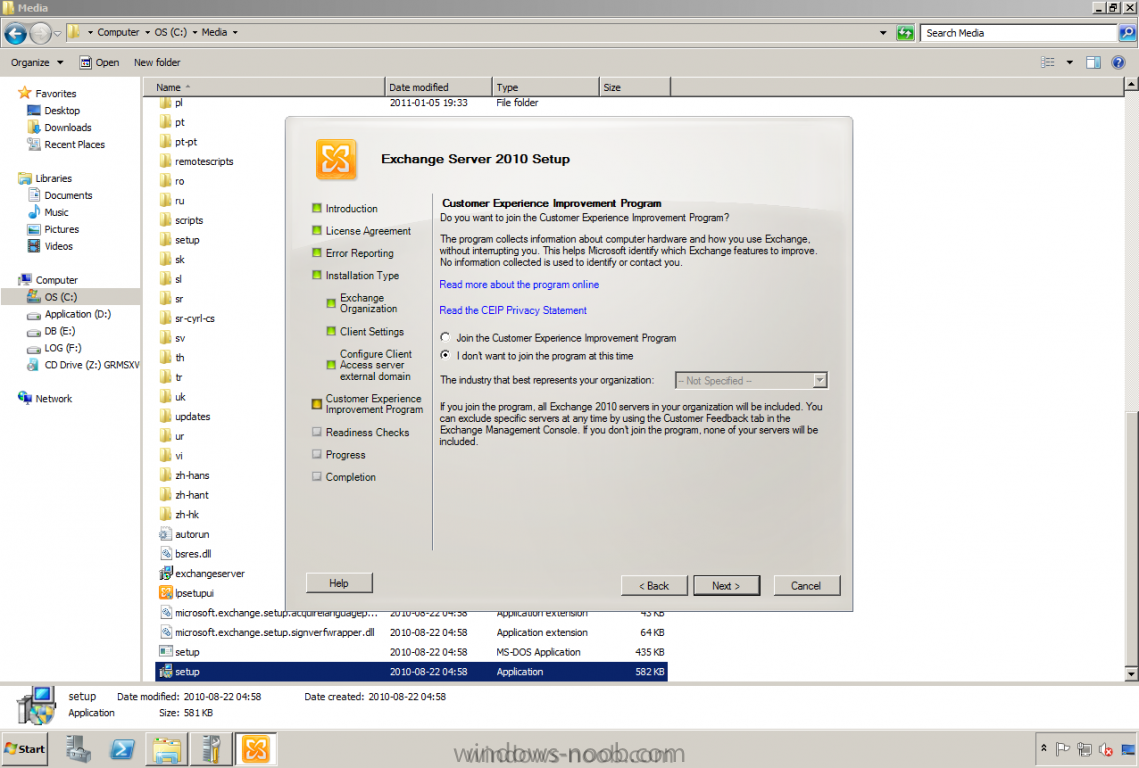
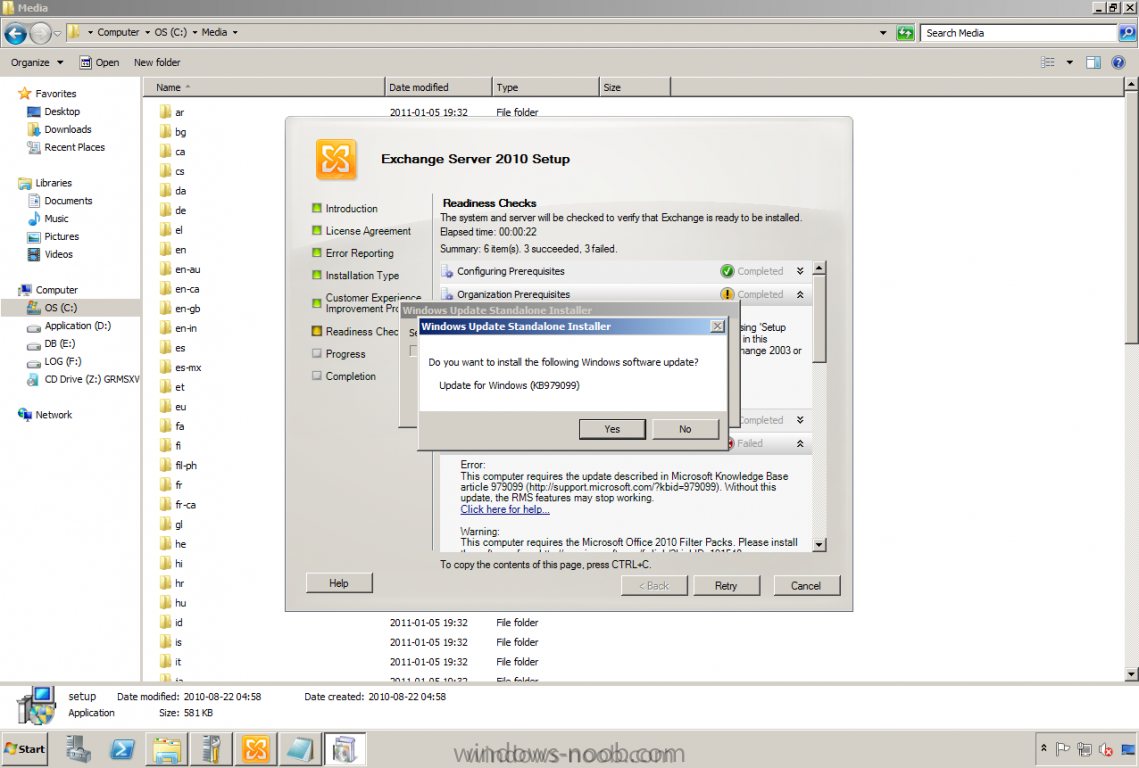
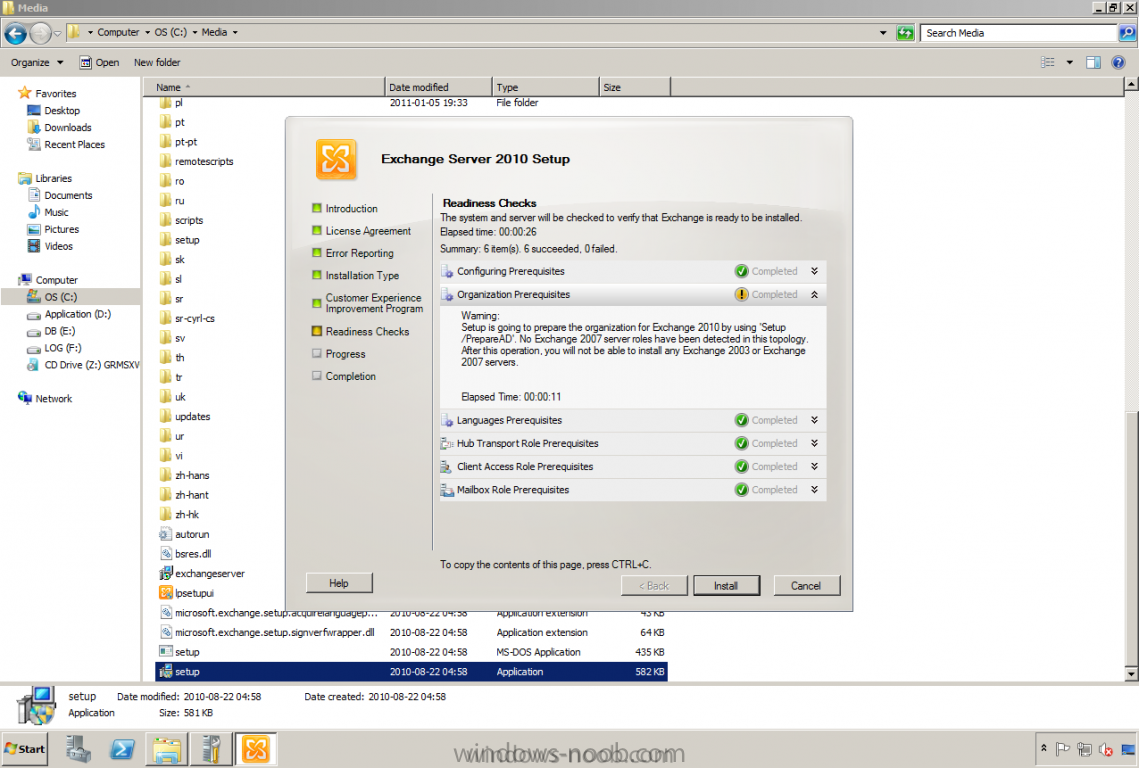
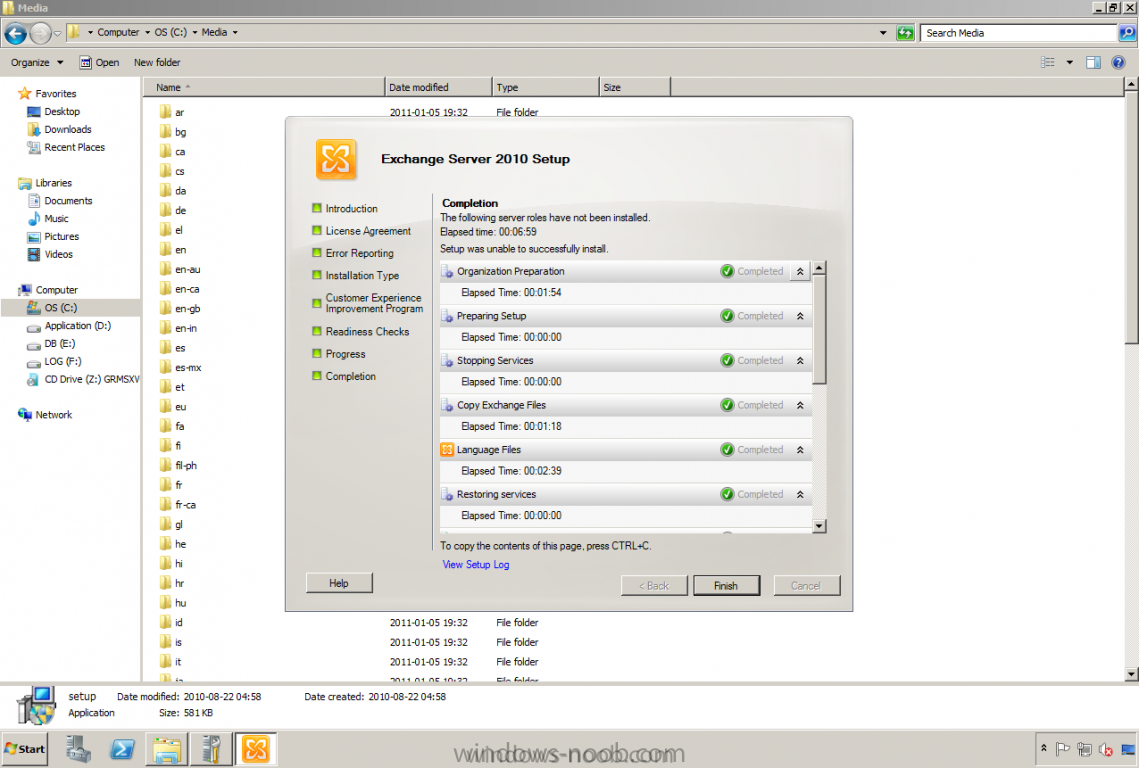
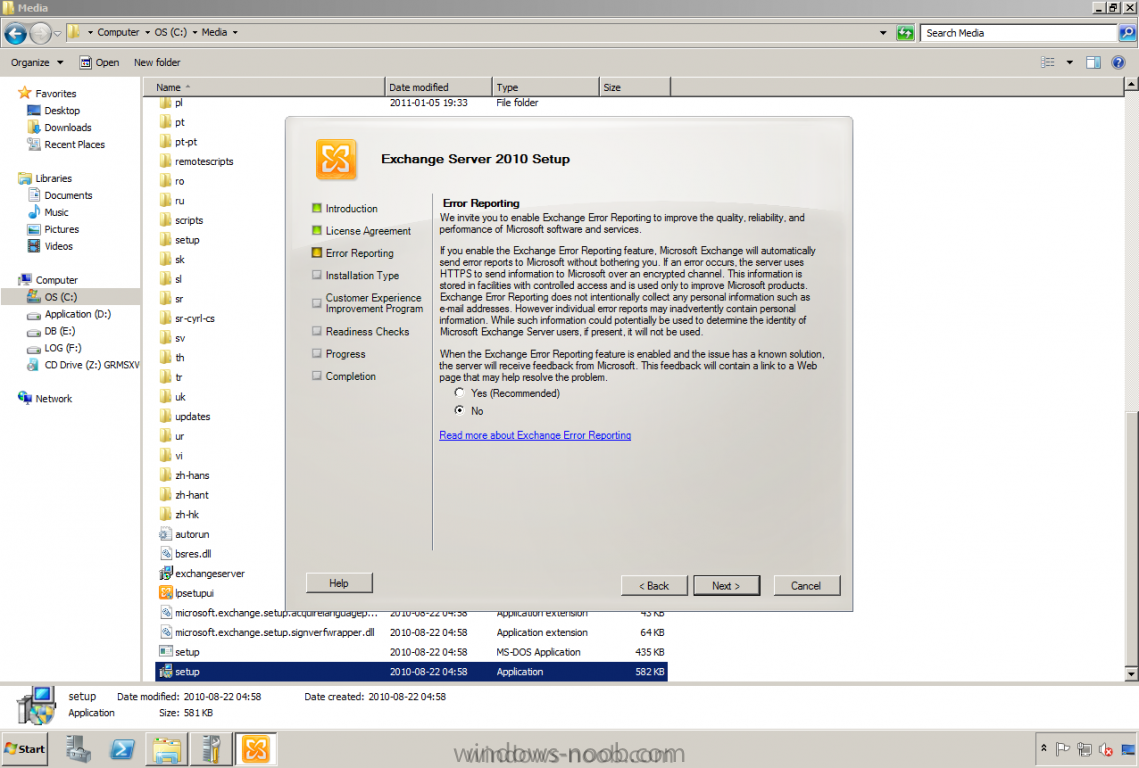
Published: 2011-01-05 Updated: - Version: 1.0 Please note that this guide is designed to get you up and running in a LAB Environment as quickly as possible. This guide is provided as is without any guarantee, if you find any errors please report them in the forums. The purpose with this how-to-guide is to give those administrators around the world an insight in how a default/basic installation should be done. Let's get started… From the beginning, we have some prerequisites that need to be solved directly. We need an administrator account which has the following permissions: domain admin, enterprise admin and schema admin. In large organizations it's often that the Active Directory personal upgrades the schema before running the installation. In this lab and scenario I'm emulating a small organization with a single server installation. In the lab environment I'm using VMware Workstation and haven't sized the machine like it should be in a production environment. On my Exchange server I have configured it with the following disks. C: - Operating System D: - Exchange binary's E: - Databases F: - Transaction Logs I can't tell you how you should size your server(s) without knowing about the environment and the business requirements. Here's a nice link to a TechNet article about performance; http://technet.micro...y/dd351192.aspx. For sizing the storage there are a storage calculator provided by the MS Exchange Team that can be found here. Article; http://msexchangeteam.com/archive/2009/11/09/453117.aspx. File; http://msexchangetea...es/default.aspx. I'm using Windows 2008 R2 Enterprise Edition with Exchange 2010 Standard Edition. There is no need of using Enterprise on Windows if you aren't going to use the failover clustering (DAG in Exchange 2010). In my case I'm going to do a post about this later so I want to use this machine in later posts. I will not add any text about certificates in this post, I'll take it in the next part when configuring Exchange with all necessary settings. Installing prerequisites These 6 prerequisites need to be installed before starting the installation of Exchange, or else it will complain about them. KB979099 (AD RMS) http://support.micro...om/?kbid=979099 Filter Pack http://go.microsoft..../?LinkID=191548 WCF: Enable WebHeader settings on the RST/SCT http://code.msdn.mic...ft.com/KB982867 LockConvoy On Windows Server 2003 Post KB 971988 http://code.msdn.mic...ft.com/KB979744 Win7 rollup package (PR for QFE 810219) http://code.msdn.mic...ft.com/KB983440 Fix for Microsoft .NET Framework 2.0 Service Pack 2 http://connect.micro...ownloadID=27977 For installing the other prerequisites there are xml file(s) that can be used. In this case it's a single server installation and then there is a file named: exchange-typical.xml. It's located in the scripts folder of the media. Start a command prompt with elevated permissions (Run as admin). I went into where my media was (C:\media) and scripts, there we have the Exchange-Typical.xml file. This file should be used with the following command "ServerManagerCmd –ip Exchange-Typical.xml". It will install all Windows prerequisites. Here's a screenshot how it looks like when it's finished. A restart is required like the prompt says above, when Windows is starting up it will complete the installation of the roles/features and prerequisites. Starting the installation of Exchange Server 2010 SP1 It's now time for the Exchange installation, go to the media path and right click the setup.com file and choose "Run as administrator". Select; Step 3 and choose "Install only languages from the DVD". Start the installation by pressing Step 4; Install Microsoft Exchange. The introduction will give you short information, press the Next button. Read through and select that you agree the license agreement or else you can't continue. I'm selecting that I don't want to report my errors since this is a lab environment. In this screen I'm selecting the typical installation and observe that my installation path is changed to D:\ instead of C:\ and also marking the check to automatically install Windows Server roles and features required for Exchange Server. It's time to set the Exchange Organization name, I'm naming it WindowsNoob and also I'm not choosing the option to split the permissions since this is a lab environment and not a large organization with those requirements. I have selected to not support older Outlook versions than Outlook 2007, in this case we don't need public folders. If Outlook 2003 is used we would per automatic get a public folder database. If this server is going to be internet faced, with that means if it should be directly published to internet for Outlook Web App, ActiveSync and Outlook Anywhere. I've selected that it should be facing internet with the address; owa.domain.com. On this screen I'm selecting that I don't want to join the program right now. This is what happens if you haven't installed the necessary prerequisites :-) Continuing the installation, the warning is just telling me that it will prepare the Active Directory Schema for Exchange 2010 SP1. Press Install to begin the installation. The installation is successfully completed. It's time for a reboot. In the next post I will go through how to configure it. Sources: http://technet.micro...y/bb125224.aspx
-
I want to give everyone that should deploy Exchange into the environment a tip about the Exchange Deployment Assistant tool It's free and will provide you with checklists that you can follow http://technet.micro...10/default.aspx Or just start a thread and ask if we can help you guys/girls with anything
-
Hi How is OWA published to Internet (external)? Using ISA/TMG?
-
Hi I know this is a very late answer, but maybe someone else will run into the same problem and read this post MS provided an article for troubleshooting these problems, check it at: http://technet.micro...(EXCHG.80).aspx


