Jump to content


Search the Community

Showing results for tags 'hyper-v'.

  • Search By Tags

    Type tags separated by commas.
  • Search By Author

Content Type


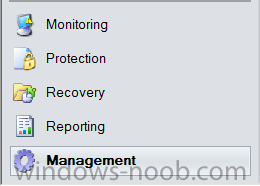
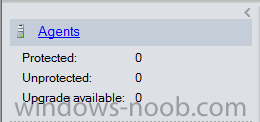
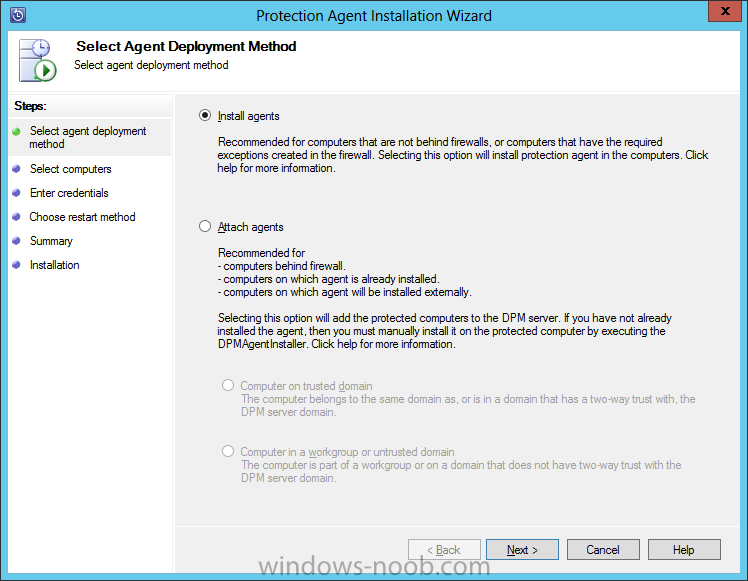
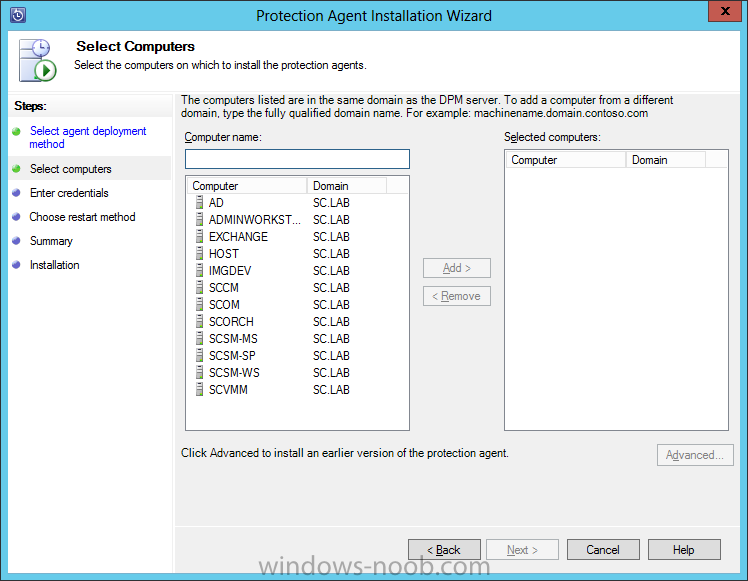
Forums

  • Cloud
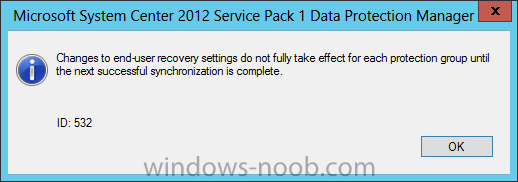
    • Azure
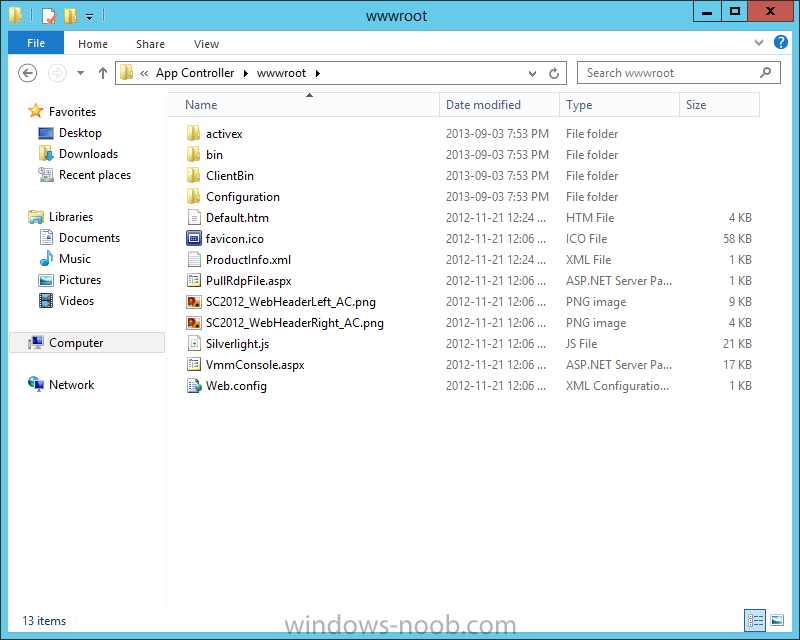
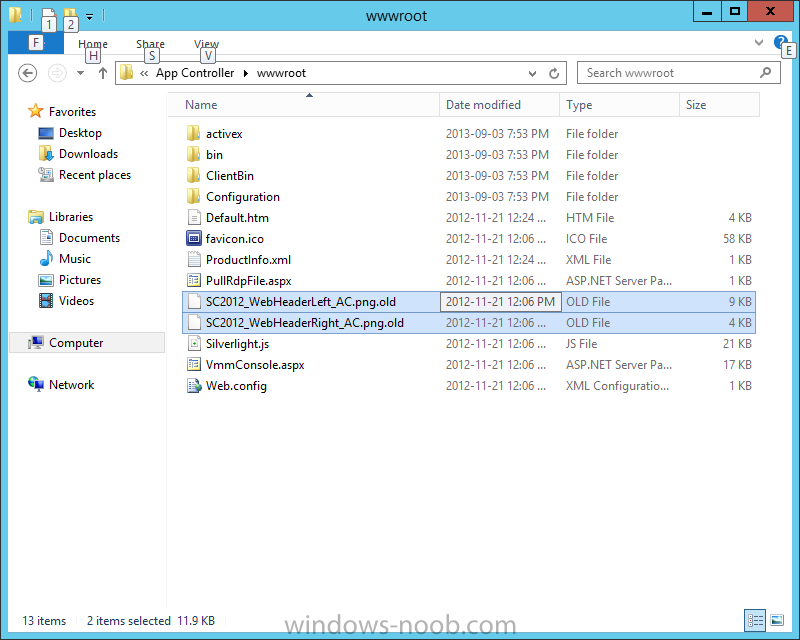
    • Microsoft Intune
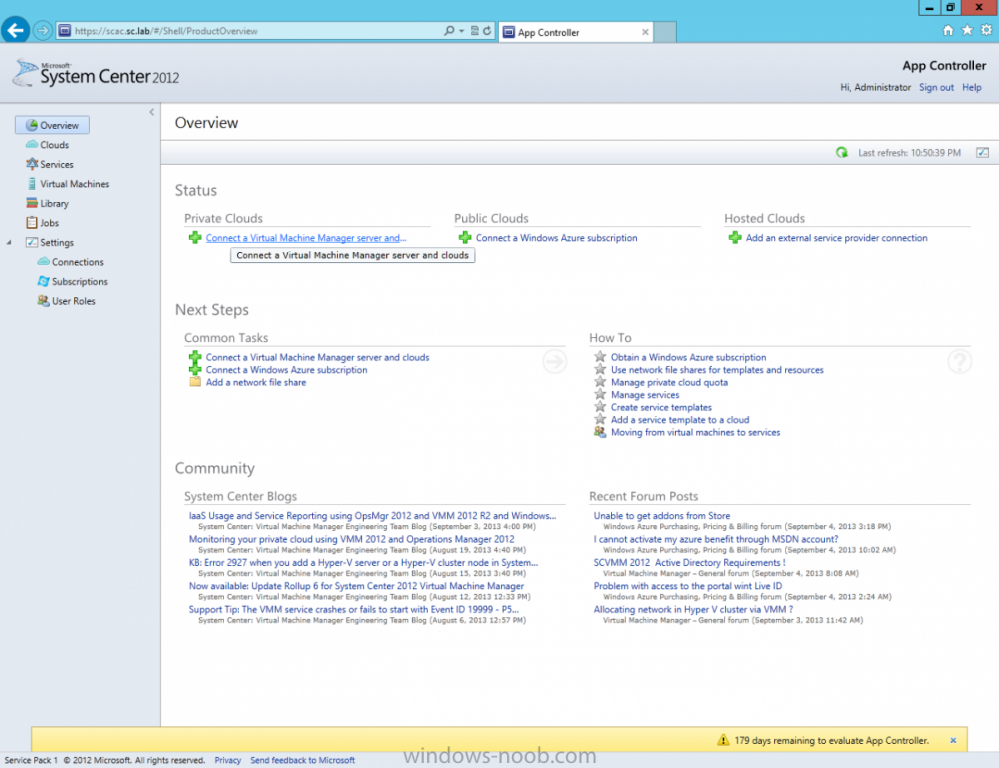
    • Office 365
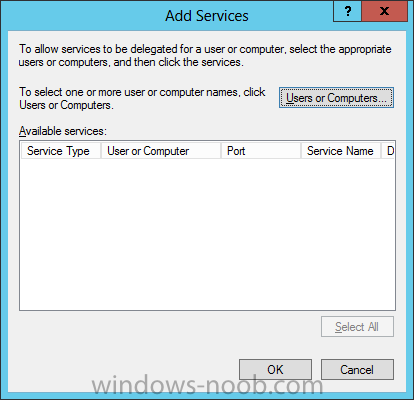
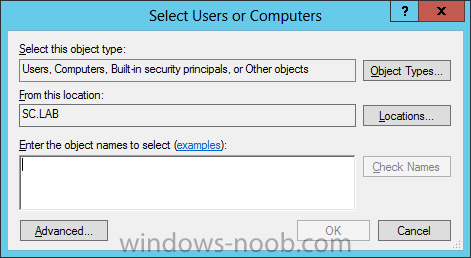
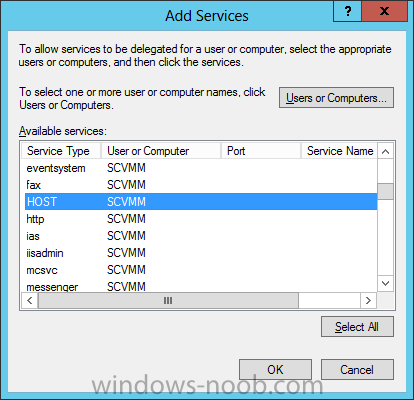
    • Windows 365
  • General Stuff
    • General Chat
    • Events
    • Site News
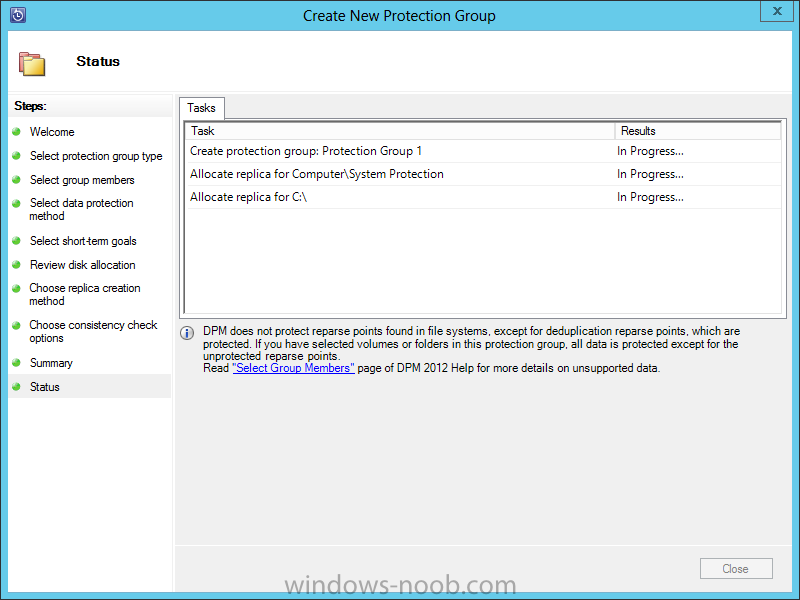
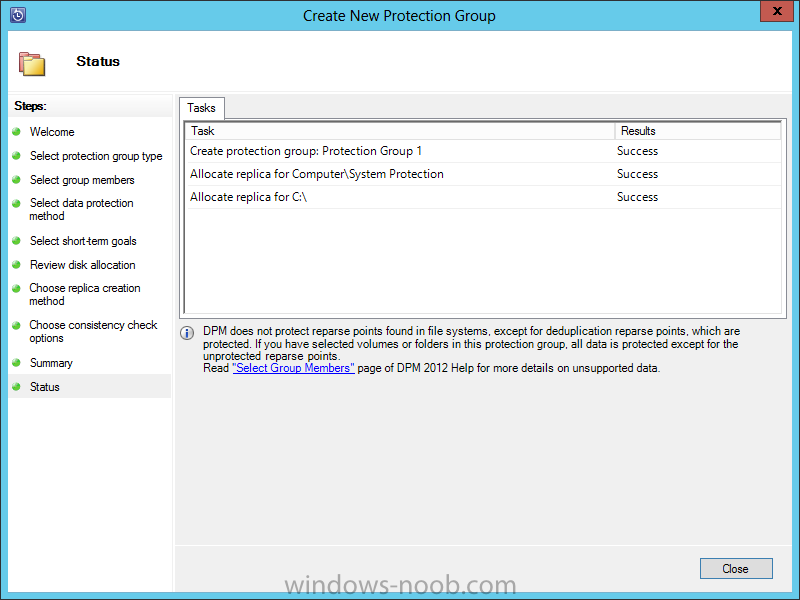
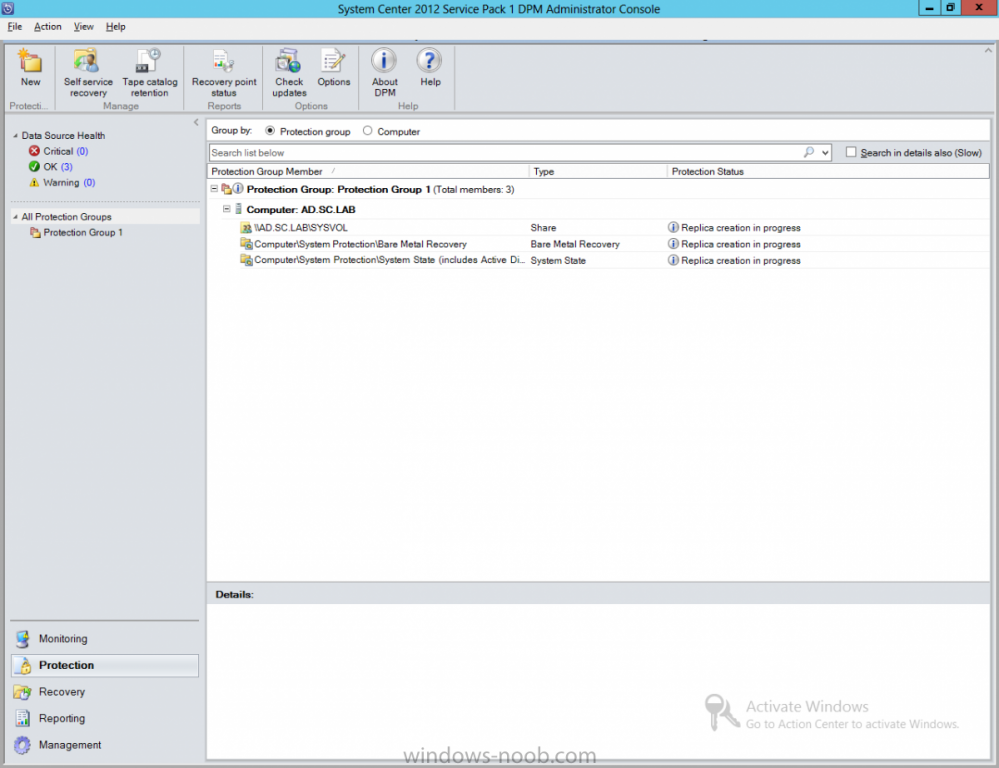
    • Official Forum Supporters
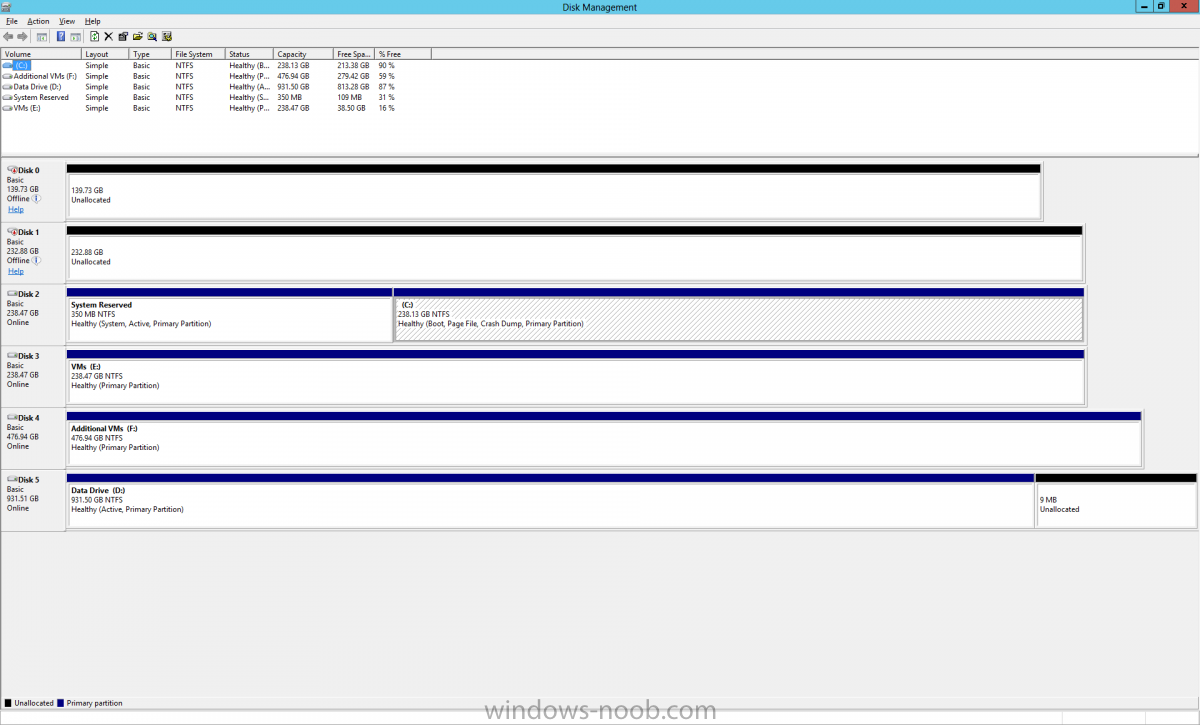
    • Windows News
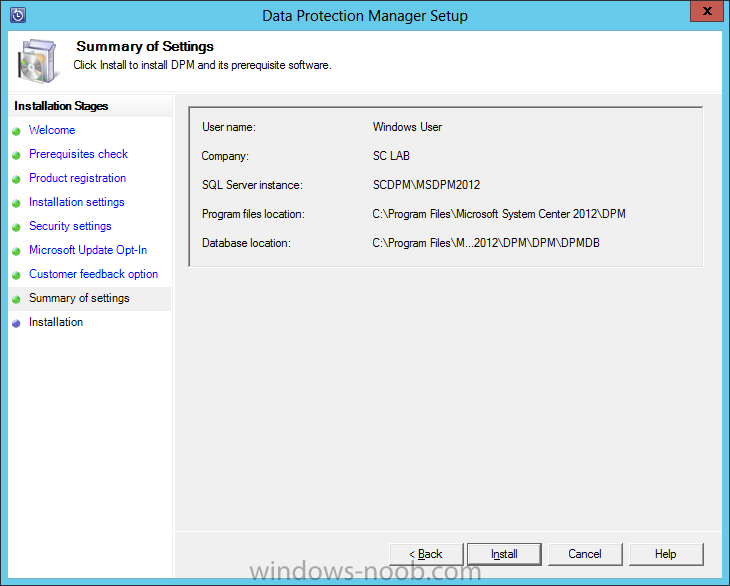
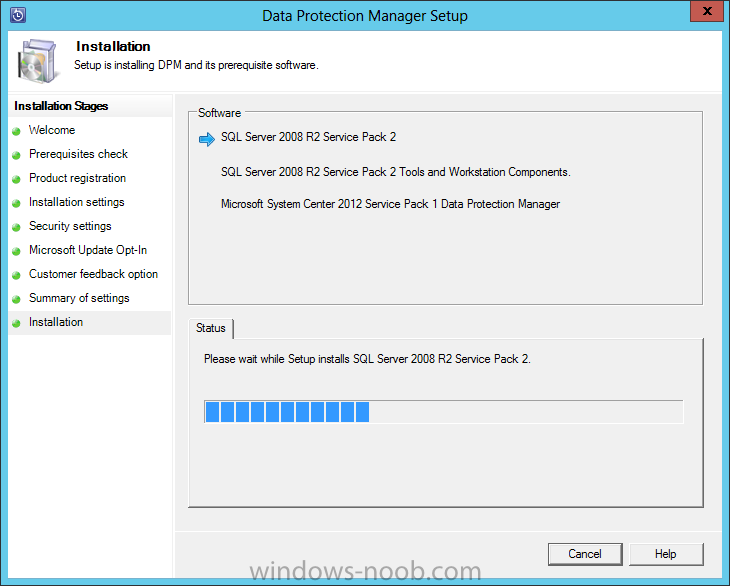
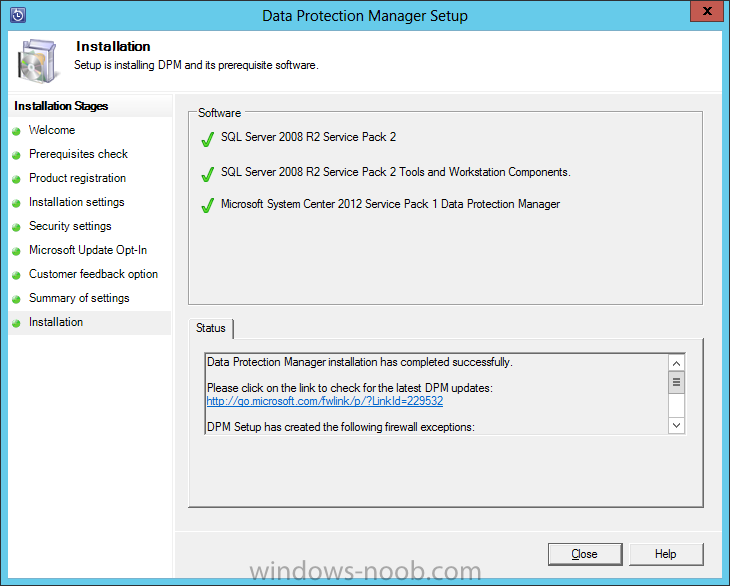
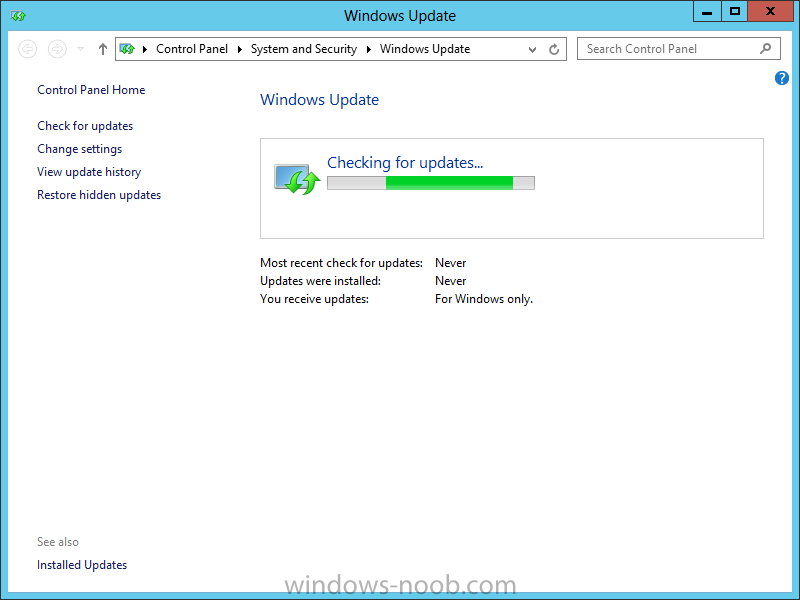
    • Suggestion box
    • Jobs
  • MDT, SMS, SCCM, Current Branch &Technical Preview
    • How do I ?
    • Microsoft Deployment Toolkit (MDT)
    • SMS 2003
    • Configuration Manager 2007
    • Configuration Manager 2012
    • System Center Configuration Manager (Current Branch)
    • Packaging
    • scripting
    • Endpoint Protection
  • Windows Client
    • how do I ?
    • Windows 10
    • Windows 8
    • Windows 7
    • Windows Vista
    • Windows XP
    • windows screenshots
  • Windows Server
    • Windows Server General
    • Active Directory
    • Microsoft SQL Server
    • System Center Operations Manager
    • KMS
    • Windows Deployment Services
    • NAP
    • Failover Clustering
    • PKI
    • Hyper V
    • Exchange
    • IIS/apache/web server
    • System Center Data Protection Manager
    • System Center Service Manager
    • System Center App Controller
    • System Center Virtual Machine Manager
    • System Center Orchestrator
    • Lync
    • Application Virtualization
    • Sharepoint
    • WSUS

Find results in...

Find results that contain...


Date Created

  • Start

    End


Last Updated

  • Start

    End


Filter by number of...

Joined

  • Start

    End


Group


Website URL


Location


Interests

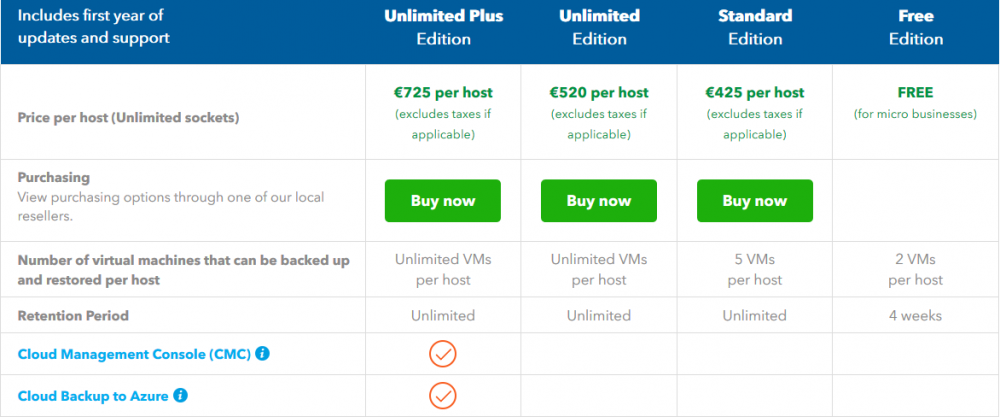
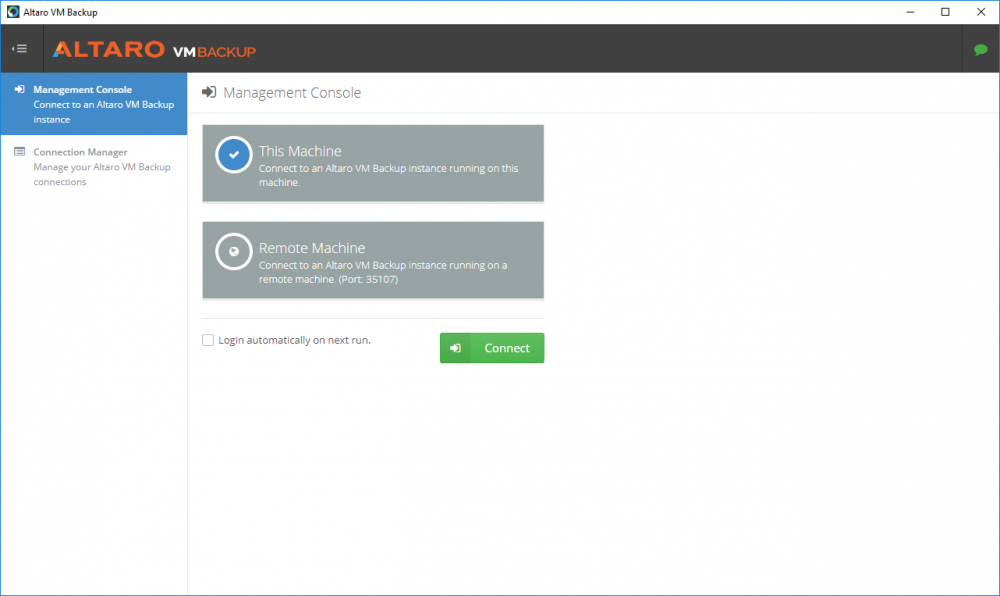
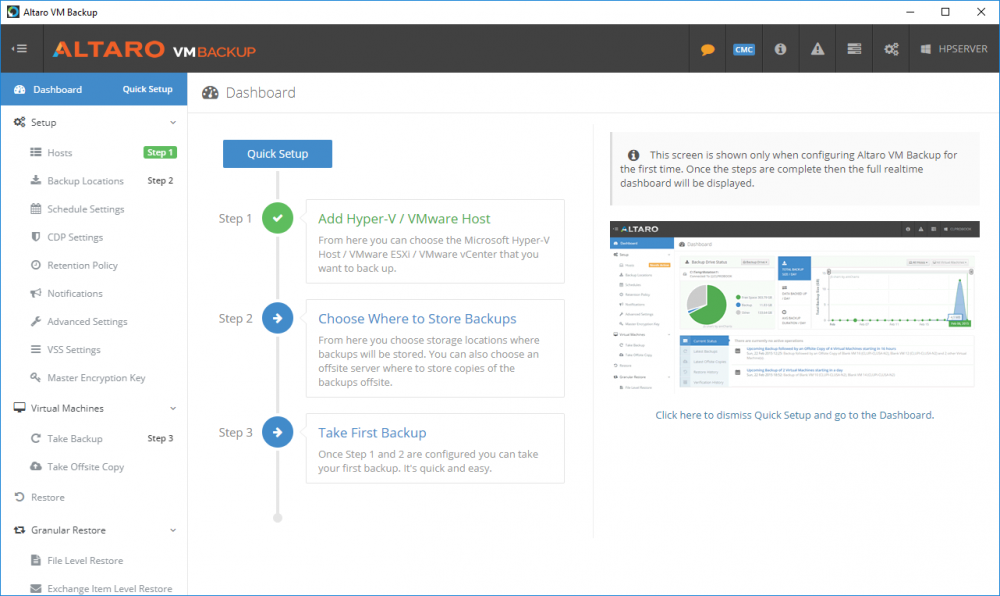
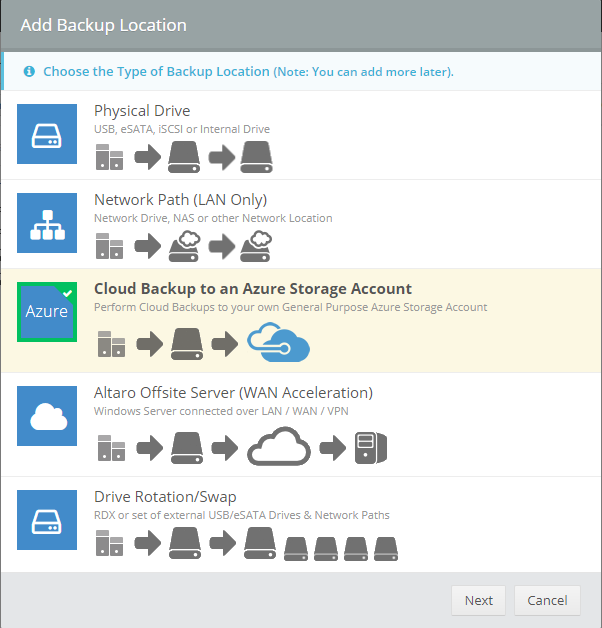
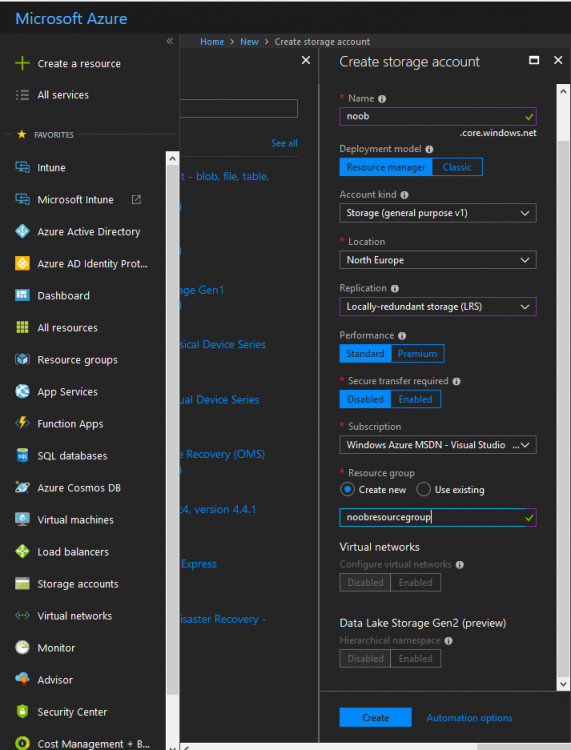
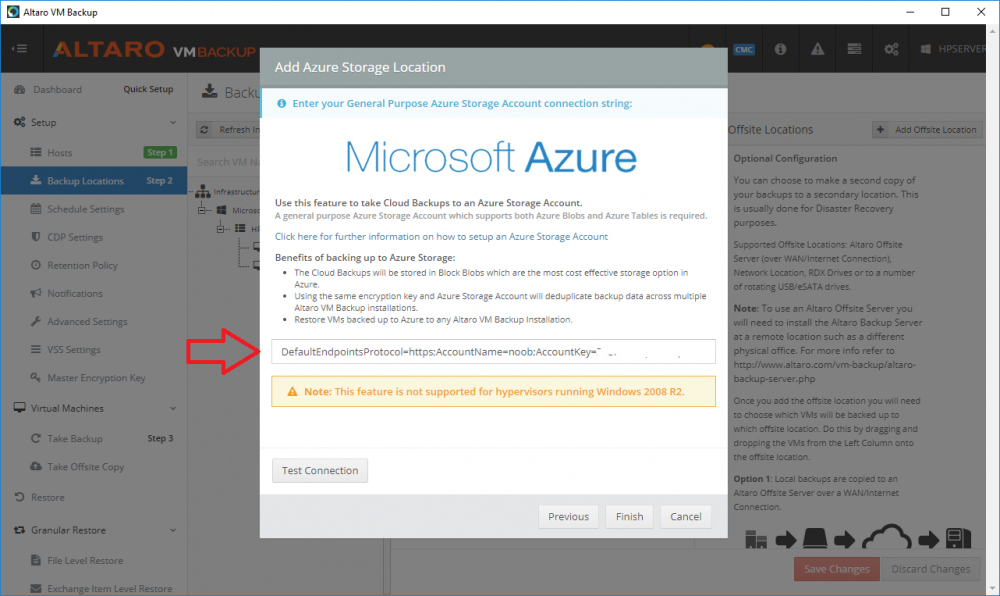
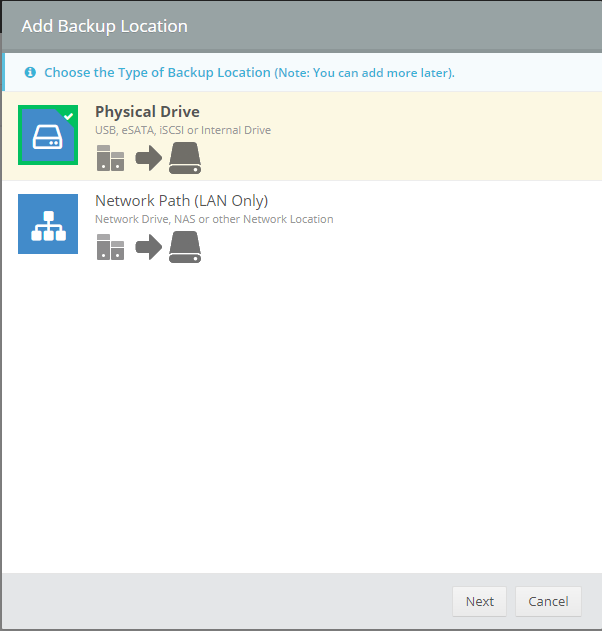
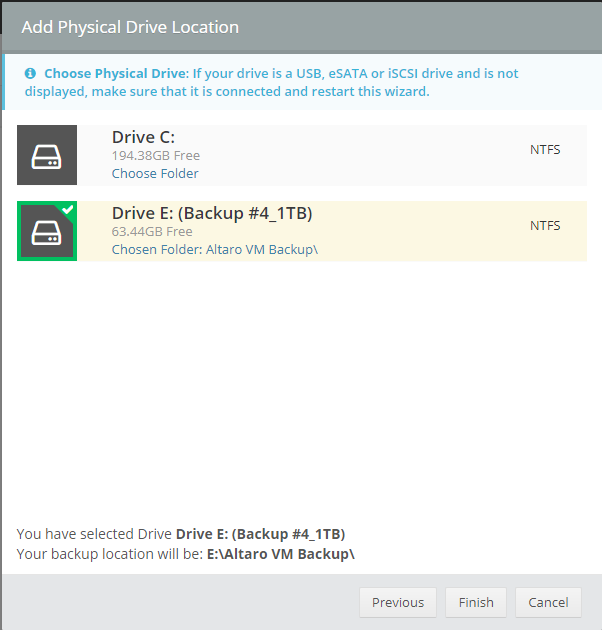
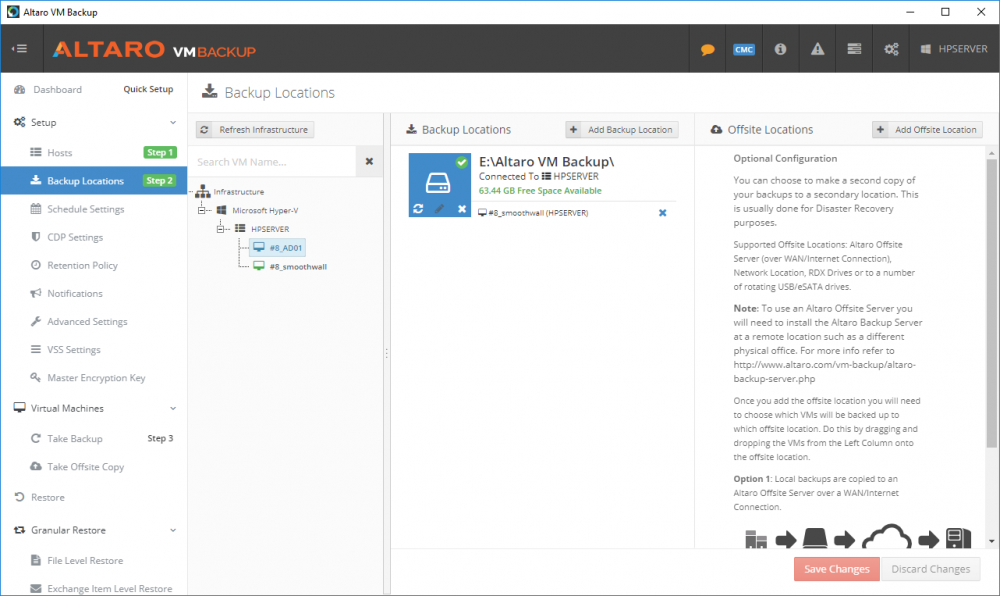
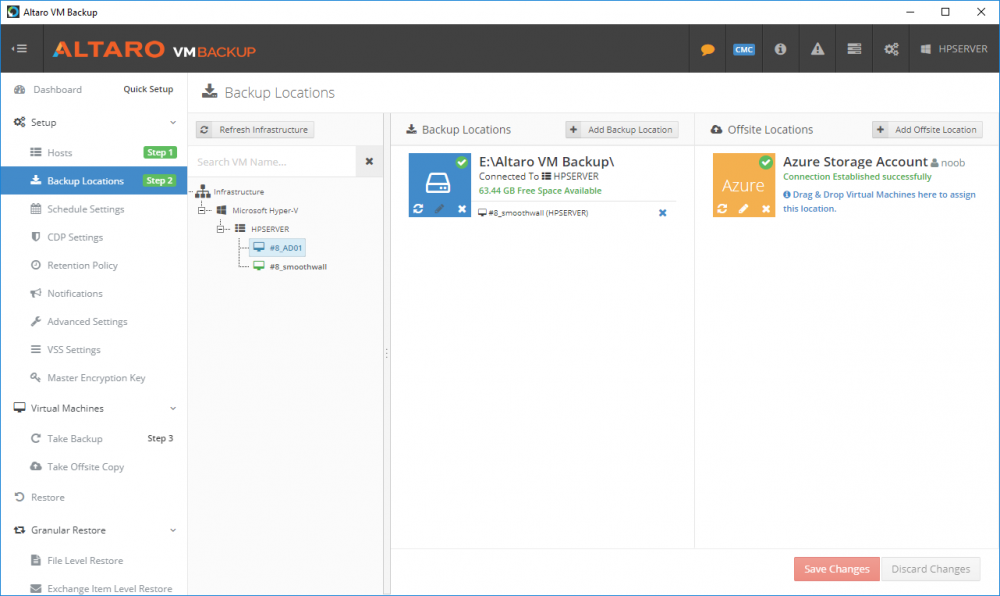
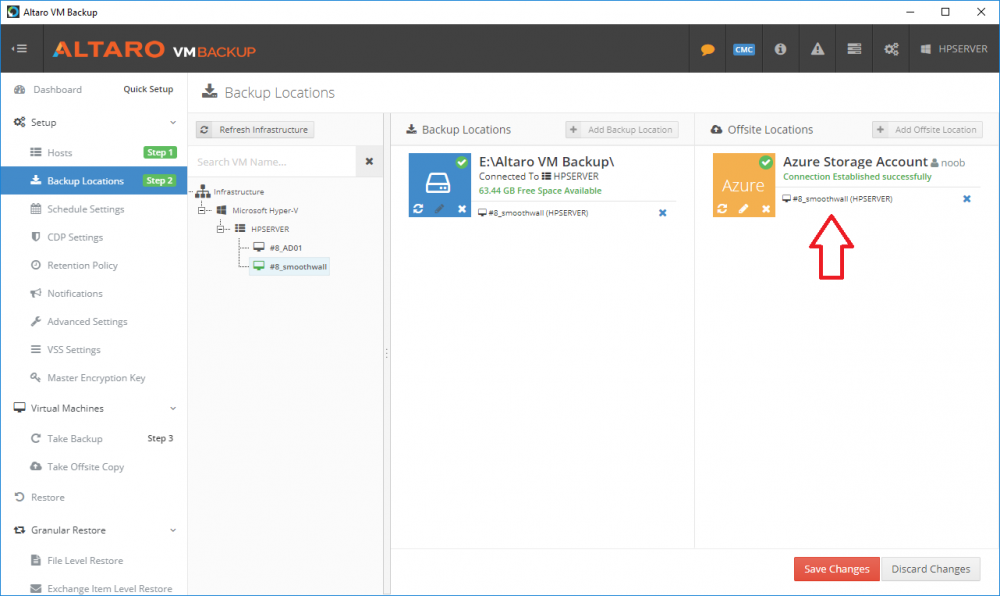
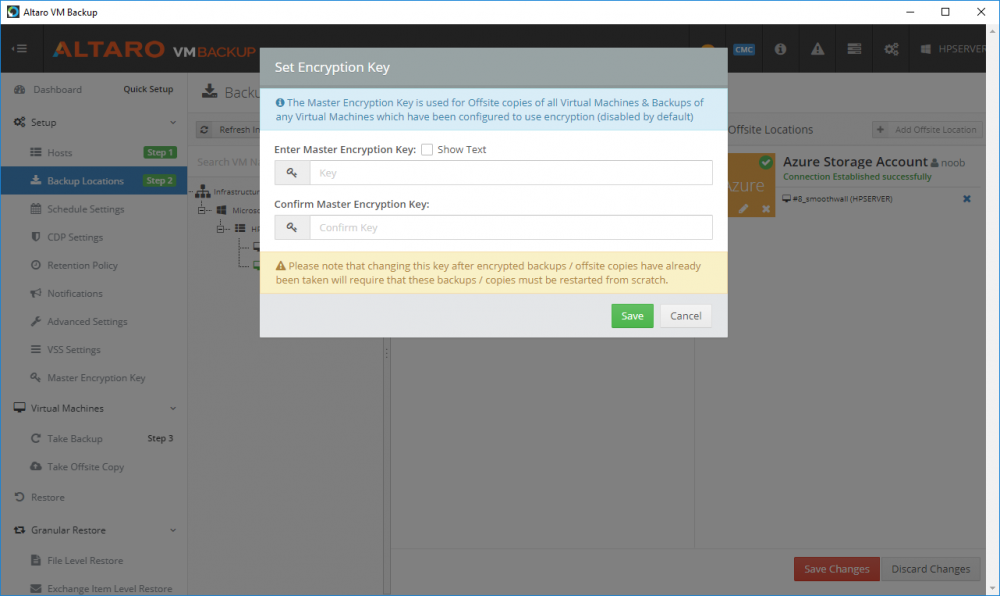
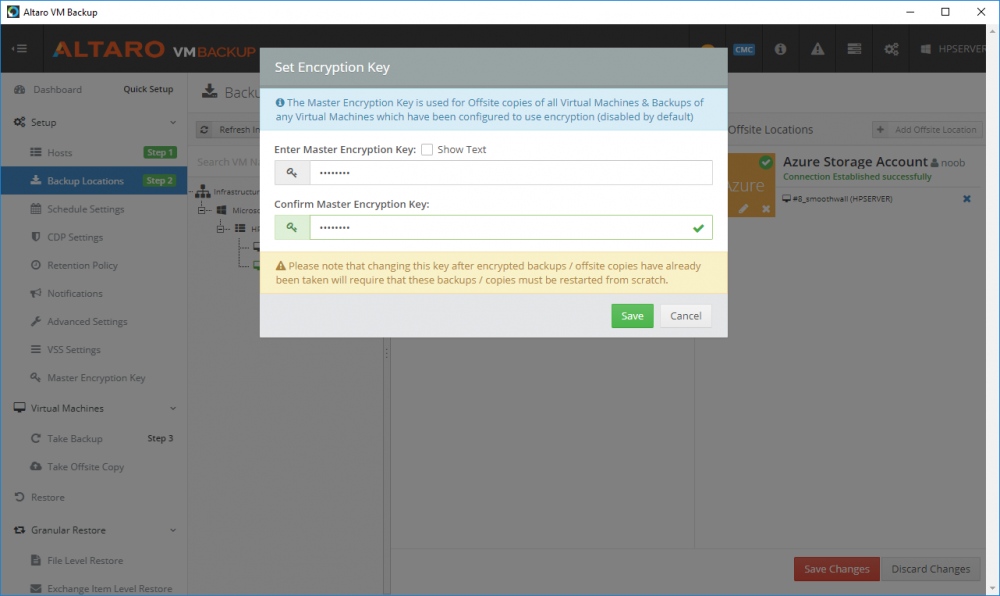
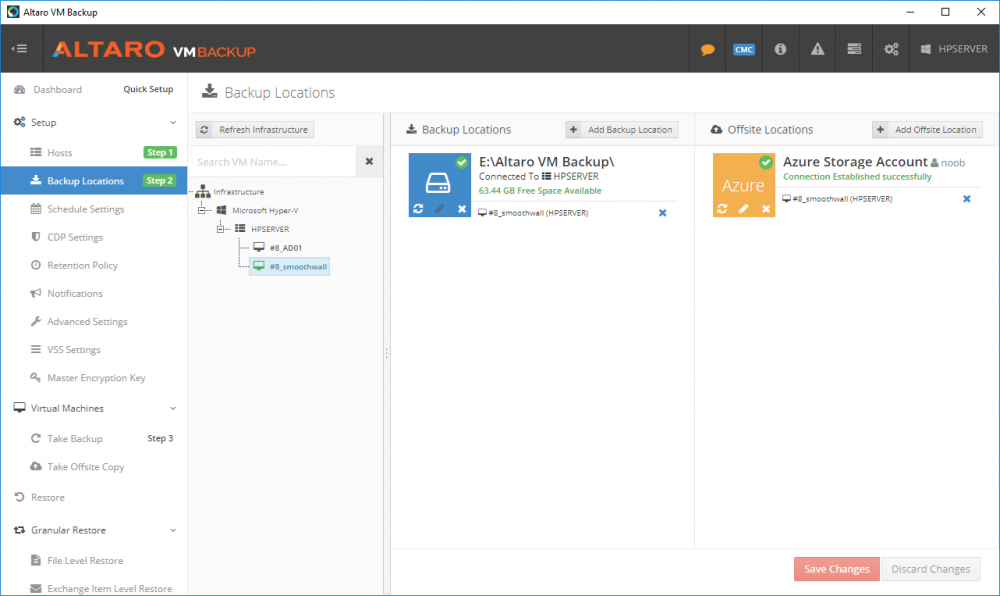
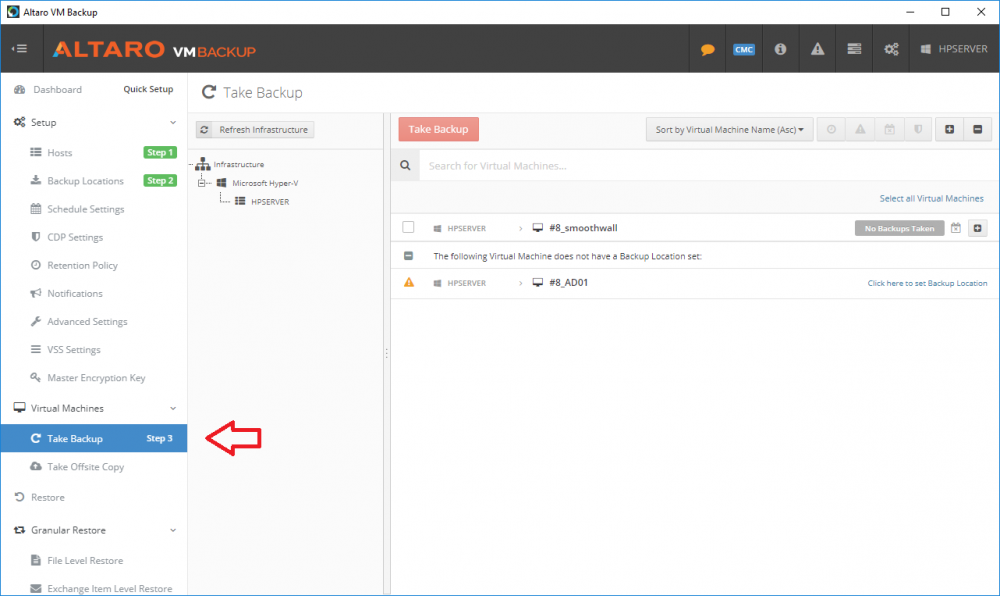
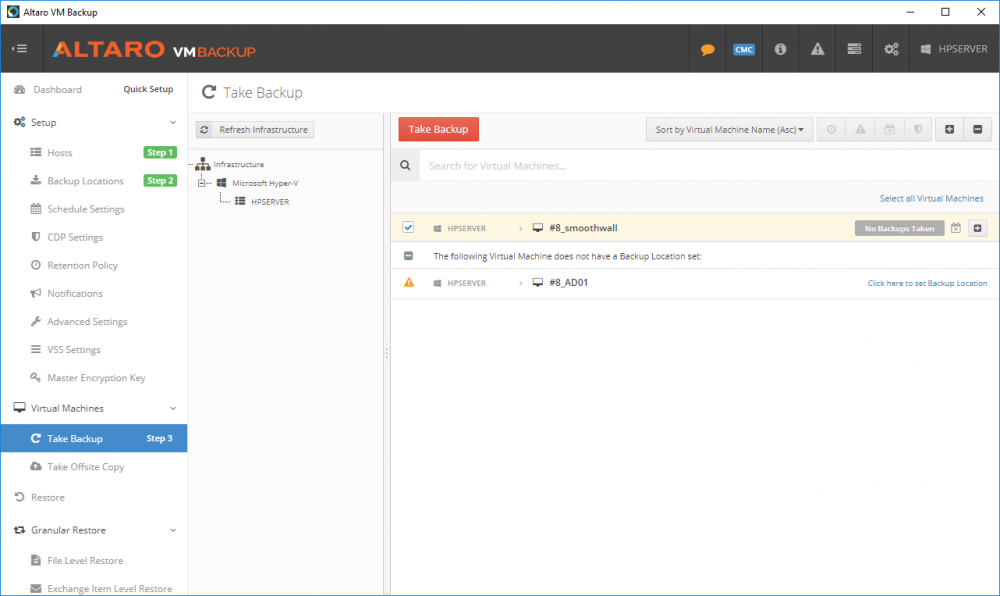
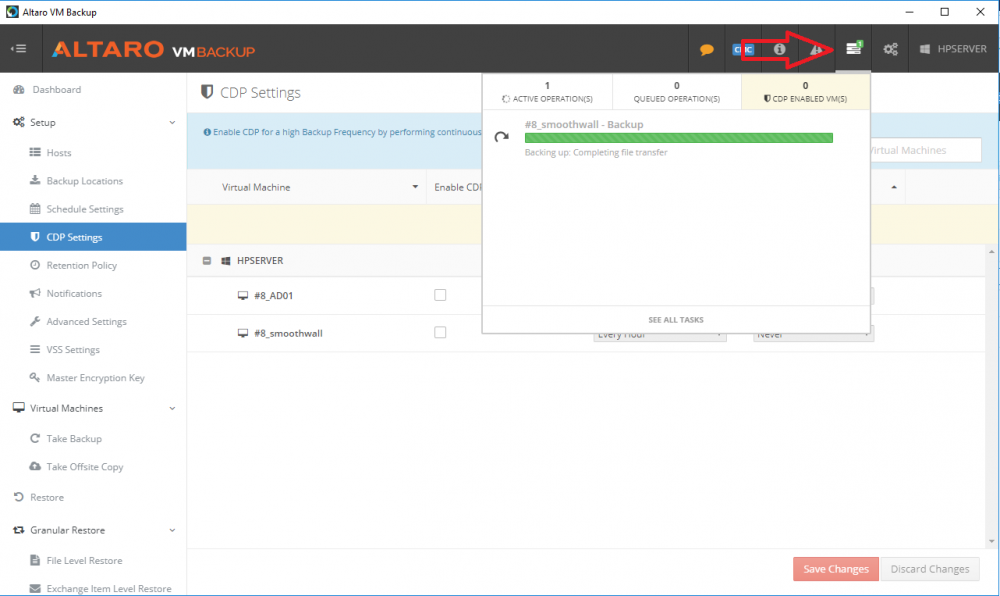
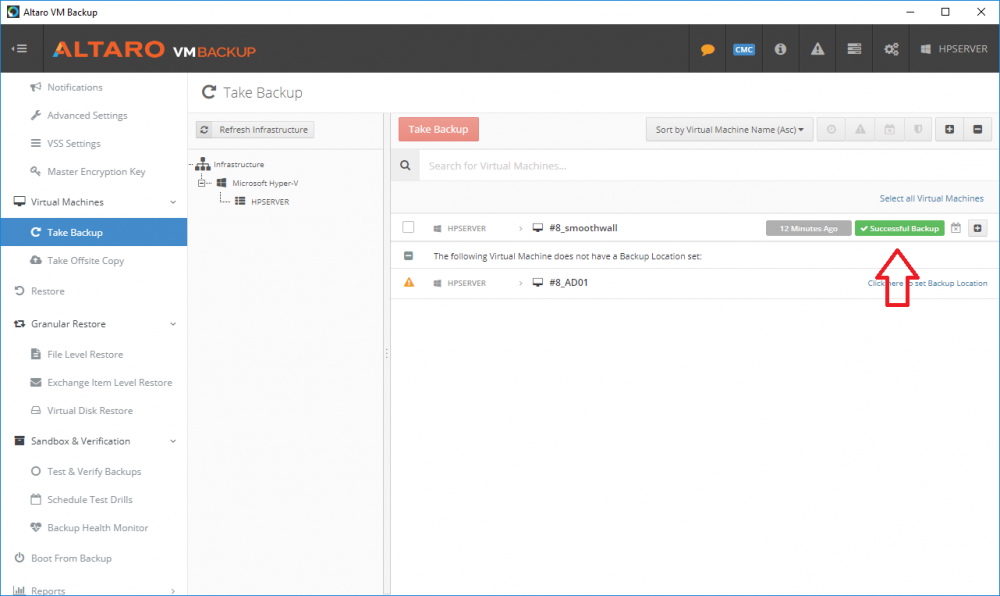
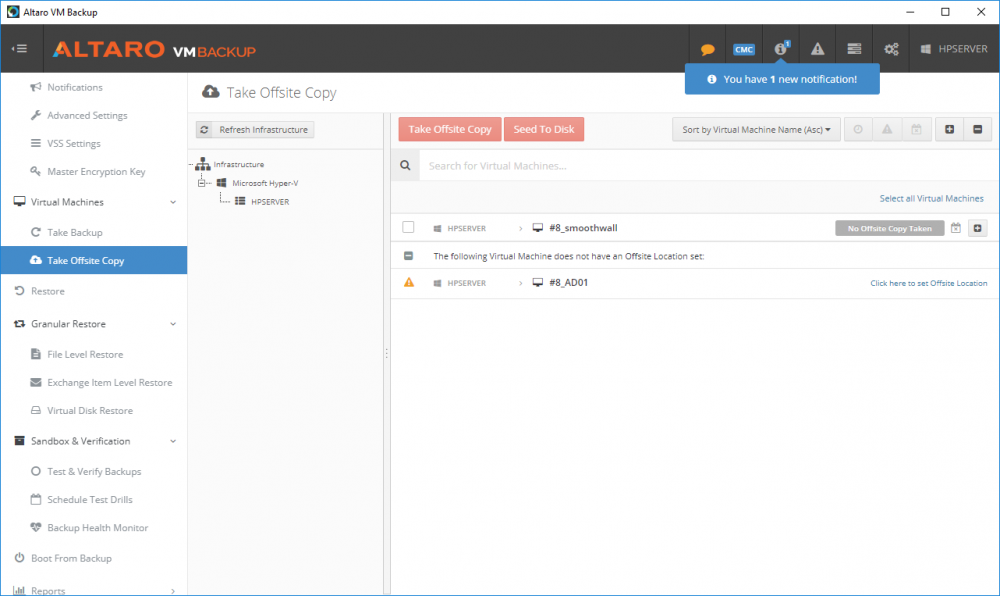
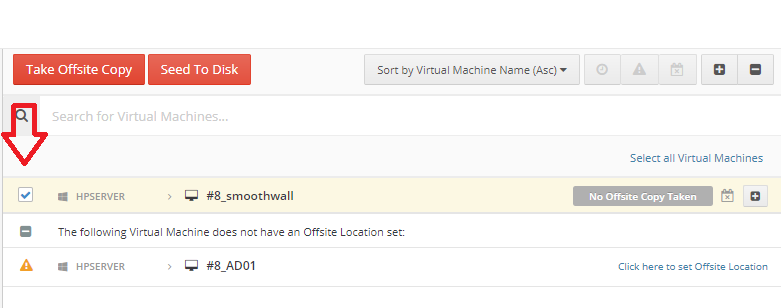
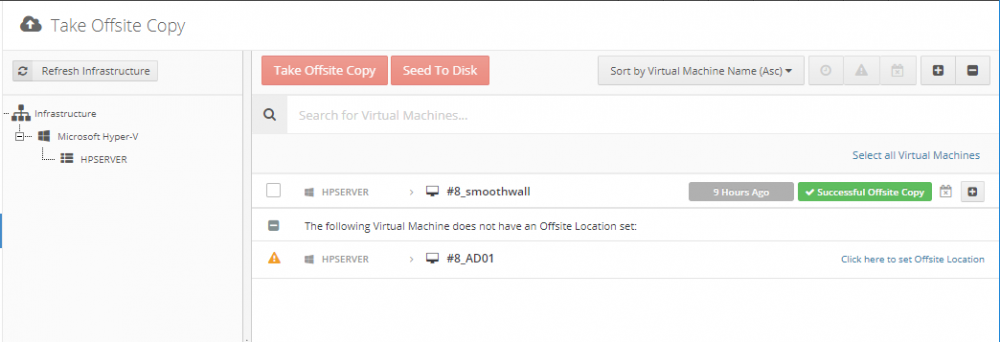
  1. Introduction Those of you who regularly read my guides know that I favor using Hyper-V over VMware for virtual machine work. I like the seamless integration with Windows and the fact that it comes built in to Windows 10. This blog post is about backing up your Hyper-V virtual machines on Windows Server 2016 to Microsoft Azure Cloud Storage using Altaro VM backup software, their software does show the process in 3 steps, but in reality, you need to do more things which I've detailed below. Step 1. Configure Azure Cloud Storage If you've already done this, please skip to step 2 otherwise sign in (or sign up) to the Azure Portal account using https://portal.azure.com. In the Azure Portal, click on the + sign to Create a resource (1) select Storage (2) then select Storage Account (3) Give the storage account a name and select General Purpose v1 as the Account kind (as General Purpose v2 would cost more). For Replication, select Locally redundant storage (LRS). For Performance, leave the default setting of Standard. Click on Create when done. Note: Ensure you select General Purpose v1 as the Account kind as it will result in the lowest cost. This is due to: "workloads with high churn or high read rates may benefit from this account type." Reference: https://docs.microsoft.com/en-us/azure/storage/blobs/storage-account-options Step 2. Download & install Altaro VM Backup software Next you need to go to Altaro's website here where you can download the 30-day free trial of Altaro VM Backup. If you’re opting for the free edition, you will still automatically get a 30-day trial of the Unlimited Plus version, which includes the backup to Azure feature. Note: You'll need Windows Server operating system such as Windows Server 2016 to host Hyper-V for this to work, Altaro VM Backup does not support Windows 10 (sadly). To see a list of supported operating systems click on this link. Once you've downloaded the trial, install it. It's a very simple installation wizard and once done you can launch the Altaro VM Backup console. Step 3. Configure an on premise backup location Now that you've installed Altaro VM Backup, you can start configuring it. In the console ensure that This machine is selected then click on Connect. Below is what it looks like when you haven't yet configured anything. Note: You are required to configure an on premise backup location prior to backing up over the WAN to Azure Cloud Storage. Select Backup Locations in the left pane, and then click on one of the two available on premise locations, in my example I selected Physical drive. click Next and select the destination drive (and previously created folder) where you want to store the backups. click on Finish. Step 4. Select which virtual machines to backup Now that you've configured a backup location, select one or more virtual machines and drag and drop them to the on premise backup location. Each selected virtual machine that you drag and drop, will then appear under that backup location. Click on Save Changes in the lower right corner of the Altaro VM Backup console once done. Step 5. Configure Offsite Location In the Altaro VM Backup console Click on Add Offsite Location (top right) and from the Offsite options that appear, select Azure (Cloud Backup to an Azure Storage Account) and then click Next. Note: There is a link to How to set up Offsite Copies to an Azure Cloud Storage Account, if you need help configuring that click on it otherwise see Step 2 above. Next, you'll need to find the Azure Storage Connection string associated with your Azure Cloud Storage. To do that, in the Azure Portal, select Storage Accounts, select the storage you previously created, and then select Access Keys. The Connection String will be listed, select it and copy it. Paste that Connection String into the empty field in Altaro VM Backup Click Finish. You should see Connection Established Successfully in the top right corner. next, drag and drop the virtual machine(s) that you want to backup to the cloud and finally, click on Save Changes in the lower right corner. You'll be prompted to Set an Encryption Key. This key is basically a text based password that you will use to protect your backups, so make sure it's something secure and that all people that need to access the backups are aware of. click on the green Save button. Once done, you'll notice that Save Changes is RED in colour, this means you cannot click on it, I found it a bit confusing but as long as you've done the steps I've outlined you'll be ok. Step 6. Take a (on premise) backup Now that you've configured an Azure Storage Account as an offsite backup location, you are ready to take a backup. However, you must first take a primary backup (on premise) before being able to backup to the cloud. To do that, click on Take Backup in the left pane. Select one or more virtual machines that you want to backup before clicking on the even redder Take Backup button. you can then click on the Storage symbol (shown here with a red arrow) to get live information about the backup in progress. Once the backup is done, you can verify it's progress in the Take Backup window. Step 7. Take an offsite backup At this point, everything is in place for your first backup to Azure Cloud Storage. So go ahead and click on Take Offsite Copy. As before, select one or more virtual machines to backup and then click on Take Offsite Copy, you'll see a small popup And after the backup is done you'll see the status has updated real time, look for Successful Offsite copy Job done ! Summary Cons: I found the Altaro VM Backup console to be a little bit confusing at times necessitating calling their support number (please change the hold music) What was not immediately clear from the console was that in order to backup to the cloud, you must first define an on-premise (disk or network location) backup location as the primary location, and only after you've successfully backed up to that primary location, can you attempt the offsite backup. (I've given this feedback to Altaro directly.) Pros: Great quick support Altaro VM Backup is definitely one of the best Virtual Machine backup softwares out there today, and it's very competitive The ability to backup to Azure Cloud Storage is a great addition I'd recommend you give it a test run yourself: http://bit.ly/altaro-download Recommended reading Microsoft Azure storage pricing details - https://azure.microsoft.com/en-us/pricing/details/storage/ Microsoft Azure replication options - https://docs.microsoft.com/en-gb/azure/storage/storage-redundancy Altaro support for setting up Azure Cloud Storage - http://support.altaro.com/customer/portal/articles/2814316 Altaro VM Backup best practises - http://support.altaro.com/customer/en/portal/articles/2268483-best-practices-for-setting-up-altaro-vm-backup?b_id=14453 Microsoft Azure Storage Explorer - https://azure.microsoft.com/en-us/features/storage-explorer/ Note: Some of you may have already noticed that Altaro is a sponsor of windows-noob.com, and that is a good thing, please return the favor and use their software.
  2. hi, hope someone can shed some light on this topic for me. We have just had a power loss to our server cab. In it contains 4 hypervisors and 2 san disk shelves. Our SCVMM server is virtual. When we restored power to the cab we were hoping the vm's would all start by them selves as specified in vmm "power on after failure". We were gobsmacked to find that no vm's started, and more they weren't even listed in hyper v. it was like they'd never been there. We had to go through all the vm's one by one and re import into hyper v. All our hypervisors are listed in the cluster. The SASN is a a Dell ps6100 and 4100. ANy ideas would be appreciated Thanks Guys
  3. Hi, Our main site has multiple locations, and a few of them within the US support and deploy our images from the main office via SCCM 2012 R2 SP1 CU3. We have been troubleshooting some network issues recently, that I believe we have cleaned up now. However during some deployment testing, we are experiencing some inconsistent results that I hope someone may have an answer or idea of where to look. -Created 4 VMs setup for OSD (testing/troubleshooting) all of the VMs are set for PXE. -All machines boot up and get to the PXE menu and populate the available task sequences with no issues. -Our guy has reported that he started the same task sequence to all the VMs at same time manually, where they all will download the boot image as so, and move forward onto the imaging process. -Anywhere from 2 out of the 4, to 3/4 of the VMs startup just fine and run the task sequence to completion. The other 1-2 (depending on the test run, it varies) will reboot and then launch within winPE and start the task sequence. I could be wrong here, but I believe usually when a TS reboots it is because the boot image from the PXE or boot media differs from the boot image assigned to the TS which makes sense. Though, given nothing is different from one VM to the other, the TS is the same...which has me scratching my head. My other theory(keyword theory) is our user is experiencing this upon the boot up itself while downloading the boot image from the bios menu. VM 2 is requesting this boot image that maybe "busy" at that very second due to VM 1 requesting it as well, forcing sccm to use another available boot image? - more than likely wrong here, nor does that really make sense to me, I'm just picking straws at this point. Has anyone run into this, or seen it before? Any thoughts, things to try? Thank you
  4. Everyone, I have an SCCM Server that is currently running in VMware, but we're moving all our environment over to Hyper-V. We have moved everything over by using the Microsoft Virtual Machine Converter Tool, and so far have had 0 issues. It scares me to mess with my SCCM server, but we're going to have to get it over to Hyper-V one way or another. My question to you all, do we convert and move or back-up and rebuild? My environment is very basic. Single site, and one server (the one being moved) that houses all roles (site server/database/reporting/management point/etc). This is a school district, and we have 4 remote campuses throughout our town, and we have distribution points setup. That's the extent of our SCCM Infrastructure. I have a feeling the best route would be to back-up and rebuild the server from scratch. If that's the case, can someone point me in the right direction for best practices for that process? I'm open to any suggestion(s) for this. I appreciate any and all input, thank you!
  5. Hello, I am running Windows 10 x64 Educational version on a virtual machine. My co-worker is running the same version on his physical box. We have both noticed that Windows 10 cannont connect to our Hyper-V host which runs on a windows 2012 server core machine. We get the following error: "An error occurred while attempting to connect to server xxxxx. Check that the Virtual Machine Management service is running and that you are authorized to connect to the server." The service is running just fine and our accounts are domain admins and have sufficient rights to connect to the host since we are able to do it from our Windows 8.1 machines. Could this be due to Hyper-V version mismatch? Do I need to change more permissions on the server core firewall? Please, any advice would be greatly appreciated. Regards, Joe
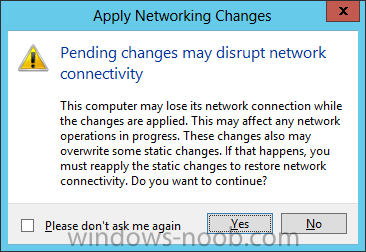
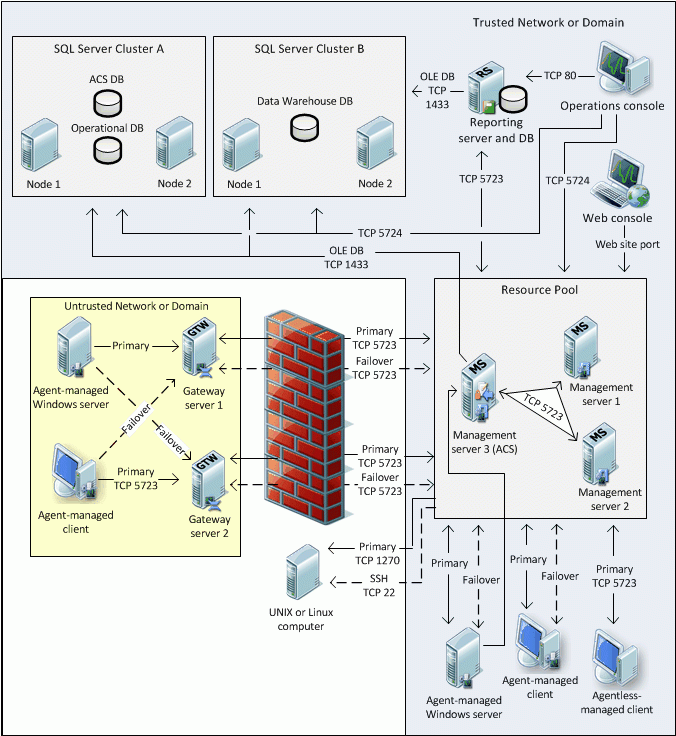
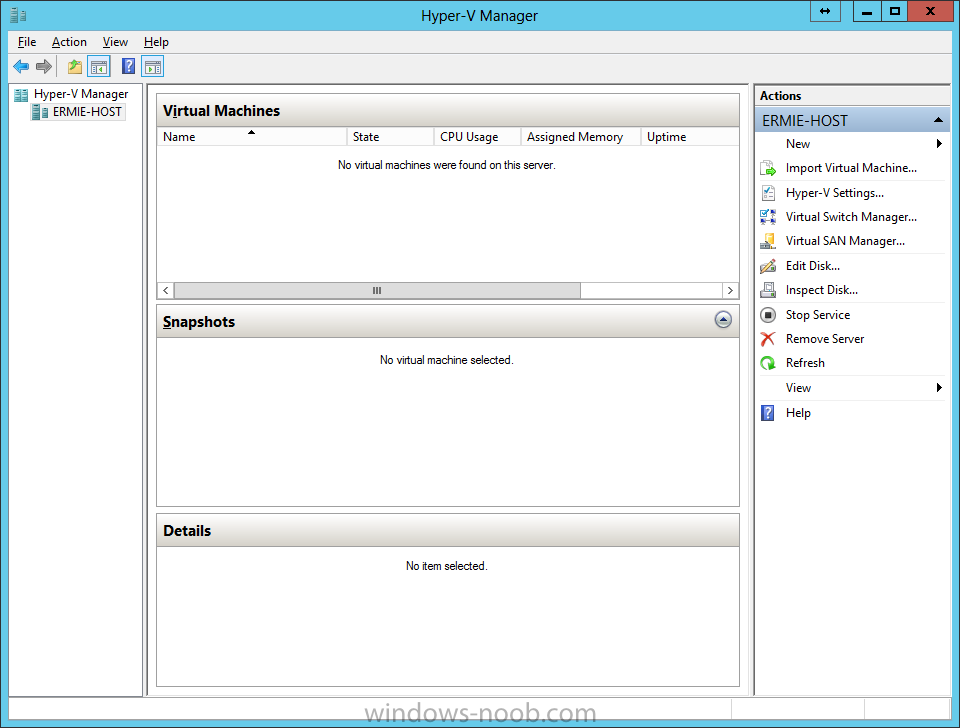
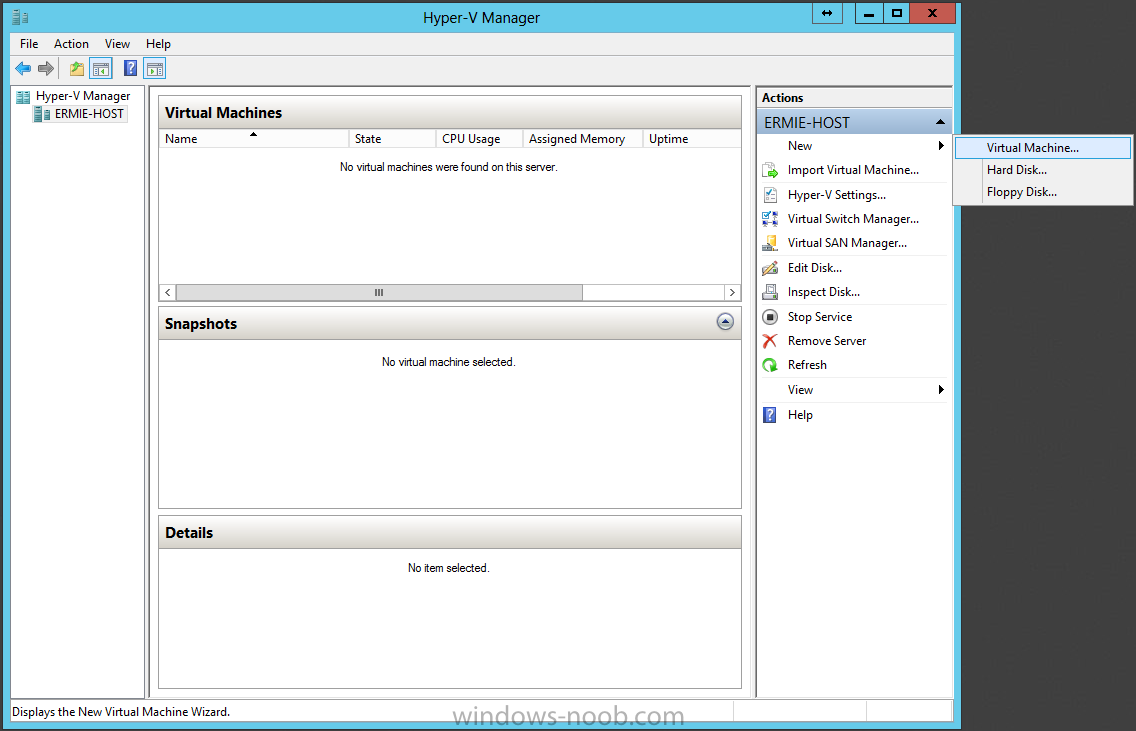
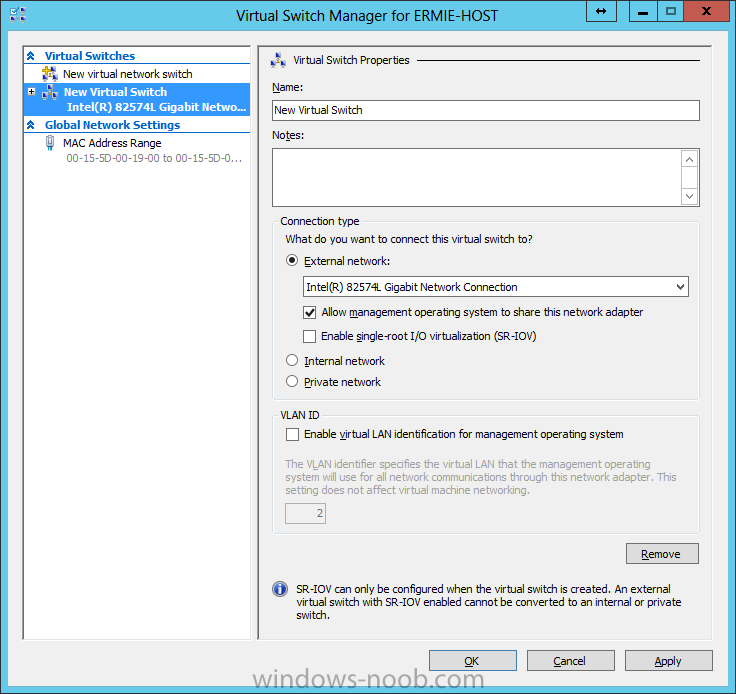
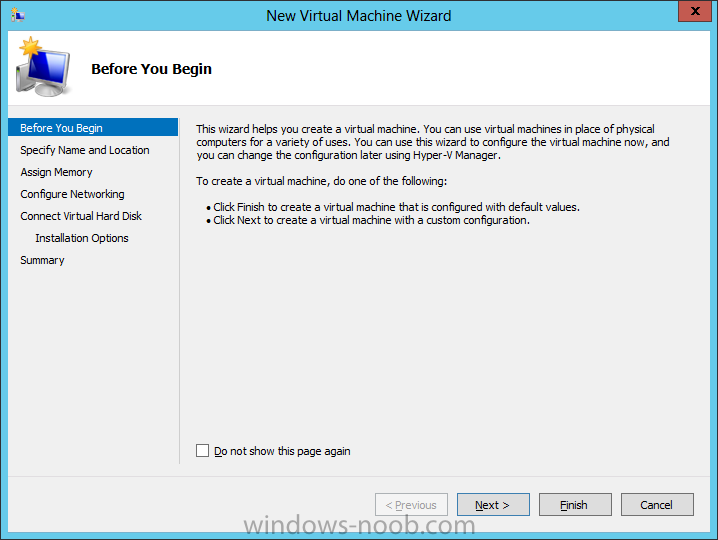
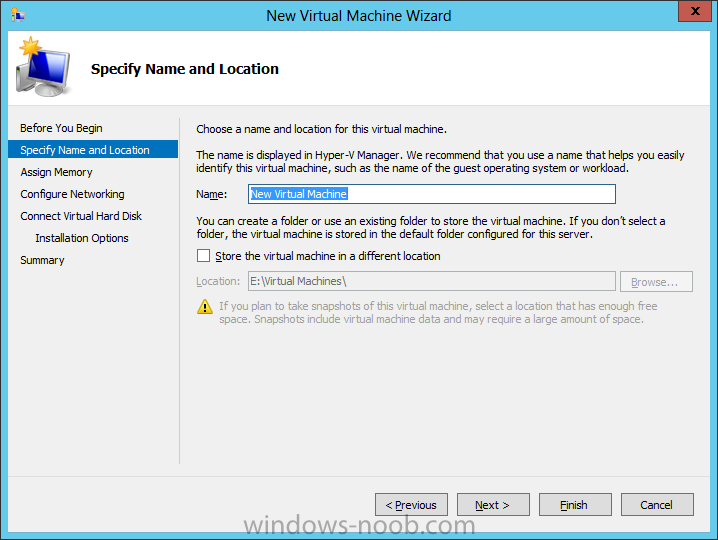
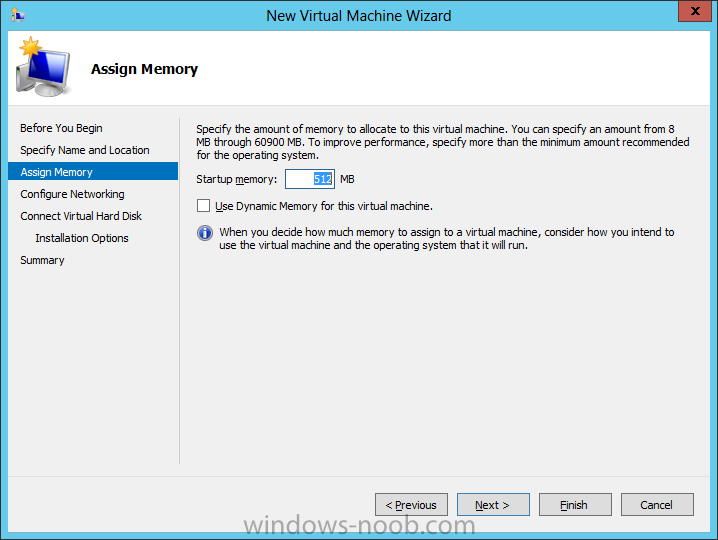
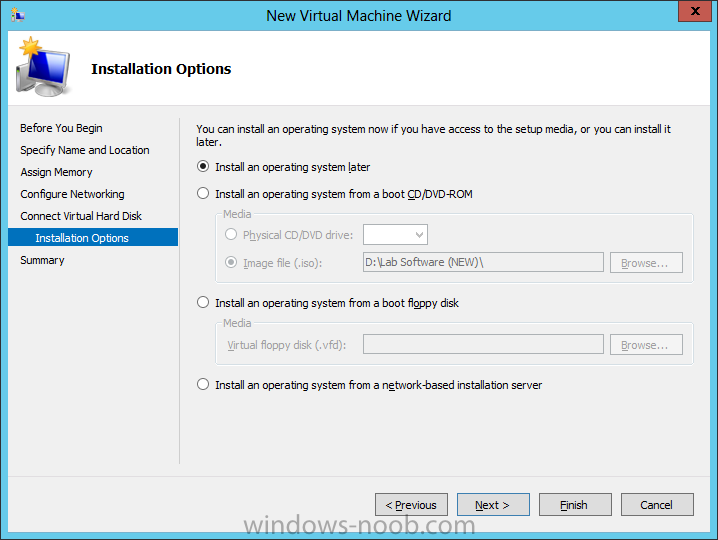
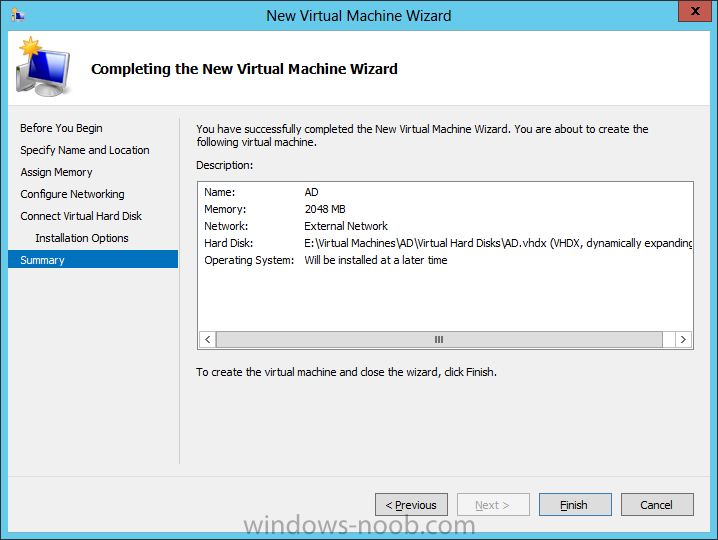
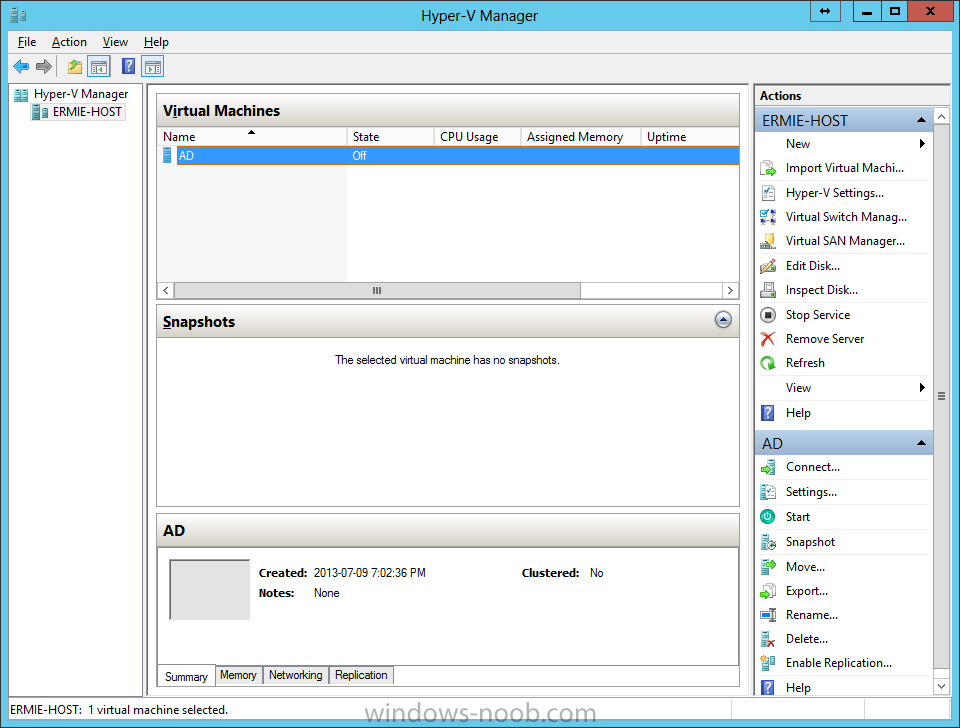
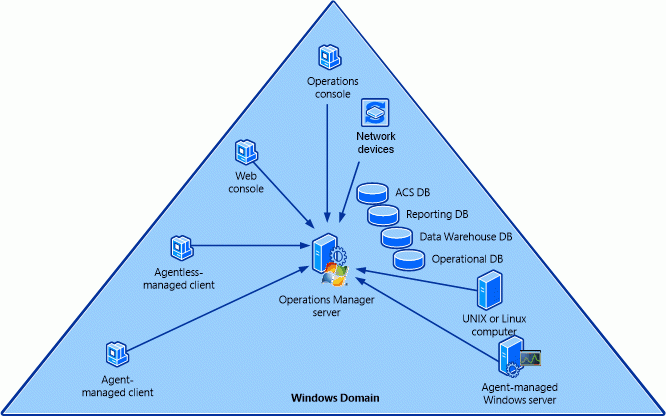
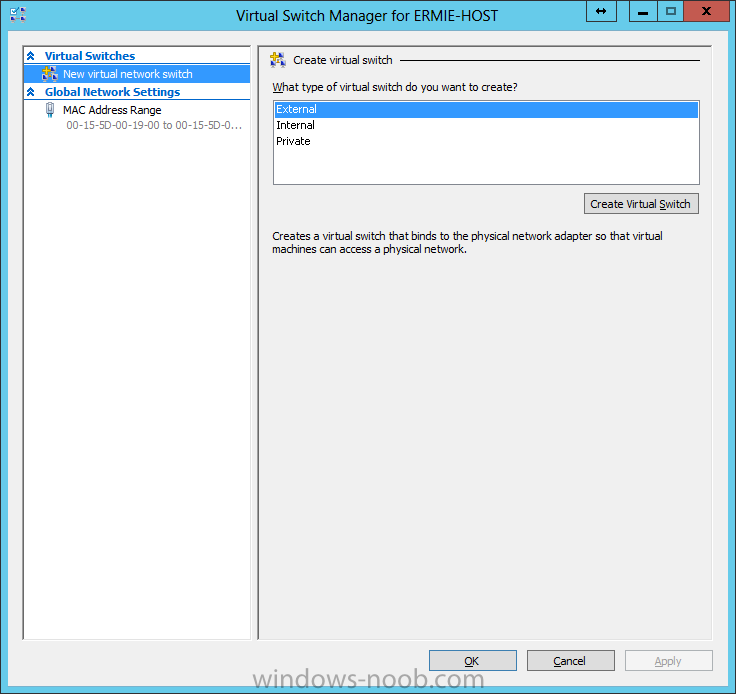
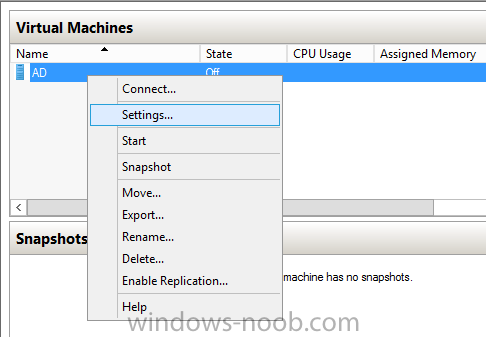
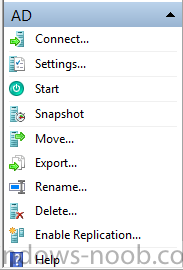
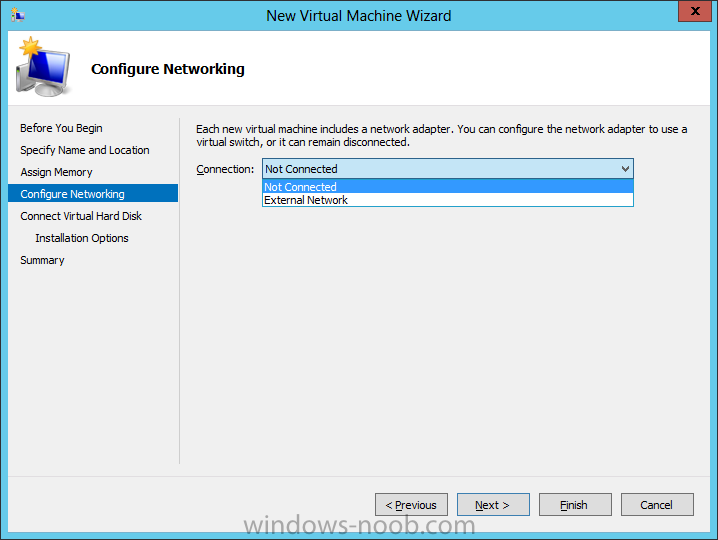
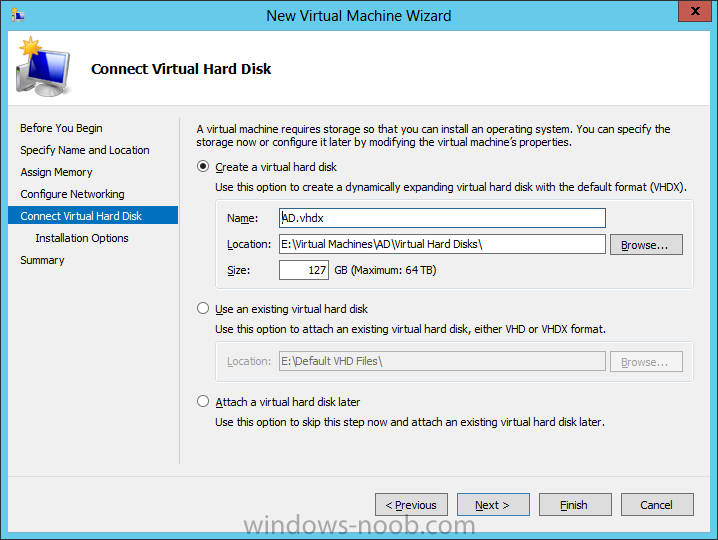
  6. SCOM 2012 SP1 in a LAB – Installation (Part A – Create The Lab Environment) TechNet Recommended Reading: Release Notes for the System Center 2012 Operations Manager SP1: http://technet.microsoft.com/en-us/library/jj656651.aspx Deploying System Center 2012 - Operations Manager: http://technet.microsoft.com/en-us/library/hh278852.aspx System Requirements: http://technet.microsoft.com/en-us/library/jj656654.aspx Getting Started with System Center 2012 - Operations Manager: http://technet.microsoft.com/en-us/library/hh509025.aspx What’s New in Operations Manager: http://go.microsoft.com/fwlink/p/?LinkID=223462 Key Concepts for Operations Manager: http://go.microsoft.com/fwlink/p/?LinkID=224022 Operations Manager Release Notes: http://go.microsoft.com/fwlink/?LinkID=221147 Operations Manager for System Center 2012 Supported Configurations: http://go.microsoft.com/fwlink/p/?LinkId=223642 Deployment Guide for Operations Manager: http://go.microsoft.com/fwlink/p/?LinkID=213291 Operations Guide for Operations Manager: http://go.microsoft.com/fwlink/p/?LinkID=207751 Hardware Requirements Note: The following page on TechNet describes the recommend hardware requirements for the Management Server(s) along with other features. Use this information to help plan for hardware requirements for your Management Server(s). Management Server Disk space: %SYSTEMDRIVE% requires at least 1024 MB free hard disk space. Server Operating System: must be Windows Server 2008 R2 SP1, Windows Server 2012, or Windows Server 2012 Core Installation. Processor Architecture: must be x64. Windows PowerShell version: Windows PowerShell version 2.0, or Windows PowerShell version 3.0. Windows Remote Management: Windows Remote Management must be enabled for the management server. .NET Framework 4 is required. Installation There are 2 different deployment scenarios that you can use: Single-Server, and Distributed. Microsoft has created 2 diagrams to show the different deployments. In our example, we are going to use the Single-Server type. Single-Server Deployment of Operations Manager Distributed Deployment of Operations Manager For the purpose of our demonstration and simplicity, we are going to use the single server method, and install all features/elements within 1 server, this includes the databases, web console, reporting, ACS, etc. Introduction: I use Hyper-V in my LAB and that's what all these virtual machines will be running on. In my lab, I have Windows Server 2012 Datacenter installed as the server OS on the host machine. All other virtual machines will be running Windows Server 2012 Standard edition, with the graphical user interface (GUI). My hardware consists of the following: § Intel Xeon E5-2620 § Asus P90X79 WS § 64 GB G.Skill Ripjaws Z Series § 2 x 256 GB Samsung 840 Pro Series SSD High Level Plan Here is a high level of what we are going to complete in this initial part of the series. 1. Create the Lab Environment 2. Install the Operating System 3. Install Active Directory Domain Services 4. Install SQL Server 5. Install System Center Operations Manager In a later posts, we will also cover installing agents, reporting/dashboards, management packs, ACS, etc. So now let’s start with the first part, creating the lab environment. Create the Lab Environment: Hyper-V Configuration As mentioned, my environment uses Hyper-V. So, we’re going to start by configuring Hyper-V for our needs, and creating the Virtual Machines (VMs) required for our lab. The first thing we need to do is setup a Virtual Switch for the VMs to connect through. Launch Server Manager, click on Tools, and select Hyper-V Manager. When Hyper-V loads, it will have nothing in it. Even if we were to create a VM, it wouldn’t have a network connection to use. So we’ll start with creating a Virtual Switch. As you can from my screenshot, I have 2 LAN ports on my host. One of them has a connection to my home network and the Internet. In the Hyper-V Manager, click the Virtual Switch Manager from the Actions pane. Now, click on the Create Virtual Switch button. From here, you now need to configure the virtual switch that your VMs will use. Give it a name to clearly identify it (in my case I called it ‘External Network’), and choose the connection type. For more information about virtual networks, see the following TechNet article: http://technet.microsoft.com/en-us/library/cc816585(v=ws.10).aspx. Here is an excerpt from the article: External virtual networks. Use this type when you want to provide virtual machines with access to a physical network to communicate with externally located servers and clients. This type of virtual network also allows virtual machines on the same virtualization server to communicate with each other. This type of network may also be available for use by the management operating system, depending on how you configure the networking. (The management operating system runs the Hyper-V role.) For more information, see “A closer look at external virtual networks” later in this topic. Internal virtual networks. Use this type when you want to allow communication between virtual machines on the same virtualization server and between virtual machines and the management operating system. This type of virtual network is commonly used to build a test environment in which you need to connect to the virtual machines from the management operating system. An internal virtual network is not bound to a physical network adapter. As a result, an internal virtual network is isolated from all external network traffic. Private virtual networks. Use this type when you want to allow communication only between virtual machines on the same virtualization server. A private virtual network is not bound to a physical network adapter. A private virtual network is isolated from all external network traffic on the virtualization server, as well any network traffic between the management operating system and the external network. This type of network is useful when you need to create an isolated networking environment, such as an isolated test domain. For our demonstration, we are going to use an External Network so that the VMs can communicate with the Host system. Make all the appropriate selections and so forth, and then press OK. You may encounter the following warning message. This is because we are remotely connecting to the Host machine using the same network connection that we are about to setup as a Virtual Switch (hence selecting the ‘Allow management operating system to share this network adapter’ checkbox). Press ‘Yes’ to the dialog. Now that we have the virtual switch setup, we can start creating VMs for our lab. Create the Virtual Machines Let’s now create the VM’s we will need for the lab, specifically one for Active Directory, and another for SCOM (since we are install all roles within the same server). In Hyper-V Manager, from the Actions pane, click on New and choose Virtual Machine. On the New Virtual Machine wizard beginning screen, click read the information presented and then click Next. Enter a name for the VM. Note that this is NOT the name the VM will have within the Operating System (unless you name it the same), but rather, used as an identifier in Hyper-V Manager. After you have entered a name, click Next. Now assign the amount of memory you want your VM to have, and then press Next. This is the screen where you connect your VM to the network that we created, then press Next. This is the screen where you configure how large a hard drive the VM will have. Make the appropriate customizations and click Next. For the Installation Options, choose if you will install an OS later, or if you want to use an ISO, then click Next. On the Summary screen, review your selections and entries, and click Finish. Once the VM is created, it will appear in the Hyper-V Manager. If you want to configure further settings, like the number of CPUs and mounting an OS ISO, right click on the VM and choose Settings or click on Settings from the Actions pane. Repeat these steps for each VM you need to create, in our case one for Active Directory and another for SCOM. Here are the settings I have used for each of the VM’s: Active Directory: Virtual Machine Name: AD Memory: 2048 MB NOTE: Active Directory doesn't need 2 GB of RAM, it will run fine with 512 MB. I just increased the RAM so that the OS would install/respond faster. CPUs: 2 OS: Windows Server 2012 SCOM: Virtual Machine Name: SCOM Memory: 8192 MBNOTE: You may need to increase the amount of RAM this VM has, depending on performance. CPUs: 2 OS: Windows Server 2012 In the next part, we will install the Operating System, so stay tuned.
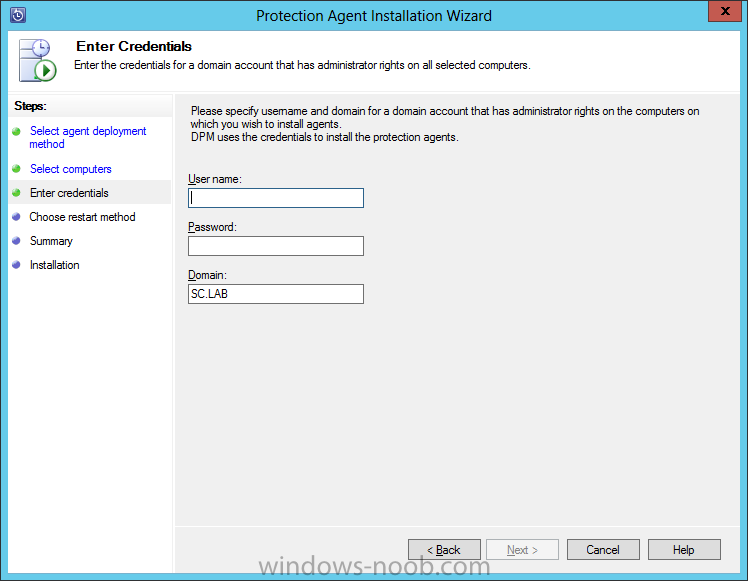
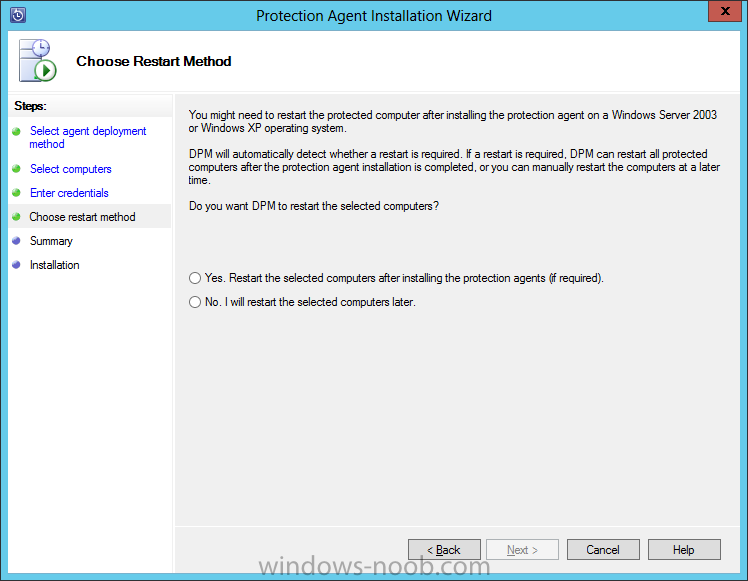
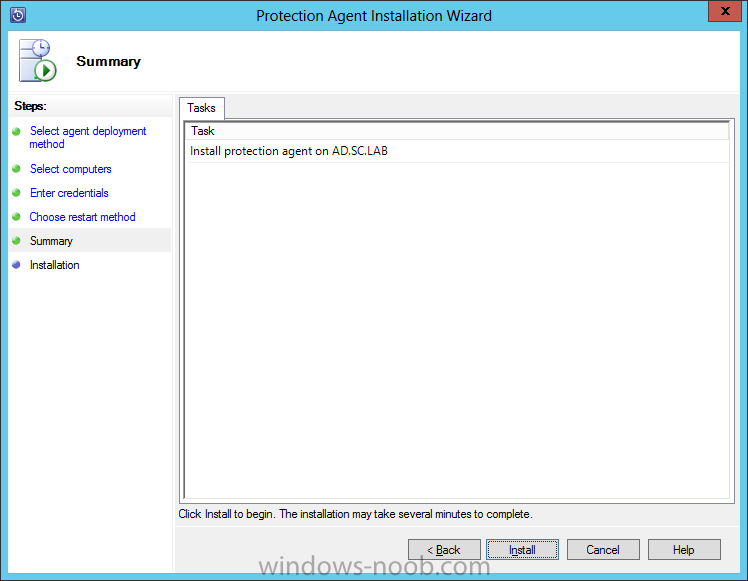
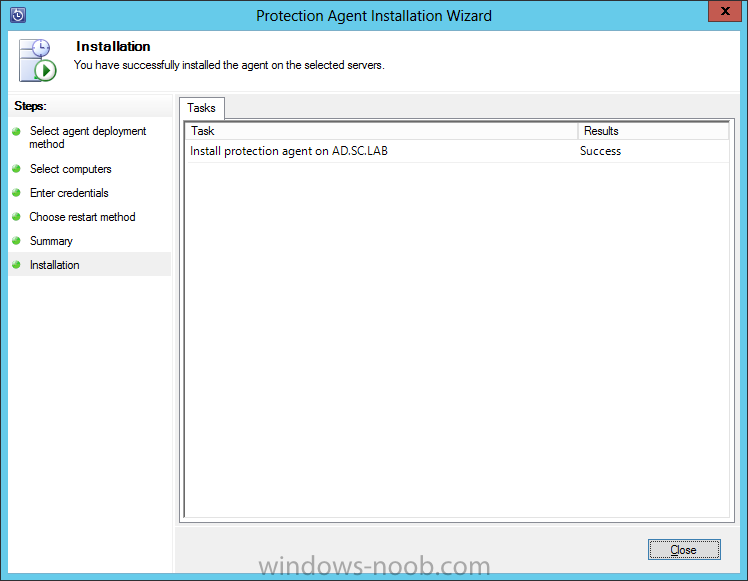
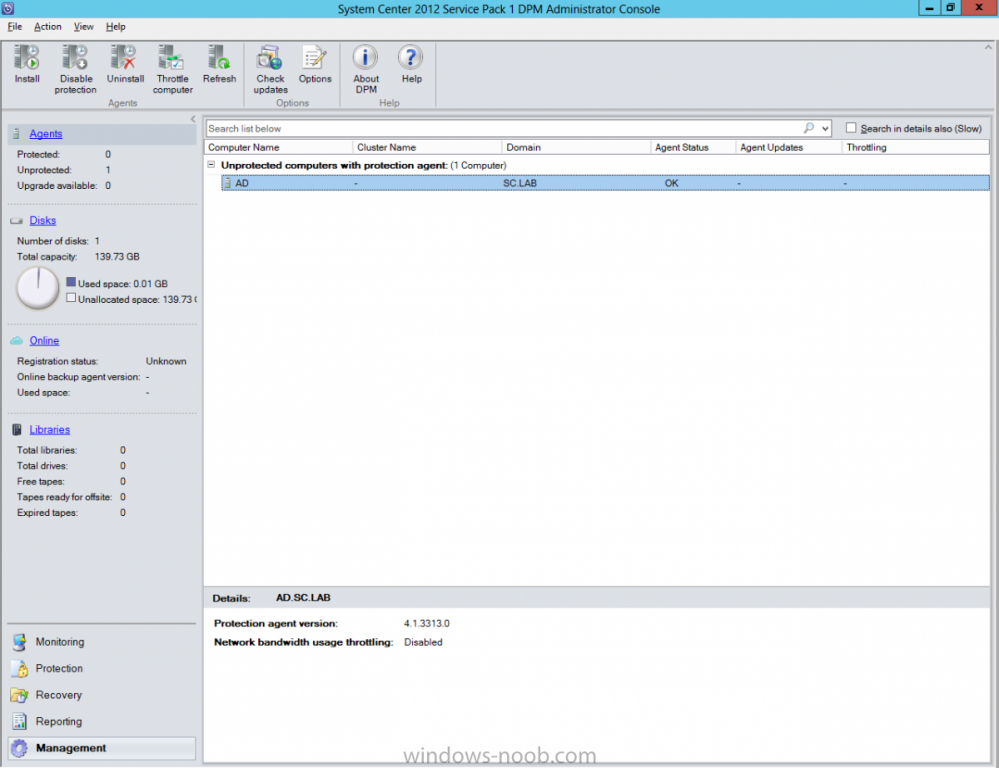
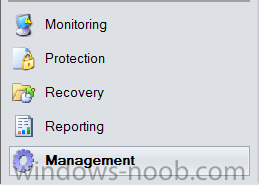
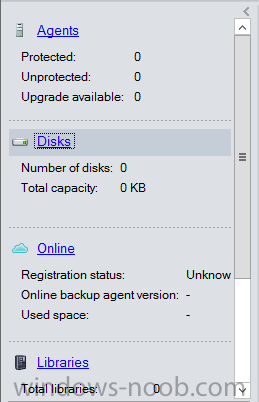
  7. Install Protection AgentNow that we have DPM installed, it doesn’t protect our environment if there are no Agents installed. Start by launching the DPM console and navigating to the Management space. Next click on the Agents link. In the toolbar, click Install. On the Agent Installation Wizard, Agent Deployment Method page, there are 2 options to choose from. Since we are starting new, we will choose ‘Install Agents’. Then click Next. On the Select Computers page, select the computer(s) that you want to protect from the list on the left, and press ‘Add’. Once you have added all the computers you want to install the Agent on, click Next. Next you need to provide credentials for the account to install the Agent. Then click Next. On the Restart Method page, chose whether to restart the computer after installing the agent or not. Your decision may be based on the location/use of the system (i.e. Production vs. Development). Make your choice and click Next. On the Summary page, click Install. Once the installation is complete, the Installation page will show ‘Success’. Click Close. Back in the DPM console, you will see your newly added system with an Agent Status of ‘OK’. You will notice that the Agents section (on the left) that it shows 0 Protected, 1 Unprotected Agents. We have to create Protection Groups.
  8. Installing SQL Server first is not required, as DPM will automatically install SQL Server for you as part of the application installation process. Since I install SQL on the local System Center server for each product, my example will allow DPM to install SQL on its own. If anyone is looking for instructions on installing SQL Server, please see my personal blog: http://adinermie.wordpress.com/lab-environment/system-center-2012-sp1-in-a-lab-installation-part-d-install-sql-server/
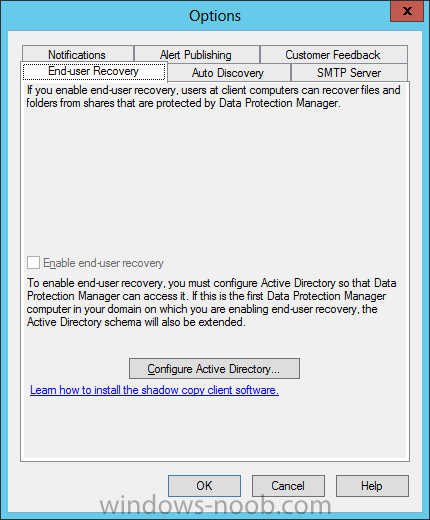
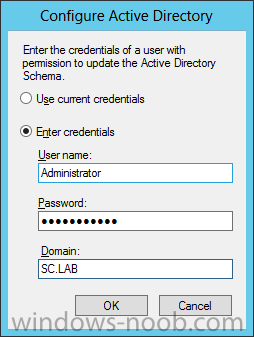
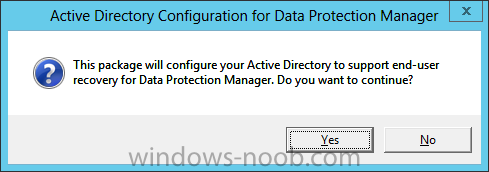
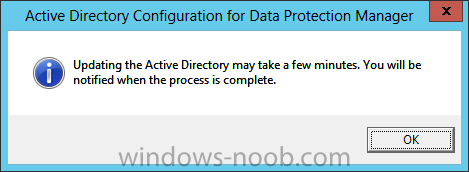
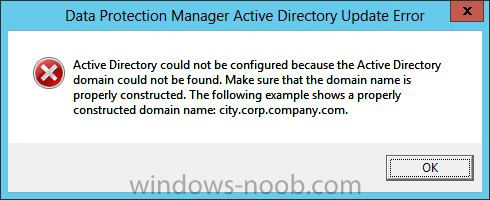
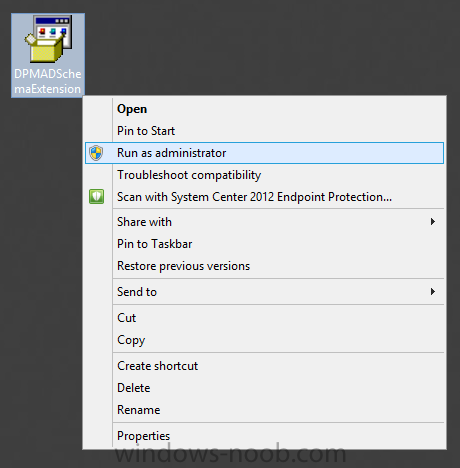
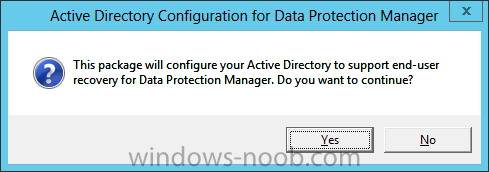
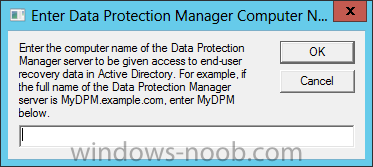
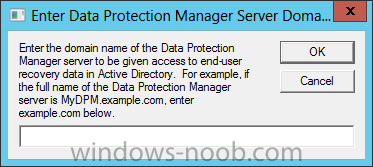
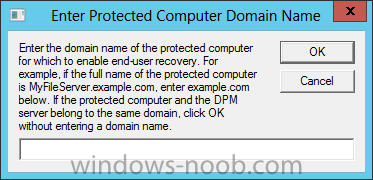
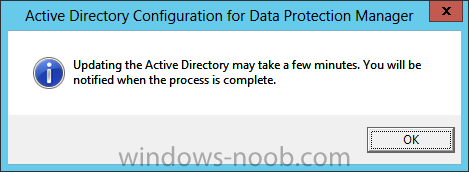
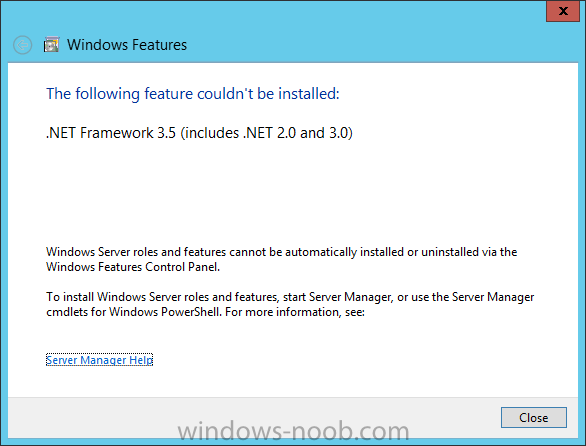
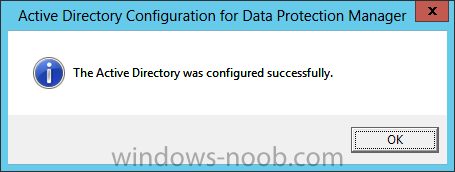
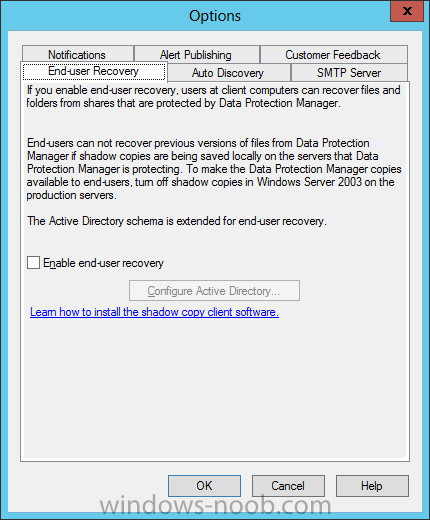
  9. Configure System Center Data Protection Manager – Configure End User Recovery Configure Active DirectoryIn reference to this TechNet article, by configuring Active Directory Domain Services to support end-user recovery. Start by launching the DPM console, and click on Management. In the toolbar at the top of the screen, click on Options. On the Options dialog, on the ‘End-User Recovery’ tab, click on the ‘Configure Active Directory’ button. On the Configure Active Directory dialog, supply credentials with permissions to update Active Directory. Then press OK. You will encounter the following message, click Yes. You will also encounter this other message, press OK. NOTE: You may encounter the following error message. Press OK. We have to perform a workaround to accomplish this. Extend Active Directory SchemaSince there is an issue with using the Configure Active Directory option, we have to perform a workaround. The reason is the way the security of Windows Server is configured. The workaround is to use the DPMADSchemaExtension tool, located in C:\Program Files\Microsoft System Center 2012\DPM\DPM\End User Recovery\. In order to run this tool logon to a domain controller map to the directory above and run DPMADSchemaExtension.exe. Log onto a domain controller, and copy the DPMADSchemaExtension.exe tool from the DPM server to the domain controller. Right-click on the EXE and choose ‘Run as Administrator’. On the following prompt, click Yes. Enter Data Protection Manager Computer Name, note this is not the FQDN name of the server, but just the server name. Then press OK. Enter Data Protection Manager Server domain name, note this will be the FQDN domain name so if your domain is yourdomain.local enter yourdomain.local. Then press OK. Enter Protected Computer Domain Name. This field can be left blank if the DPM server is in the same domain as the Domain Controller that owns the Schema master role. On this information dialog, press OK. You may encounter the following prompt, especially if you are attempting this on Windows Server 2012. You will have to close this dialog, install .NET Framework 3.5 and then re-run the DPMADSchemaExtension.exe tool on the Domain Controller. After having successfully installed .NET Framework 3.5, and re-running the DPMADSchemaExtension.exe tool, when it completes you should encounter this message. Press OK. Log back into your DPM server, and open the Options window. On the End-User Recovery tab, you will notice that the ‘Configure Active Directory’ button is now disabled, and the ‘Enable End-User Recovery’ checkbox is available. Ensure that this checkbox is selected, and press OK. You will encounter the following information message, press OK.
  10. Customize the Organization LogoYou can customize the organization logo of the App Controller console. To customize the organization logoNavigate to the website root of the App Controller installation directory. By default, this is %PROGRAMFILES%\Microsoft System Center 2012\App Controller\wwwroot. Create a backup of the default organization logos by renaming the files as follows: a. Rename SC2012_WebHeaderLeft_AC.png to SC2012_WebHeaderLeft_AC.png.old b. Rename SC2012_WebHeaderRight_AC.png to SC2012_WebHeaderRight_AC.png.old Copy your logo into the wwwroot folder. The images must meet the following requirements: Location: Top Left Image Name: SC2012_WebHeaderLeft_AC.png Size: 287x44 Location: Top Right Image Name: SC2012_WebHeaderRight_AC.png Size: 108-16 The logos that you can change appear at the top of the App Controller site. SC2012_WebHeaderLeft_AC.png SC2012_WebHeaderRight_AC.png
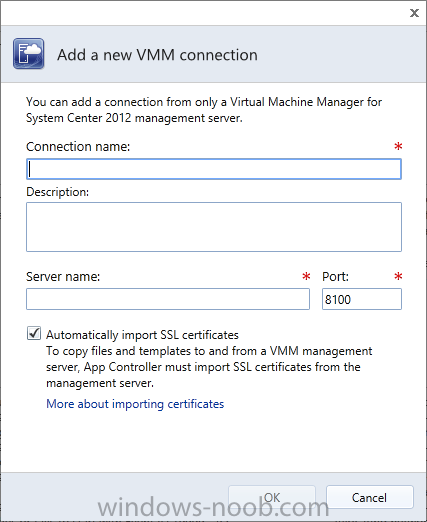
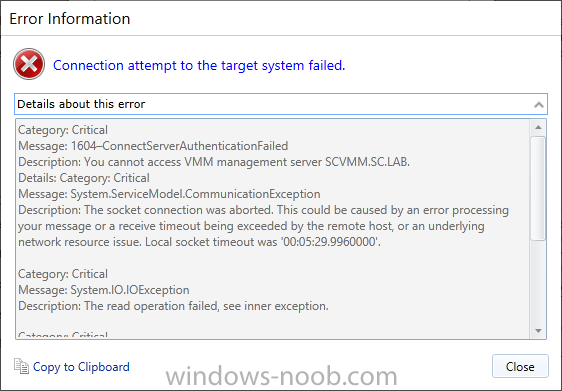
  11. Connect App Controller to A VMM Management ServerOn the App Controller server, open a browser and navigate to the app controller site (in this lab example my site URL is https://SCSM.SC.LAB). Click on the ‘Connect a Virtual Machine Manager server and…’ link. In the Connect dialog box, enter a name for this connection. This name is displayed in the Name column of Clouds page. Add an optional description in the Description text box. In the Server name text box, enter the fully qualified domain name (FQDN) of the VMM management server. In the Port field, enter a port number that matches the port used by the VMM management server (default: 8100). Check Automatically import SSL certificates if you plan to copy files and templates to and from VMM cloud libraries. NOTE: SSL certificates must be imported to the App Controller server in order to copy files or templates to and from VMM cloud libraries. In order for the import to succeed, users need to be part of all of the following roles: the local administrator of the App Controller server, local administrator of the VMM server, and VMM administrator. Click OK to create the connection. You may then be asked to select which VMM user role to use from the new VMM server connection for the current session. NOTE: You may encounter the following error. See the following TechNet thread: http://social.technet.microsoft.com/Forums/en-US/047ba638-81de-4870-a3fd-6f2390633685/app-controller-2012-sp1-rtm-connection-failed-with-virtual-machine-manager-2012-sp1-rtm. Excerpt: “If System Center App Controller and the VMM Server are installed on separate servers, single sign-on does not work when App Controller is used. So, in UR1 for SC 2012 issue was fixed, but in SP1 present again. Solution is to disable SSO and use Basic Authentication or install App Controller on VMM server, but be aware 443 port VMM used for BITS.”
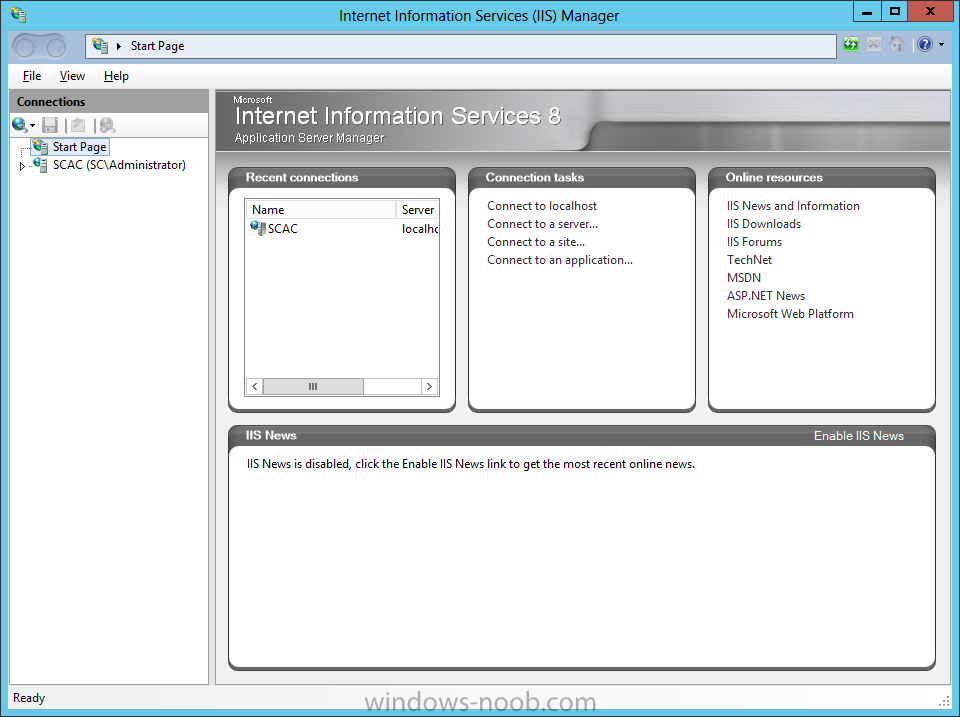
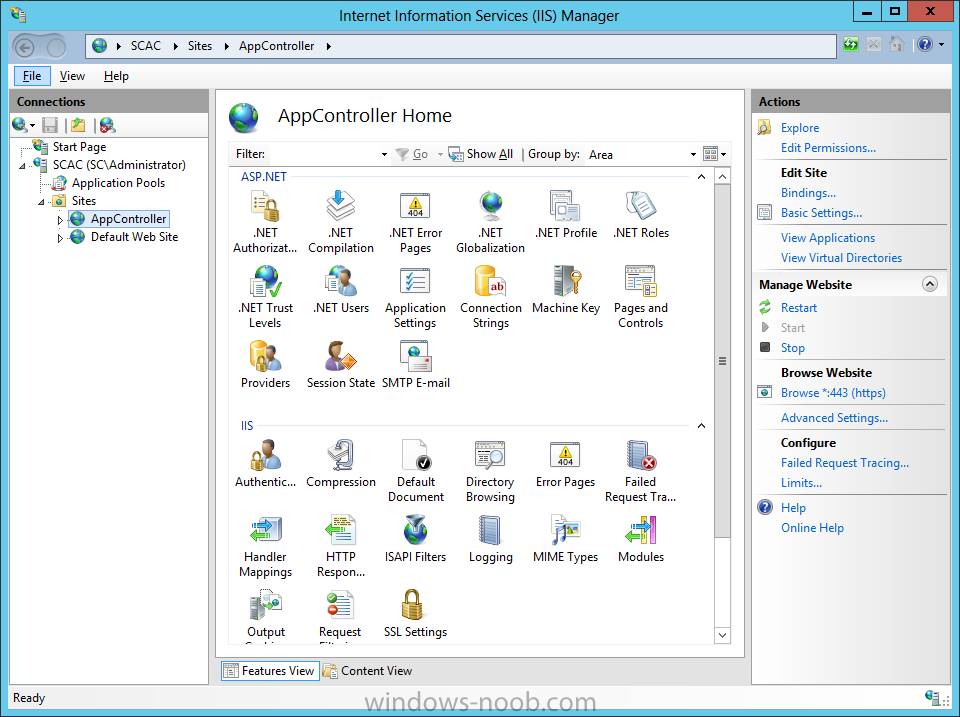
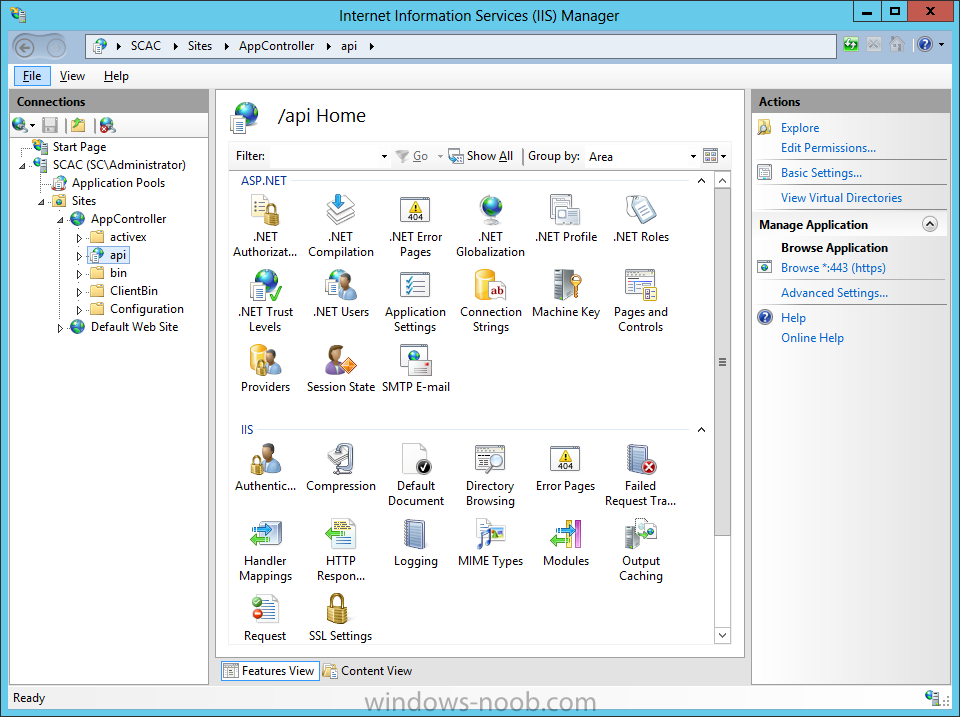
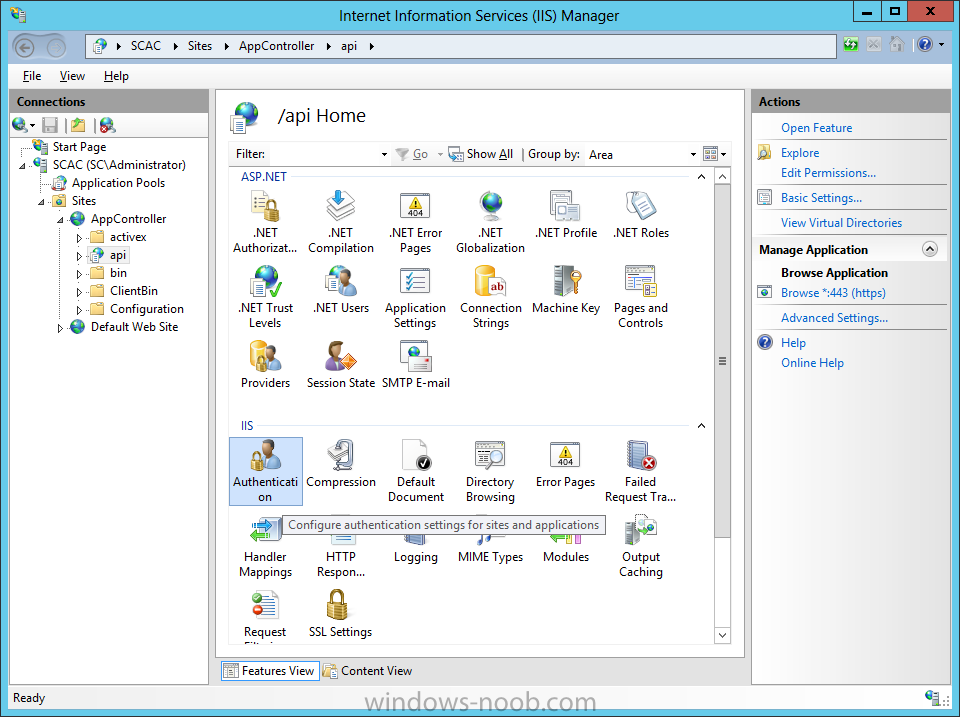
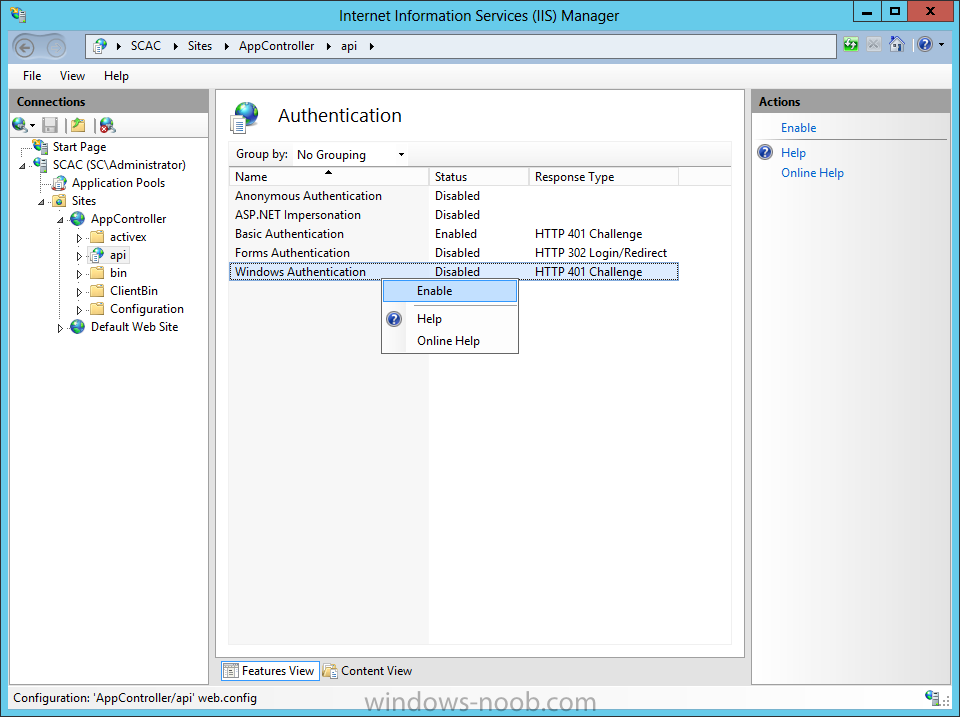
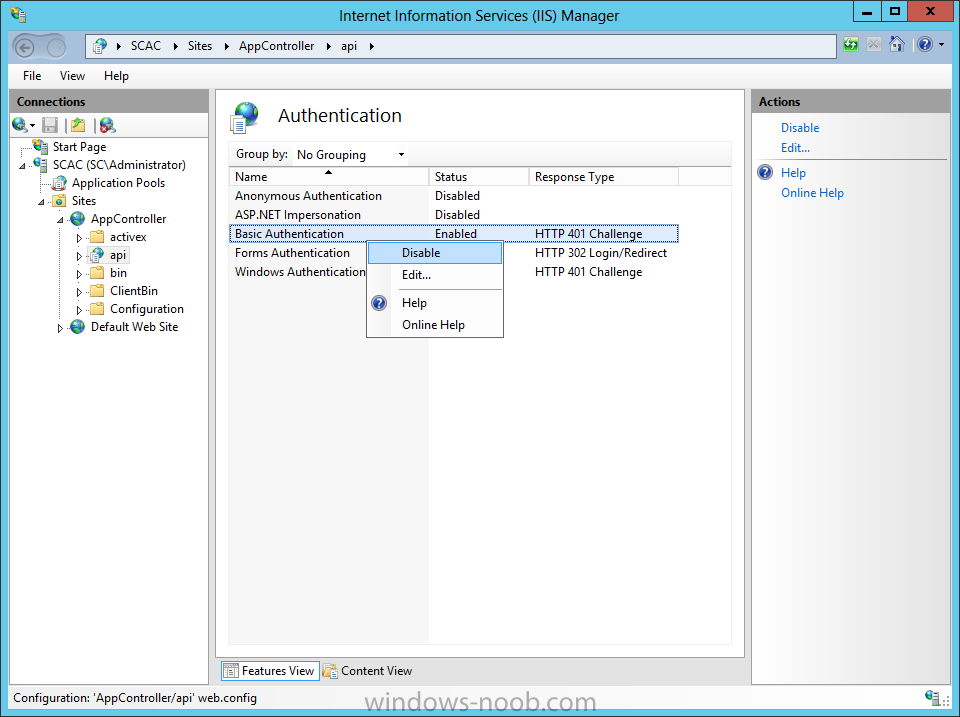
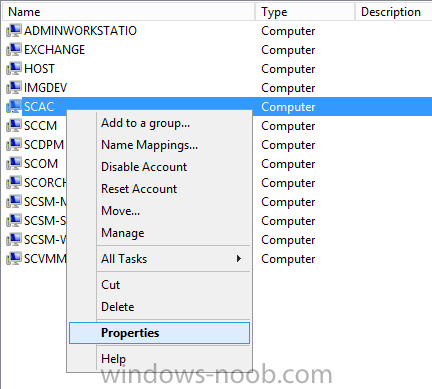
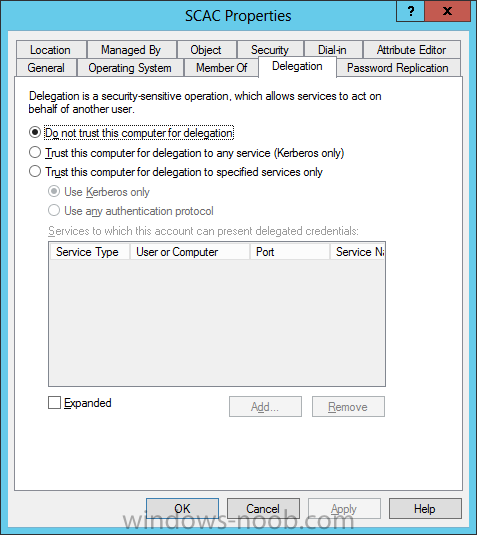
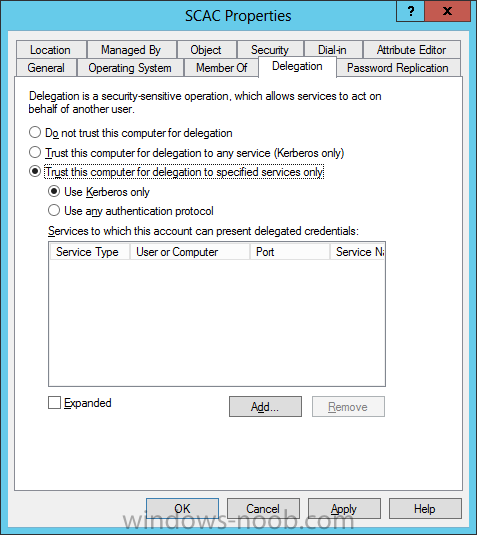
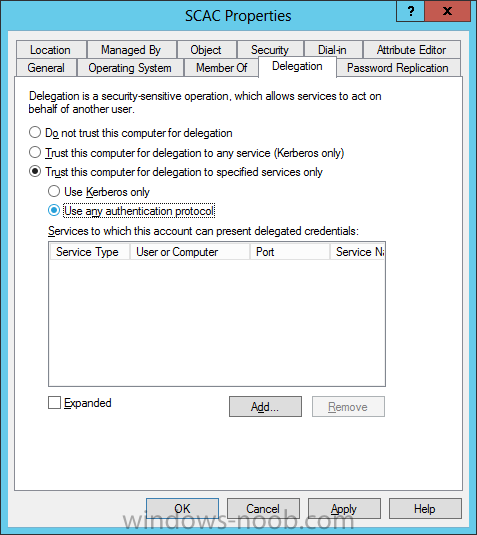
  12. Enable Single Sign-On How to Enable Single Sign-On for App ControllerBy default, App Controller is enabled to prompt users to sign in by entering their Active Directory user name and password. The following procedures describe how to configure App Controller to use the user’s current Windows credentials to automatically sign on. To verify or change the authentication methodOpen IIS manager on the App Controller server. Select the App Controller website. Expand the website and select the /api node. Click Authentication. Enable Windows Integrated Authentication. Disable Basic Authentication. To turn on constrained delegationLog on using an account that has OU Administrator privileges in Active Directory Domain Services. Ensure that this account is also granted the SeEnableDelegationPrivilege user right (for example, a domain administrator could run the command ntrights -u domain\user +r SeEnableDelegationPrivilege on a domain controller, where domain/user represent the domain and account name for the account). In Active Directory Users and Computers, right-click the App Controller system and click Properties. Click the Delegation tab. Select the Trust this computer for delegation to specified services only option. Select the Use any authentication protocol option. Click Add and then do one of the following: a. If the VMM management server is running under the Local System account, enter the name of the VMM management server and select HOST, and then click OK. b. If the VMM management server is running under a domain account, enter the name of domain account and select SCVMM, and then click OK. Restart the App Controller management server.
  13. Install SQL Server At this point, since we will be installing SQL Server on the same server that we will be installing App Controller, it is expected that you have the VM created, the OS is installed, the appropriate networking has been configured, and it is joined to your lab domain. To avoid a specific installation error (see the end of the Install SQL Server section), you have to install the .NET Framework 3.5. So we’re going to complete this first before we start the installation of SQL. .NET Framework Installation To install the specific version of .NET that we require (version 3.5 in this case), start by launching the Server Manager, and selecting Manager > Add Roles and Features. On the Add Roles and Features Wizard, read the information on the Before You Begin screen, and then click Next. On the Installation Type screen, select ‘Role-based or feature-based installation’, and click Next. On the Server Selection screen, since we are installing SQL on the same server as Orchestrator, ensure that it is selected, and then click Next. On the Server Roles screen, we are not installing a Role, but rather a Feature, so just click Next. On the Features screen, select .NET Framework 3.5 Features, and click Next. Since in Windows Server 2012 the .NET Framework 4.x is the main framework, the OS installation does not contain the source files for this installation. Therefore, you will need to click on the ‘Specify an alternate source path’ link at the bottom of the dialog. You will need to provide the path to where the source files are. This is found within the installation media of Windows Server 2012. If you insert a DVD or mount an ISO, specify the path to the SxS folder (i.e. D:\Sources\SxS), and then press OK. Click Install, and once it has completed, click Close. SQL Installation Start by either extracting or mounting the SQL Server ISO, and run the setup.exe. In this example, we are installing SQL Server 2012 SP1. On the main installation screen, click on the Installation link on the left pane. From the Installation screen, click the ‘New SQL Server stand-along installation or add features to an existing installation’ link. This is initiate the installation. First, the Setup Support Rules will check for any issues. As long as there isn’t any ‘Failed’ issues, click OK to continue with the installation. Next, enter your product key or select the evaluation copy to install, and press Next. Accept the License Terms and choose if you will send usage data to Microsoft, then press Next. If you have an Internet connection, the installer will check if there are any applicable updates to the installation, and will download the updates to use during the install. Click Next. The Setup will perform another Setup Support Rules check. As long as there are no Failures, you can click Next. Next is the Setup Role. For our needs, we will choose ‘SQL Server Feature Installation’, then press Next. For the Feature Selection, select the following, and then press Next. § Database Engine Services § Management Tools – Basic and Complete (for running queries and configuring SQL services) The Installation Rules will run to determine if anything will block the SQL installation. If there are no Failures, click Next. Next we will configure the instance. You can choose either to use a Default instance, or a Named instance. In this example, I will use a named instance, so as to not get this installation of SQL mixed up with any other I will have in my lab. Make your applicable choice, and click Next. The setup will check and confirm there is enough space on the drive for the installation. If everything is reported as OK, click Next. You next have to configure the server, which includes the Service Accounts and Collation. In Production, it is best practice to have a separate account for each of the services. In our lab, we will leave everything at defaults, with the exception of changing the ‘SQL Server Agent’ startup type from ‘Manual’ to ‘Automatic’. After you have completed this, don’t click Next, but rather click on the Collation tab. On the Collation tab, you will need to click the Customize button to be able to change it appropriately. On the Customize dialog, select ‘SQL collation, used for backwards compatibility’. Within the list, find ‘SQL_Latin1_General_CP1_CI_AS’ and select it, then click OK. You will be back on the Server Configuration dialog, click Next. On the Database Engine Configuration screen, leave the Authentication Mode at ‘Windows authentication mode’. What do have to change is to add SQL Server Administrators. Click the Add button. On the next dialog, you will need to add either the user(s) or security group(s) you want to have administrator access to SQL. At a bare minimum, add the current user account, so that you can log into SQL Server. Add the user(s)/security group(s), and click OK. You will be back on the Database Engine Configuration screen, and your accounts will now be present. In my example, I have an Active Directory Security Group I specifically created for SQL Administrators. Then click Next. You can choose to send Error Reporting information to Microsoft. Make your choice, and click Next. The setup will now re-check the configuration rules, based on the selections and information that has been supplied. If it passes, click Next. Review the information on the Ready To Install screen, and then click Install. Note: during the installation, you may encounter the following error message. This is due to not having the .NET Framework 3.5 installed prior to attempting to install SQL Server. If you encounter this, cancel the SQL server installation, and install the .NET Framework 3.5 (which is an available feature within Roles and Features). You may have to wait a while for the Installation Progress to complete. On the Complete screen, click Close. Congratulations, you now have SQL Server installed and are finally ready to install System Center App Controller (SCAC).
  14. Install Active Directory Domain Services Now that we have the VMs created, and the OS installed on both, we need to first install/setup Active Directory (AD). When you log into a new installation of Server 2012, Server Manager will auto launch. From Server Manager, click on Manage, and choose ‘Add Roles and Features’. On the Add Roles and Features Wizard, read the information on the Before You Begin dialog, and then click Next. On the Installation Type screen, select ‘Role-based on feature-based installation’ and then click Next. On the ‘Server Selection’ screen, since we are installed Active Directory on this local system, ensure that it is selected, and click Next. Side note: Windows Server 2012 has a new feature that allows you to remotely install Roles and Features on other systems. On the Server Roles screen, select ‘Active Directory Domain Services’. When you select ‘Active Directory Domain Services’, immediately you will be presented with the following dialog. Click Add Features. On the Features screen, accept what has already been selected by default, and click Next. On the AD DS screen, read the information presented, and click Next. On the Confirmation screen, check the ‘Restart the destination server automatically if required’ checkbox, and then click Install. Note: You are not required to check the ‘restart’ checkbox, however, you’re going to have to restart the system anyways after the installation, so you might as well let the system do it for you. Note: When you check off the ‘Restart the destination server automatically if required’ checkbox, you will immediately be prompted with the following dialog. Click Yes. On the Results screen, click Close. After the system restarts, and Server Manager launches, you will have to promote the server as a domain controller. This is because Active Directory has been installed, but that process does not automatically promote the server. Click on the ‘Promote this server to a domain controller’ link. On the Deployment Configuration screen, select ‘Add a new forest’ since this is the first domain controller in our lab. Then enter a root domain name, and click Next. In my example I am using “SC.LAB” for System Center Lab (since I will be installing all other System Center products in my lab eventually). For the Domain Controller Options, select the appropriate Forest functional level, and Domain functional level. This is more applicable if you already have an existing domain and are adding a new domain controller. But since this is the first domain controller in our new domain, then we’ll use the highest level, that of Windows Server 2012. Also, don’t forget to create the Directory Service Restore Mode password. Then press Next. On the DNS Options screen, you can ignore this warning message and click Next. On the Additional Options screen, click Next. On the Paths screen, normally you would change the location for the database, log files, and SYSVOL, but since we are just in a lab environment, we’ll leave it at the defaults and click Next. On the Review Options scree, review what you have entered/selected, and click Next. The Prerequisites Check screen will check and confirm that everything passes before promoting the system as a domain controller. You will notice in my screenshot, that I have 1 warning because I didn’t set a static IP for the server yet. After installation completes, the system will automatically restart. You will then be presented with the login screen. Something to note here, that because we were originally logged in with a local account, the first time you want to log on using a domain account you will have to type the domain\username; in my example SC\Administrator. When you login, you will then see in the Server Manager, that AD DS is now listed, along with DNS. Now all that you need to do is assign a static IP to your domain controller. To do this, in Server Manager, select Local Server from the panel on the left. From there, click on the Ethernet link labelled ‘IPv4 address assigned by DHCP, IPv6 enabled’. This will cause the Networks Connections explorer to open. From here, right click on the Ethernet network that is displayed. This is in fact the network connection that we configured when we first created the VM. On the Ethernet Properties dialog, select ‘Internet Protocol Version 4 (TCP/IPv4)’ and click the Properties button. Within the Internet Protocol Version 4 (TCP/IPv4) Properties dialog, enter a static IP, gateway, and DNS that is applicable to your network. Once all the items have been entered, click OK. You will also have to click Close on the Ethernet Properties dialog as well. Congratulations, you now have a domain setup in your lab environment. Add Systems to Your Domain Now that you have your domain setup, you need to add your other VM (the one that we will use for DPM) to the domain before being able to install DPM. Log into the system you want to add to the domain. To do this in Server 2012, launch Server Manager, and click on Local Server. Then click on the computer name. This will launch the System Properties dialog. From this dialog, click the Change button. From this dialog, select the Domain option for ‘Member of’, and enter the domain name you want to join and press OK. After pressing OK, you are immediately presented with a Windows Security dialog, in which you need to enter the credentials of an account that has Domain Admin rights. Enter the credentials and click OK. Once the system is successfully joined to the domain, you will receive the following Welcome message. Press OK. After you press OK to the Welcome message, you will receive a second prompt, indicating that you need to restart the system for the changes to take effect. You will be back on the System Properties dialog. Press Close. When you press Close, you will receive yet another prompt about restarting the system. You can choose to Restart Now or Restart Later, but you won’t be able to install App Controller without the VM being added to the domain. After the system restarts, you will then be presented with the login screen. Something to note here, that because we were originally logged in with a local account, the first time you want to log on using a domain account you will have to type the domain\username; in my example SC\Administrator. Now we have our Active Directory server setup and ready, and the VM we will be installing App Controller on is joined to the domain.
  15. Install the Operating System Now that we have created the VMs for our lab, we can install the Operating System (OS). Start by connecting to one of the VMs, either by double clicking on the VM in Hyper-V Manager, right click the VM and choose Connect, or click on Connect from the Action pane/menu. When you have the VM connection up, and an ISO mounted, power the VM on. On the Windows Setup screen, select the Language, Time/Currency Format, and Keyboard Method appropriate, and click Next. All you have to do now is click Install Now. Next you have to choose the Operating System and version you want to install. In our lab example, I will choose Windows Server 2012 Standard (Server with a GUI). Make your selection and then click Next. You will have to accept the license terms, and then click Next. For the Installation Type, since we don’t already have an OS installed, we will choose the ‘Custom: Install Windows only (advanced)’ option. Now select the hard drive that you want to install the OS to. Since we only created one hard drive when setting up the VM, we only have one to choose from. Select it, and click Next. Now all you have to do is wait for the installation to finish. Once the installation is complete, you will be prompted to enter a password for the local administrator account. This is different from a domain-based local administrator account. Enter a password and click Finish. After some final quick configuration, you will then be presented with the login screen. Now repeat these steps for the other VMs in the lab. NOTE: After you install an OS, you will need to rename the computer within the OS. To do this in Server 2012, launch Server Manager, and click on Local Server. Then click on the computer name. This will launch the System Properties dialog. From this dialog, click the Change button. From this dialog, enter the name you want to call the computer. In my lab, I called the Active Directory computer “AD”, and the App Controller computer “SCAC”. Press OK after entering the name. You will encounter the following prompt. Click OK. Then click Close on the System Properties dialog. You can choose to either Restart Now or Restart Later, but the name change will not take effect until you do so.
  16. Introduction: I use Hyper-V in my LAB and that's what all these virtual machines will be running on. In my lab, I have Windows Server 2012 Datacenter installed as the server OS on the host machine. All other virtual machines will be running Windows Server 2012 Standard edition, with the graphical user interface (GUI). My hardware consists of the following: § Intel Xeon E5-2620 § Asus P90X79 WS § 64 GB G.Skill Ripjaws Z Series § 2 x 256 GB / 1 x 512 GB Samsung 840 Pro Series SSD § 1 x 150 GB HDD, and 1 x 250 GB HDD High Level Plan Here is a high level of what we are going to complete in this initial part of the series. 1. Create the Lab Environment 2. Install the Operating System 3. Install Active Directory Domain Services 4. Install SQL Server 5. Install System Center App Controller So now let’s start with the first part, system requirements and creating the lab environment. System Requirements Note: The following page on TechNet describes the requirements for deploying AppController. Server§ OS: Windows Server 2008 R2 or Windows Server 2012 § CPU: Dual-Processor, Dual-Core, 2.8 GHz (x64) or greater § RAM: 1 gigabyte (GB) of RAM minimum, 4 GB or more recommended § HDD: 1 gigabyte (GB) of available hard disk space § Software: o Microsoft SQL Server 2008 R2 or Microsoft SQL Server 2012: § Database Engine Service § SQL_Latin1_General_CP1_CI_AS collation o Microsoft .NET Framework 4.0 o Web Server (IIS): § Static Content § Default Document § Directory Browsing § HTTP Errors § ASP.NET § .NET Extensibility § ISAPI Extensions § ISAPI Filters § HTTP Logging § Request Monitor § Tracing § Basic Authentication § Windows Authentication § Request Filtering § Static Content Compression § IIS Management Console o VMM Console Create the Lab Environment: Hyper-V Configuration As mentioned, my environment uses Hyper-V. So, we’re going to start by configuring Hyper-V for our needs, and creating the Virtual Machines (VMs) required for our lab. The first thing we need to do is setup a Virtual Switch for the VMs to connect through. Launch Server Manager, click on Tools, and select Hyper-V Manager. When Hyper-V loads, it will have nothing in it. Even if we were to create a VM, it wouldn’t have a network connection to use. So we’ll start with creating a Virtual Switch. As you can from my screenshot, I have 2 LAN ports on my host. One of them has a connection to my home network and the Internet. In the Hyper-V Manager, click the Virtual Switch Manager from the Actions pane. Now, click on the Create Virtual Switch button. From here, you now need to configure the virtual switch that your VMs will use. Give it a name to clearly identify it (in my case I called it ‘External Network’), and choose the connection type. For more information about virtual networks, see the following TechNet article: http://technet.microsoft.com/en-us/library/cc816585(v=ws.10).aspx. Here is an excerpt from the article: External virtual networks. Use this type when you want to provide virtual machines with access to a physical network to communicate with externally located servers and clients. This type of virtual network also allows virtual machines on the same virtualization server to communicate with each other. This type of network may also be available for use by the management operating system, depending on how you configure the networking. (The management operating system runs the Hyper-V role.) For more information, see “A closer look at external virtual networks” later in this topic. Internal virtual networks. Use this type when you want to allow communication between virtual machines on the same virtualization server and between virtual machines and the management operating system. This type of virtual network is commonly used to build a test environment in which you need to connect to the virtual machines from the management operating system. An internal virtual network is not bound to a physical network adapter. As a result, an internal virtual network is isolated from all external network traffic. Private virtual networks. Use this type when you want to allow communication only between virtual machines on the same virtualization server. A private virtual network is not bound to a physical network adapter. A private virtual network is isolated from all external network traffic on the virtualization server, as well any network traffic between the management operating system and the external network. This type of network is useful when you need to create an isolated networking environment, such as an isolated test domain. For our demonstration, we are going to use an External Network so that the VMs can communicate with the Host system. Make all the appropriate selections and so forth, and then press OK. You may encounter the following warning message. This is because we are remotely connecting to the Host machine using the same network connection that we are about to setup as a Virtual Switch (hence selecting the ‘Allow management operating system to share this network adapter’ checkbox). Press ‘Yes’ to the dialog. Now that we have the virtual switch setup, we can start creating VMs for our lab. Create the Virtual Machines Let’s now create the VM’s we will need for the lab, specifically one for Active Directory, and another for App Controller (since we are install all roles within the same server). In Hyper-V Manager, from the Actions pane, click on New and choose Virtual Machine. On the New Virtual Machine wizard beginning screen, click read the information presented and then click Next. Enter a name for the VM. Note that this is NOT the name the VM will have within the Operating System (unless you name it the same), but rather, used as an identifier in Hyper-V Manager. After you have entered a name, click Next. Now assign the amount of memory you want your VM to have, and then press Next. This is the screen where you connect your VM to the network that we created, then press Next. This is the screen where you configure how large a hard drive the VM will have. Make the appropriate customizations and click Next. For the Installation Options, choose if you will install an OS later, or if you want to use an ISO, then click Next. On the Summary screen, review your selections and entries, and click Finish. Once the VM is created, it will appear in the Hyper-V Manager. If you want to configure further settings, like the number of CPUs and mounting an OS ISO, right click on the VM and choose Settings or click on Settings from the Actions pane. Repeat these steps for each VM you need to create, in our case one for Active Directory and another for App Controller. Here are the settings I have used for each of the VM’s: Active Directory: § Virtual Machine Name: AD § Memory: 2048 MB o NOTE: Active Directory doesn’t need 2 GB of RAM, it will run fine with 512 MB. I just increased the RAM so that the OS would install/respond faster during setup. § CPUs: 2 § OS: Windows Server 2012 SCAC: § Virtual Machine Name: SCAC § Memory: 4096 MB § CPUs: 2 § OS: Windows Server 2012
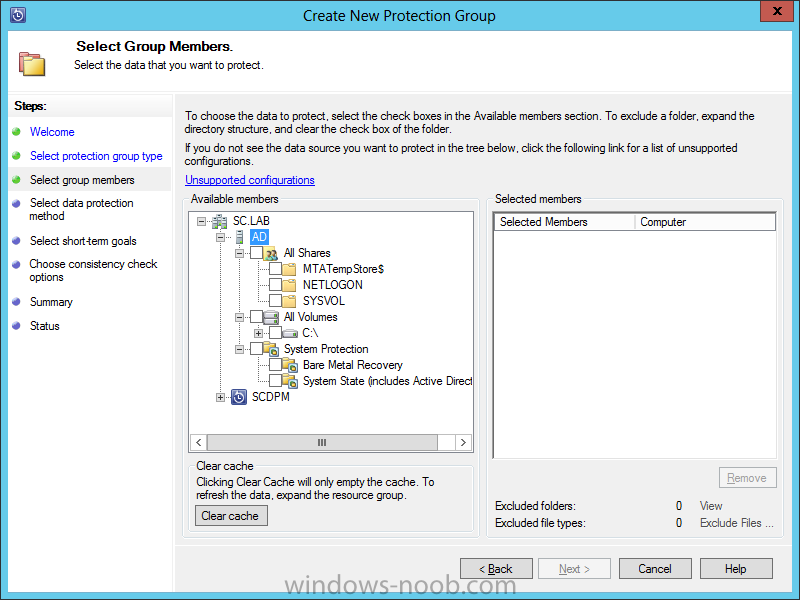
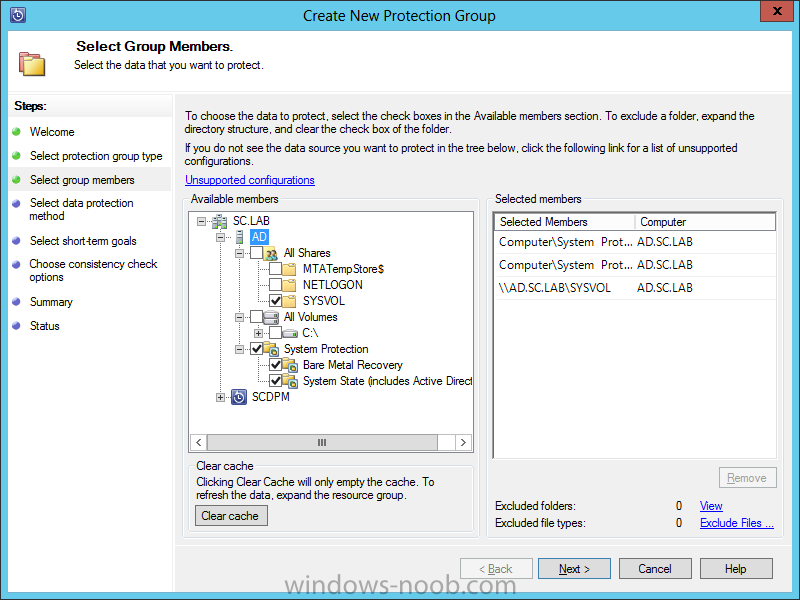
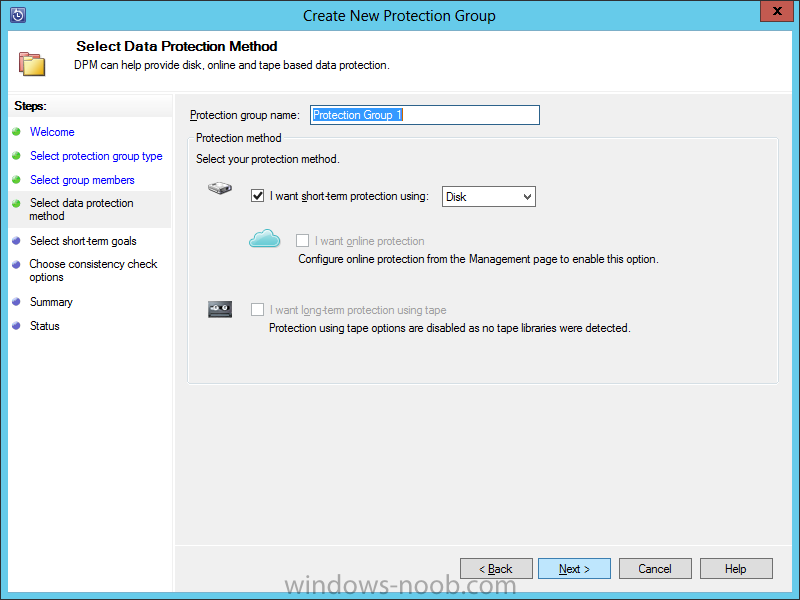
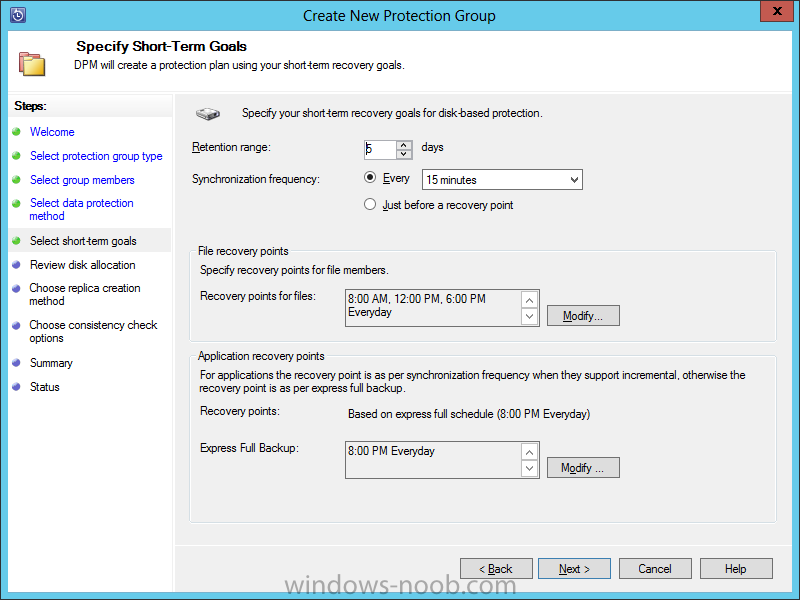
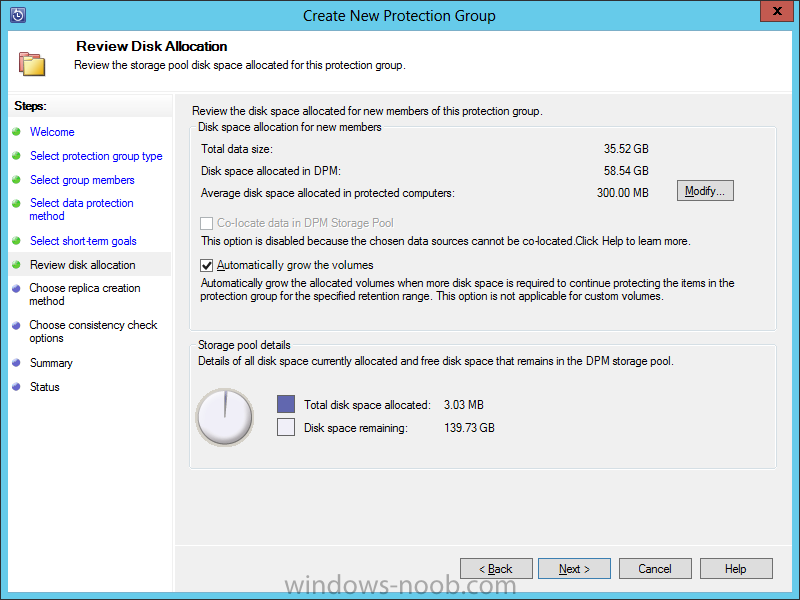
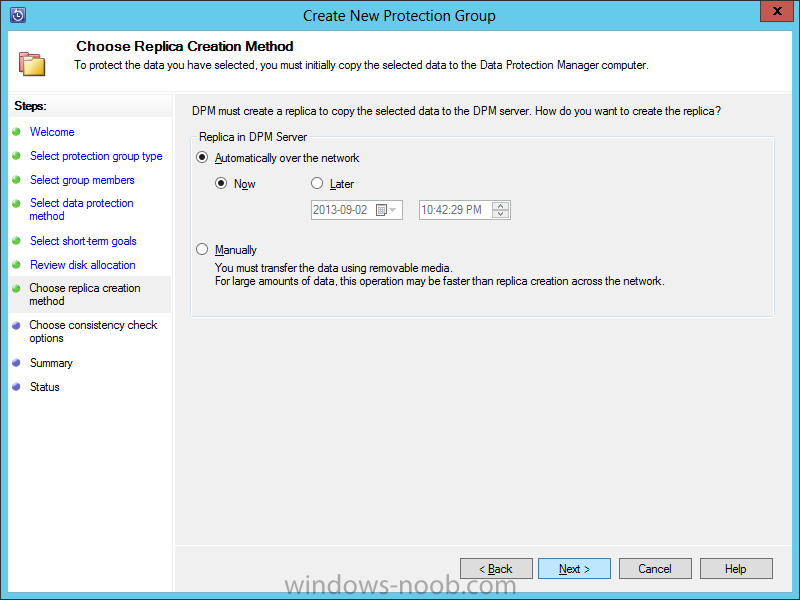
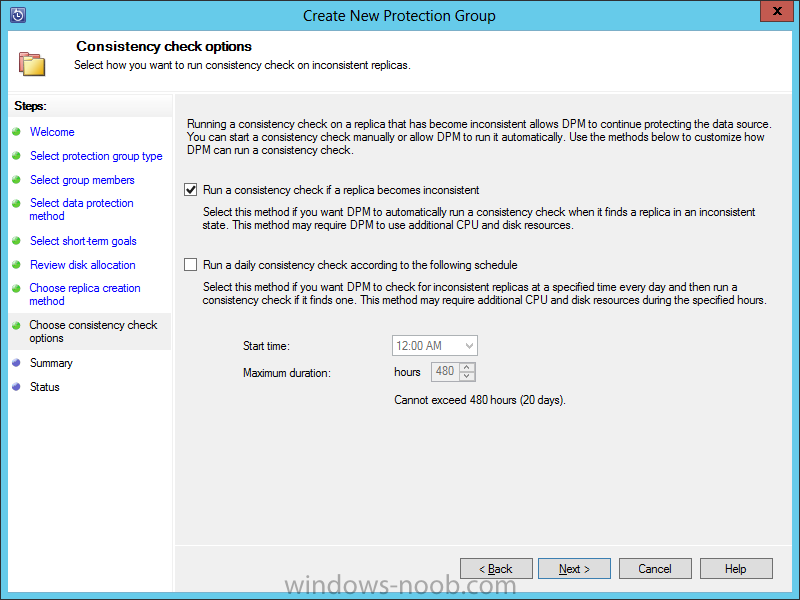
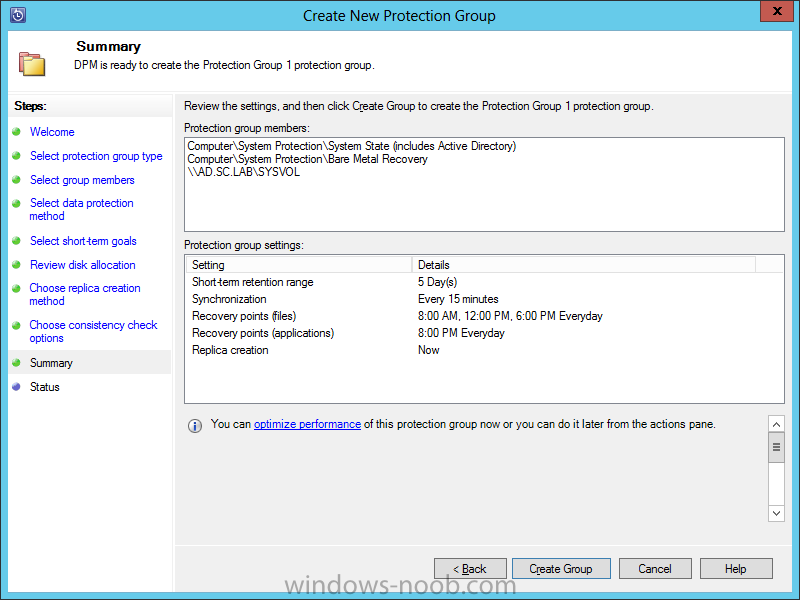
  17. Protection GroupsIn order for DPM to protect our data, we need to have the DPM Protection Agent installed. But that’s not enough. We also need to add the system to a Protection Group. That’s what we will document here. Start by launching the DPM console, and navigating to the Protection area. On the toolbar at the top of the console, click on New. On the Welcome page, review the information presented, and then click Next. On the Protection Group Type page, choose whether you are protecting Servers or Clients. For our lab example, we will choose Servers, and then click Next. On the Select Group Members page, expand the Server(s) and select what you want to protect. When you select what you want to protect, it will automatically be added to the Selected Members list, then click Next. On the Data Protection Method, give the Protection Group a name (like PROD Active Directory Servers), and choose either short-term and/or long-term protection, then click Next. For this lab example, since I don’t have a Tape Library to simulate long-term backups, I will only use short-term. On the Short-Term Goals page, you can set a retention range, sync frequency, recovery points, and backups; then click Next. On the Disk Allocation page, review the information modifying it in required, then click Next. On the Replica Creation Method page, choose either Automatic or Manual, and then click Next. On the Consistency Check Options page, it is recommended to perform consistency checks on the data. You may also opt-in to performing daily checks. Then click Next. On the Summary page, review the selections made, and then click Create Group. Depending on how many systems and the amount of data, it may take a little while to complete. Once the task is complete, the Results will show Success. Click Close. Back in the DPM console, you will now see the system you added, along with the items being protected.
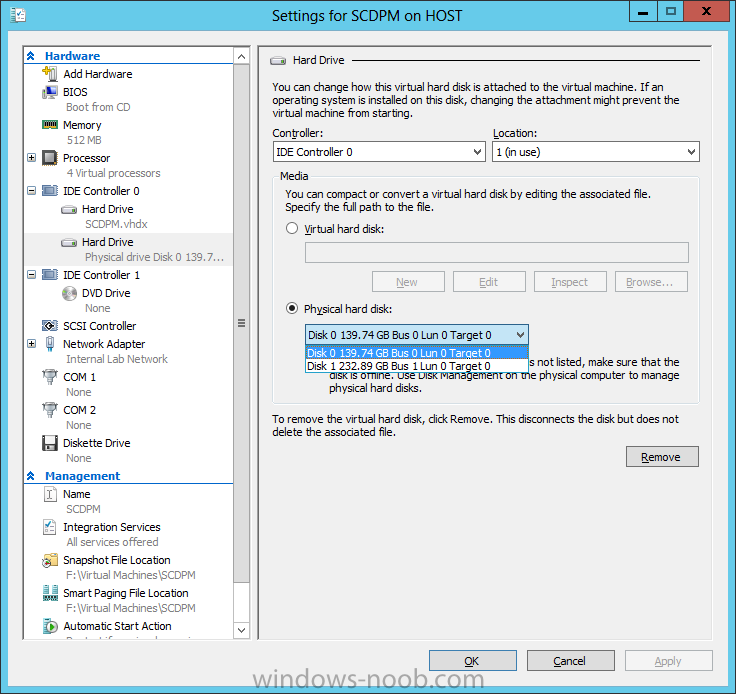
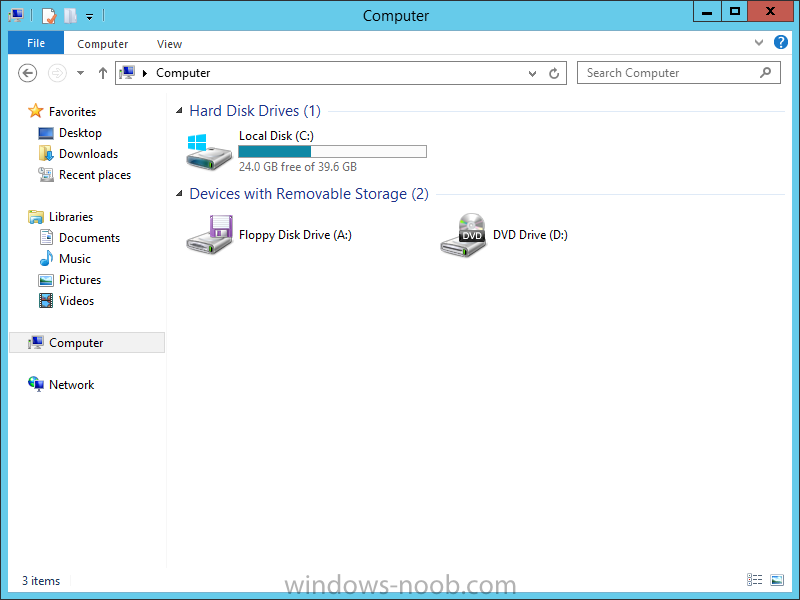
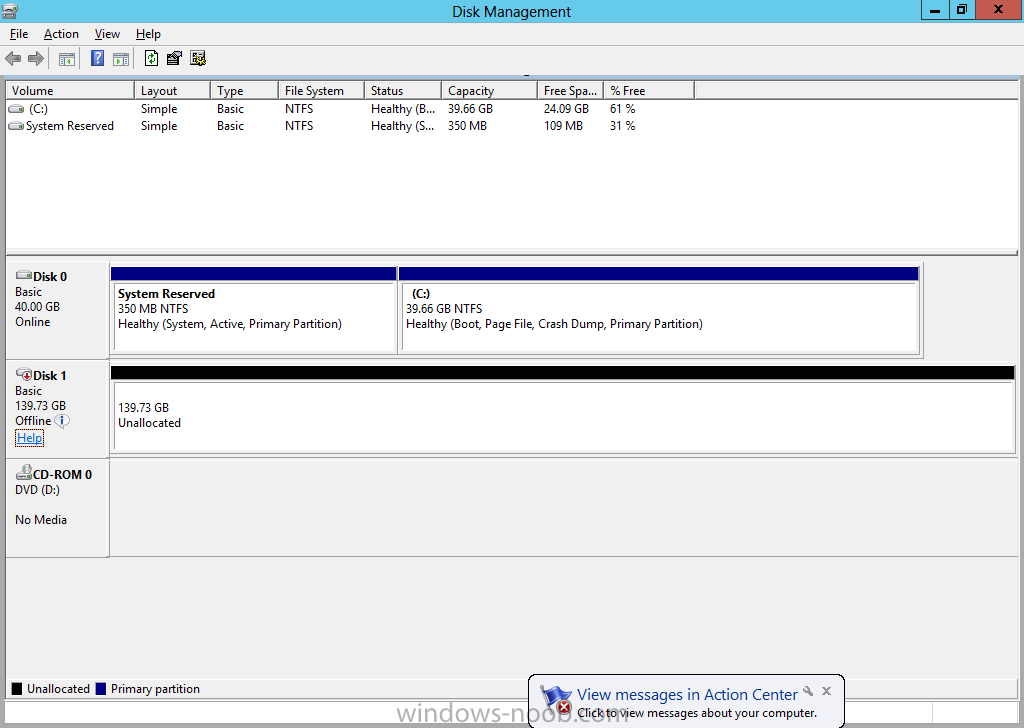
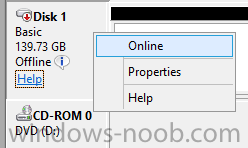
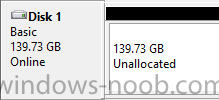
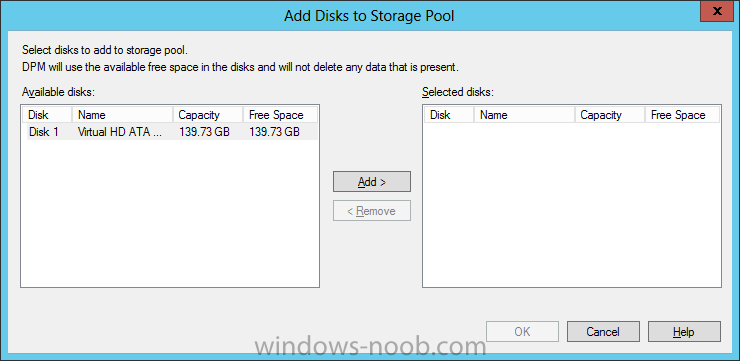
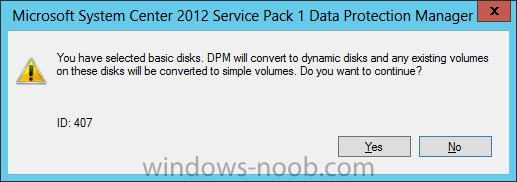
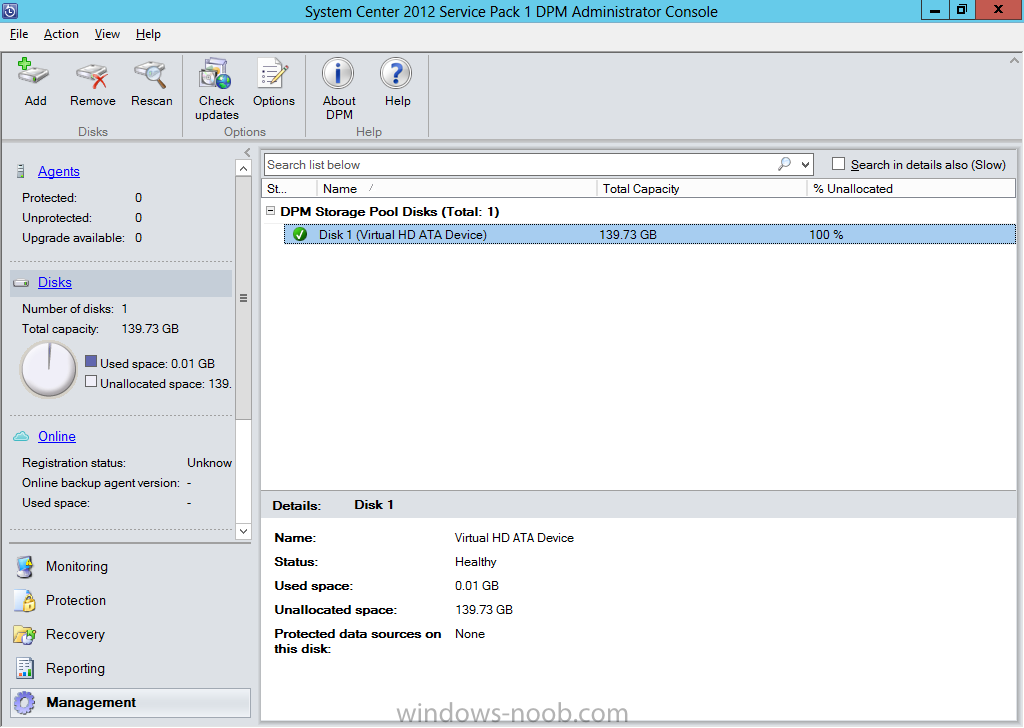
  18. Configure System Center Data Protection Manager – Add Disks Adding a Physical Disk to a Hyper-V Virtual Machine NOTE: Some of these steps will need to be completed on the physical Hyper-V host, and others will be completed in the DPM VM after you have installed the Operating System. In order for DPM to be able to use a hard drive for backups, it needs to be attached to the DPM system only. For example, even though we have virtual machine running DPM, we cannot use .VDHX hard drives. That means we need a physical disk from the Hyper-V host to be made available to the DPM VM. It is important to note that if you have a hard drive that is present and visible to the physical Hyper-V host, you won’t be able to connect it to the VM. Here’s a screenshot of the Disk Management console on my physical host machine. You will note that there are 2 disks that are Offline. I am going to use one of these for my DPM backup storage. In looking at my DPM VM settings, I have added another IDE Hard Drive. I have set the drive to Physical Hard Disk, and as you can see in the screenshot, I can choose one of the 2 drives that were Offline in my physical host. If any of those drivers were Online on the host, although Unallocated, they would not appear in the selection. Now on my DPM VM system in File Explorer, you can see that although we added that physical disk in the Hyper-V settings, it is not appearing in the system. We need to launch the Disk Management console. When it opens, you will see the physical disk that we attached, but notice that it is also ‘Offline’. We need to right-click on the Offline disk, and choose ‘Online’. You will notice that even though the disk is now Online, that the space is still Unallocated. This is fine as DPM will prepare the disk when we add it to the tool. Add Disks to DPM Now that we have a physical disk available to the VM, we need to add disk(s) to the DPM tool. Start by launching the DPM console. Within the console, click on Management. In the Management space, click on Disks. In the toolbar at the top, click on Add. In the Add Disks to Storage Pool dialog, locate the disk(s) you want to include, and click the Add button. When you have added all the disks you want, click OK. You may encounter the following Warning message. Click Yes. Once the disk(s) have been added, they will appear in the DPM console, ready for use.
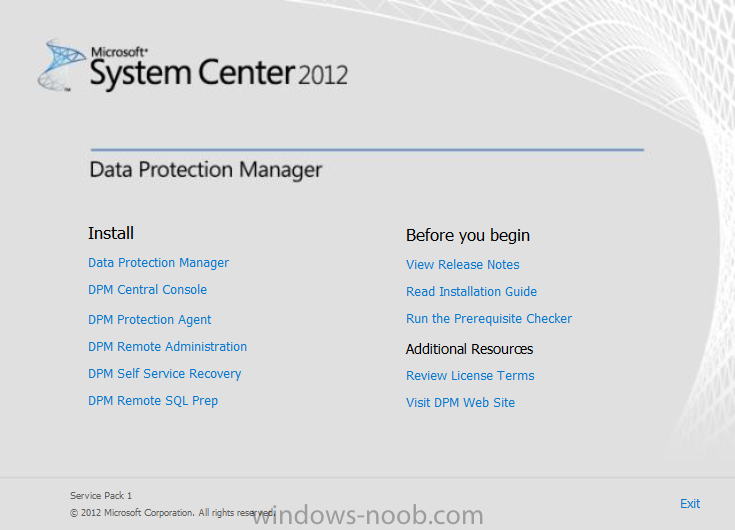
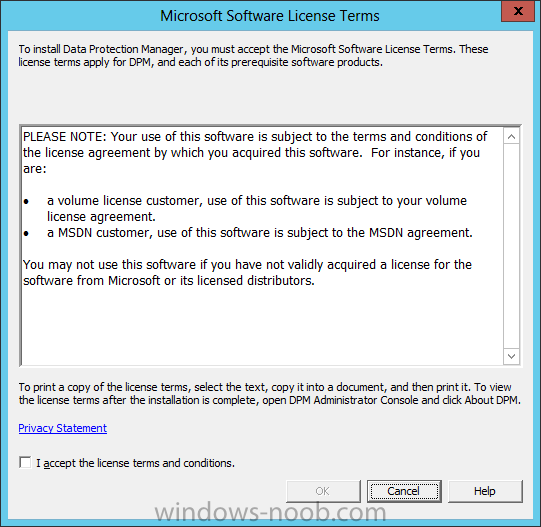
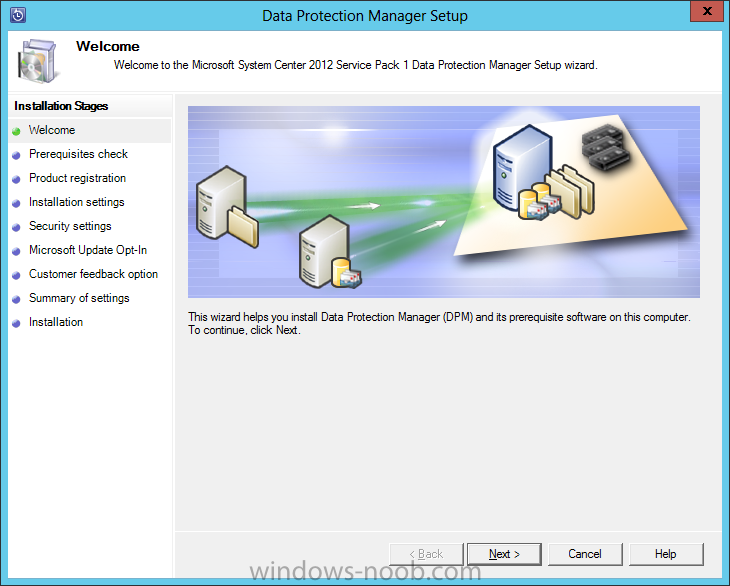
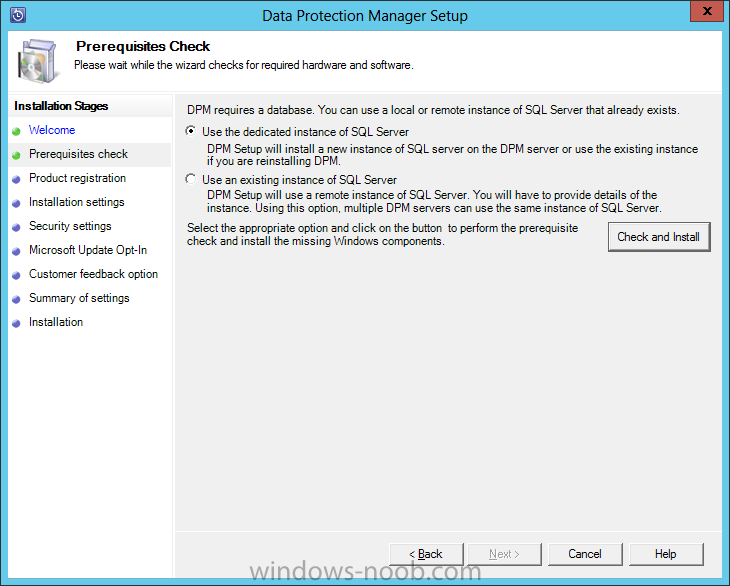
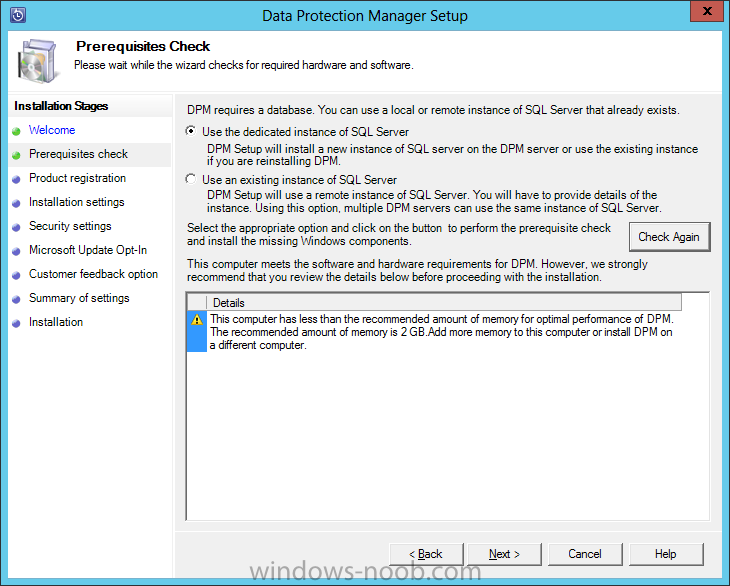
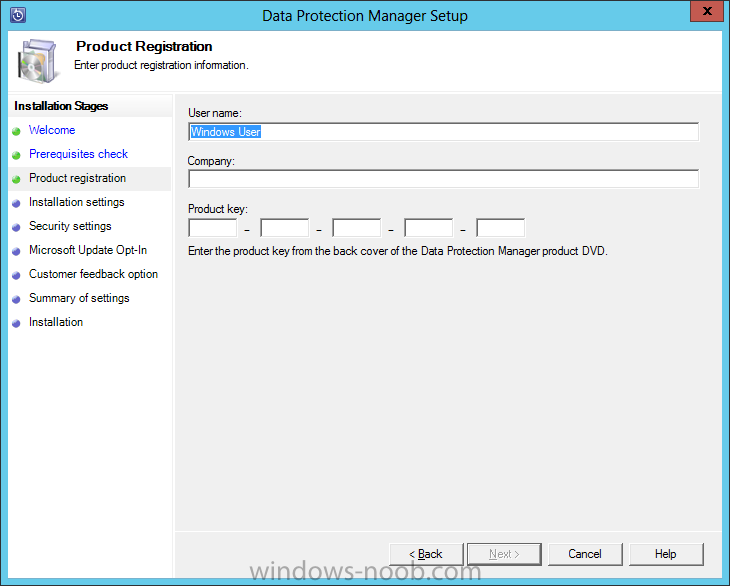
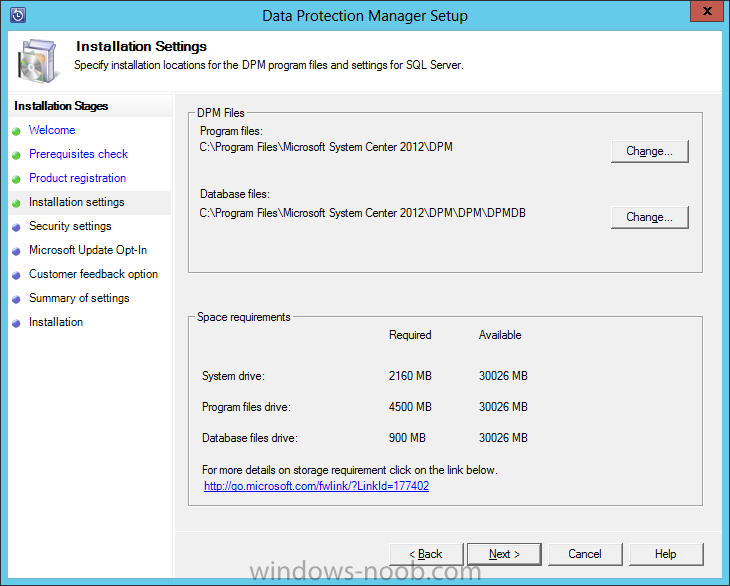
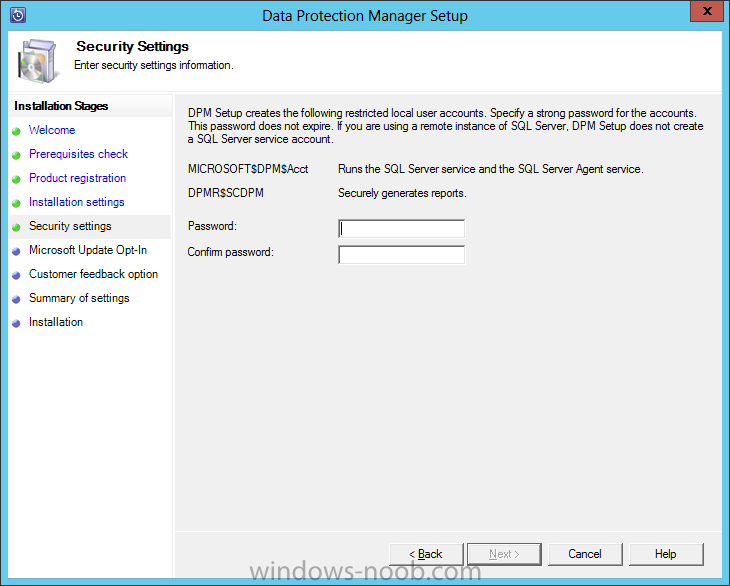
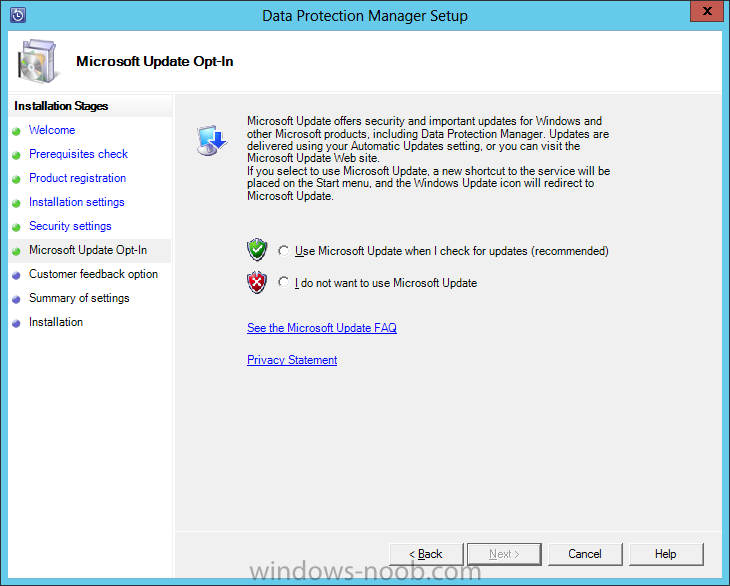
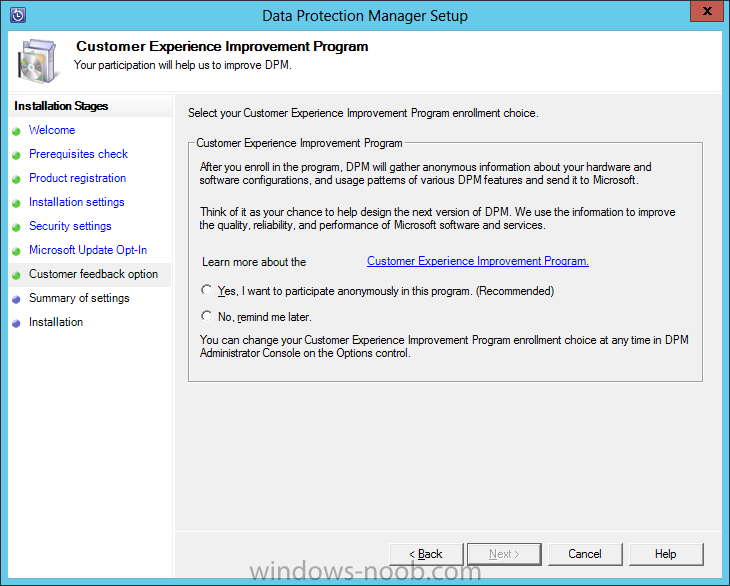
  19. Install System Center Data Protection ManagerWe are now finally ready to install DPM. Install PrerequisitesTo start, before we will actually be able to install SCDPM, we have to install a few prerequisites. § .NET Framework 3.5 SP1 Install SCDPMStart by either extracting the DVD contents, or mounting the ISO (the TechNet ISO is currently labelled as mu_system_center_2012_data_protection_manager_with_sp1_x64_dvd_1359086.iso). Start by running the Setup.exe. On the splash screen click the Data Protection manager link. Read and agree to the License Terms, and then click OK. Data Protection Manager will prepare to install. On the Welcome page, click Next. On the Prerequisites Check page, choose what type of database DPM will use; either a dedicated instance, or an existing instance. Basically, will it use a local SQL install or a remote install. Since we are doing this in a lab, I will choose the ‘Use the dedicated instance of SQL Server’ option, to install a local instance on the DPM server. Make your choice and then click Check and Install. The Prerequisites Check will check the system for any issues preventing installation. If there are issue, you will need to resolve them prior to being able to continue with the installation. Once you are able to continue, click Next. On the Product Registration page, enter a User Name, Company, and a Product Key, then click Next. Unfortunately, I am not aware of any way to install an evaluation version of the application, although all other System Center products provide this option. On the Installation Settings page, you can specify the location to install DPM, along with the Database files. Make any changes required and then click Next. On the Security Settings page, provide a password for the DPM SQL service account, then click Next. On the Microsoft Update Opt-In page, choose if you want to include the product in Microsoft Updates, then click Next. On the Customer Experience Improvement Program page, you can choose if you want to join the CEIP program or not. Make your choice and then click Next. On the Summary of Settings page, review the selections/choices made, and then click Install. The installation will begin, and will take a while since DPM will also install SQL Server for you automatically. Once the installation is complete, click Close. Once the Data Protection Manager Setup wizard is closed, it will automatically launch Windows Update and check for updates.
  20. Install the Operating System Now that we have created the VMs for our lab, we can install the Operating System (OS). Start by connecting to one of the VMs, either by double clicking on the VM in Hyper-V Manager, right click the VM and choose Connect, or click on Connect from the Action pane/menu. When you have the VM connection up, and an ISO mounted, power the VM on. On the Windows Setup screen, select the Language, Time/Currency Format, and Keyboard Method appropriate, and click Next. All you have to do now is click Install Now. Next you have to choose the Operating System and version you want to install. In our lab example, I will choose Windows Server 2012 Standard (Server with a GUI). Make your selection and then click Next. You will have to accept the license terms, and then click Next. For the Installation Type, since we don’t already have an OS installed, we will choose the ‘Custom: Install Windows only (advanced)’ option. Now select the hard drive that you want to install the OS to. Since we only created one hard drive when setting up the VM, we only have one to choose from. Select it, and click Next. Now all you have to do is wait for the installation to finish. Once the installation is complete, you will be prompted to enter a password for the local administrator account. This is different from a domain-based local administrator account. Enter a password and click Finish. After some final quick configuration, you will then be presented with the login screen. Now repeat these steps for the other VMs in the lab. NOTE: After you install an OS, you will need to rename the computer within the OS. To do this in Server 2012, launch Server Manager, and click on Local Server. Then click on the computer name. This will launch the System Properties dialog. From this dialog, click the Change button. From this dialog, enter the name you want to call the computer. In my lab, I called the Active Directory computer “AD”, and the Data Protection Manager computer “SCDPM”. Press OK after entering the name. You will encounter the following prompt. Click OK. Then click Close on the System Properties dialog. You can choose to either Restart Now or Restart Later, but the name change will not take effect until you do so.
  21. Install the Operating System Now that we have created the VMs for our lab, we can install the Operating System (OS). Start by connecting to one of the VMs, either by double clicking on the VM in Hyper-V Manager, right click the VM and choose Connect, or click on Connect from the Action pane/menu. When you have the VM connection up, and an ISO mounted, power the VM on. On the Windows Setup screen, select the Language, Time/Currency Format, and Keyboard Method appropriate, and click Next. All you have to do now is click Install Now. Next you have to choose the Operating System and version you want to install. In our lab example, I will choose Windows Server 2012 Standard (Server with a GUI). Make your selection and then click Next. You will have to accept the license terms, and then click Next. For the Installation Type, since we don’t already have an OS installed, we will choose the ‘Custom: Install Windows only (advanced)’ option. Now select the hard drive that you want to install the OS to. Since we only created one hard drive when setting up the VM, we only have one to choose from. Select it, and click Next. Now all you have to do is wait for the installation to finish. Once the installation is complete, you will be prompted to enter a password for the local administrator account. This is different from a domain-based local administrator account. Enter a password and click Finish. After some final quick configuration, you will then be presented with the login screen. Now repeat these steps for the other VMs in the lab. NOTE: After you install an OS, you will need to rename the computer within the OS. To do this in Server 2012, launch Server Manager, and click on Local Server. Then click on the computer name. This will launch the System Properties dialog. From this dialog, click the Change button. From this dialog, enter the name you want to call the computer. Press OK after entering the name. You will encounter the following prompt. Click OK. Then click Close on the System Properties dialog. You can choose to either Restart Now or Restart Later, but the name change will not take effect until you do so.
  22. Introduction: I use Hyper-V in my LAB and that's what all these virtual machines will be running on. In my lab, I have Windows Server 2012 Datacenter installed as the server OS on the host machine. All other virtual machines will be running Windows Server 2012 Standard edition, with the graphical user interface (GUI). My hardware consists of the following: Intel Xeon E5-2620 Asus P90X79 WS 64 GB G.Skill Ripjaws Z Series 2 x 256 GB / 1 x 512 GB Samsung 840 Pro Series SSD High Level Plan Here is a high level of what we are going to complete in this initial part of the series. Create the Lab Environment Install the Operating System Install Active Directory Domain Services Install SQL Server Install System Center Service Manager So now let’s start with the first part, system requirements and creating the lab environment. System Requirements Note: The following TechNet articles describe the Hardware and Software requirements for deploying Service Manager. This is the largest deployment (as far as VMs go) even in a lab. This is because we cannot deploy Service Manager on a single server, even in a lab/POC environment. In fact, even Microsoft’s single computer scenario, actually tells you to install it on a physical host with a VM for the warehouse! And that doesn’t even take into account the SharePoint server needed for the self-service portal. So in our lab example, we will have 3 VMs. The first VM will have the Service Manager Management Server, Service Manager Database, and Service Manager Console. The second VM will have the Data Warehouse Management Server and the Data Warehouse Database. The third VM will be for SharePoint and the self-service portal. Service Manager Management Server 4-Core 2.66 GHz CPU 8 GB of RAM 10 GB of available disk space ADO.NET Data Services Update for .NET Framework 3.5 SP1 for Windows Server 2008 R2 SQL Server 2008 R2 Native Client or SQL Server 2012 Native client Microsoft Report Viewer Redistributable Service Manager Database 8-core 2.66 gigahertz (GHz) CPU 8 gigabytes (GB) of RAM for 20,000 users, 32 GB of RAM for 50,000 users 80 GB of available disk space RAID Level 1 or Level 10 drive SQL Server Reporting Services (SSRS) The SQL Server and Analysis Services collation settings must be the same for the computers hosting the Service Manager database, data warehouse database, analysis services database, and Reporting Services database. For Service Manager in System Center 2012 SP1 and and System Center 2012 R2 Service Manager: SQL Server 2012 Analysis Management Objects, which are part of the SQL Server 2012 Feature Pack, are required regardless of the SQL Server version that you use Service Manager Console 2-core 2.0 GHz CPU 4 GB of RAM 10 GB of available disk space Microsoft Report Viewer Redistributable You must have Microsoft Excel 2007 or later installed in order view OLAP data cubes on the computer running the Service Manager console. ADO.NET Data Services Update for .NET Framework 3.5 SP1 for Windows Server 2008 R2 For Service Manager in System Center 2012 SP1 and System Center 2012 R2 Service Manager: SQL Server 2012 Analysis Management Objects are required regardless of the SQL Server version that you use Data Warehouse Management Server 4-Core 2.66 GHz CPU 8 GB of RAM When a data warehouse management group and SQL Server Analysis Services are hosted on a single server, it should contain at least 16 GB RAM. 10 GB of available disk space SQL Server 2008 R2 Native Client or SQL Server 2012 Native client Data Warehouse Databases 8-core 2.66 GHz CPU 8 GB of RAM for 20,000 users, 32 GB of RAM for 50,000 users 400 GB of available disk space RAID Level 1 or Level (1+0) drive SQL Server Reporting Services (SSRS) The SQL Server and Analysis Services collation settings must be the same for the computers hosting the Service Manager database, data warehouse database, analysis services database, and Reporting Services database. For Service Manager in System Center 2012 SP1 and and System Center 2012 R2 Service Manager: SQL Server 2012 Analysis Management Objects, which are part of the SQL Server 2012 Feature Pack, are required regardless of the SQL Server version that you use Self-Service Portal: Web Content Server with SharePoint Web Parts 8-Core 2.66 GHz CPU 8-core, 64-bit CPU for medium deployments 16 GB of RAM for 20,000 users, 32 GB of RAM for 50,000 users 80 GB of available hard disk space Microsoft Internet Information Services (IIS) 7 with IIS 6 metabase compatibility A Secure Sockets Layer (SSL) certificate can be used on the IIS server that hosts the Self-Service Portal For Service Manager in System Center 2012 SP1 and System Center 2012 R2 Service Manager: SQL Server 2012 Analysis Management Objects are required regardless of the SQL Server version that you use Create the Lab Environment: Hyper-V Configuration As mentioned, my environment uses Hyper-V. So, we’re going to start by configuring Hyper-V for our needs, and creating the Virtual Machines (VMs) required for our lab. The first thing we need to do is setup a Virtual Switch for the VMs to connect through. Launch Server Manager, click on Tools, and select Hyper-V Manager. When Hyper-V loads, it will have nothing in it. Even if we were to create a VM, it wouldn’t have a network connection to use. So we’ll start with creating a Virtual Switch. As you can from my screenshot, I have 2 LAN ports on my host. One of them has a connection to my home network and the Internet. In the Hyper-V Manager, click the Virtual Switch Manager from the Actions pane. Now, click on the Create Virtual Switch button. From here, you now need to configure the virtual switch that your VMs will use. Give it a name to clearly identify it (in my case I called it ‘External Network’), and choose the connection type. For more information about virtual networks, see the following TechNet article: http://technet.microsoft.com/en-us/library/cc816585(v=ws.10).aspx. Here is an excerpt from the article: External virtual networks. Use this type when you want to provide virtual machines with access to a physical network to communicate with externally located servers and clients. This type of virtual network also allows virtual machines on the same virtualization server to communicate with each other. This type of network may also be available for use by the management operating system, depending on how you configure the networking. (The management operating system runs the Hyper-V role.) For more information, see “A closer look at external virtual networks” later in this topic. Internal virtual networks. Use this type when you want to allow communication between virtual machines on the same virtualization server and between virtual machines and the management operating system. This type of virtual network is commonly used to build a test environment in which you need to connect to the virtual machines from the management operating system. An internal virtual network is not bound to a physical network adapter. As a result, an internal virtual network is isolated from all external network traffic. Private virtual networks. Use this type when you want to allow communication only between virtual machines on the same virtualization server. A private virtual network is not bound to a physical network adapter. A private virtual network is isolated from all external network traffic on the virtualization server, as well any network traffic between the management operating system and the external network. This type of network is useful when you need to create an isolated networking environment, such as an isolated test domain. For our demonstration, we are going to use an External Network so that the VMs can communicate with the Host system. Make all the appropriate selections and so forth, and then press OK. You may encounter the following warning message. This is because we are remotely connecting to the Host machine using the same network connection that we are about to setup as a Virtual Switch (hence selecting the ‘Allow management operating system to share this network adapter’ checkbox). Press ‘Yes’ to the dialog. Now that we have the virtual switch setup, we can start creating VMs for our lab. Create the Virtual Machines Let’s now create the VM’s we will need for the lab, specifically one for Active Directory, and 3 for Service Manager (since we can’t install all roles on the same server). In Hyper-V Manager, from the Actions pane, click on New and choose Virtual Machine. On the New Virtual Machine wizard beginning screen, click read the information presented and then click Next. Enter a name for the VM. Note that this is NOT the name the VM will have within the Operating System (unless you name it the same), but rather, used as an identifier in Hyper-V Manager. After you have entered a name, click Next. Now assign the amount of memory you want your VM to have, and then press Next. This is the screen where you connect your VM to the network that we created, then press Next. This is the screen where you configure how large a hard drive the VM will have. Make the appropriate customizations and click Next. For the Installation Options, choose if you will install an OS later, or if you want to use an ISO, then click Next. On the Summary screen, review your selections and entries, and click Finish. Once the VM is created, it will appear in the Hyper-V Manager. If you want to configure further settings, like the number of CPUs and mounting an OS ISO, right click on the VM and choose Settings or click on Settings from the Actions pane. Repeat these steps for each VM you need to create, in our case one for Active Directory and 3 for Service Manager. Here are the settings I have used for each of the VM’s: Active Directory: Virtual Machine Name: AD Memory: 2048 MBNOTE: Active Directory doesn’t need 2 GB of RAM, it will run fine with 512 MB. I just increased the RAM so that the OS would install/respond faster during setup. CPUs: 2 OS: Windows Server 2012 SCSM Management Server: Virtual Machine Name: SCSM-MS Memory: 8192 MBNOTE: You may need to increase the amount of RAM this VM has, depending on performance. CPUs: 4 HDD: 80 GB OS: Windows Server 2012 SCSM Warehouse Server: Virtual Machine Name: SCSM-WS Memory: 8192 MBNOTE: You may need to increase the amount of RAM this VM has, depending on performance. CPUs: 4 HDD: 80 GB OS: Windows Server 2012 SCSM SharePoint Server: Virtual Machine Name: SCSM-SP Memory: 8192 MBNOTE: You may need to increase the amount of RAM this VM has, depending on performance. CPUs: 4 HDD: 80 GB OS: Windows Server 2012
  23. Hello everyone, if you have been following along with my guides, you should now have Orchestrator installed. Orchestrator includes over 41 built-in workflow standard activities that perform a wide variety of functions. You can expand Orchestrator’s functionality and ability to integrate with other Microsoft and third-party platforms and products by installing integration packs. Integration packs for Orchestrator contain additional activities that extend the functionality of Orchestrator. For this lab example, we will download and install the System Center Integration Packs, which will enable Orchestrator to integrate with all the other System Center products. Download Integration PacksTo start, open a browser and navigate to the following URL: http://technet.microsoft.com/en-us/library/hh295851.aspx, and click on the last link in the page labelled “Integration Packs for System Center”. On the Integration Packs for System Center page, you can choose either the 2007 or 2012 Integration Packs. For this lab example, we will use the 2012 packs. Click on the link for each System Center product, which will bring you to another webpage. Look for the link under the ‘Downloading the Integration Pack’ section. This will bring you to the download page. Click the Download button, and select all 3 items to download. Note, you do not need to download and install the Best Practice Analyzer, or the Integration Toolkit, but they are useful to have. After the files are downloaded transfer them to the Orchestrator server (if you didn’t download them directly). Install Integration PacksStart by running the System_Center_2012_Orchestrator_Integration_Packs.exe. You will receive the following prompt to extract the files. Either accept the default or change it to another directory, then press OK. When the extraction is complete, you will receive the following prompt. Press OK. If you open the directory where the files were extracted to, you will see a bunch of files ending in .oip file extensions. These are the Orchestrator Integration Packs. Now open the Deployment Manager. Before we can use the Integration Packs, we need to Register and Deploy them. We have to start with registering the packs. Right-click on the Integration Packs folder and choose ‘Register IP with the Orchestrator Management Server’. This will launch the Integration Pack Registration Wizard. Register Integration PacksWhen you choose ‘Register IP with the Orchestrator Management Server’ from the Deployment Manager, this wizard will launch. Click Next. On the Selection screen, click the Add button to find the Integration Pack(s) you want to register. In the Open dialog, browse to where the .OIP files were extracted to, and select the Integration Pack you want to register. Note that you can only select one at a time, and are not able to multi-select. You can, however, register more than one at once. If you want to register more than one Integration Pack at once, just click the Add button again and select another .oip file. Once you have the file(s) selected click Next. The next screen will list everything the wizard finds. Click Finish to start the registration. You will encounter an End-User License Agreement for every Integration Pack (meaning if you are importing 5 packs at the same time, you will have 5 agreement prompts). Read the information presented and press Accept. Once the registration is complete, the Integration Packs will now be present under the Integration Packs directory. Deploy Integration PacksNow that the packs are registered with the Orchestrator server, we can now deploy them. In the Deployment Manager, right-click the Integration Packs directory and choose ‘Deploy IP to Runbook Server or Runbook Designer’. The Integration Pack Deployment Wizard will launch. Click Next. Now select the Integration Packs that you want to deploy. On this dialog you can select multiple packs, but only the packs that have been registered will appear for selection. Make your selection and then click Next. Next you need to supply the computer(s) that you want to deploy to. If you recall from the context menu, this is either to a Runbook Server or a Runbook Designer. So this can be the Runbook Server (in our lab example, the same server running all the other Orchestrator elements), or the Runbook Designer (which can be installed on an Administrator workstation). Add the various computer names, and then click Next. You can schedule the installation for the future (i.e. after-hours in Production), or install the packs immediately with the wizard. You also have control on how the installation will affect the system (i.e. stopping the Runbooks or not). Make the applicable selections and click Next. Review the information on this final screen and click Finish. The wizard will deploy the Integration Packs. Once the Integration Packs have been deployed, in the Runbook Designer you will see the additions (in this example the System Center packs) on the right in the Activities pane. Now we need to connect the pack(s) to the corresponding system. Configure Connection SettingsNow that we have the Integration Packs registered and deployed, we still need to provide connection information so that Orchestrator will be able to communicate and operation with these other systems. Open Runbook Designer, select Options from the menu, and select the system you want to configure connection settings for. In this example, we will use ‘SC 2012 Configuration Manager’. When the Connections dialog appears, click the Add button. On the Connection Entry screen, provide a name (to identify the connection), and fill in the Server, Username, and Password to use for the connection. In a Production environment, a dedicated Service Account would be created/used for each product connection. Don’t forget to test the connection to ensure it can communicate with the system you are integrating. Then press OK. The newly added connection will be shown. Click Finish. If you have more than one Integration Pack, you will have to configure the connections for each of them.
  24. We are now finally ready to install SCORCH. Install Prerequisites To start, before we will actually be able to install SCORCH, we have to install a few prerequisites. .NET Framework 3.5 SP1 .NET Framework 4.0 IIS (Web Server role) Install System Center Orchestrator Start by either extracting the DVD contents, or mounting the ISO (the TechNet ISO is currently labelled as en_system_center_2012_orchestrator_with_sp1_x86_dvd_1345499). Start by running the SetupOrchestrator.exe. On the splash screen click the Install link. On the Product Registration screen, fill in the Name, Organization and Product Key fields, and click Next. Read and accept the License Terms, and then click Next. On the Select Features screen, select what you want to install. In this lab example, we are installing all features onto the same server. Next you need to provide a Service Account for running the Runbooks, and accessing remote systems. Note that the account must have “Log on as a service” rights. Enter the account details, and then click the Test button. Once the credentials have been tested successfully, you will be able to click Next. Now you need to configure the database. Provide the server and instance, and click the Test Database Connection button. Only once the database connection has been successfully tested will you be able to click the Next button. Now you can also specify the database name. In this lab example we will accept the defaults and click Next. Now we need to configure the Orchestrator User Group. This group will have Administrative access to Orchestrator. You can locate and use an existing Security Group from Active Directory. Specify a User Group and click Next. On the Web Services screen, you have the opportunity to change the ports used. For this lab example we will accept the defaults and click Next. You can also change the installation location. For example, if you have a dedicated drive in the server for the Operating System, and a second drive for the middleware. Make the appropriate modifications if applicable, and then click Next. New to System Center 2012, you can use Microsoft Update to find updates for the product. In a Production environment, you would probably not want to do this, since there will more than likely be Change Management controls around updating/patching. In this lab example, I am not going to enable Microsoft Updates for the product, so that in the future I will be able to document the update/upgrade process in detail. Next, you can choose if you want to participate in the CEIP program. In a Production environment, this will probably not be accepted, as there may be some concern over private/personal data. In a lab/non-production environment though, I would personally choose to be a part of the program, because the information collected by Microsoft aids them in improving the product. If no one was willing to participate, then there would be no improvements. Finally, review the information on the Summary screen, and click Install. Once the installation is complete, you can select/de-select any of the listed checkboxes, and then click Close. Congratulations, you have now successfully installed System Center Orchestrator. It’s fairly simple/straight forward. But after installation you now need to work with Integration Packs, and Runbooks.
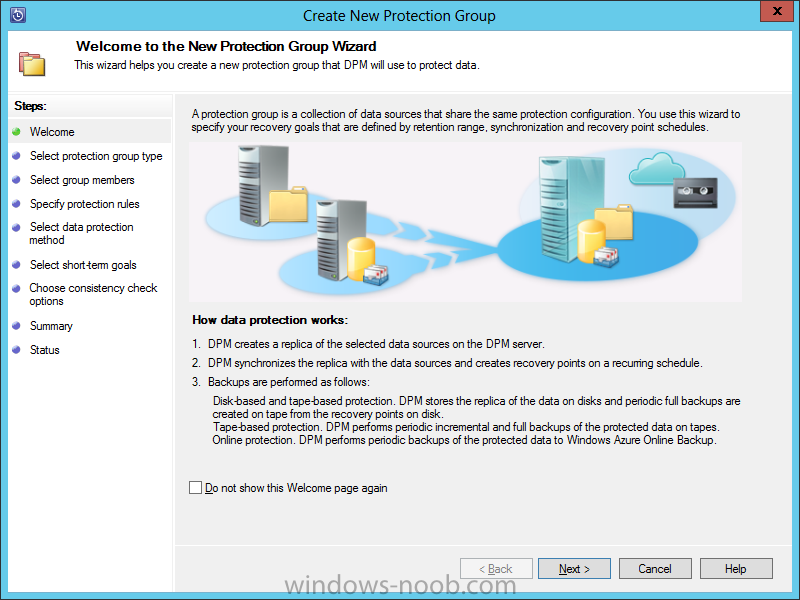
  25. In our last post, we installed Active Directory. Now we will install SQL Server. Install SQL Server At this point, since we will be installing SQL Server on the same server that we will be installing Orchestrator, it is expected that you have the VM created, the OS is installed, the appropriate networking has been configured, and it is joined to your lab domain. To avoid a specific installation error (see the end of the Install SQL Server section), you have to install the .NET Framework 3.5. So we’re going to complete this first before we start the installation of SQL. .NET Framework Installation To install the specific version of .NET that we require (version 3.5 in this case), start by launching the Server Manager, and selecting Manager > Add Roles and Features. On the Add Roles and Features Wizard, read the information on the Before You Begin screen, and then click Next. On the Installation Type screen, select ‘Role-based or feature-based installation’, and click Next. On the Server Selection screen, since we are installing SQL on the same server as Orchestrator, ensure that it is selected, and then click Next. On the Server Roles screen, we are not installing a Role, but rather a Feature, so just click Next. On the Features screen, select .NET Framework 3.5 Features, and click Next. Since in Windows Server 2012 the .NET Framework 4.x is the main framework, the OS installation does not contain the source files for this installation. Therefore, you will need to click on the ‘Specify an alternate source path’ link at the bottom of the dialog. You will need to provide the path to where the source files are. This is found within the installation media of Windows Server 2012. If you insert a DVD or mount an ISO, specify the path to the SxS folder (i.e. D:\Sources\SxS), and then press OK. Click Install, and once it has completed, click Close. SQL Installation Start by either extracting or mounting the SQL Server ISO, and run the setup.exe. In this example, we are installing SQL Server 2012 SP1. On the main installation screen, click on the Installation link on the left pane. From the Installation screen, click the ‘New SQL Server stand-along installation or add features to an existing installation’ link. This is initiate the installation. First, the Setup Support Rules will check for any issues. As long as there isn’t any ‘Failed’ issues, click OK to continue with the installation. Next, enter your product key or select the evaluation copy to install, and press Next. Accept the License Terms and choose if you will send usage data to Microsoft, then press Next. If you have an Internet connection, the installer will check if there are any applicable updates to the installation, and will download the updates to use during the install. Click Next. The Setup will perform another Setup Support Rules check. As long as there are no Failures, you can click Next. Next is the Setup Role. For our needs, we will choose ‘SQL Server Feature Installation’, then press Next. For the Feature Selection, select the following, and then press Next. § Database Engine Services § Management Tools – Basic and Complete (for running queries and configuring SQL services) The Installation Rules will run to determine if anything will block the SQL installation. If there are no Failures, click Next. Next we will configure the instance. You can choose either to use a Default instance, or a Named instance. In this example, I will use a named instance, so as to not get this installation of SQL mixed up with any other I will have in my lab. Make your applicable choice, and click Next. The setup will check and confirm there is enough space on the drive for the installation. If everything is reported as OK, click Next. You next have to configure the server, which includes the Service Accounts and Collation. In Production, it is best practice to have a separate account for each of the services. In our lab, we will leave everything at defaults, with the exception of changing the ‘SQL Server Agent’ startup type from ‘Manual’ to ‘Automatic’. After you have completed this, don’t click Next, but rather click on the Collation tab. On the Collation tab, you will need to click the Customize button to be able to change it appropriately. On the Customize dialog, select ‘SQL collation, used for backwards compatibility’. Within the list, find ‘SQL_Latin1_General_CP1_CI_AS’ and select it, then click OK. You will be back on the Server Configuration dialog, click Next. On the Database Engine Configuration screen, leave the Authentication Mode at ‘Windows authentication mode’. What do have to change is to add SQL Server Administrators. Click the Add button. On the next dialog, you will need to add either the user(s) or security group(s) you want to have administrator access to SQL. At a bare minimum, add the current user account, so that you can log into SQL Server. Add the user(s)/security group(s), and click OK. You will be back on the Database Engine Configuration screen, and your accounts will now be present. In my example, I have an Active Directory Security Group I specifically created for SQL Administrators. Then click Next. You can choose to send Error Reporting information to Microsoft. Make your choice, and click Next. The setup will now re-check the configuration rules, based on the selections and information that has been supplied. If it passes, click Next. Review the information on the Ready To Install screen, and then click Install. Note: during the installation, you may encounter the following error message. This is due to not having the .NET Framework 3.5 installed prior to attempting to install SQL Server. If you encounter this, cancel the SQL server installation, and install the .NET Framework 3.5 (which is an available feature within Roles and Features). You may have to wait a while for the Installation Progress to complete. On the Complete screen, click Close. Congratulations, you now have SQL Server installed and are finally ready to install System Center Orchestrator (SCORCH).
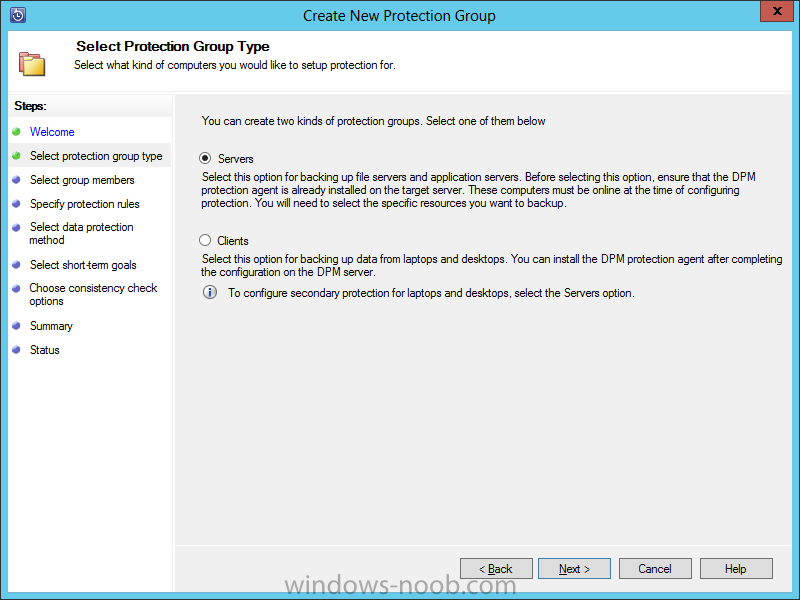
×
×
  • Create New...

Important Information

We have placed cookies on your device to help make this website better. You can adjust your cookie settings, otherwise we'll assume you're okay to continue.