Search the Community
Showing results for tags 'pki'.
-
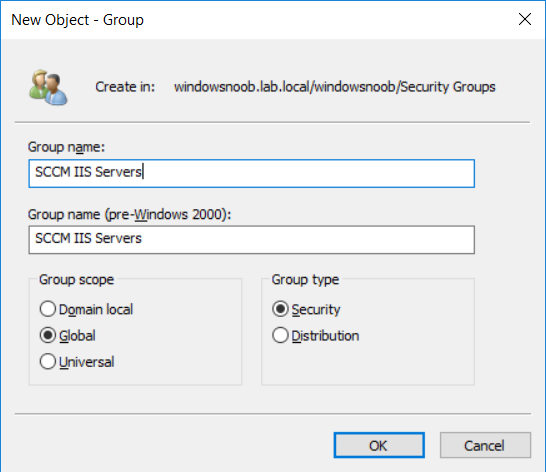
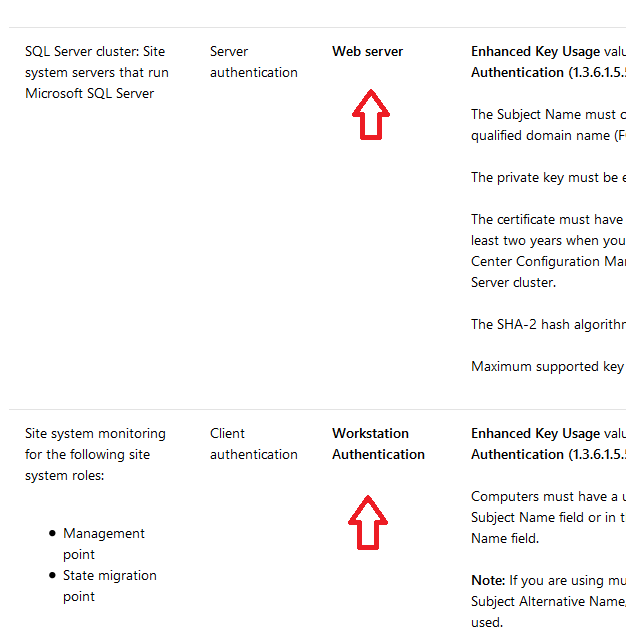
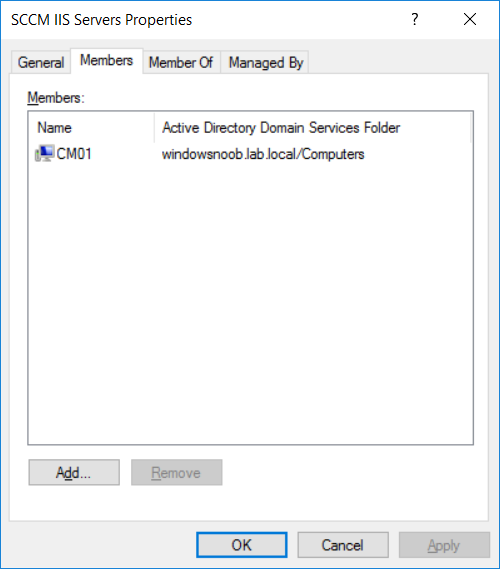
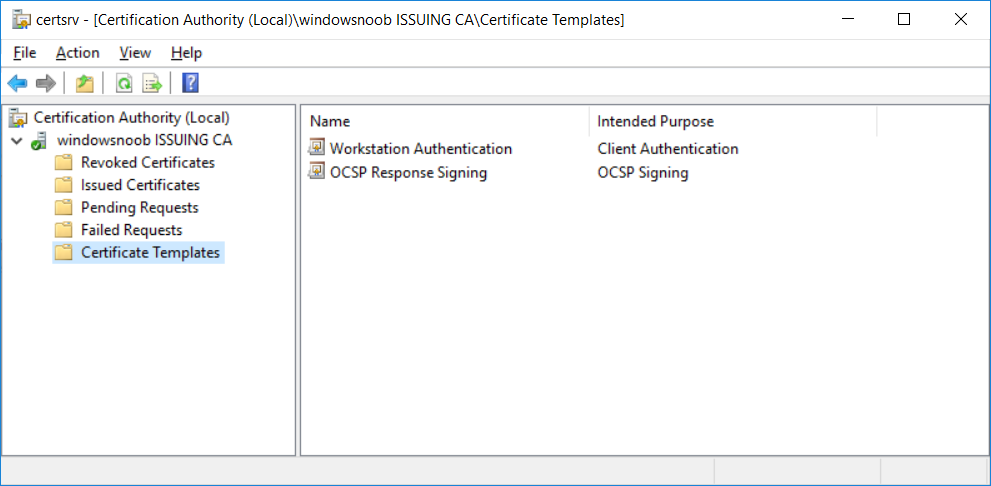
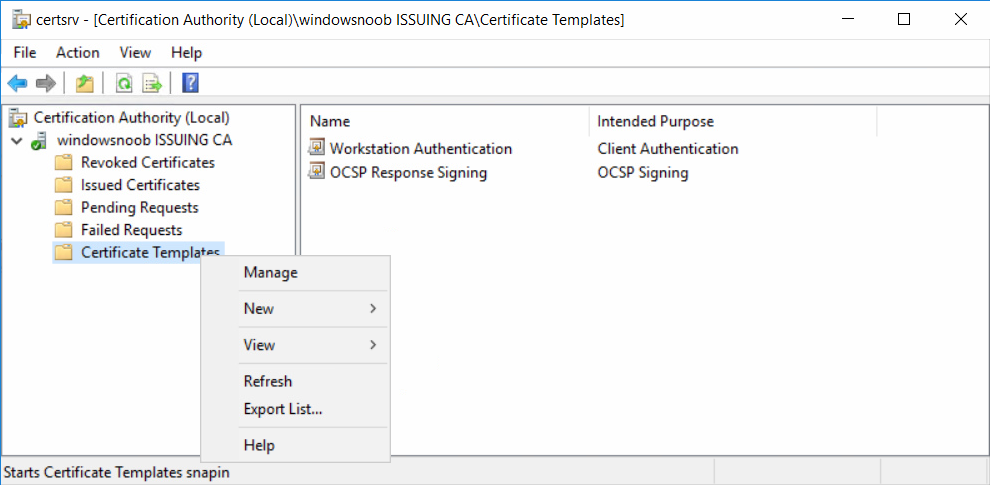
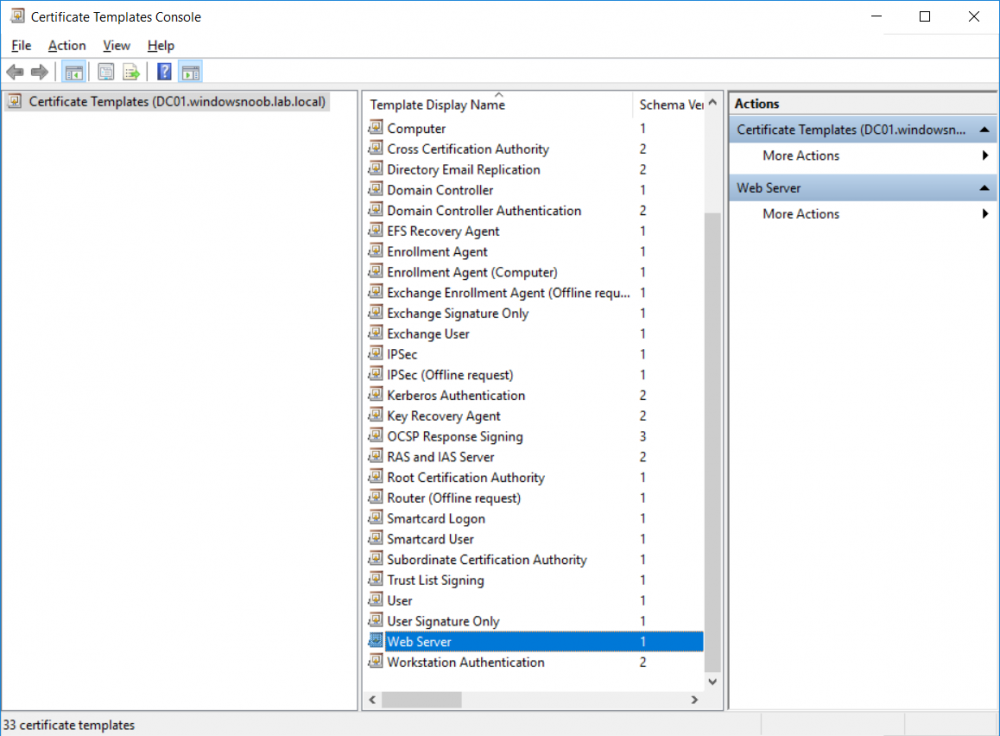
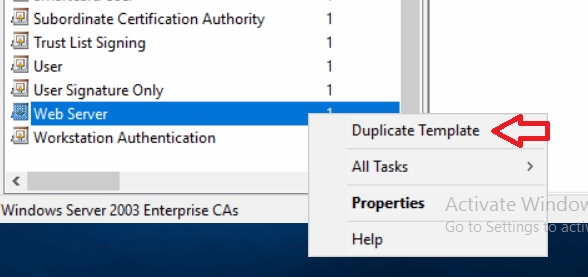
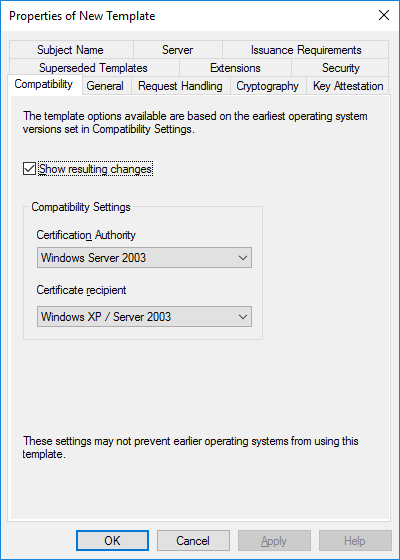
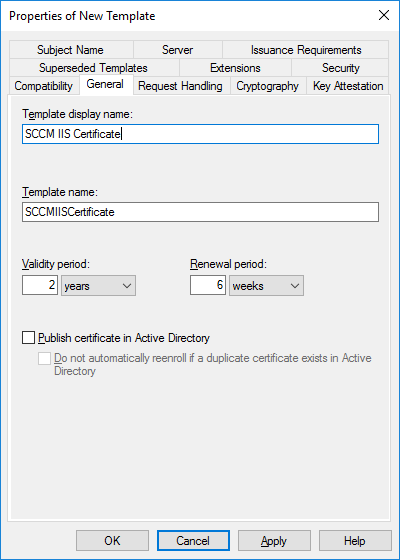
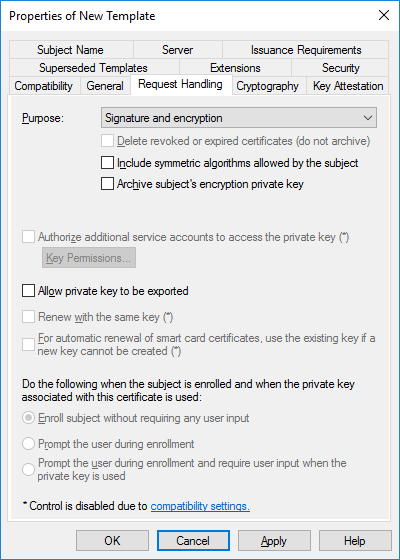
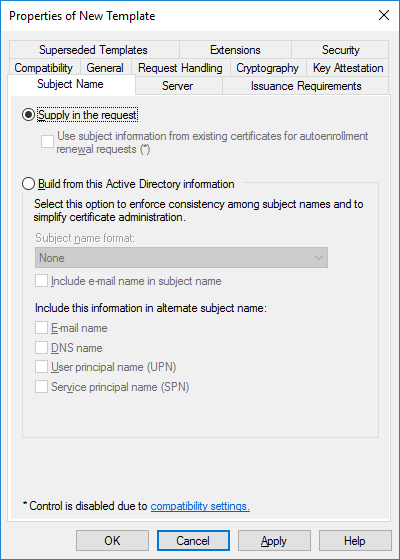
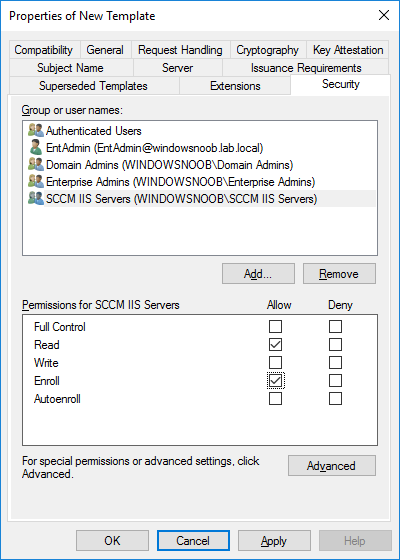
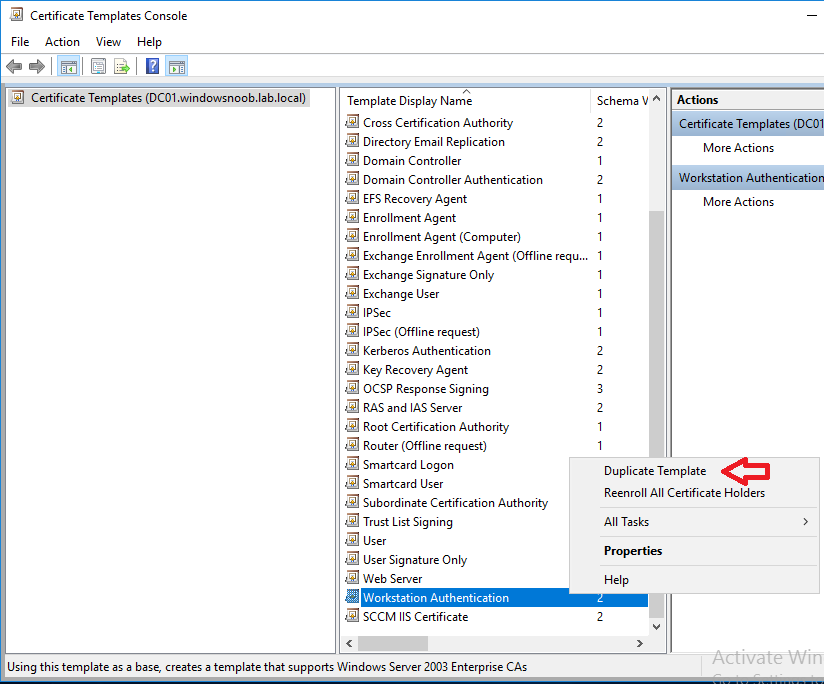
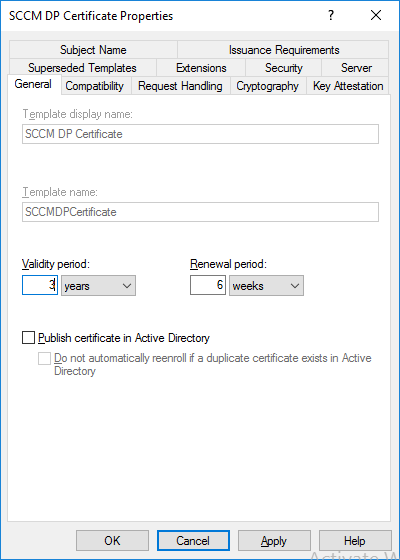
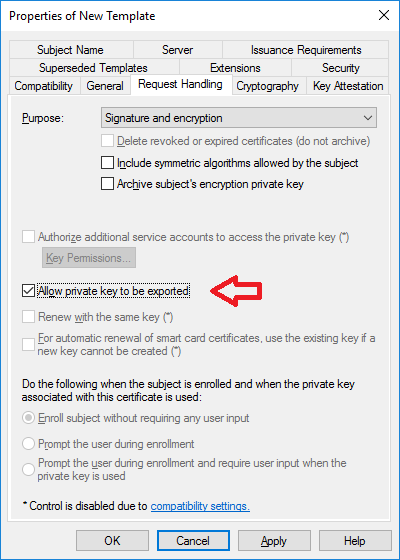
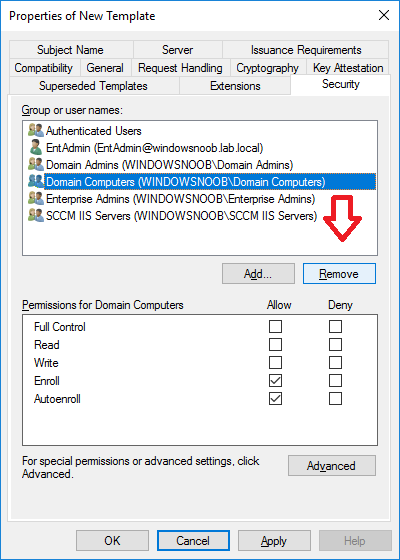
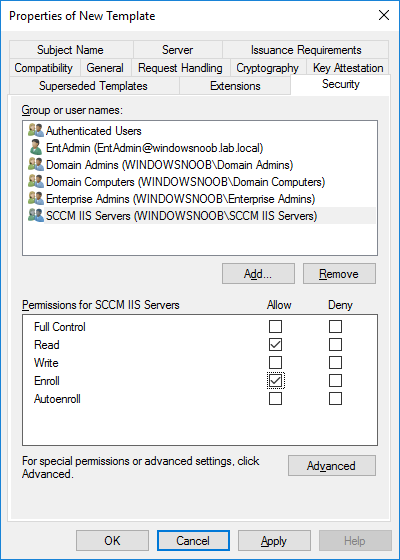
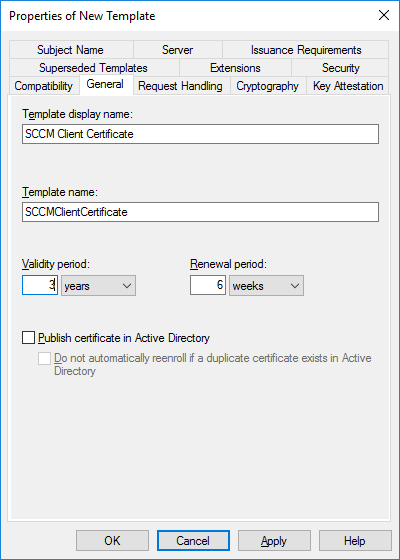
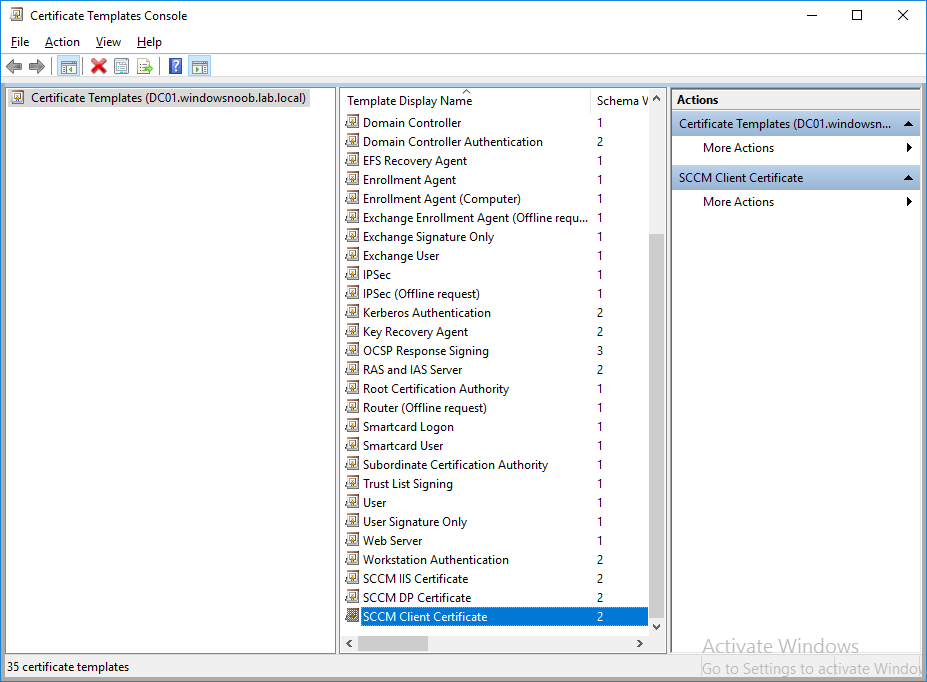
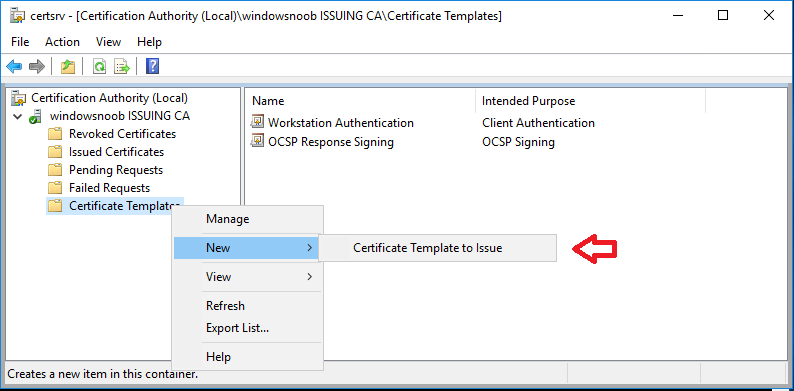
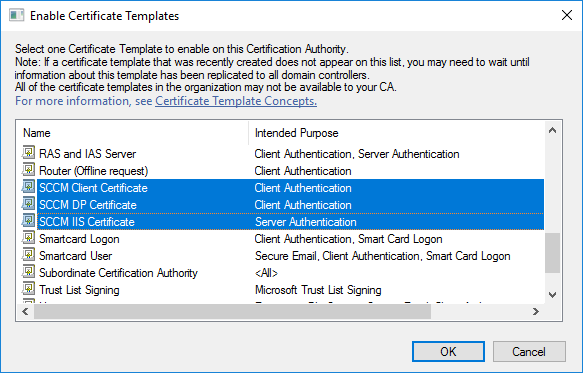
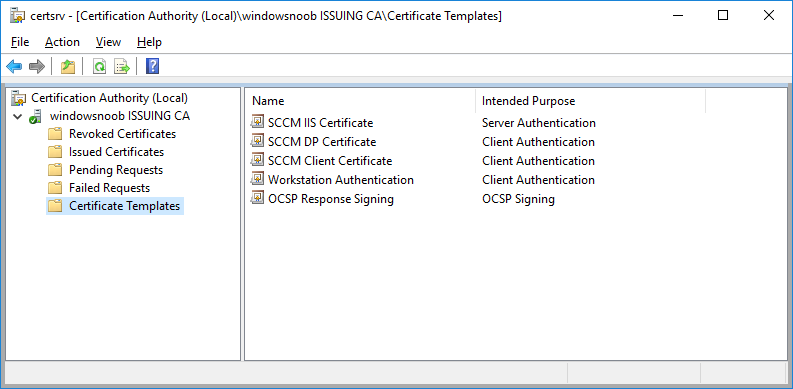
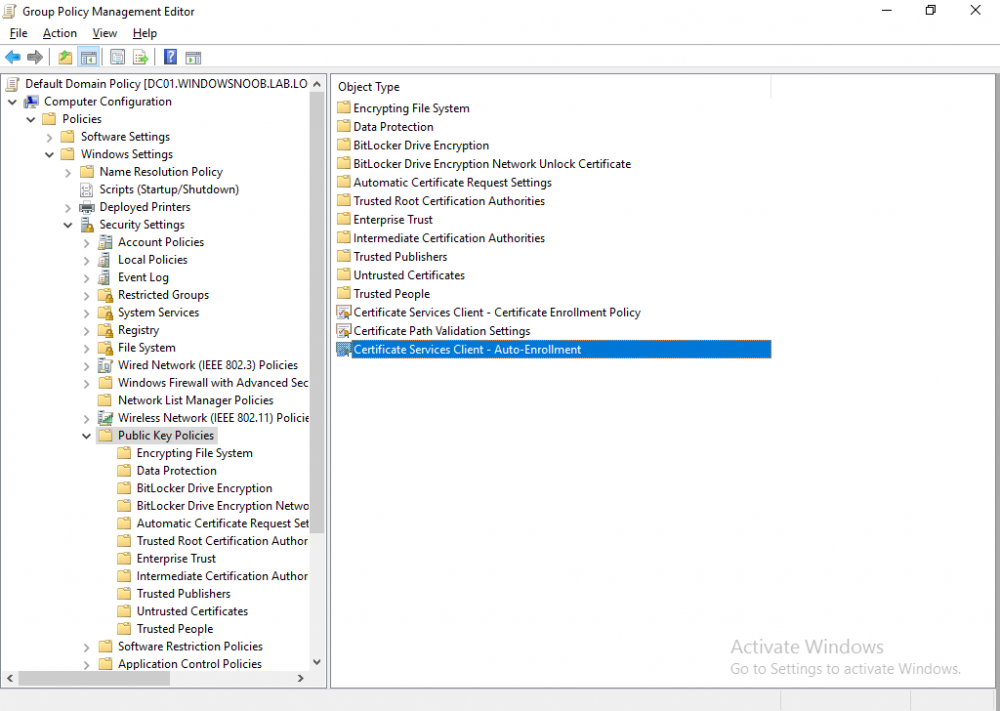
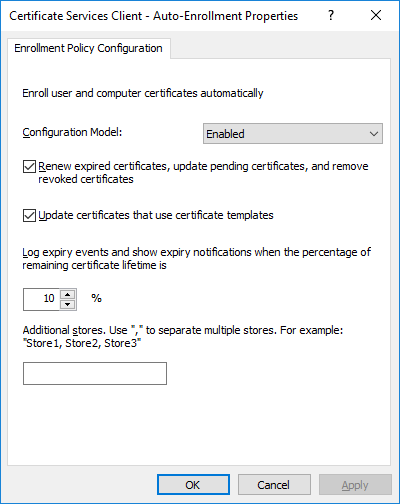
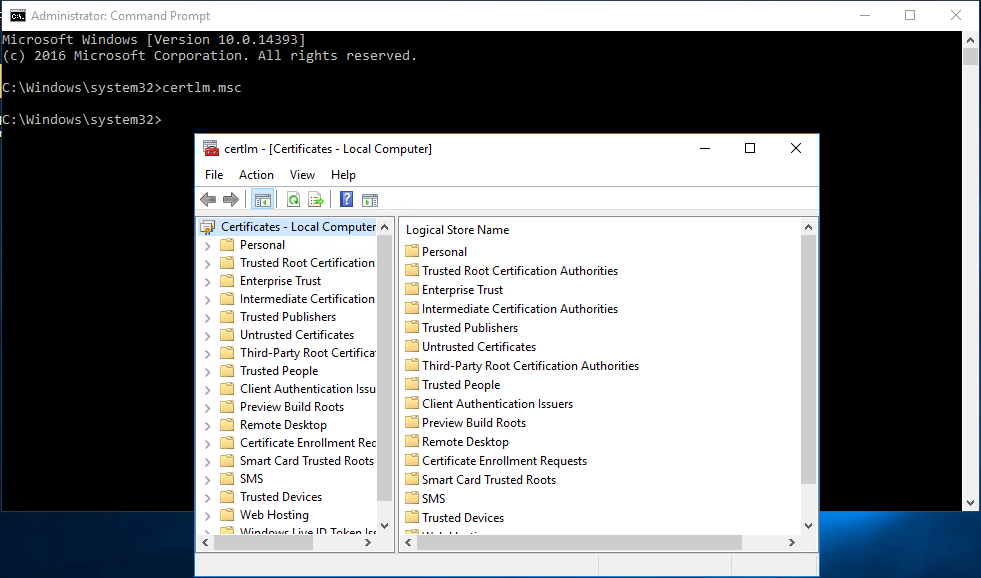
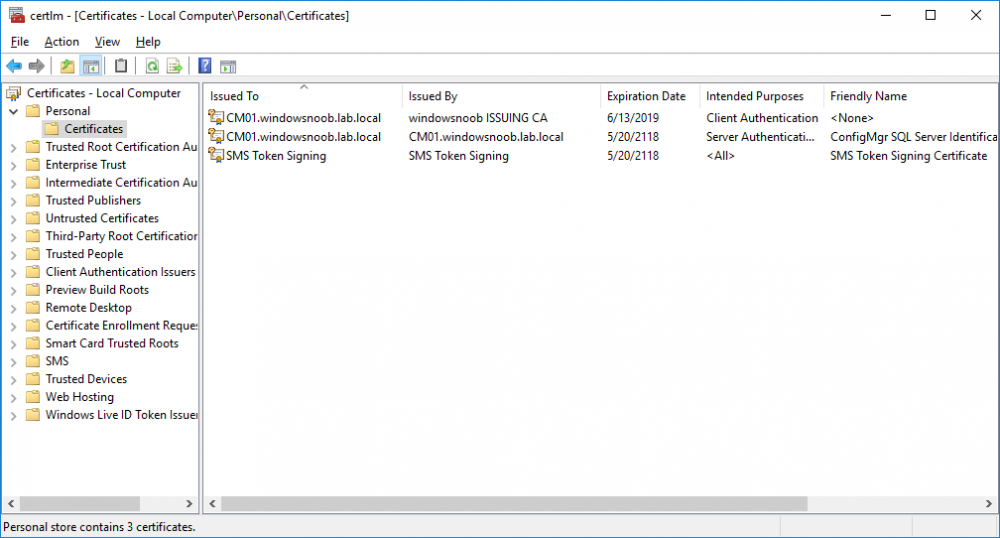
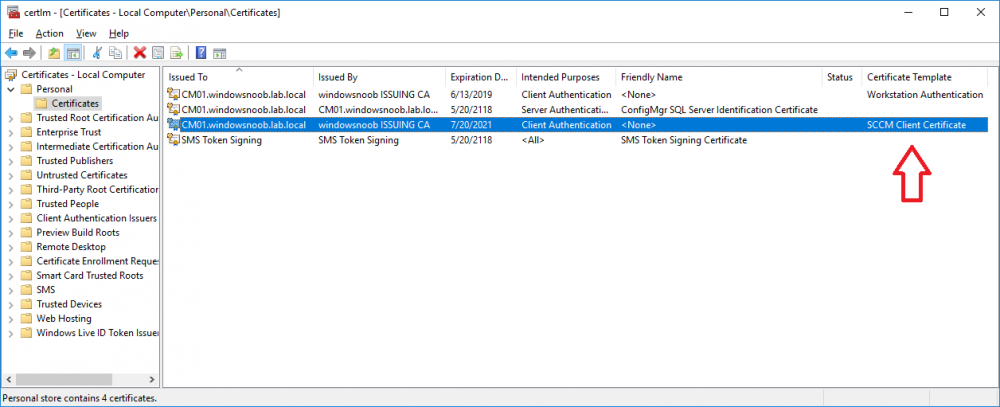
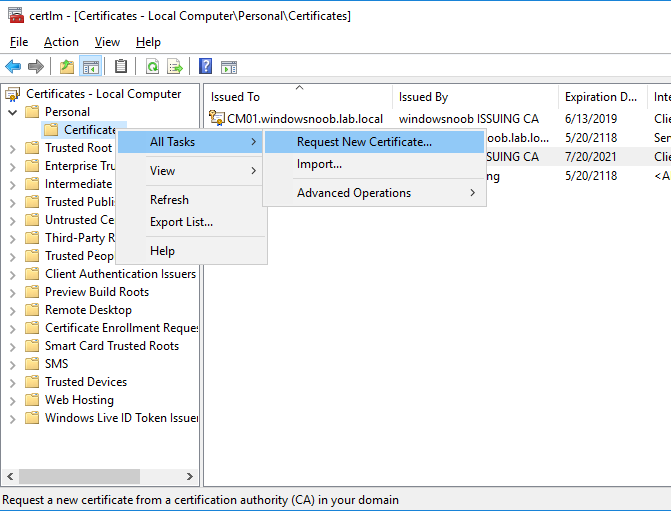
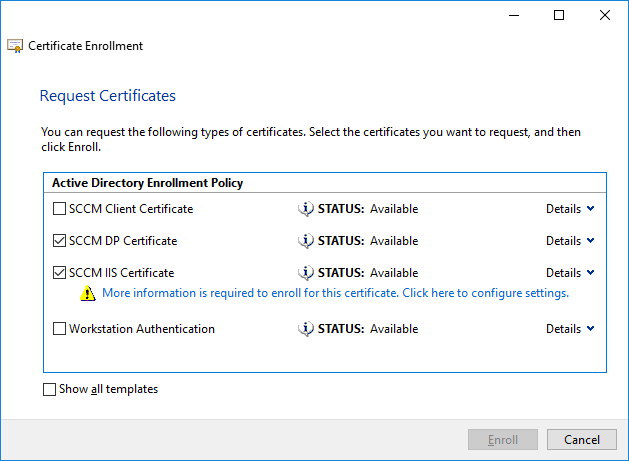
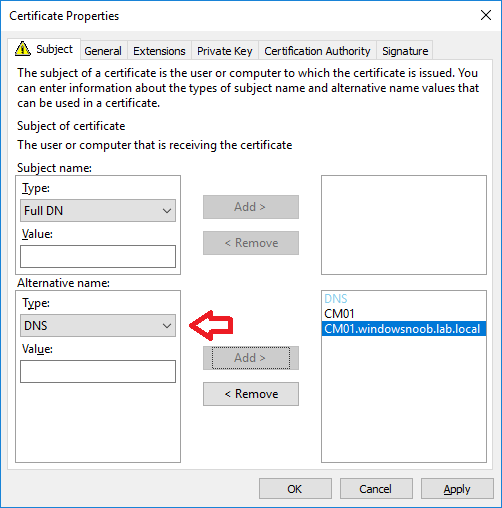
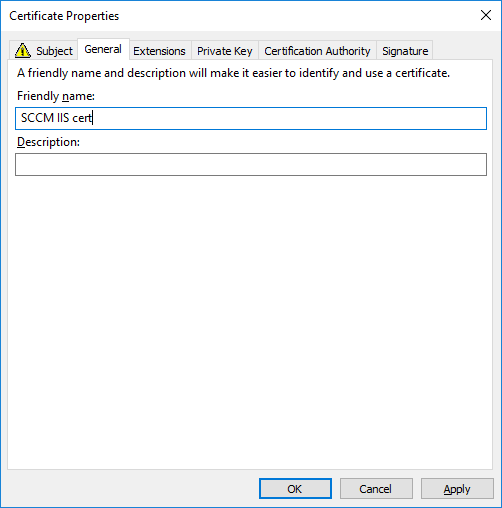
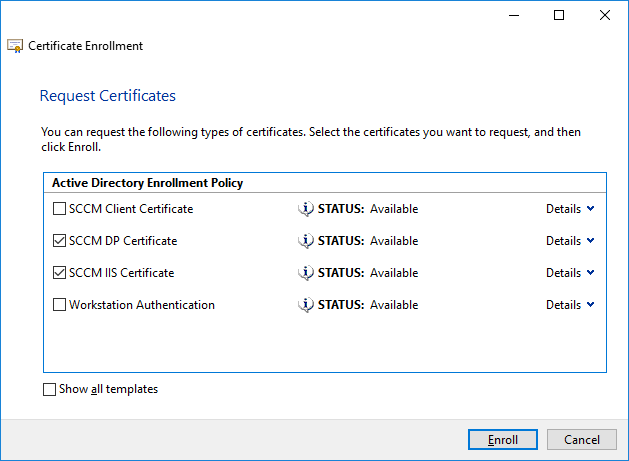
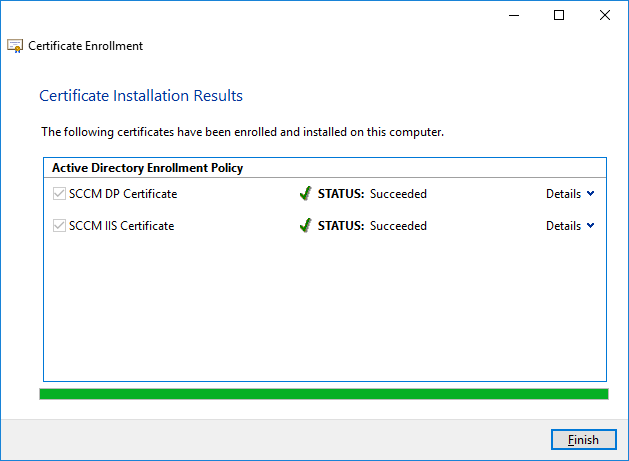
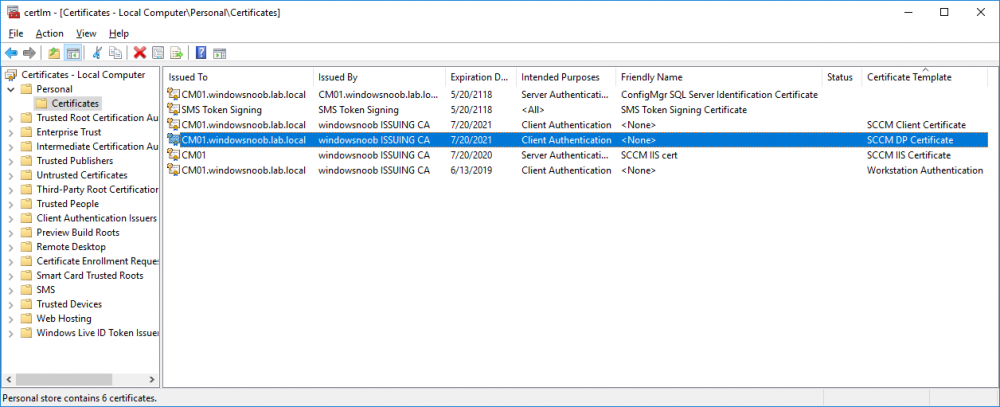
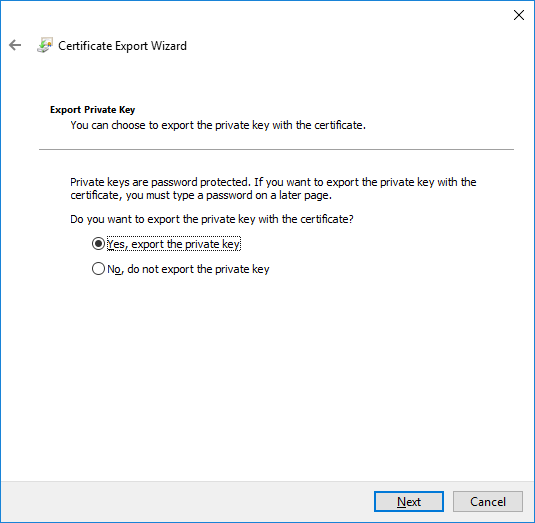
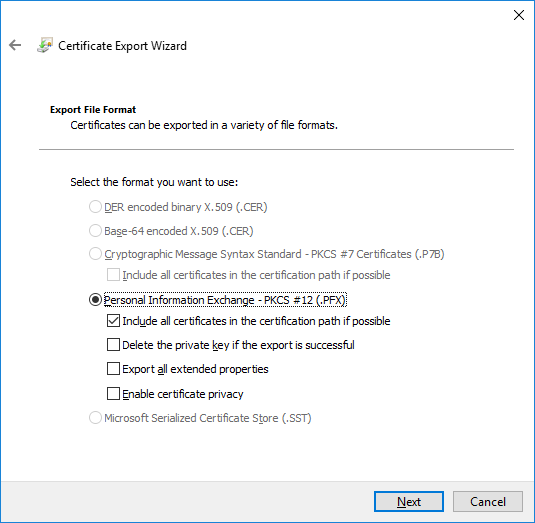
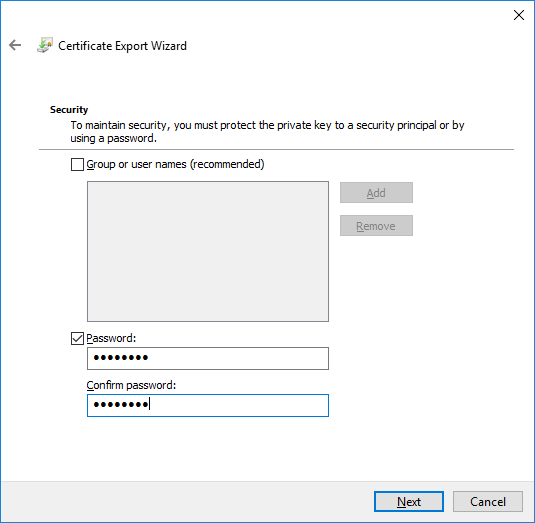
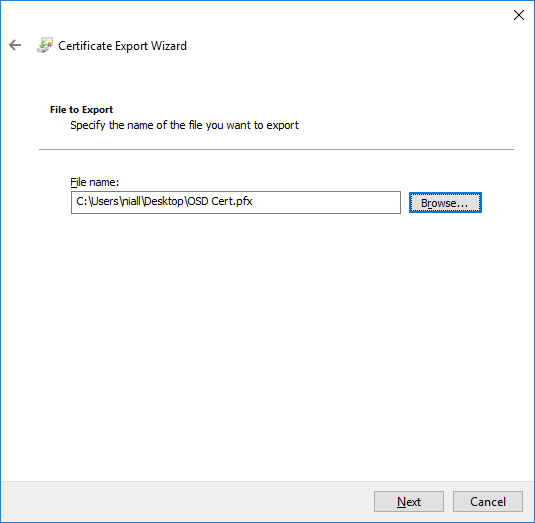
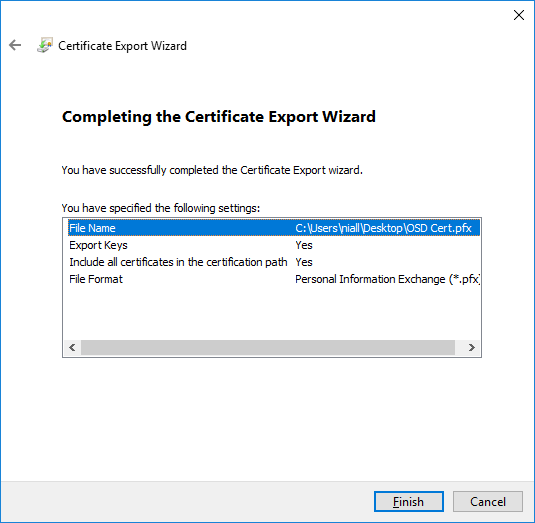
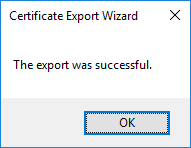
In a previous series of guides I showed you how to configure PKI in a lab on Windows Server 2016. In another series, I also showed you how to install System Center Configuration Manager (Current Branch) version 1802 on Windows Server 2016 with SQL Server 2017. In this lab, I will show you how to configure SCCM to utilize that PKI environment. This series is based upon an excellent video by the talented former Microsoft Premier Field Engineer Justin Chalfant here. If you haven't seen it yet, do check it out. The intention here is that after you've completed this PKI enabled SCCM lab you can then use this in future guides, and to dig deeper into new technologies from Microsoft, for example enabling a Cloud Management Gateway and/or Cloud Distribution Point and using later on, using Co-Management. Note: To complete this lab you must first complete the PKI Lab series (8 parts) and then install a new virtual machine within that PKI lab running System Center Configuration Manager (Current Branch) version 1902 utilizing this series, that installation of Configuration Manager will be in HTTP mode. In addition, you must configure the Software Update Point role (in HTTP mode) on CM01 See this guide (step 2 onward) for details. For details how to configure that, see this post. It will take some time to setup but you'll be glad you did. Also, don't do this in production without consulting with a PKI Expert. I don't claim to be one, I'm just helping you get it up and running in a lab. This is intended for use in a lab only. Step 1 - Create an Active Directory Security Group In this step you'll create an active directory group which will contain all your site systems that use Configuration Manager server roles which utilize IIS (Internet Information Systems) such as the below (1): Management point Distribution point Software update point State migration point Enrollment point Enrollment proxy point Application Catalog web service point Application Catalog website point A certificate registration point On the Active Directory domain controller (DC01), open Active Directory Users and Computers, and expand the windowsnoob organisational unit (OU) created in this Step 1, part 5 of this blog post. Click on Security Groups, and then right click and choose New, select Group. Give the group a name, SCCM IIS Servers. Once done, right click on the SCCM IIS Servers Active Directory Security Group, choose Properties and click on the Members tab, click on Add, for Object Types make sure Computers are selected. Add the Configuration Manager server (CM01) to that group. Once done, reboot the Configuration Manager server (CM01) using the following command otherwise you might get access denied when trying to request a certificate. shutdown /r Step 2. Create certificate templates on the Issuing CA In this step you will create three new certificate templates for use within SCCM by duplicating existing templates. Using the windowsnoob\Entadmin credentials, logon to the Issuing CA server (IssuingCA) and launch the certificate authority console (CertSrv.msc). In the three templates below, one uses the Web Server template, and the others use the Workstation Authentication template, you can verify which Microsoft certificate template to use by using the tables on the following blog post, of which i'm showing a screenshot below to make it clear. 1. SCCM IIS Certificate Right click on Certificate Templates and choose Manage. Scroll down to Web Server from the templates listed. Right click on the Web Server template and choose Duplicate Template. The Properties of New Template screen appears. Verify that the Certificate Authority Compatibility settings are set to Windows Server 2003. Note: When you use an enterprise certification authority and certificate templates, do not use the Version 3 templates (well you can but read this first). These certificate templates create certificates that are incompatible with System Center Configuration Manager. Instead, use Version 2 templates by using the following instructions. On the Compatibility tab of the certificate template properties, specify Windows Server 2003 for the Certification Authority option, and Windows XP / Server 2003 for the Certificate recipient option. (1) Click on the General tab and rename it to SCCM IIS Certificate. On the Request Handling tab, verify that Allow private key to be exported is not selected (default). On the Subject Name tab verify that the Supply in the Request is selected (default). On the Security tab, add the previously created Active Directory Security Group called SCCM IIS Servers and give it Read and Enroll access. Optionally you can remove Enroll from the Domain Admin and Enterprise Admins as it is mentioned in the docs. Click Apply to apply the changes and then close the Properties of New Template. 2. SCCM DP Certificate This template is used by the distribution point site system for Operating System Deployment (clients that are not domain joined). Next, right click on Workstation Authentication from the templates listed and choose Duplicate Template. The Properties of New Template screen appears. The Properties of New Template screen appears. Verify that the Certificate Authority Compatibility settings are set to Windows Server 2003. Click on the General tab and rename it to SCCM DP Certificate, change the validity period to something more reasonable, like 3 years. On the Request Handling tab, ensure that Allow private key to be exported is selected to allow us to export the certificate as a pfx file and we need the private key to do so, as we'll import that certificate into our console so that the clients can utilize it during imaging (workgroup members, to authenticate back to your site). On the Security tab, add the previously created Active Directory Security Group called SCCM IIS Servers and give it Read and Enroll access. Next, remove Domain Computers altogether. Click Apply to apply the changes and then close the Properties of New Template. 3. SCCM Client Certificate This template is used by clients to communicate with site systems. Next, right click on Workstation Authentication from the templates listed and choose Duplicate Template. The Properties of New Template screen appears. The Properties of New Template screen appears. Verify that the Certificate Authority Compatibility settings are set to Windows Server 2003. Click on the General tab and rename it to SCCM Client Certificate, change the validity period to something more reasonable, like 3 years. Under Subject Name verify that Build from Active Directory is selected. On the Request Handling tab, verify that Allow private key to be exported is not selected (default). On the Security tab, select Domain Computers and ensure that Read, Enroll and AutoEnroll permisions are selected. Click Apply to apply the changes and then close the Properties of New Template. The three SCCM templates are now shown below. Close the Certificate Templates console. Next you will issue these certificate templates. To do so, in the Certificate Authority (on the IssuingCA), right click on Certificate Templates and choose New, then Certificate Template to Issue. In the Enable Certificate Templates window, select the 3 previously created SCCM templates as shown below and click OK. They will now appear under Certificate Templates. Step 3. Verify Auto-Enrollment GPO is enabled for the Client Certificate In Part 8 of the PKI lab you enabled Auto Enrollment so that clients can request certificates automatically. As it is a lab, the setting is deployed in the default domain GPO. The setting is in Computer Configuration, Policies, Windows Settings, Security Settings, Public Key Policies, and Certificate Services Client - Auto Enrollment. The setting should look like so (Enabled). Step 4. Requesting the IIS and DP/OSD Certificates on the IIS Site System On the SCCM server (CM01), which hosts all those IIS ConfigMgr roles, start certlm.msc from an Administrative command prompt. if you expand Personal, then Certificates, you'll see certificates issued to that computer, there will be a few by default. In the administrative command prompt, run gpupdate /force to pull down group policy changes...and refresh the view in certlm. Below you can see the SCCM Client Certificate template was used to generate this Client Authentication certificate. Requesting New certificates Next, you will request certificates from Active Directory, to do so, right click on Certificates and choose All Tasks then Request New Certificate. click Next at the Before you begin screen, and verify that Active Directory Enrollment Policy is selected before clicking Next. Select the SCCM DP Certificate and SCCM IIS Certificate from those listed (you already have the SCCM Client Certificate from AutoEnrollment). You'll notice that for the SCCM IIS Certificate, more information is required to enroll, Click on the message to enter this info. For Alternative Name, choose the DNS option and then click on Add to add the hostname and fully qualified domain name of your SCCM server (CM01). Note: If you want this server to be available via IBCM you could also add the publicly available FQDN of the site here (eg: cm01.windowsnoob.com) Next Click on General, and give this cert a friendly name so we can distinguish it in IIS later when we bind it. click OK, then click Enroll. It should state a status of Succeeded for both certificates. If not look at the details to find out what went wrong. Click Finish to exit. Step 5. Exporting the Distribution Point certificate Next you need to export the Distribution Point certificate so that during OSD the client can authenticate to the management point in WinPE. To do that, refresh the view in Certificates (certlm.msc) and then select the client authentication certificate created with the SCCM DP Certificate template. Right click and choose All Tasks, then select Export. In the welcome to certificate export wizard click Next and choose to export the private key. stick with the defaults and give it a password that you will use when you import it back into the SCCM Console, I used P@ssw0rd Save the cert to your desktop with a filename of OSD Cert.pfx and continue through that wizard until completion. You should see that the export was successful. That's it for this part, please join me in part 2 where we will complete the configuration of SCCM to HTTPS. cheers niall Recommended reading (1) - https://docs.microsoft.com/en-us/sccm/core/plan-design/network/pki-certificate-requirements
-
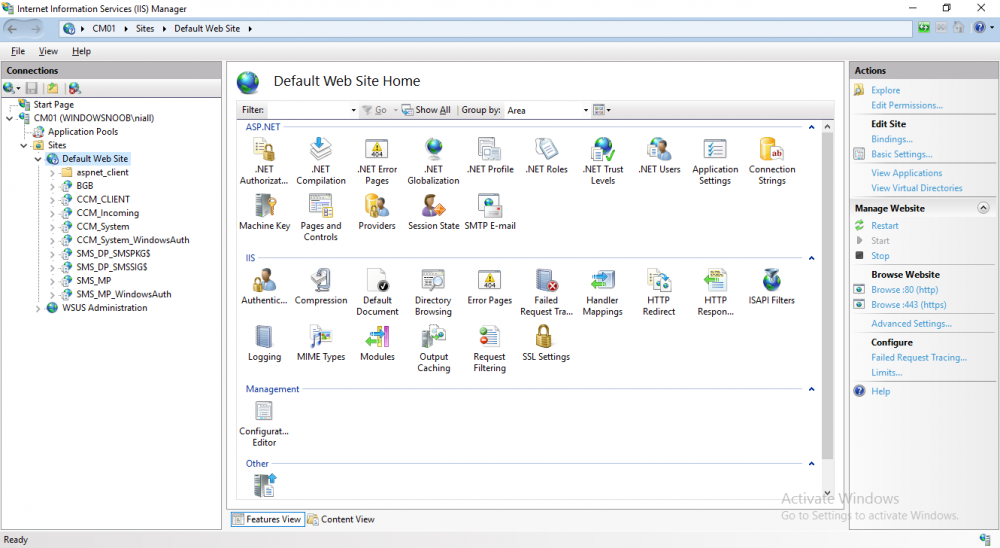
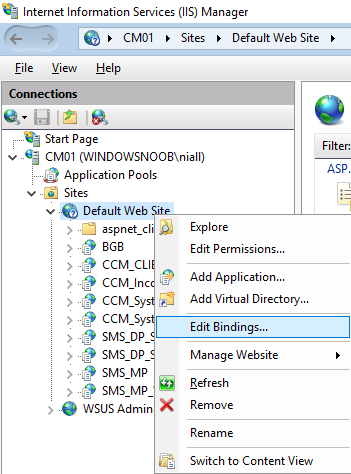
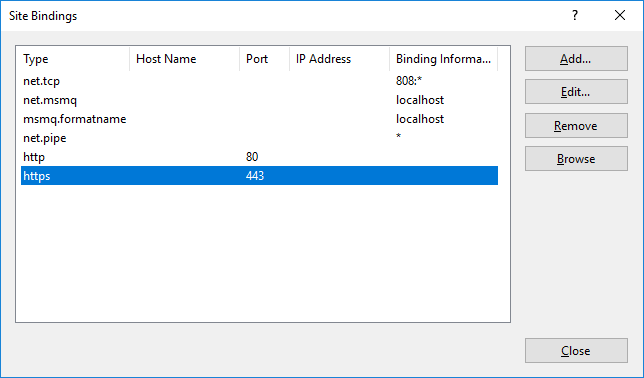
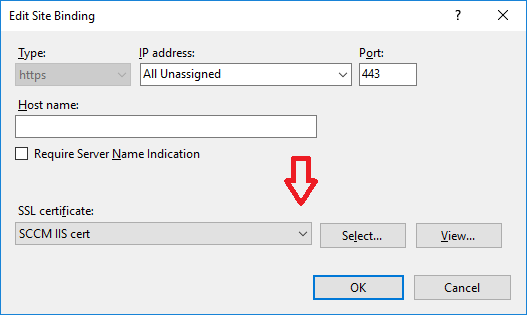
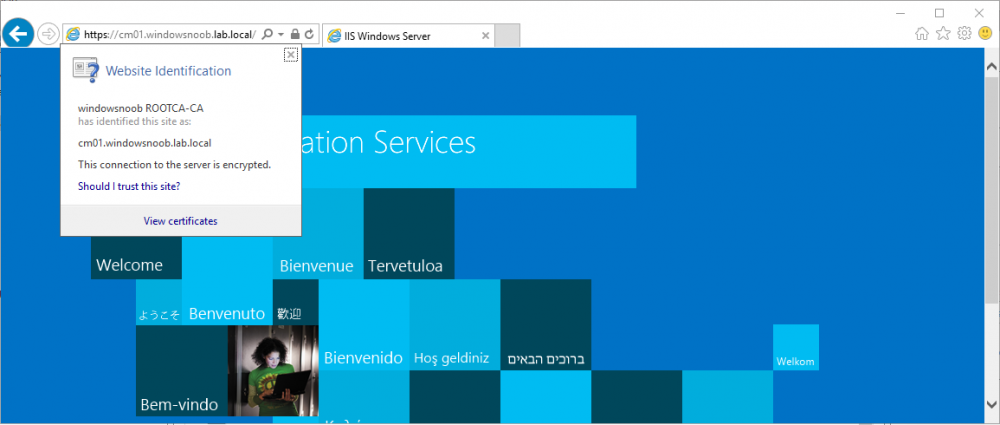
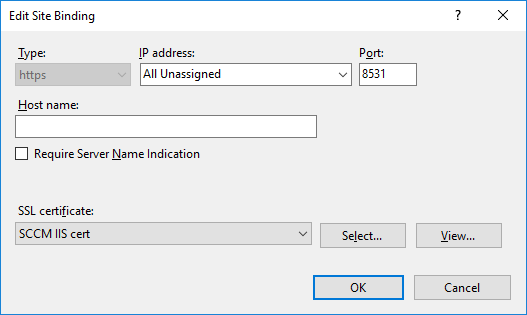
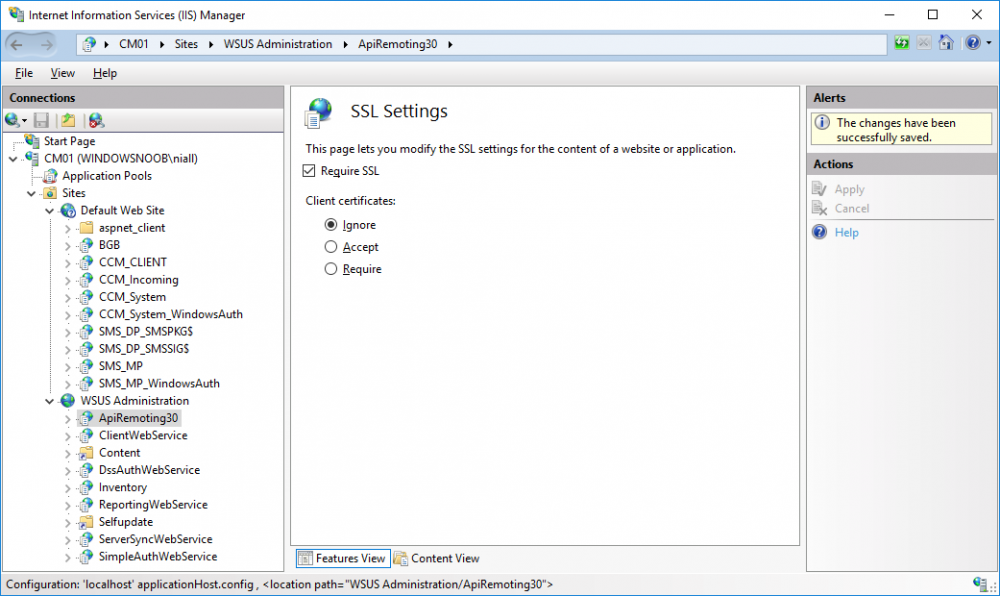
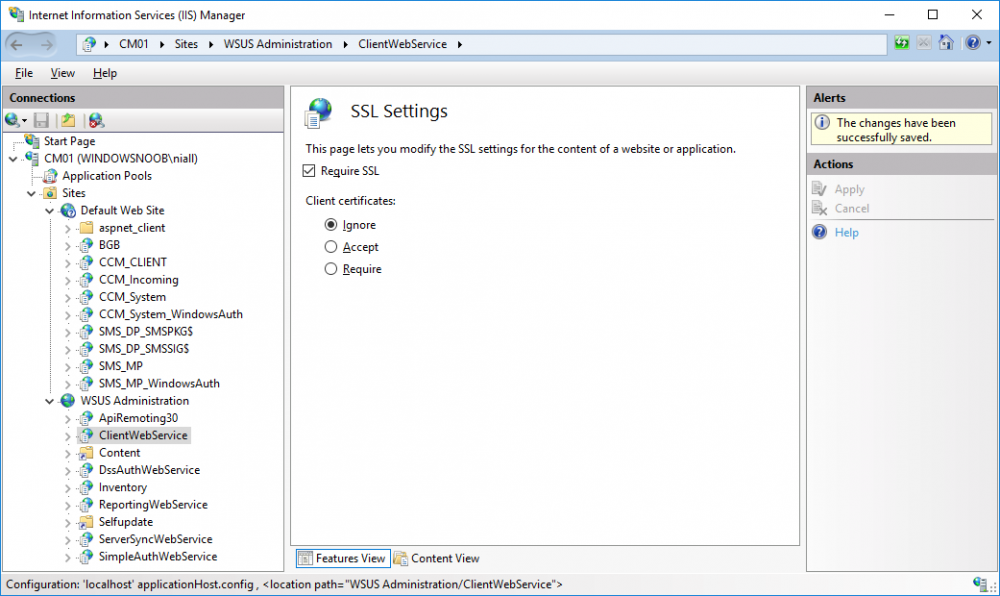
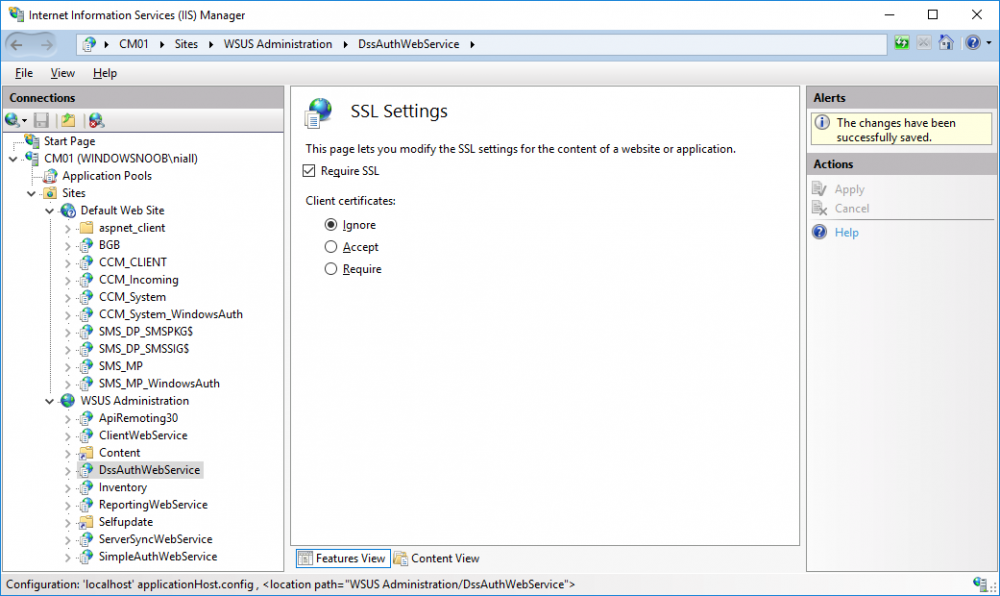
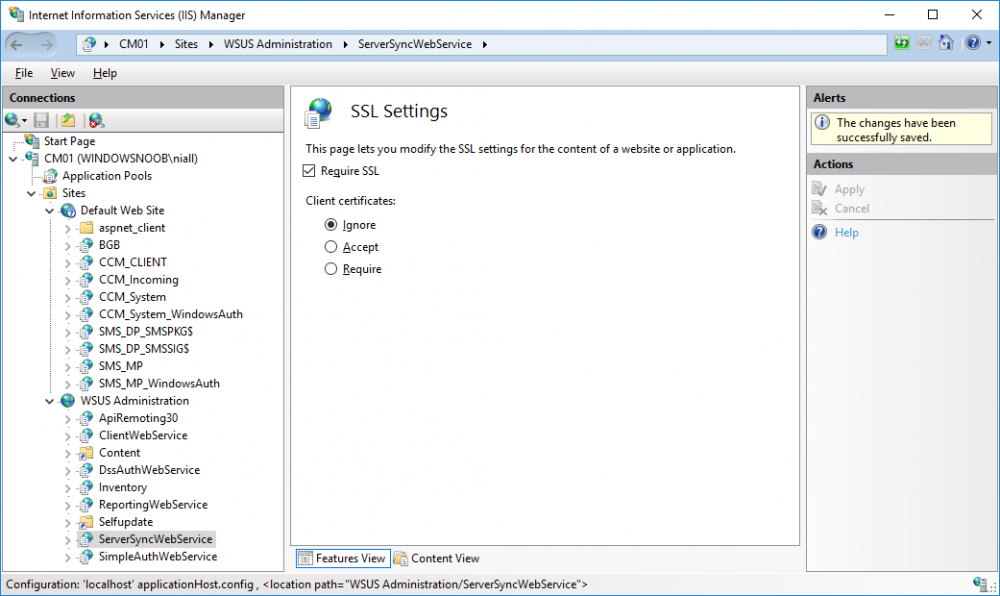
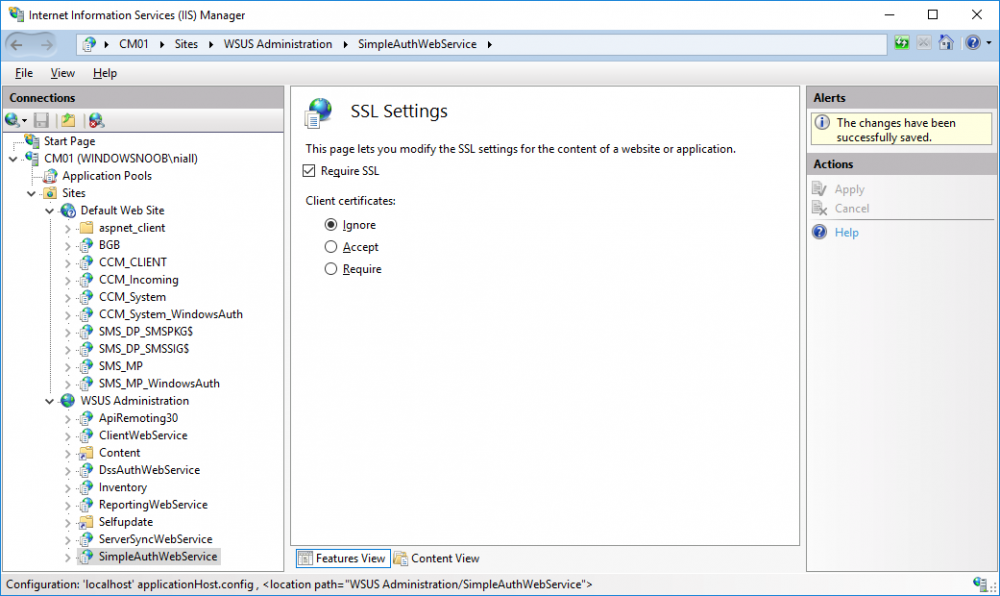
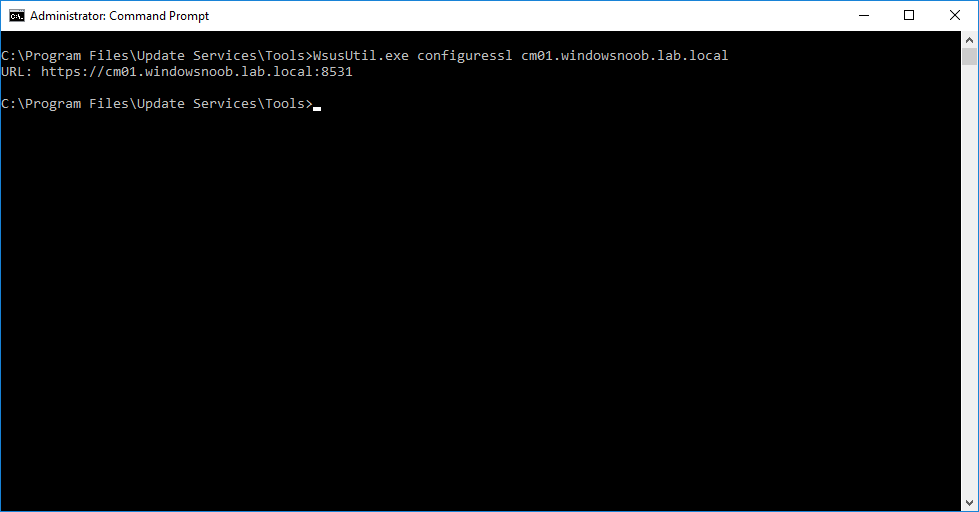
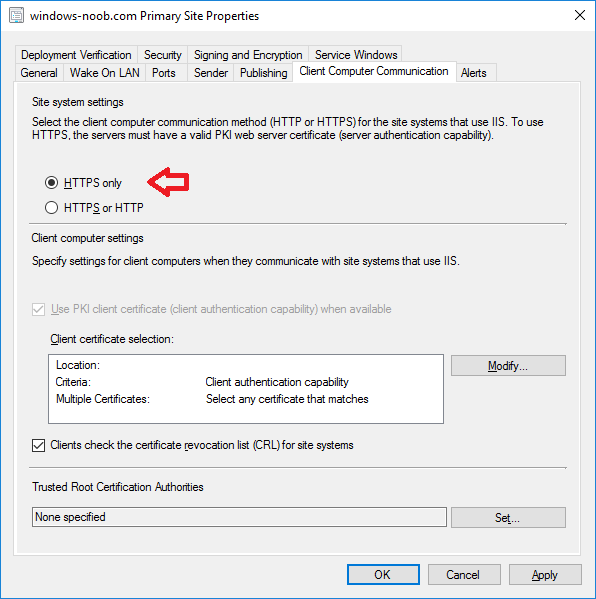
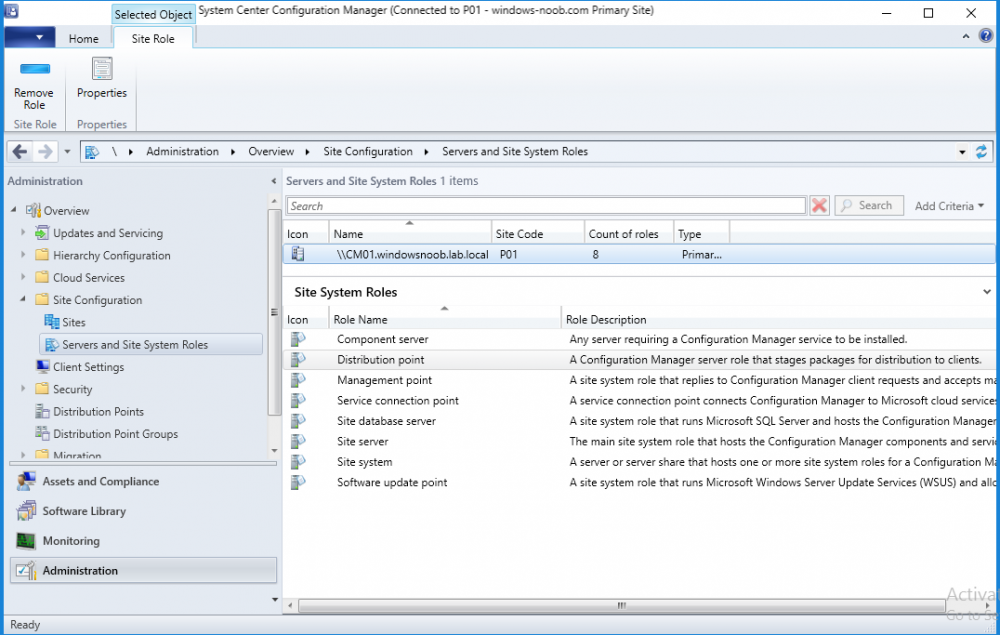
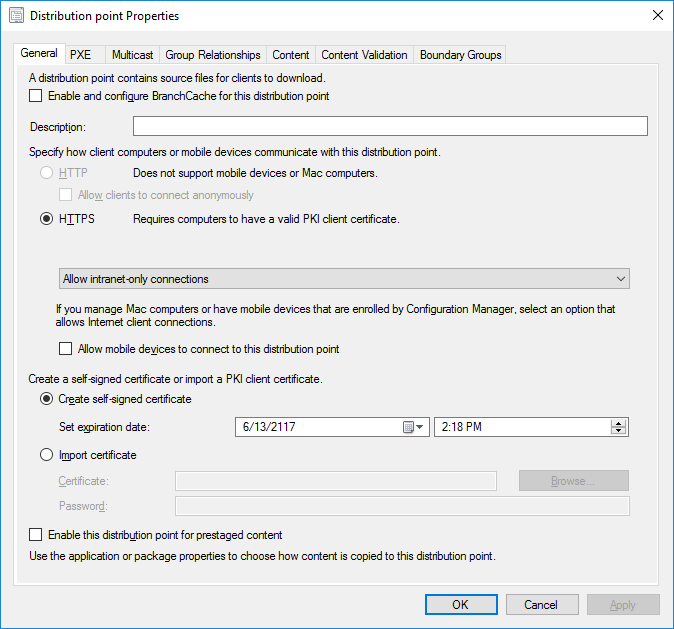
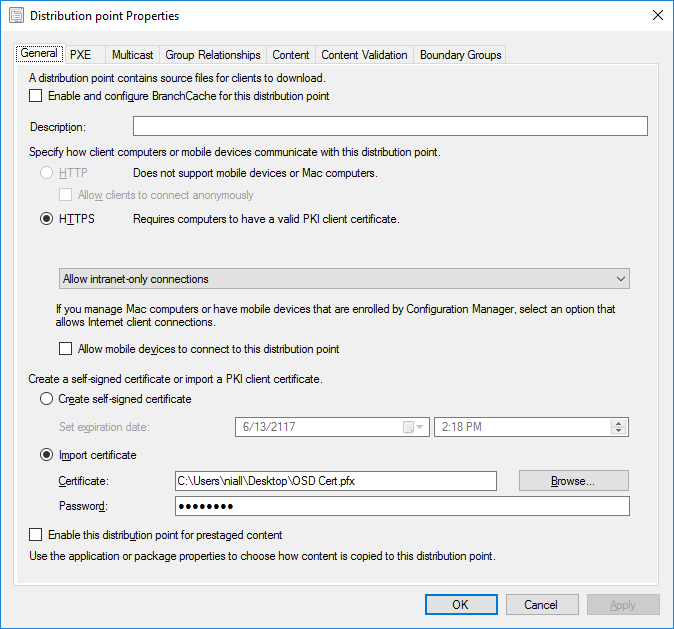
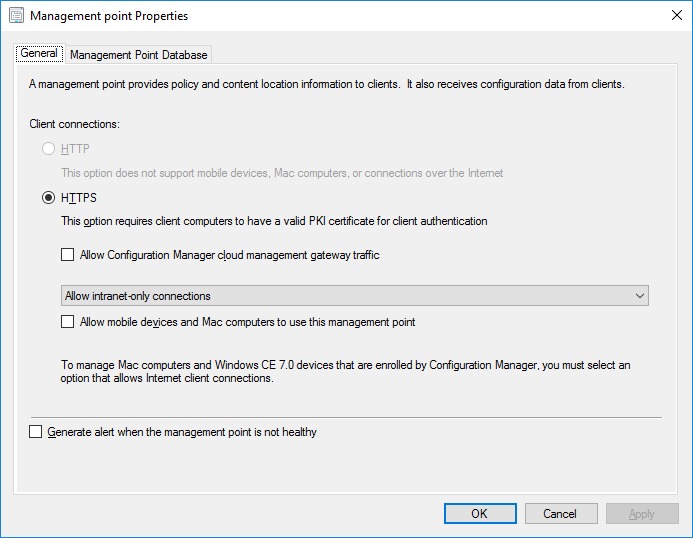
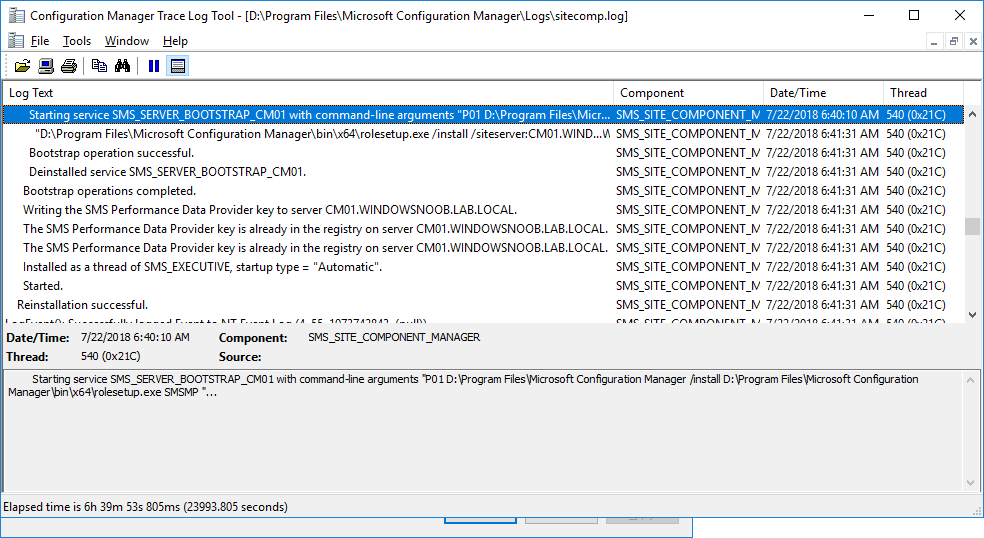
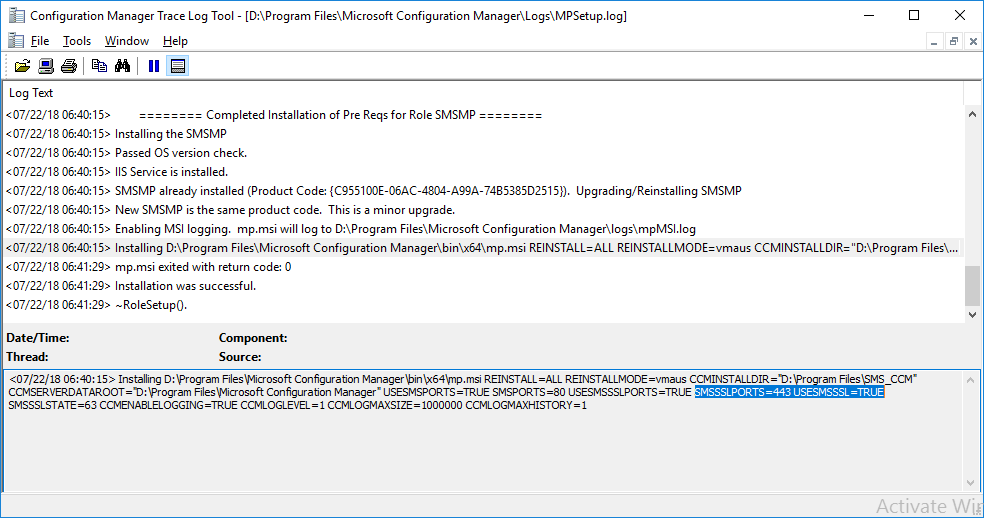
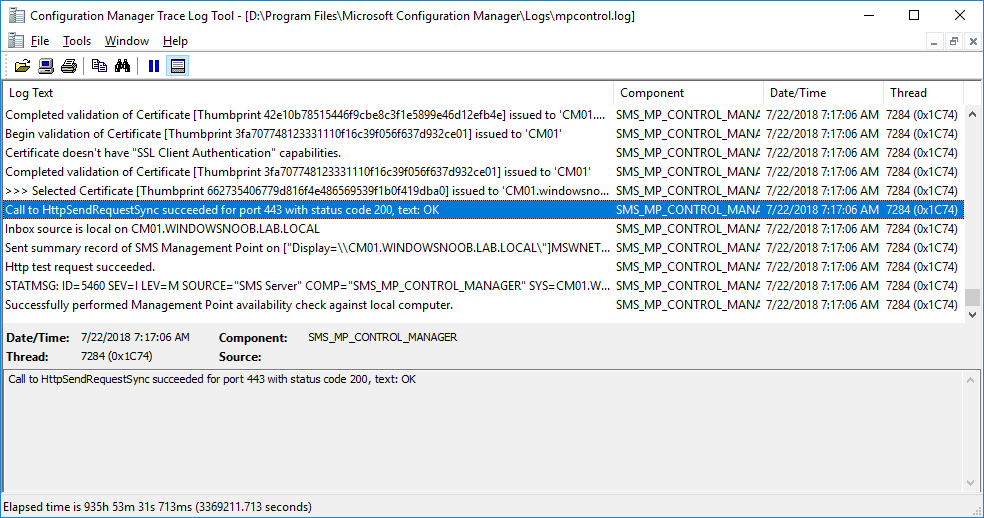
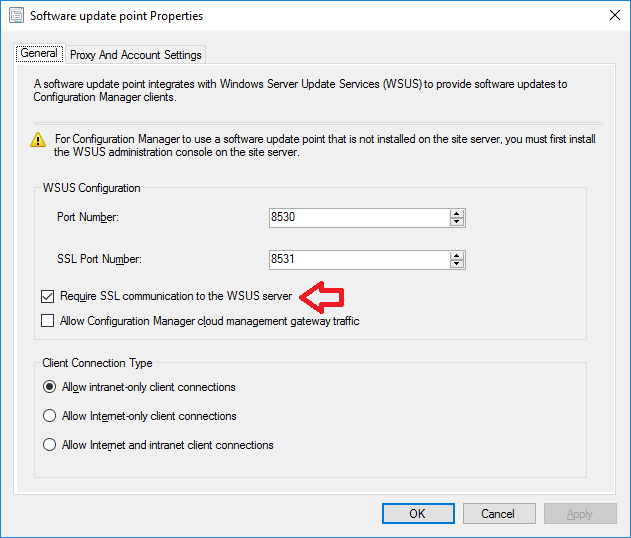
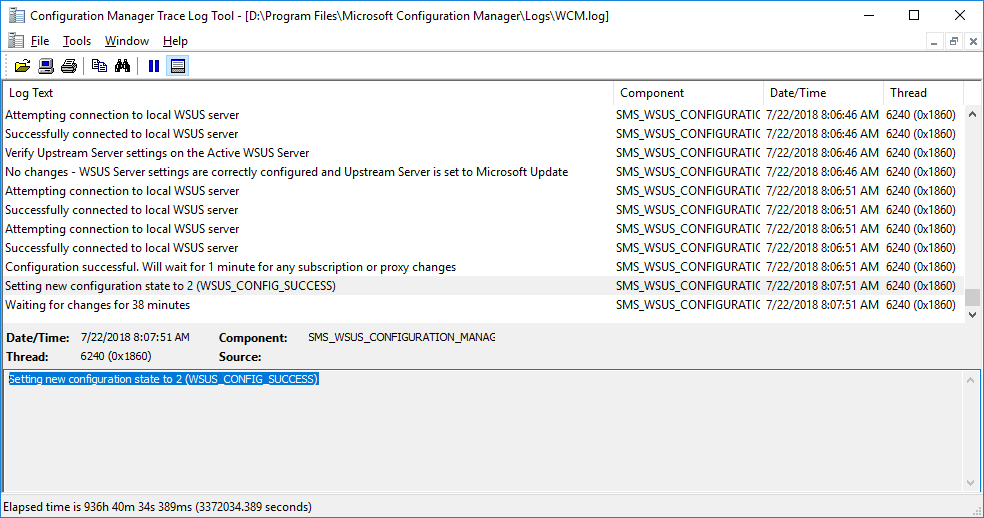
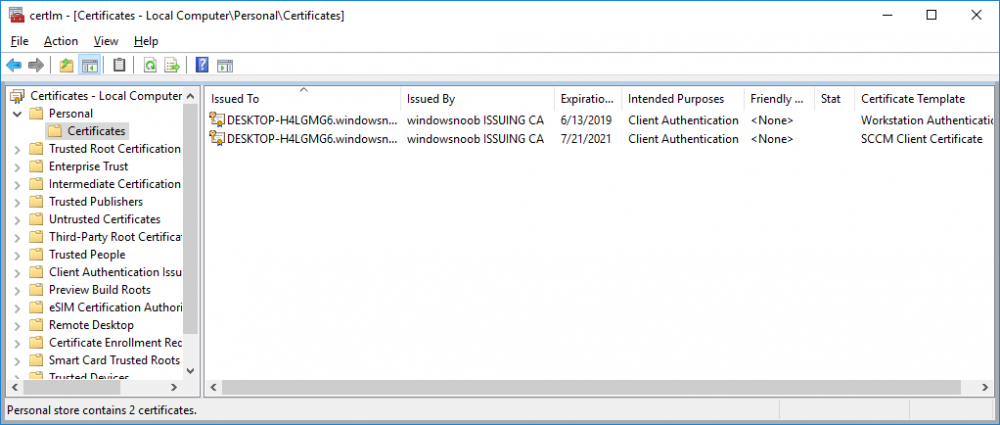
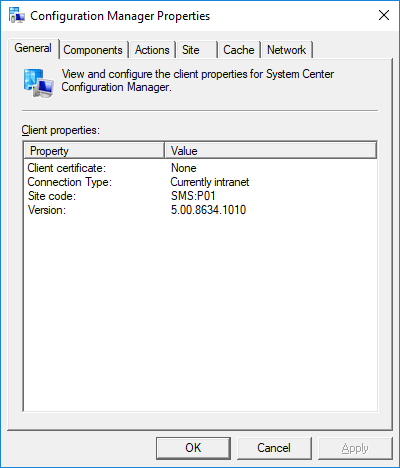
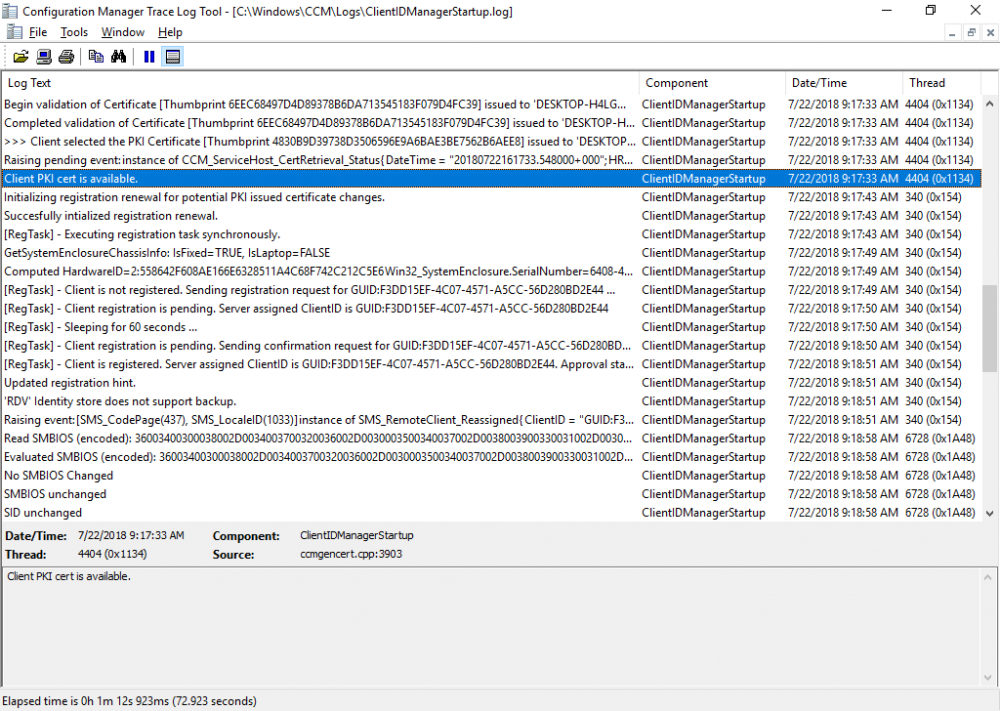
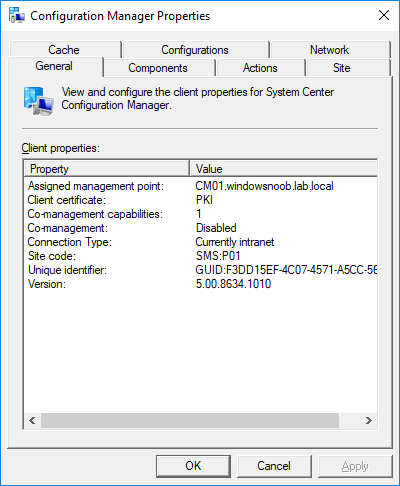
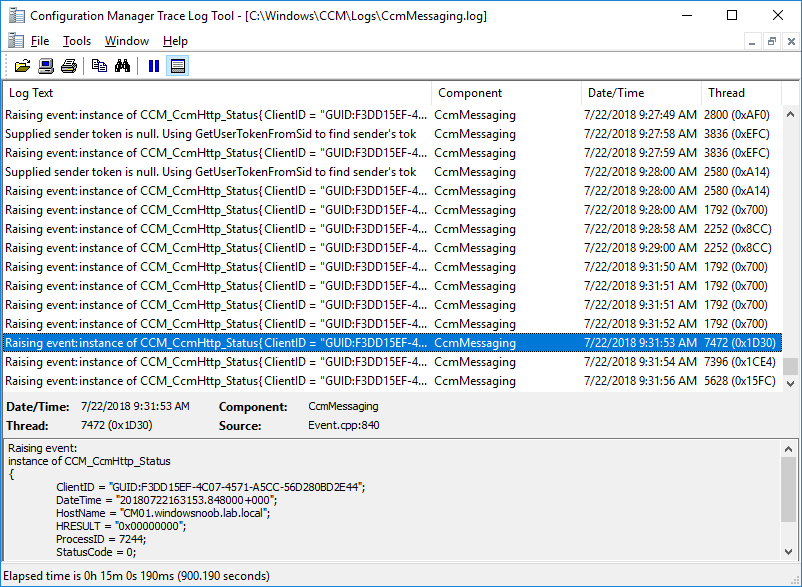
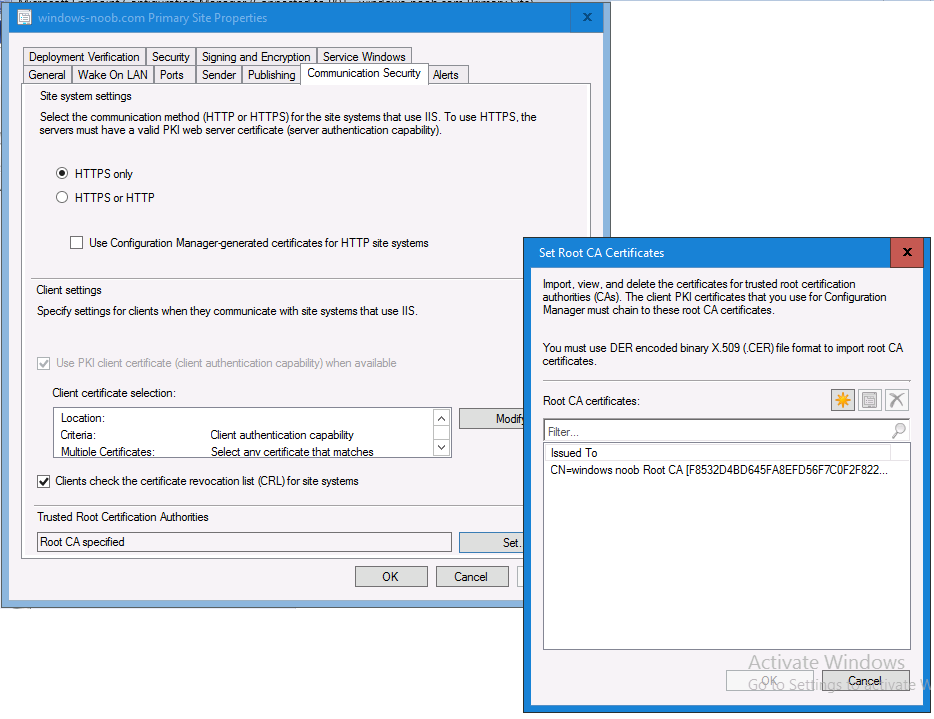
In a previous series of guides I showed you how to configure PKI in a lab on Windows Server 2016. In another series, I also showed you how to install System Center Configuration Manager (Current Branch) version 1802 on Windows Server 2016 with SQL Server 2017. In this lab, I will show you how to configure SCCM to utilize that PKI environment. This series is based upon an excellent video by the talented former Microsoft Premier Field Engineer Justin Chalfant here. If you haven't seen it yet, do check it out. The intention here is that after you've completed this PKI enabled SCCM lab you can then use this in future guides, and to dig deeper into new technologies from Microsoft, for example enabling a Cloud Management Gateway and/or Cloud Distribution Point and using later on, using Co-Management. Note: To complete this lab you must first complete the PKI Lab series (8 parts) and then install a new virtual machine within that PKI lab running System Center Configuration Manager (Current Branch) version 1802 utilizing this series (4 parts), that installation of Configuration Manager will be in HTTP mode. In addition, you must configure the Software Update Point role (in HTTP mode) on CM01 See this guide (step 2 onward) for details. For details how to configure that, see this post. It will take some time to setup but you'll be glad you did. Also, don't do this in production without consulting with a PKI Expert. I don't claim to be one, I'm just helping you get it up and running in a lab. This is intended for use in a lab only. In part 1 of this series you created an Active Directory Security Group to contain your SCCM servers that host IIS based roles such as Distribution Point, Management Point and Software Update Point, you then rebooted that server after adding it (CM01) to the group. You then created 3 certificate templates for SCCM on the Issuing CA server (IssuingCA) and issued them so that they could be available to applicable computers. You verified that you had a GPO in place for AutoEnrollment before requesting the IIS and DP/OSD Certificates on the IIS Site System (CM01) using certlm.msc. Step 1. Edit bindings in IIS for the Default Web Site and WSUS Administration Websites On the SCCM server (CM01), start Internet Information Services (IIS) Manager, expand Sites so that you can see the Default Web Site and the WSUS Administration websites listed. Select the Default Web Site, this web site is where the management point, distribution point and other SCCM roles such as Application Catalog can be found (if they are installed). Edit bindings on the Default Web Site Right click on the Default Web Site and choose Edit Bindings from the options available. In the window that appears, select the https section (port 443) and choose Edit. In the SSL certificate dropdown menu, select SCCM IIS Cert. Click OK and then click Close. Verify changes made Once done, you can open up Internet Explorer and verify that it's reporting back in HTTPS mode for the default web site by browsing to the following addresses to verify the Netbios name and FQDN resolve in HTTPS mode. Click on the Lock in the address bar to get info about the connection. https://cm01 https://cm01.windowsnoob.lab.local/ Edit bindings on the WSUS Administration Web Site Repeat the above operation, on the WSUS Administration website (note that it uses port 8531 for https mode). click OK and Close when done. Step 2. Modify WSUS Administration SSL Settings WSUS itself requires some additional changes documented here (1) that we need to configure to allow WSUS to use HTTPS. In the Internet Information Services (IIS) Manager, expand sites and selct WSUS Administration. Select ApiRemoting30 under the WSUS Administration web site, in the right pane, click on SSL Settings and select Require SSL and verify that Ignore is selected before clicking Apply. Next, select ClientWebService under the WSUS Administration web site, in the right pane, click on SSL Settings and select Require SSL and verify that Ignore is selected before clicking Apply. Next, select DSSAuthWebService under the WSUS Administration web site, in the right pane, click on SSL Settings and select Require SSL and verify that Ignore is selected before clicking Apply. Next, select ServerSyncWebService under the WSUS Administration web site, in the right pane, click on SSL Settings and select Require SSL and verify that Ignore is selected before clicking Apply. Finally, select SimpleAuthWebService under the WSUS Administration web site, in the right pane, click on SSL Settings and select Require SSL and verify that Ignore is selected before clicking Apply. Step 3. Configure WSUS to require SSL In an administrative command prompt on CM01, browse to the location of WSUS installation files. cd C:\Program Files\Update Services\Tools Next issue the following command where CM01.windowsnoob.lab.local is the Fully qualified domain name of your ConfigMgr server hosting WSUS. WsusUtil.exe configuressl cm01.windowsnoob.lab.local The results are shown below: Step 4. Configure SCCM to use HTTPS In this step you will configure SCCM to operate in HTTPS mode. To do that, first bring up the site properties in the SCCM Console on CM01. To bring up the site properties, select the Administration workspace, select Site Configuration, select your site and in the ribbon choose Properties. Next, click on Client Computer Configuration, select HTTPS only from the options and then select Apply. Note: If you have both HTTP and HTTPS site systems in your environment, keep the second box checked (HTTPS or HTTP) and enable the Use PKI client certificate (client authentication capability) when available check box. Step 5. Configure Trusted Root Certification Authorities Note: If you fail to add the Root CA (ROOTCA_windows noob Root CA.crt) specified here, PXE boot will fail to download policy after entering the PXE password. In the site properties screen, click on Communication Security and then click on Set beside Trusted Root Certification Authorities, and click on the yellow star to add your Root CA, in this case, the Root CA for your lab (from the offline root ca), in other words point it to the ROOTCA_windows noob Root CA.crt file which is the Trusted Root Certificate for this site (the Root CA cert). Step 6. Verify that the Distribution Point, Management Point and Software Update Point are using SSL Next you need to verify the DP (and perform some additional configuration), MP and SUP roles are using SSL. To do this, select the Administration workspace in the console, click Site Configuration, select Servers and Site System roles, and select the Distribution Point role. Right click it and choose Properties to bring up the Distribution Point role properties. You should see that it is already configured for HTTPS. Next you need to add the certificate used by clients being imaged by operating system deployment in WinPE or for WorkGroup based clients, to do so, click on Import Certificate and select Browse, browse to the location where you saved the OSD Cert.pfx file (which you created in Step 5 of part 1 here), enter the password you specified, and click Apply. Click OK to close the Distribution Point role properties. For more info on the DP Cert requirements see - https://docs.microsoft.com/en-us/sccm/core/plan-design/network/pki-certificate-requirements Next, select the Management Point role properties, they are shown below, again, HTTPS is selected by default as you set it site wide with the HTTPS only option. When you selected HTTPS Only in the Client Computer Communication of the site properties, this initiated the Management Point to reinstall itself with the new settings, as you can see here in the sitecomp.log. In addition in the mpsetup.log you can see that it's configured for SSL Finally you can check mpcontrol.log this log logs the status of your Management Point, and in there you can verify that the Management Point is up and running and communicating OK in HTTPS mode and that it has successfully performed Management Point availability checks. Next, double click the Software Update Point role to review it's properties. Place a check in the Require SSL communication to the WSUS Server check box. Click Apply and click OK to close the Software Update Point properties. At this point open the WCM.log and look for a line that reads Step 7. Verify Client Received Client Certificate and SCCM Client Changes to SSL Logon to the Windows 10 1803 client and start and administrative command prompt, from there launch certlm.msc to bring up Certificates on the Local Machine. Browse to Personal and Certificates, and you should see the SCCM Client Certificate listed. Note: I assume you've already installed the ConfigMgr client agent using whatever method your prefer on the Windows 10 1803 virtual machine. Next, open the Control Panel and locate the Configuration Manager client agent in System and Security, and open it. If the client was just installed the Client Certificate will probably state Self-Signed (or None if you have just installed the client..). After a couple of minutes, close and then reopen the client and you should see that the Client Certificate states PKI. At this point, open the ClientIDManagerStartup.log in C:\Windows\CCM\Logs and you can see Client PKI cert is available. You can also verify client communication to the Management Point in the CCMMessaging.log and we can see it's successful in that communication. Job done ! You've successfully converted SCCM from HTTP to HTTPS using your PKI lab, and you've verified that the client is operating in HTTPS mode. In the next parts we'll look at the Cloud Management Gateway and Cloud Distribution Point. Recommended reading (1) - https://technet.microsoft.com/en-us/library/bb633246.aspx https://docs.microsoft.com/en-us/sccm/core/plan-design/network/pki-certificate-requirements https://www.enhansoft.com/how-to-setup-ssrs-to-use-https-part-1/
-
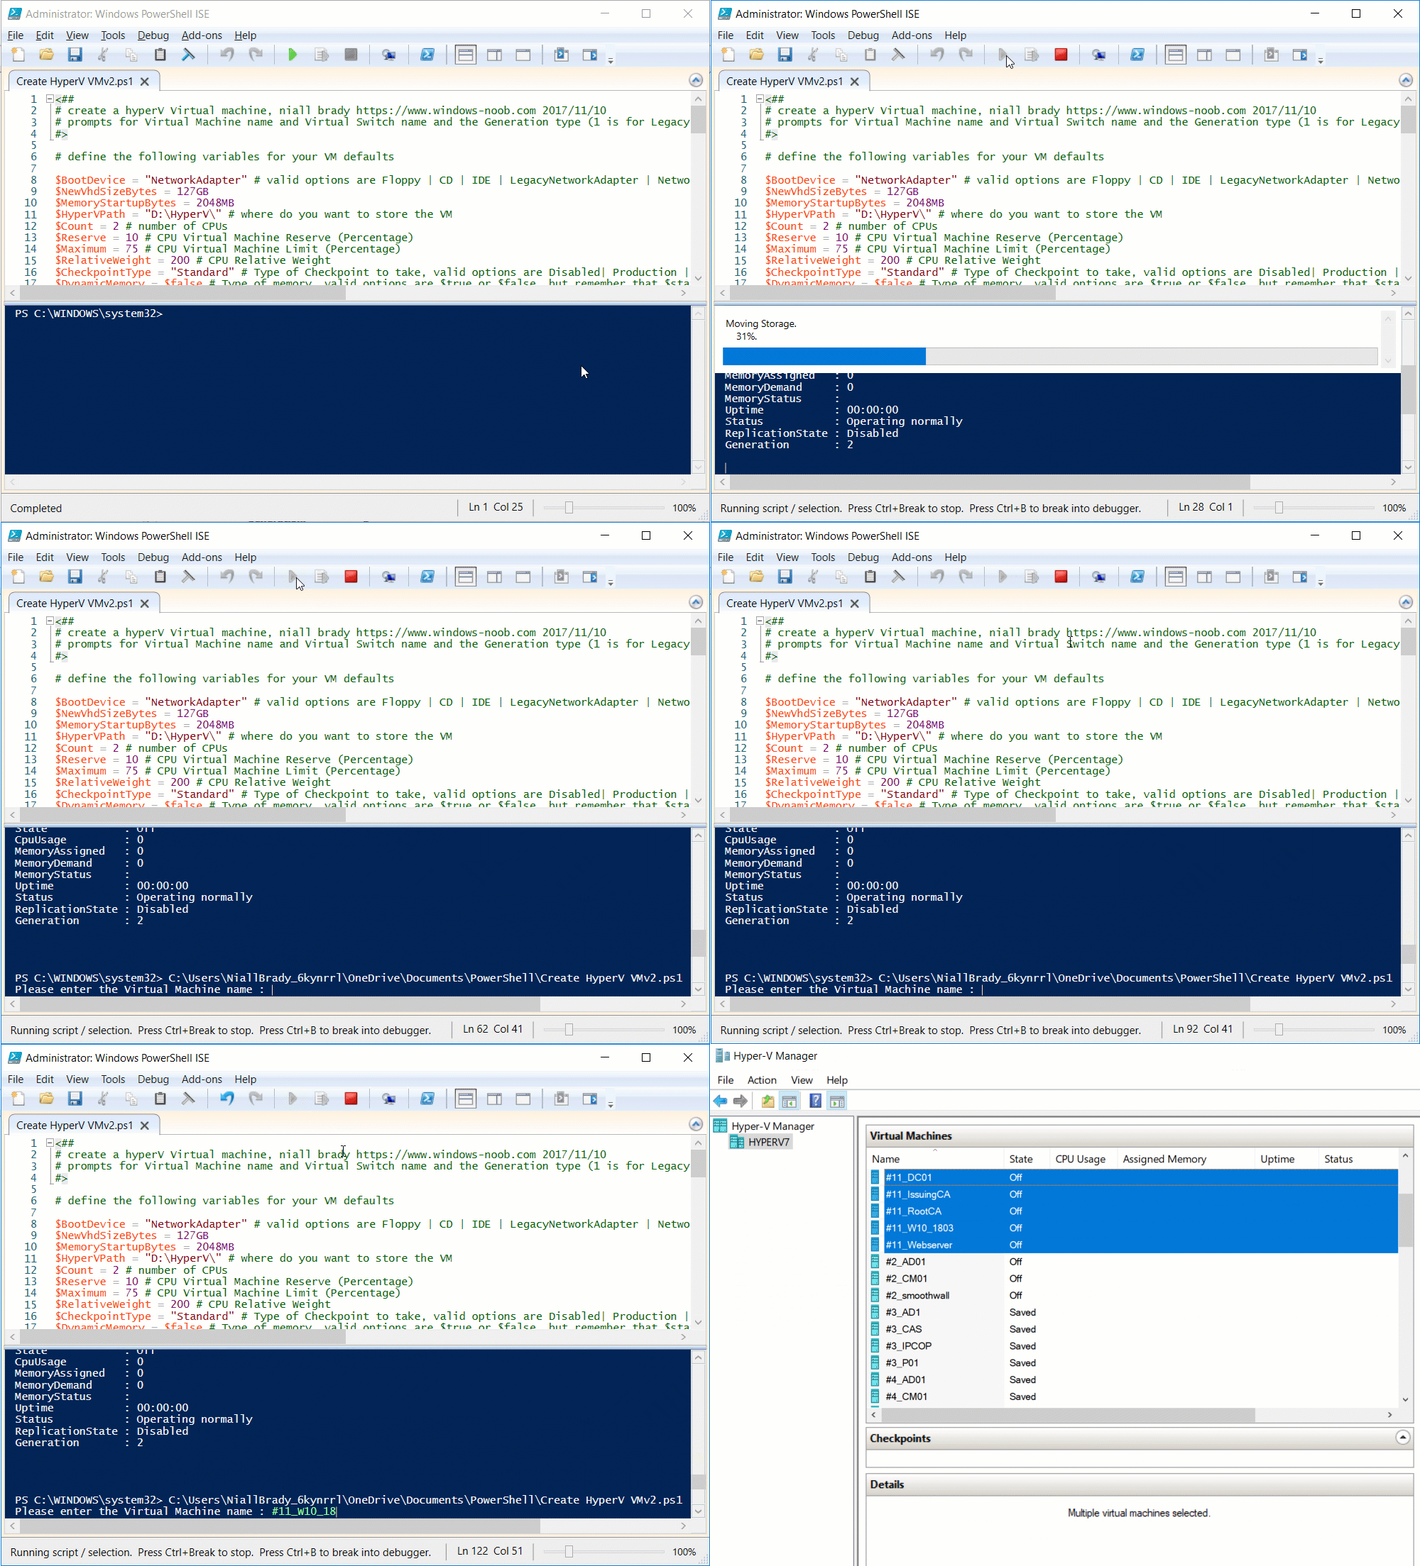
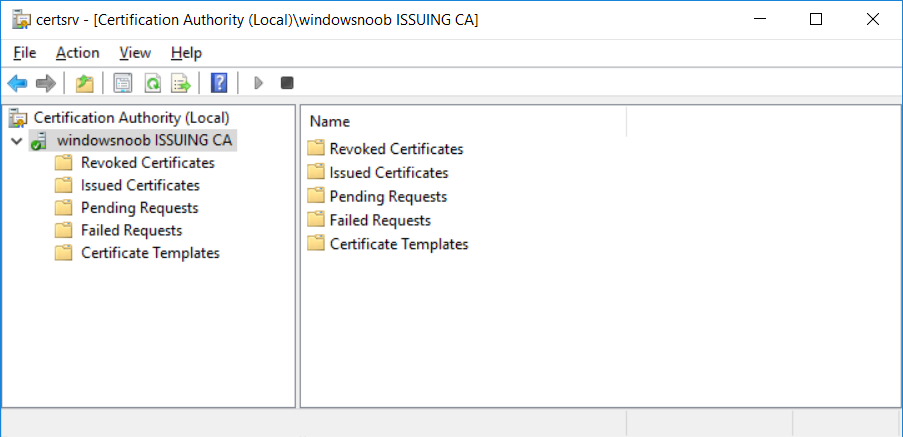
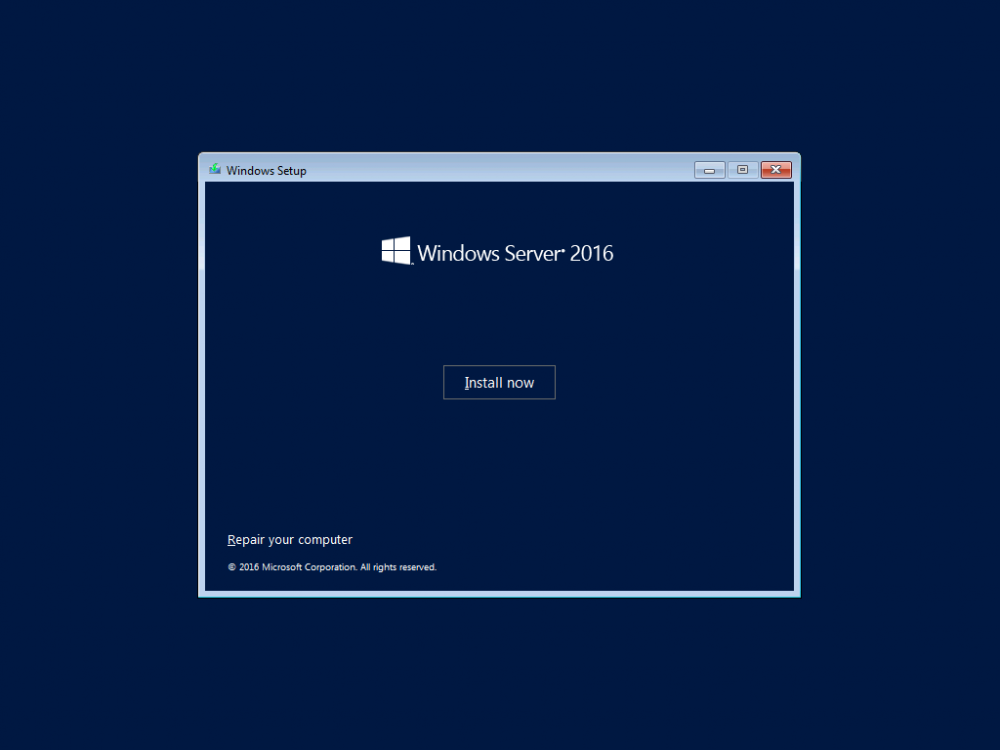
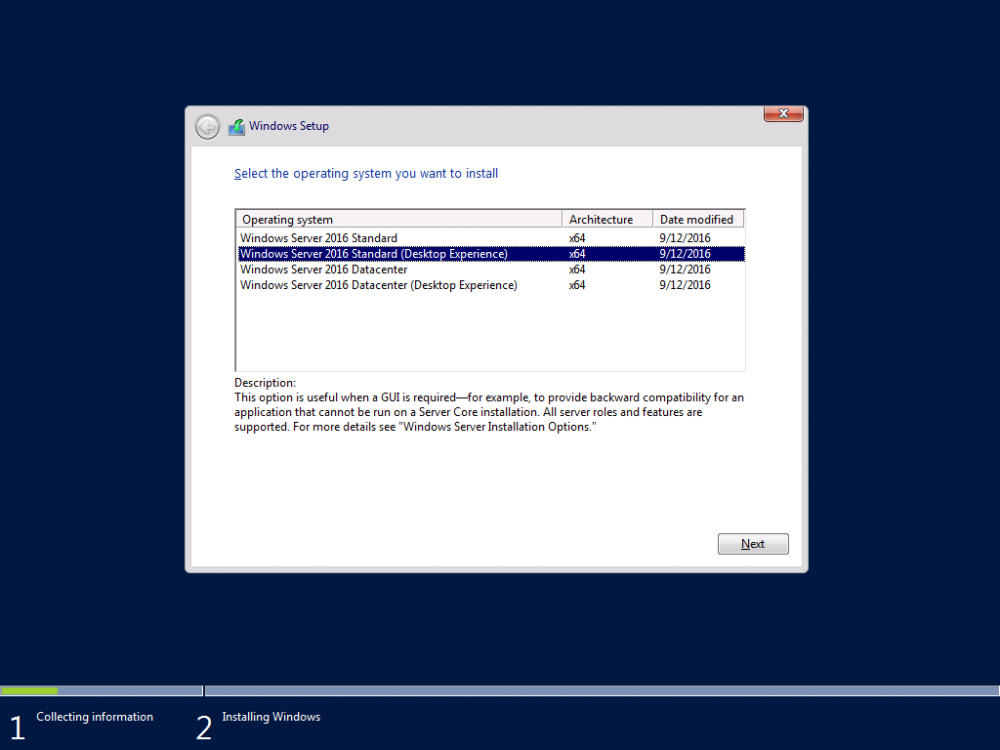
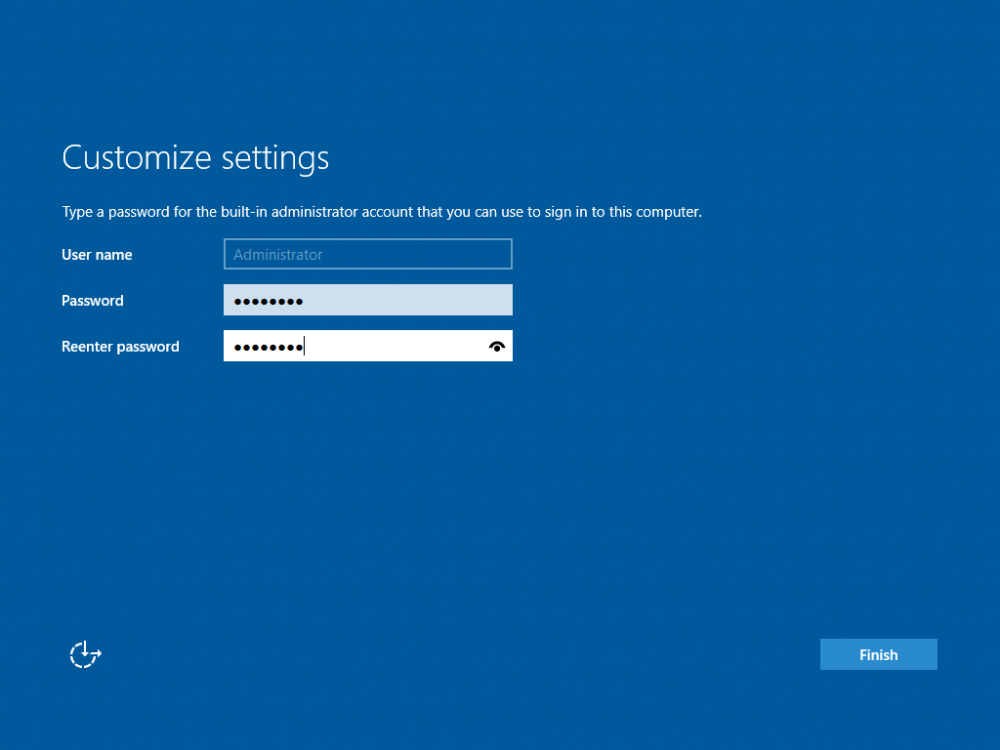
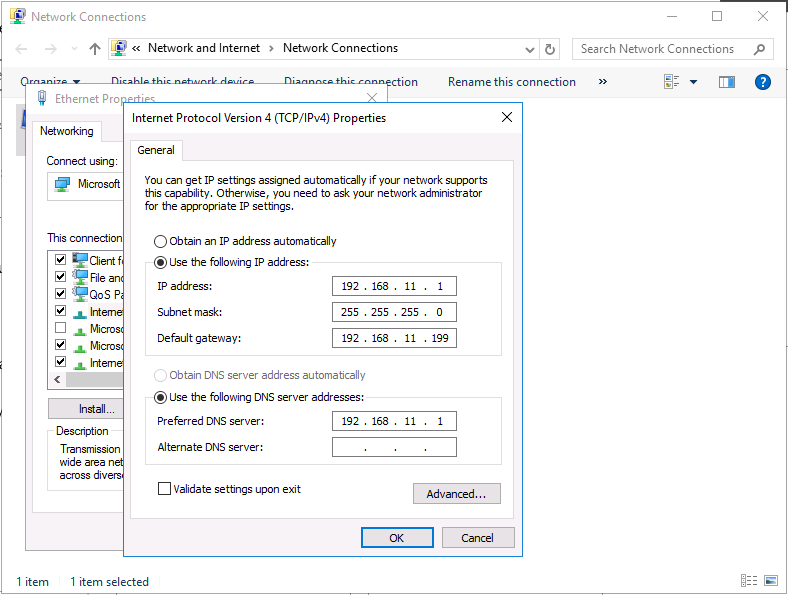
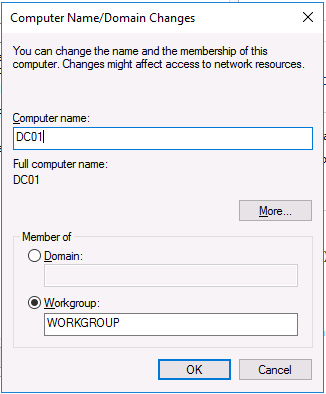
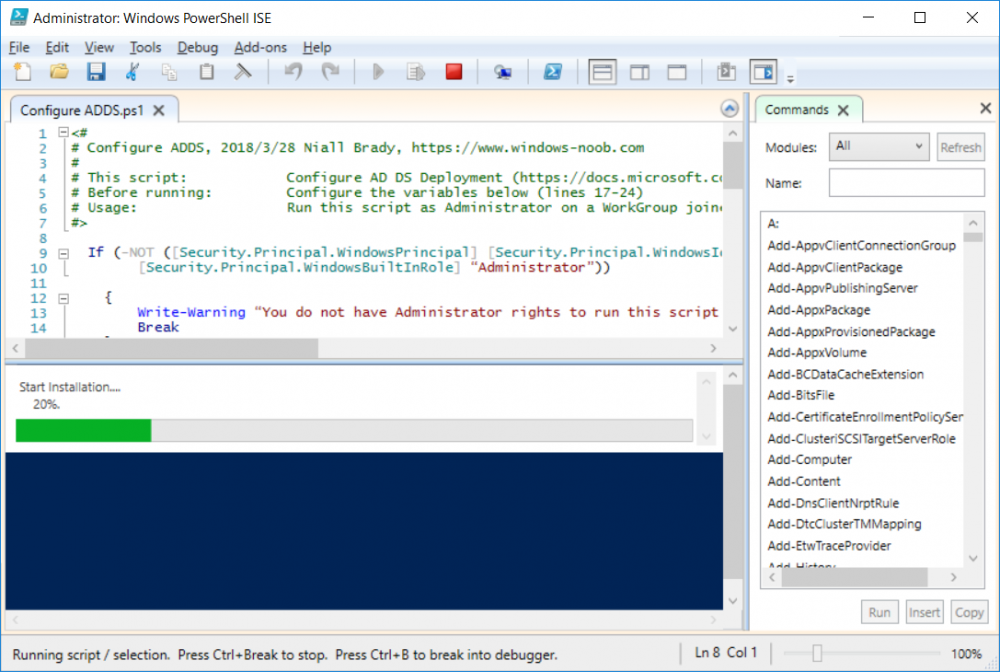
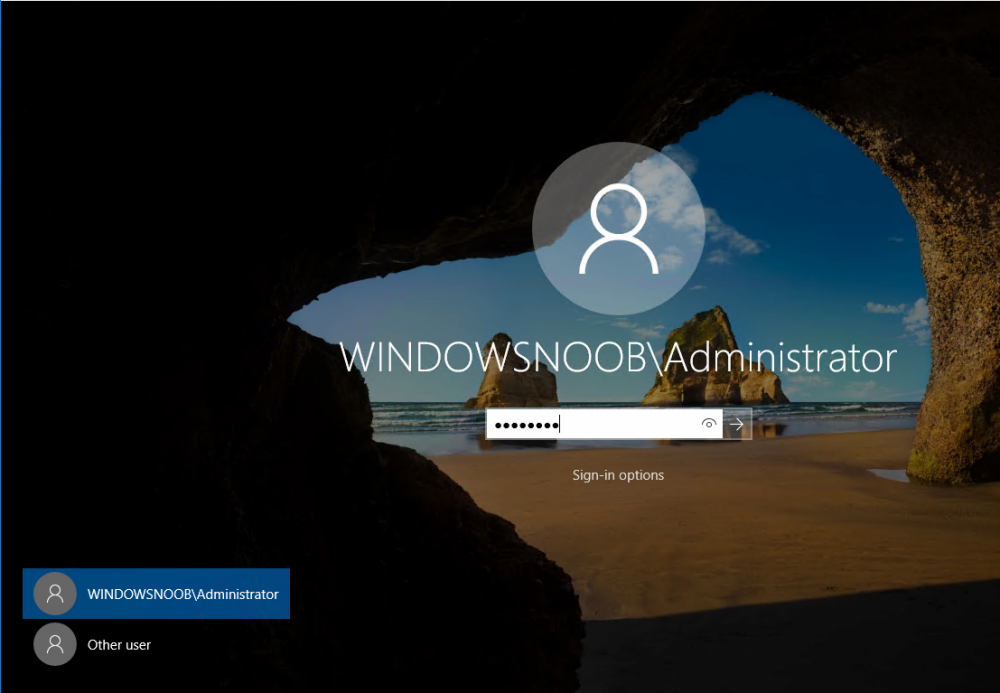
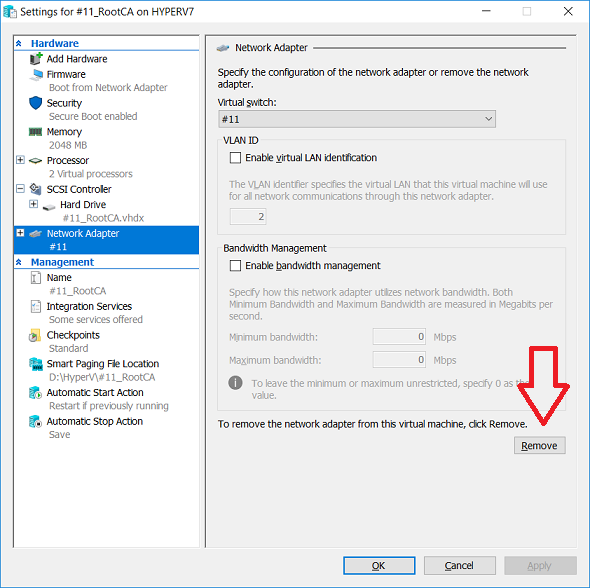
This series is comprised of different parts, listed below. Part 1 - Introduction and server setup (this part) Part 2 - Install and do initial configuration on the Standalone Offline Root CA Part 3 - Prepare the HTTP Web server for CDP and AIA Publication Part 4 - Post configuration on the Standalone Offline Root CA Part 5 - Installing the Enterprise Issuing CA Part 6 - Perform post installation tasks on the Issuing CA Part 7 - Install and configure the OCSP Responder role service Part 8 - Configure AutoEnroll and Verify PKI health Introduction Security is everywhere, and a core component of security is certificates. Public key infrastructure (PKI) is a set of roles, policies, and procedures needed to create, manage, distribute, use, store, and revoke digital certificates and manage public-key encryption (1). In this series of guides I will show you how to set up a 2 tier PKI hierarchy running on Windows Server 2016 and you can use this to set up your own LAB so that you can learn about PKI and later use it for related System Center Configuration Manager roles such as Co-Management (3). Note: I don't claim to be an expert on PKI and would absolutely advise you to consult with a PKI expert if you plan on setting up PKI in production. This guide is designed to help you setup your LAB, it's based on a Windows Server 2012 R2 PKI guide on Technet from here and kudos to those guys for writing it (2). The difference here is you'll be using Windows Server 2016 and you'll see more screenshots and hints to guide you through the experience. I'd highly recommend you go through this entire series at least twice, just to get a feel for how PKI works and to become familiar with the terms involved. The first time you complete this series will probably feel laborious, however the second time you do it things will start to make sense and you'll have a better understanding of why you are doing it. This series will be tough to wrap your head around especially if you are new to PKI, but take it one part at a time, one step at a time, methodically. If in any doubt, about any of the content then please ask your questions here by starting a new thread. By the end of this series of guides you'll have the following setup and running in your windowsnoob.lab.local PKI LAB. Domain Controller (Windows Server 2016) - 192.168.11.1 Issuing CA (Windows Server 2016) - 192.168.11.2 Webserver (Windows Server 2016) - 192.168.11.3 Offline Root CA (Windows Server 2016) Windows 10 (Windows 10 Enterprise, version 1803) - 192.168.11.4 (Optional) Smoothwall NAT (linux) - 192.168.11.199 and MMC based applications like this screenshot from the Enterprise Issuing CA will become familiar to you Before we start the series let's list some of the terms you'll see popping up over and over. I will try to explain them as we move through the guide. PKI - Public Key Infrastructure AIA - Authority Information Access CDP - Certificate revocation list Distribution Point CRL - Certificate Revocation List OCSP - Online certificate status protocol CA - Certificate Authority Note: I'd recommend that you snapshot (checkpoint) the Virtual Machines at the end of each part of this series, so if you make a mistake, you can always back track to a known good state. Step 1. Create the Virtual Machines I use Hyper-V for my labs, as it's a role built into Windows Server 2016 (and even Windows 10), so as long as your computer is relatively new and the hardware supports virtualization, you can use it (simply enable the role, reboot, and start using it). You should have at least 16GB of ram and 500GB of SSD storage to set this lab up comfortably. To quickly create the virtual machines I use a PowerShell script which I wrote, you can download it here. Download the script - Create HyperV VMv2.ps1 Virtual Machine Names For this LAB, please use the following naming convention for your virtual machines (note this is not the computer name but the virtual machine name). #11_DC01 #11_IssuingCA #11_RootCA #11_W10_1803 #11_Webserver #11_Smoothwall Note: The #11 prefix is simply a method I use in Hyper-V to separate my labs visually in Hyper-v manager, so #11 is one lab, and #10 is another (and so on). You don't have to use the same convention as I do, but it would make it easier for you to follow the entire series. I use the Smoothwall linux based NAT to provide Port Forwarding capability and to share internet into my various LABs. Virtual Machine Roles The Virtual Machines created will have the following functions #11_DC01 Roles: DC, DNS, LDAP CDP,AIA #11_IssuingCA Roles: Enterprise Issuing CA #11_RootCA Roles: Standalone Offline Root CA #11_W10_1803 Roles: A Windows client #11_Webserver Roles: Webserver HTTP CDP, AIA #11_Smoothwall Roles: Port Forward, Internet sharing Note: When prompted for a network switch, create a unique one (#11) for the first VM created, and use the same one for each of the other vm's (we will remove the network from the Offline Root CA). For generation type, use Gen 2. Below is how I created the virtual machines listed above. Note: After creating the virtual machines and before installing Windows Server 2016 on the Offline Root CA, you must remove the Network Card for the Offline Root CA virtual machine as it should not be connected to any network. Step 2. Install the virtual machines Install Server 2016 On DC01, RootCA, IssuingCA and Webserver, install Windows Server 2016. It's up to you how to do this, you can use an Automated MDT PowerShell script, or install them manually. To install all Windows Server 2016 on all 4 servers as WorkGroup joined computers do as follows.. Choose Windows Server 2016 Standard (Desktop Experience) Continue through the installation wizard until prompted for a password, use P@ssw0rd as the Administrator password Click Finish. And then logon using the Administrator username and password configured above. Once Windows is installed, set the IP address for each virtual machine as shown below. Note: Below are the Computer Name and IP addresses used in this guide. For the Offline Root CA, you must remove the Network card in the Hyper-V virtual machine settings. Computer Name: DC01, IP address: 192.168.11.1, Subnet mask 255.255.255.0, Default gateway: 192.168.11.199, Preferred DNS server: 192.168.11.1 Computer Name: IssuingCA, IP address: 192.168.11.2, Subnet mask 255.255.255.0, Default gateway: 192.168.11.199, Preferred DNS server: 192.168.11.1 Computer Name: Webserver, IP address: 192.168.11.3, Subnet mask 255.255.255.0, Default gateway: 192.168.11.199, Preferred DNS server: 192.168.11.1 Computer Name: RootCA, IP: <NO NETWORK> Computer Name: W101803, IP address: 192.168.11.4, Subnet mask 255.255.255.0, Default gateway: 192.168.11.199, Preferred DNS server: 192.168.11.1 Computer Name: smoothwall11, IP address: (Green, static) 192.168.11.199 (Red, DHCP internet IP) x.x.x.x Here's how you can set the IP address for DC01. And configure the Computer Name as per the list (in this example it's for the Domain Controller) Reboot when prompted. Install Windows 10 Enterprise version 1803 Install Windows 10 Enterprise, version 1803 on the remaining virtual machine (#11_W10_1803). Configure the Computer Name and IP address as specified. Leave it WorkGroup joined. Optionally install Smoothwall To learn how to setup Smoothwall express as a firewall see this blog post. Step 3. Configure ADDS on DC01 Now that you've installed the servers, it's time to make DC01 a domain controller, to do that we'll install Active Directory Domain Services (ADDS) and to do that we'll use this PowerShell script, simply run the script as Administrator in Windows PowerShell ISE on DC01. Download the script -Configure ADDS.ps1 After running the script, DC01 is prompted to a Domain Controller and is ready for the next part of this series. Note: Please only run this script on the DC01 virtual machine. After running the script, the Domain Controller is ready for Part 2 (configured as dc01.windowsnoob.lab.local) and internet is working (via the Smoothwall) To continue with Part 2 of this series, click here. Recommended reading (1) - https://en.wikipedia.org/wiki/Public_key_infrastructure (2) - https://social.technet.microsoft.com/wiki/contents/articles/15037.ad-cs-step-by-step-guide-two-tier-pki-hierarchy-deployment.aspx (3) - https://docs.microsoft.com/en-us/sccm/core/clients/manage/co-management-overview
- 2 replies
-
- 2
-

-
- co-mangement
- ca
-
(and 12 more)
Tagged with:
-
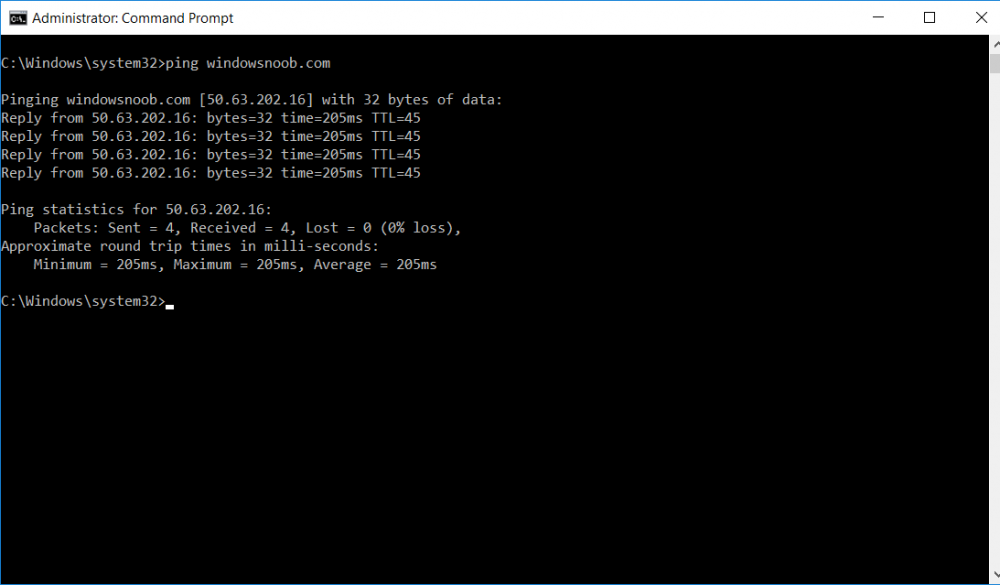
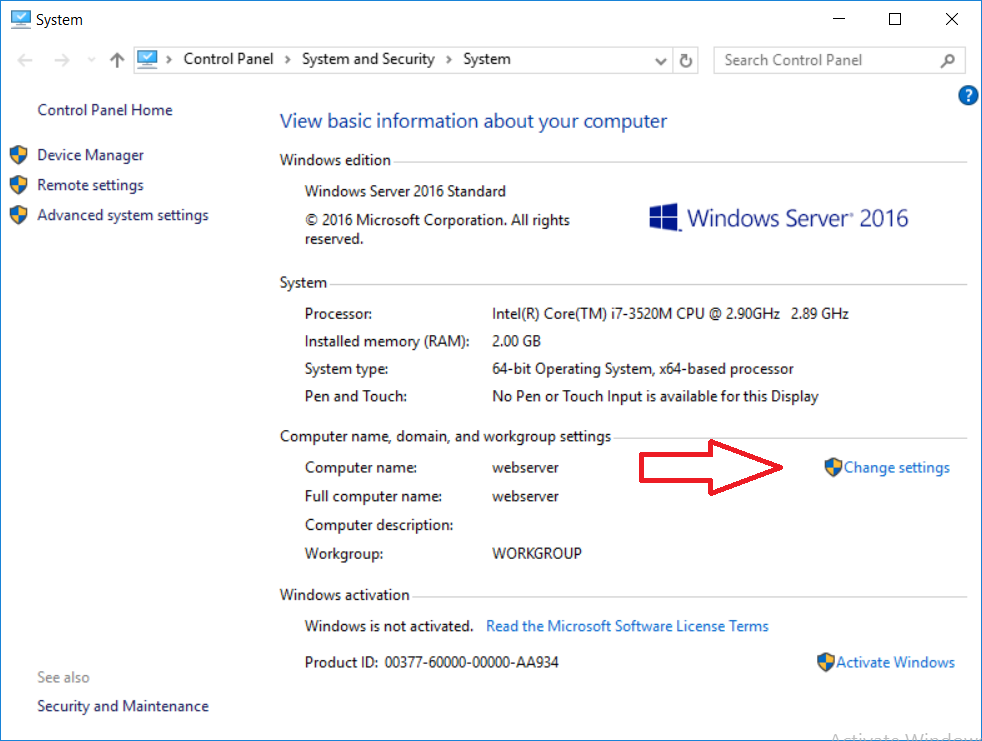
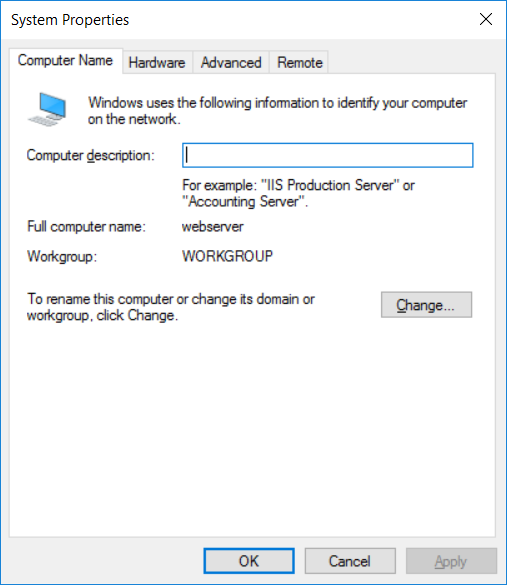
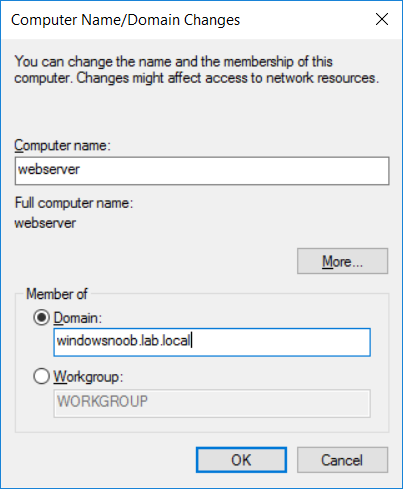
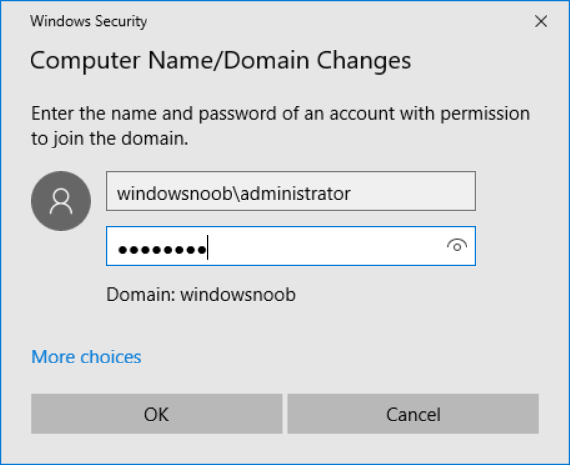
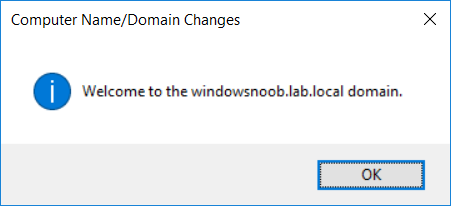
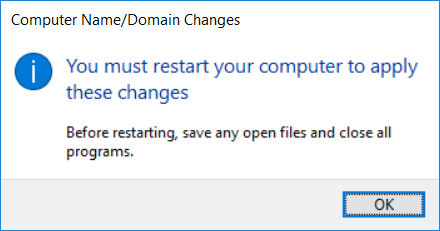
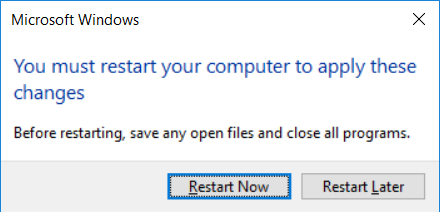
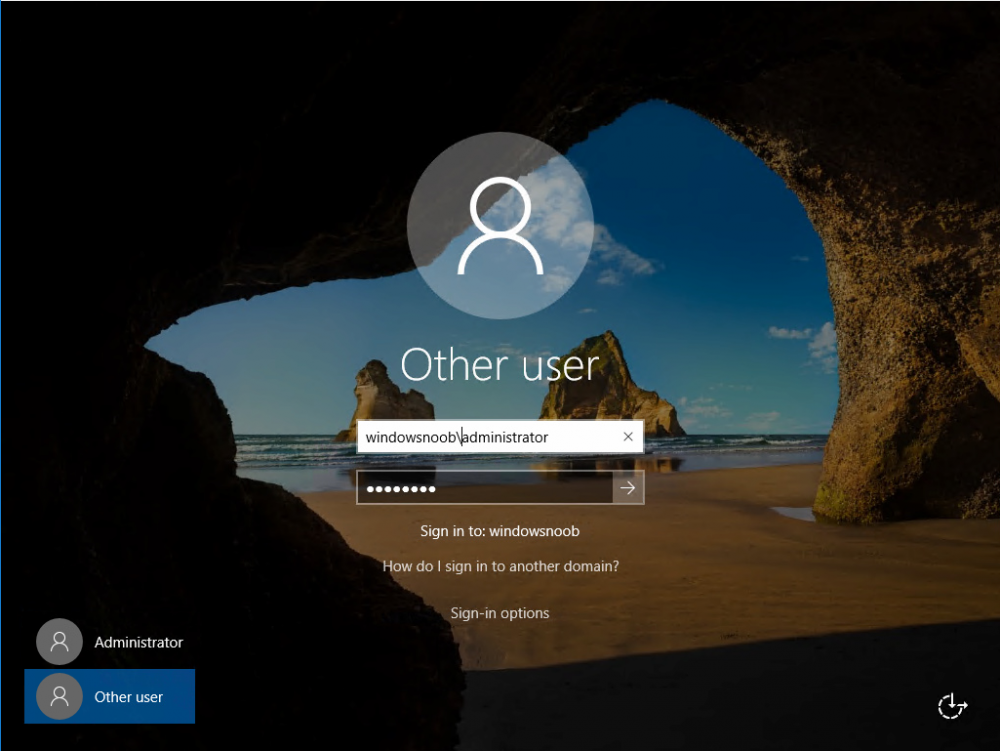
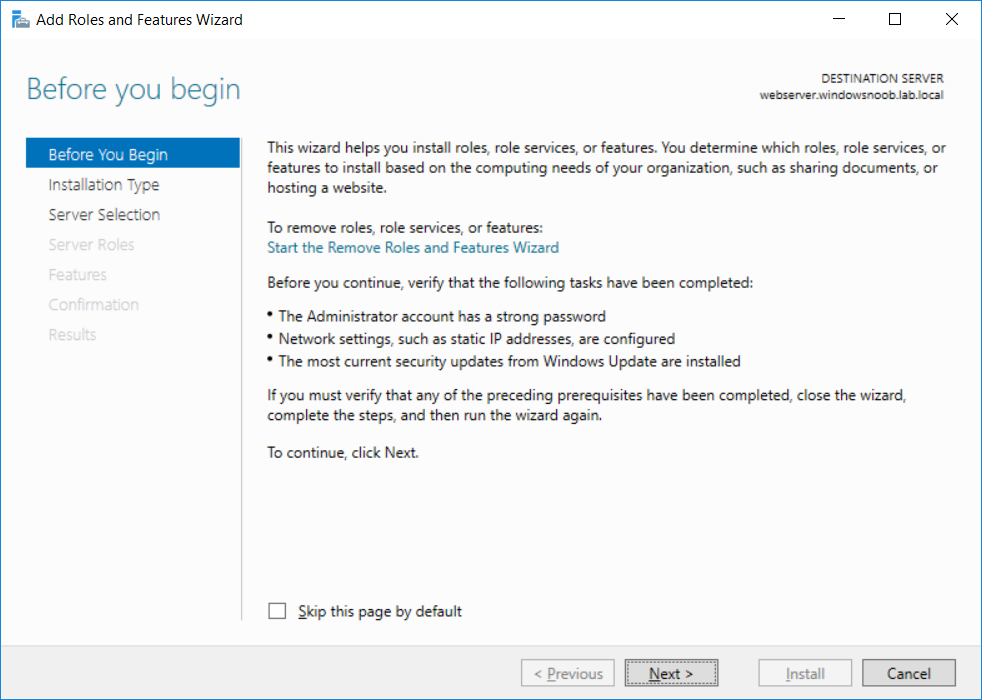
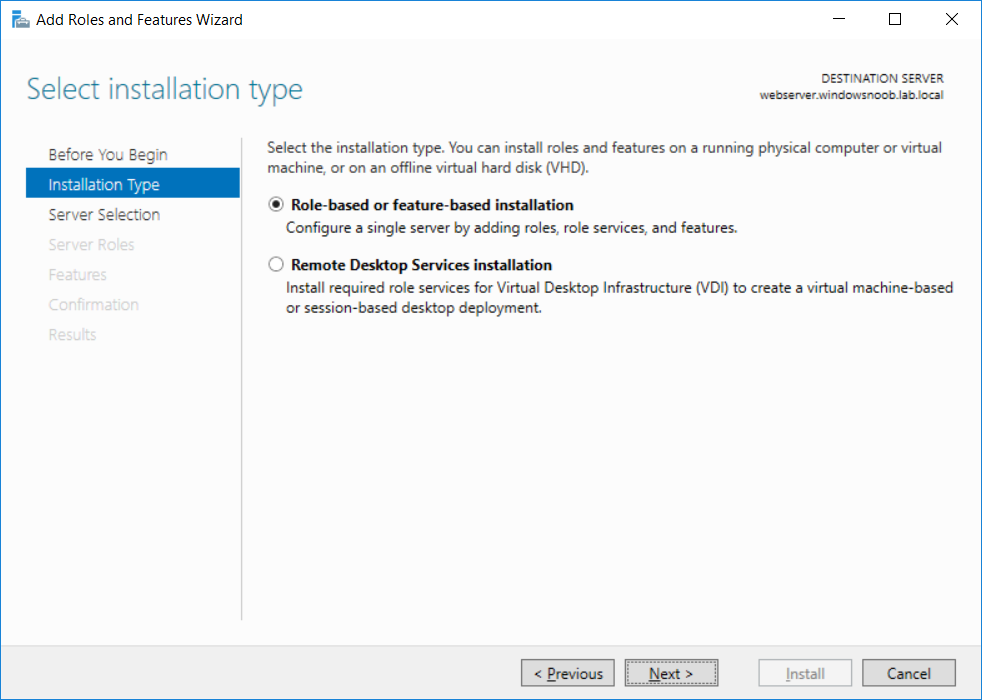
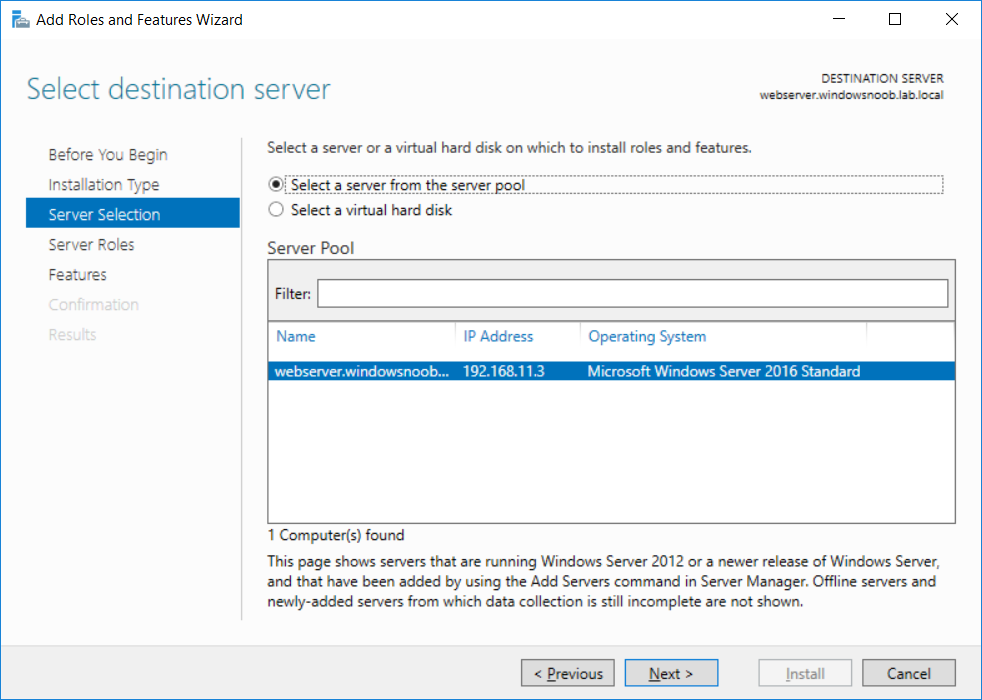
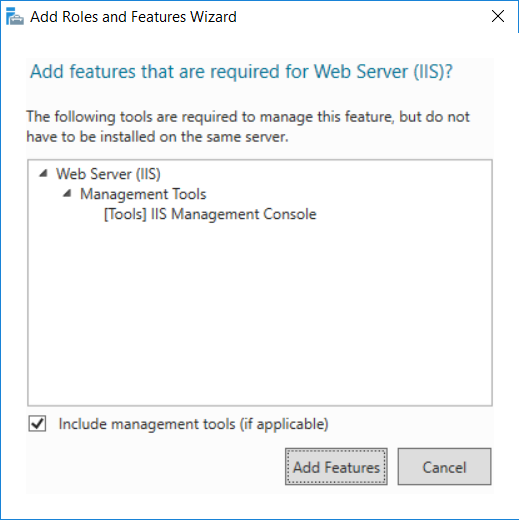
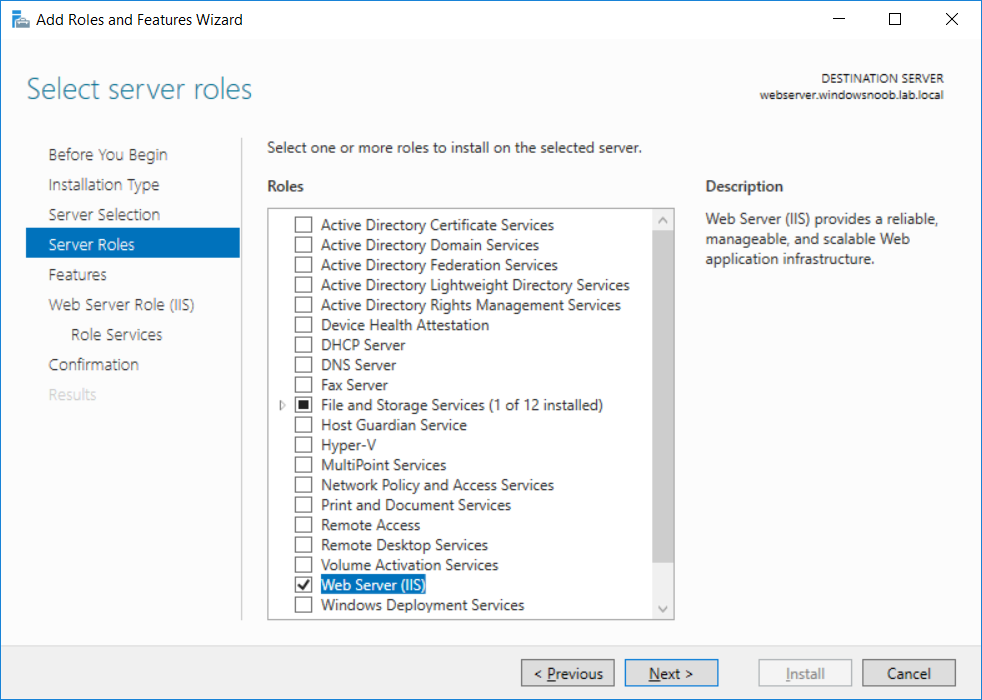
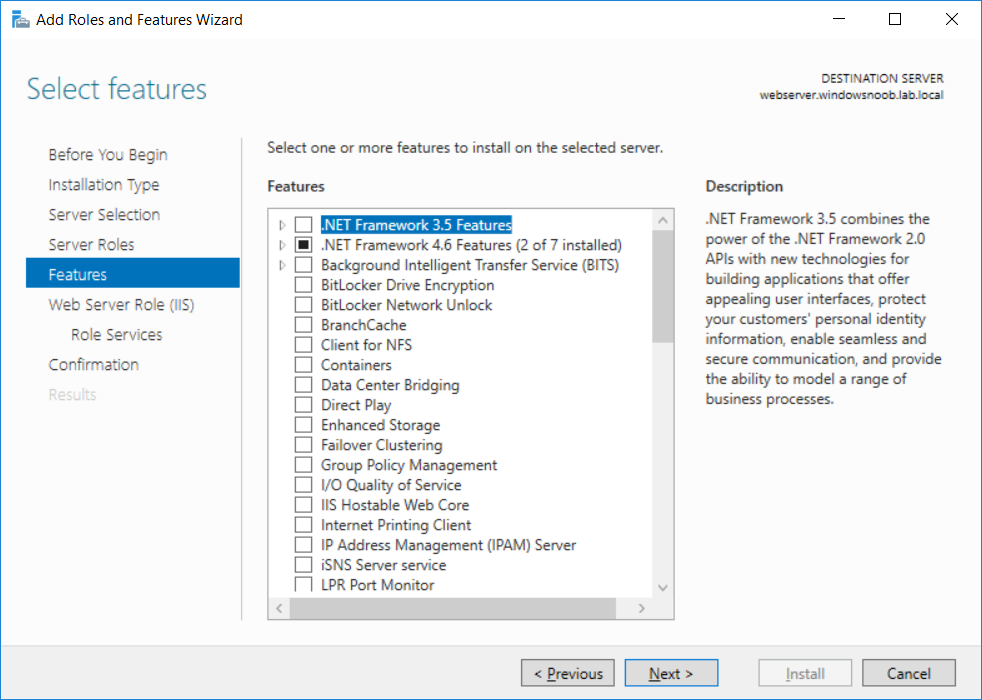
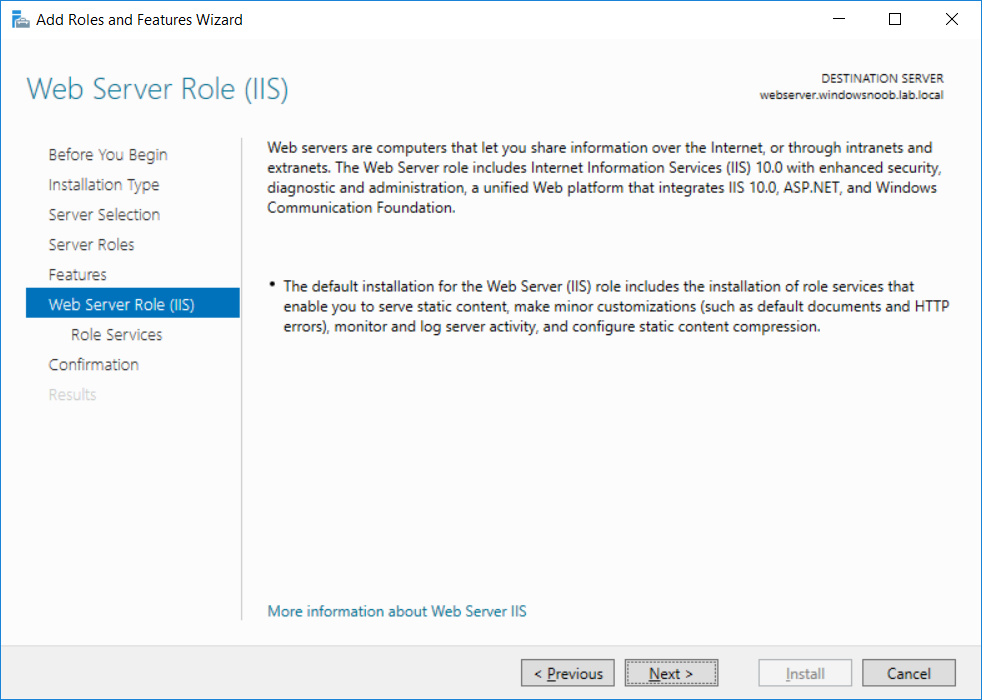
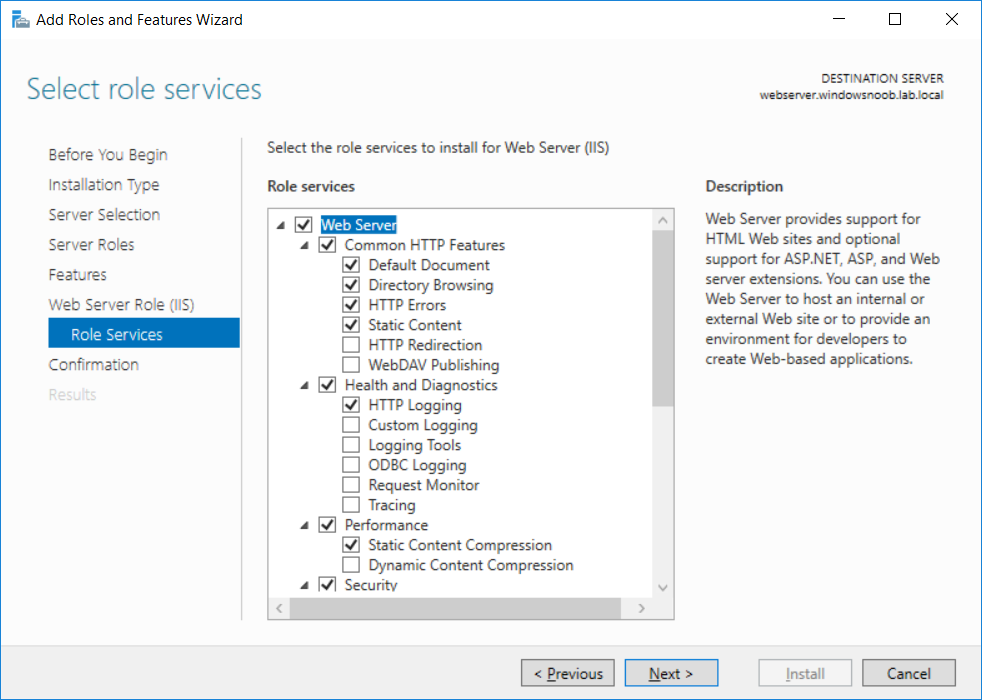
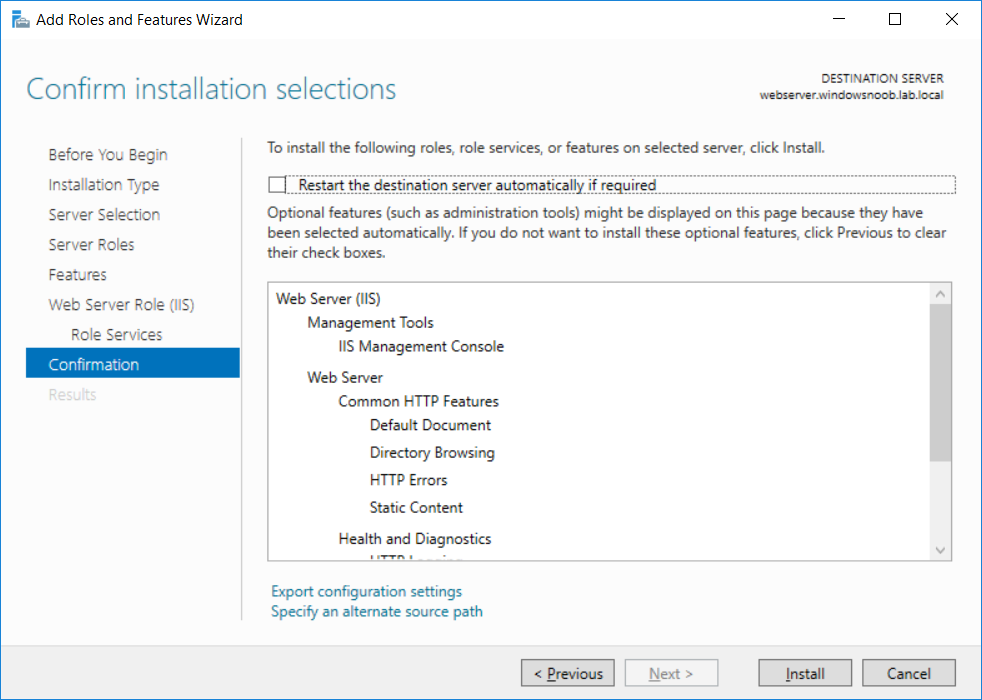
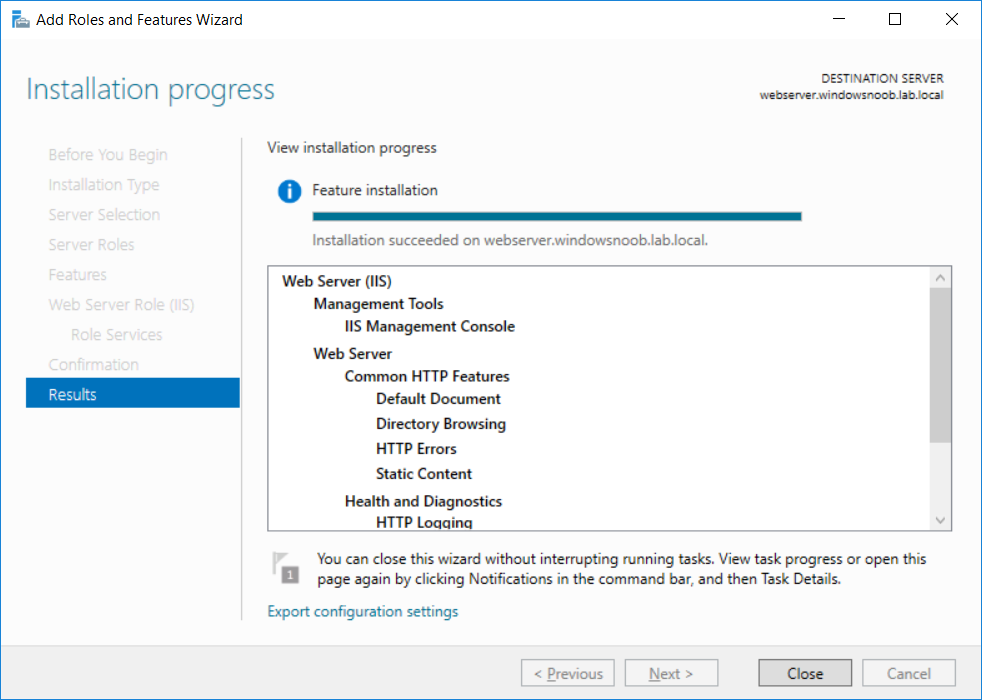
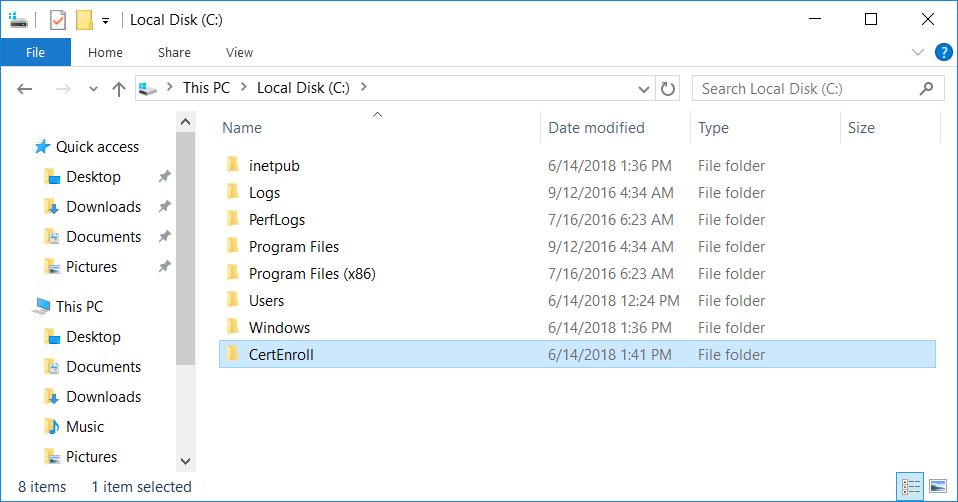
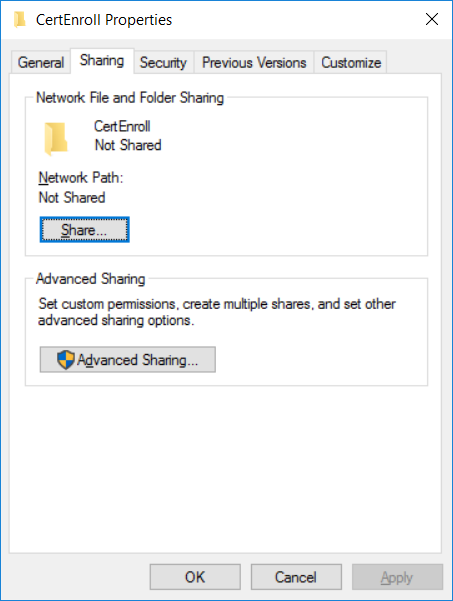
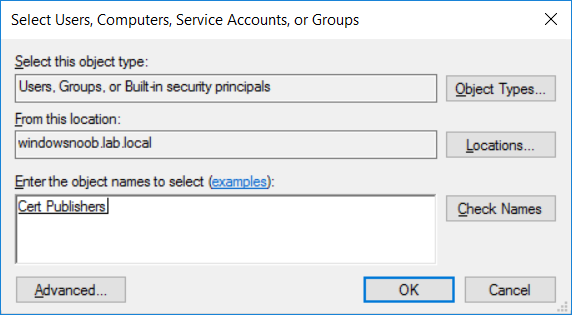
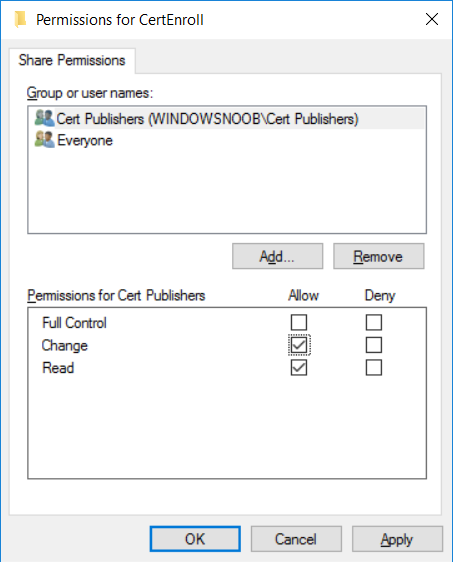
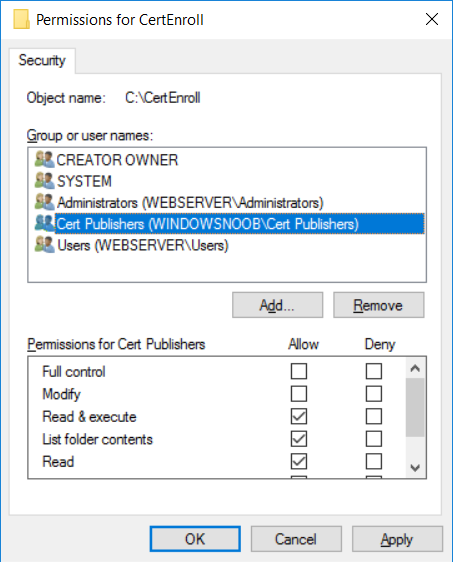
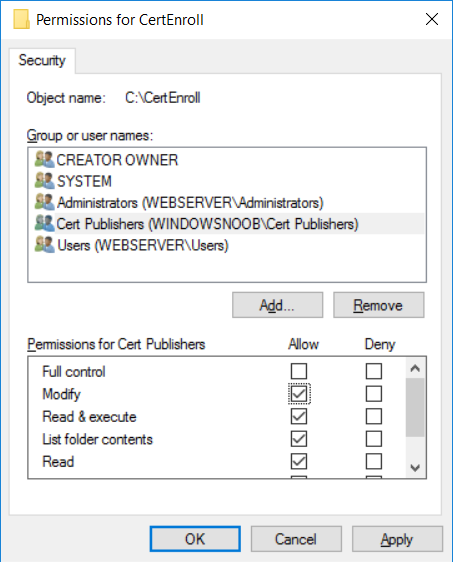
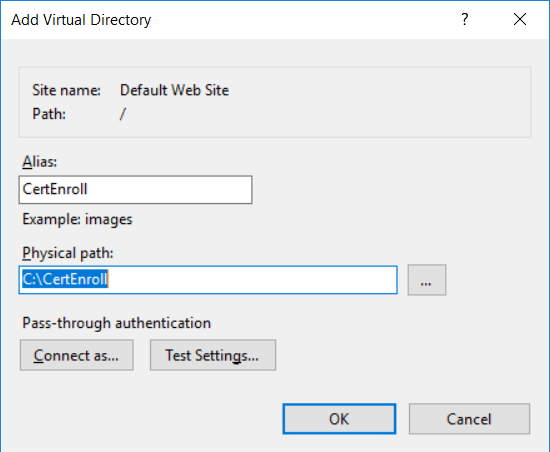
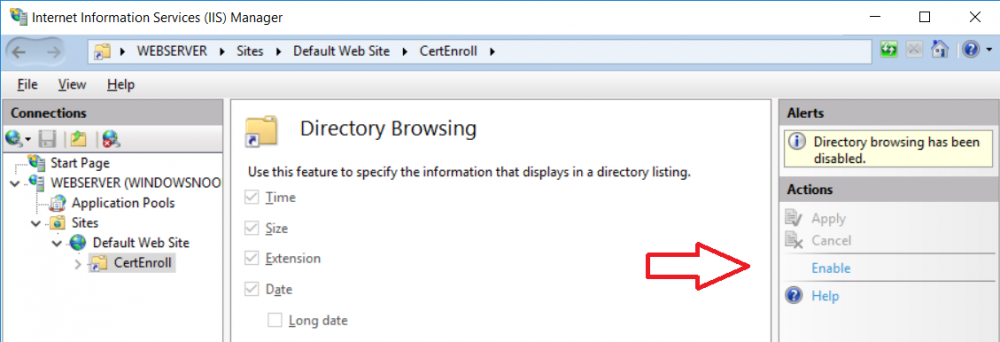
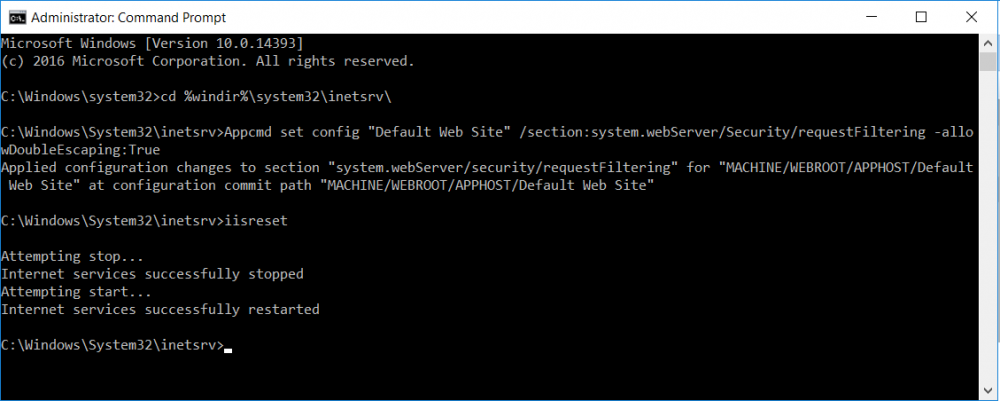
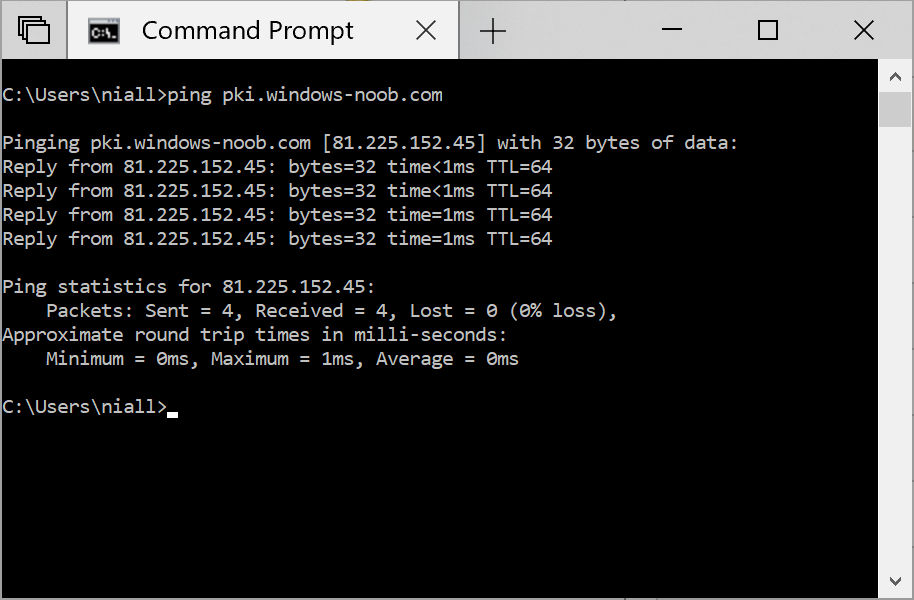
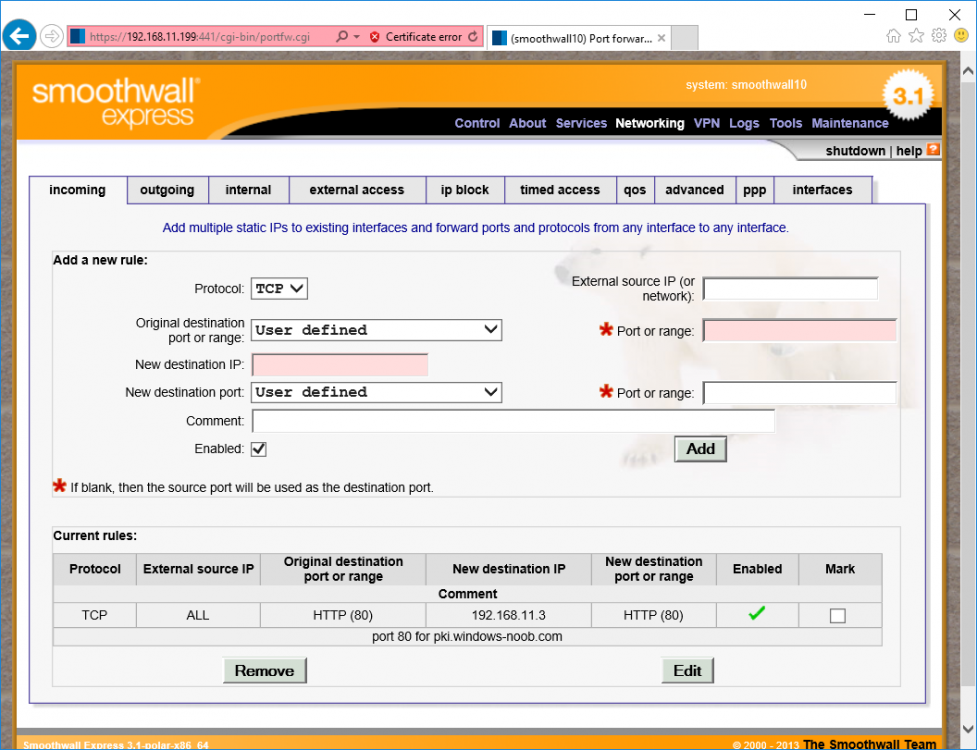
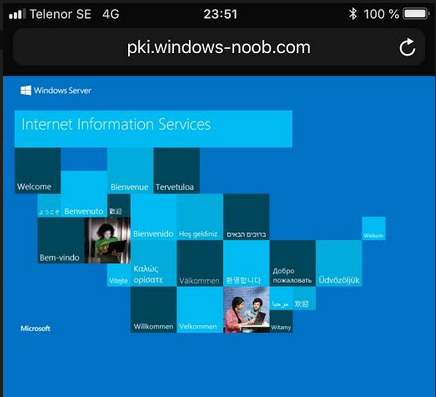
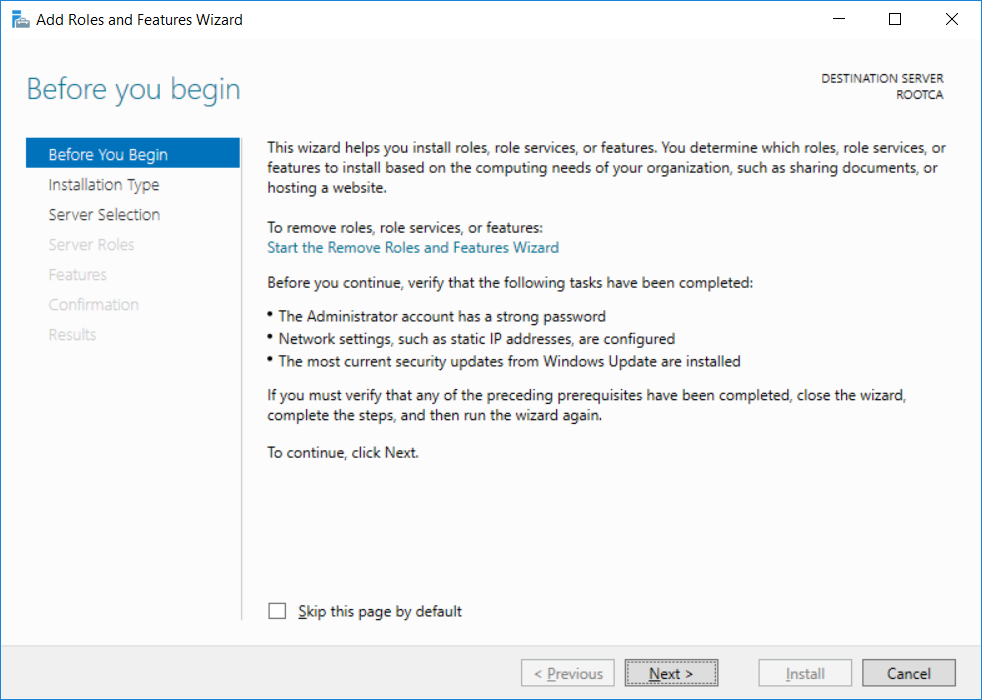
This series is comprised of different parts, listed below. Part 1 - Introduction and server setup Part 2 - Install and do initial configuration on the Standalone Offline Root CA Part 3 - Prepare the HTTP Web server for CDP and AIA Publication (this part) Part 4 - Post configuration on the Standalone Offline Root CA Part 5 - Installing the Enterprise Issuing CA Part 6 - Perform post installation tasks on the Issuing CA Part 7 - Install and configure the OCSP Responder role service Part 8 - Configure AutoEnroll and Verify PKI health In part 1 of this series, you configured your LAB for a 2 tier PKI hierarchy running on Windows Server 2016. You used PowerShell to create some virtual machines, and then installed Windows Server 2016, Windows 10 Enterprise version 1803 and optionally Smoothwall 3.1 before configuring the IP address scheme and Computer Names on the virtual machines. Finally you configured ADDS on DC01 so that you have a working Domain Controller for the rest of this LAB. In part 2 you installed and did the initial configuration on the Standalone Offline Root CA. In this part you will prepare the HTTP Web Server for CDP and AIA Publication. But before you get started with that, please have a read below of what a CDP and AIA actually are. What is a CDP ? A CDP (CRL Distribution Point) is an extension that contains links to the CRL of the issuer of the certificate which is being verified (1). What is an AIA ? An AIA (Authority Information Access) is an extension that contains links to the certificate of the issuer of the certificate which is being verified. Step 1. Join the web server computer to the domain When you installed the web server virtual machine (#11_Webserver) in part 1, it was workgroup joined. To join the domain do as follows. Logon to the web server virtual machine as Administrator. In Windows File Explorer, right click on This PC and choose Properties. Click on Change Settings beside Computer name, domain and workgroup settings. In the System Properties screen, click on Change. In the Member of field select Domain and enter the domain name you configured in part 1. enter credentials required for Domain join membership (eg: windowsnoob\administrator) click OK and click OK again when prompted with the welcome click OK Click OK, click Close then click Restart Now. After the reboot login to the domain as windowsnoob\administrator Alternatively, to join the domain automatically, use the joindomain.ps1 PowerShell script which you can download from here. JoinDomain.ps1 1. Copy the script to C:\Scripts on the webserver. 2. Edit the variables (lines 16-18) as desired before running. 3. Start Windows PowerShell ISE as Administrator and run the script by clicking on the green triangle. Step 2. Install the Web Server (IIS) Role Logon to the web server as windowsnoob\administrator and open Server Manager, select Add Roles and Features. In the wizard that appears click Next. Click Next and select Role-based or feature-based installation. Click Next and Select Select a server from the server pool, ensure that webserver.windowsnoob.lab.local is selected. Click Next and select Web Server(IIS) from the choices available on the Select server roles page, if prompted to Add features that are required for Active Directory Certificate Services, click Add features. Here you can see the Web Server (IIS) role selected. On Select features click Next. In the introduction to Web Server (IIS) screen, select Next. Accept the defaults and click Next. on the Confirm Installation Selections screen click Install. Click Close when the installation succeeds. Step 3. Create a CertEnroll Folder and grant Share & NTFS Permissions to the Cert Publishers group Create the CertEnroll Folder Now you need to create a shared folder where certificates and delta certificates can be stored from the PKI infrastructure. Open Windows File Explorer and then browse to the C:\ drive, Create a folder called CertEnroll at the root of the drive. Share the CertEnroll folder Right-click on the CertEnroll folder and select Properties. On the CertEnroll Properties page select the Sharing tab to configure share permissions. Click on the Advanced Sharing option and then select Share this folder. Click on Permissions and then click Add, on the Select Users or Groups page, in the Enter the object names to select, type windowsnoob\Cert Publishers and then click OK. On Permissions for CertEnroll dialog box, select the Cert Publishers group and then in the Allow column select Change permission. Click OK twice to go back to the CertEnroll Properties page. Edit NTFS permissions on the CertEnroll folder Select the Security tab and click Edit to configure NTFS permissions. On Permissions for CertEnroll page click Add. On the Select Users or Groups page, under the Enter the object names to select, enter windowsnoob\Cert Publishers and then click OK. On the Permissions for CertEnroll page highlight the Cert Publishers group and then under the Allow column select the Modify permission and then click OK. On the Permissions for CertEnroll page, click OK to close the window and click OK again to close CertEnrolls properties page. Step 4. Create a Virtual Directory in IIS Ensure you are logged on to webserver as windowsnoob\Administrator. Click Start, select Administrative Tools and then select Internet Information Services (IIS) Manager. In the Connections pane, expand WEBSERVER and then expand Sites. Right-click on Default Web Site and select Add Virtual Directory. On the Add Virtual Directory page, in Alias, type CertEnroll and for Physical path, type C:\Certenroll, and then click OK. In the Connections pane, under the Default Web Site, ensure the CertEnroll virtual directory is selected then in the CertEnroll Home pane, double-click on Directory Browsing. In the Actions pane click Enable. Step 4. Enable Double Escaping on the IIS Server Allowing double escaping makes it possible for the web server to host Delta CRLs. For more information about this see KB Article 942076 (3). Ensure you are logged on to the webserver as windowsnoob\Administrator. Open an Administrative Command Prompt. Then enter the following cd %windir%\system32\inetsrv\ and press ENTER. Type following command and press Enter. Appcmd set config "Default Web Site" /section:system.webServer/Security/requestFiltering -allowDoubleEscaping:True Type the following to restart IIS. iisreset and press ENTER. Step 5. Create a DNS record for externally accessible website address To answer requests for OCSP and CRL, AIA via a publicly available URL, login to your DNS provider and create a new DNS record for your chosen public URL, eg: http://pki.windows-noob.com Note: http://pki.windows-noob.com is a website address that I own and use, and I'm using it in this guide to show you what you need to do, obviously you need to use your own website address, for example http://pki.yourdomain.com. This should point to the IP address of your internet connection that is being shared via the smoothwall. Once it's setup, you can verify pinging the URL Lastly, you need to configure your Smoothwall (or use another method) to port forward port 80 (http) internet requests to the webserver. To do that, login to https://192.168.11.199:441 (the Smoothwall IP address) via the Internet Explorer Web browser on the WebServer. Note that you may have to disable IE enhanced security information temporarily to allow access. Once connected, login as Admin/password, which you defined when you installed the Smoothwall. Below you can see the Port Forward I've configured for port 80 requests. After doing so, anyone can browse to http://pki.windows-noob.com using a web browser which means they'll be able to retrieve CRL's when they are published to http://pki.windows-noob.com/certenroll Join me in part 4 to further configure the Standalone Offline Root CA. Recommended reading (1) - https://www.sysadmins.lv/blog-en/root-certification-authority-ca-cdp-and-aia-extension-question.aspx (2) - https://blogs.technet.microsoft.com/nexthop/2012/12/17/updated-creating-a-certificate-revocation-list-distribution-point-for-your-internal-certification-authority/ (3) - http://support.microsoft.com/kb/942076
-
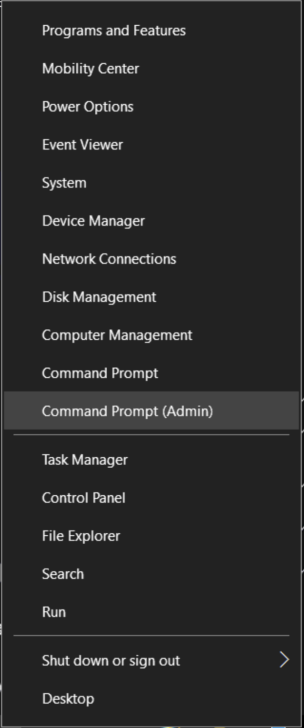
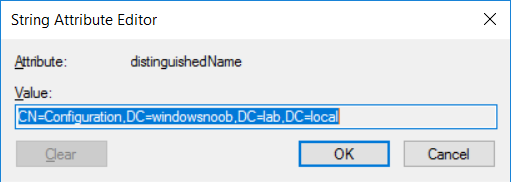
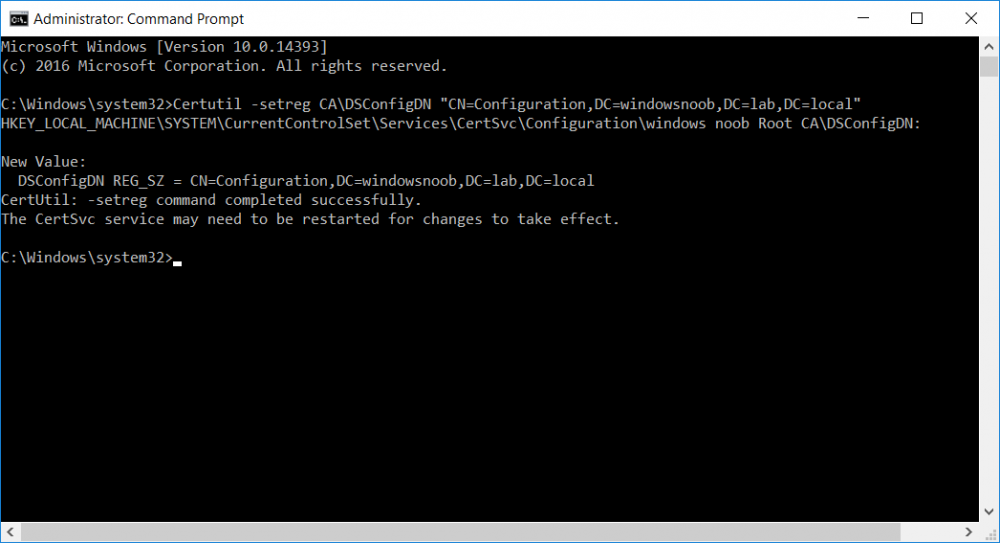
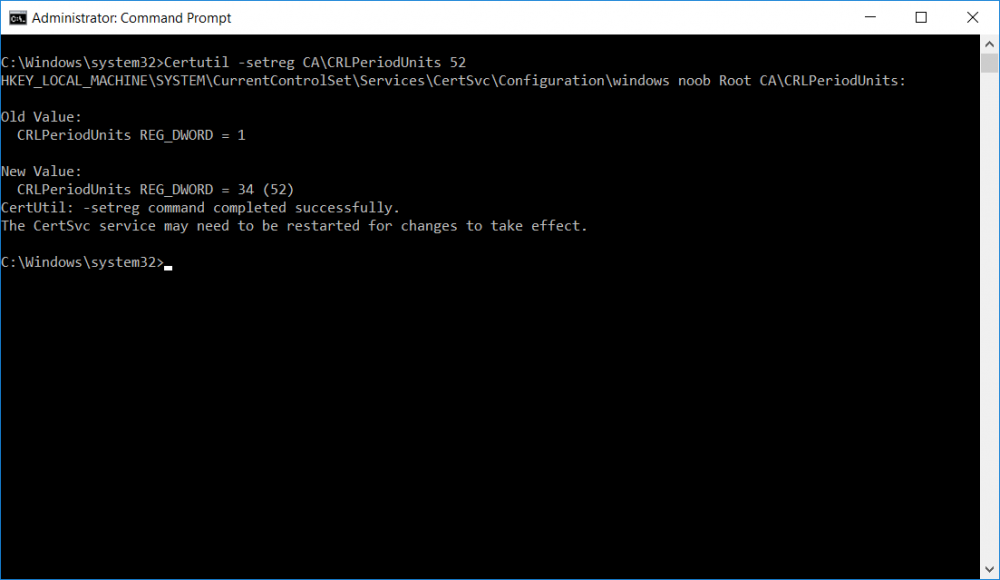
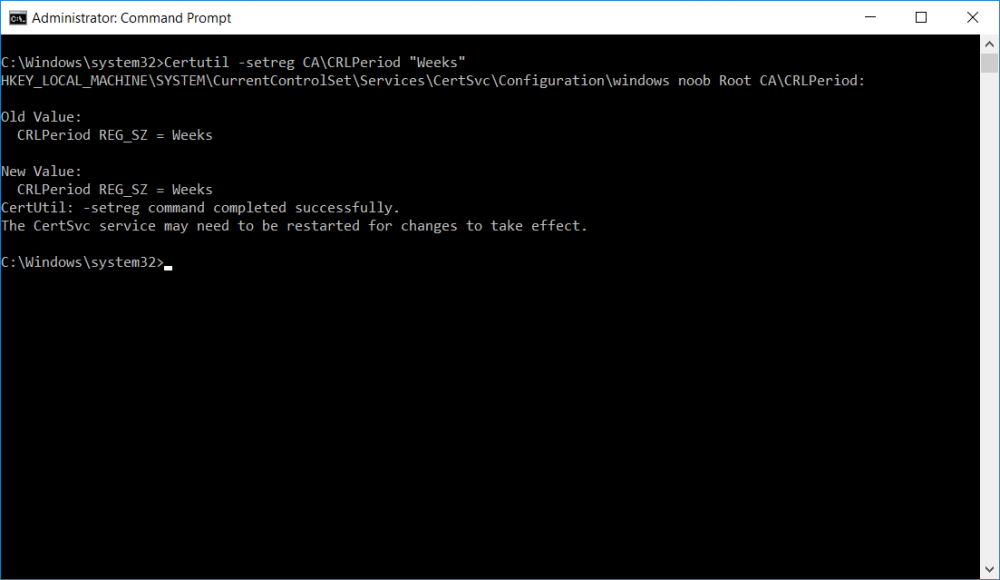
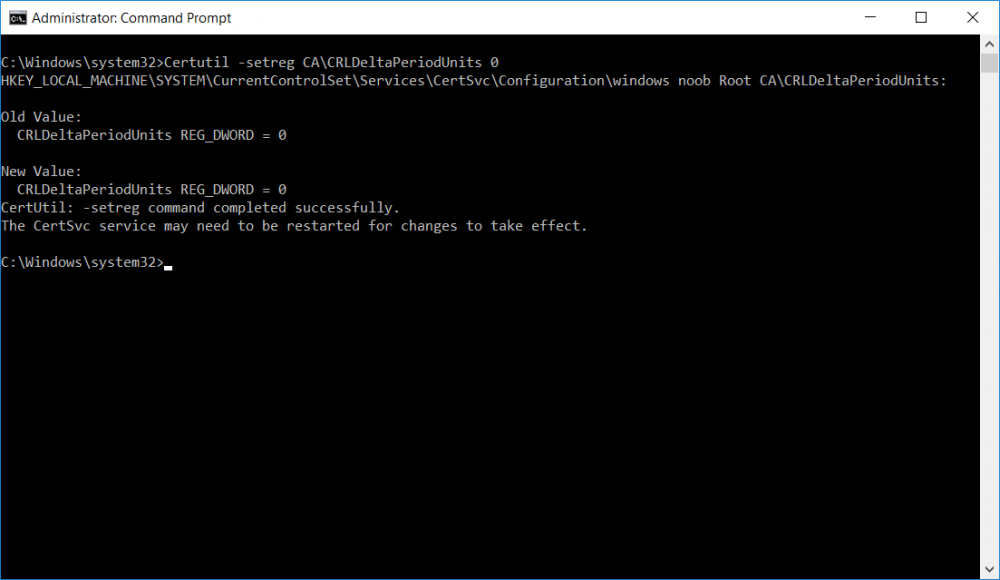
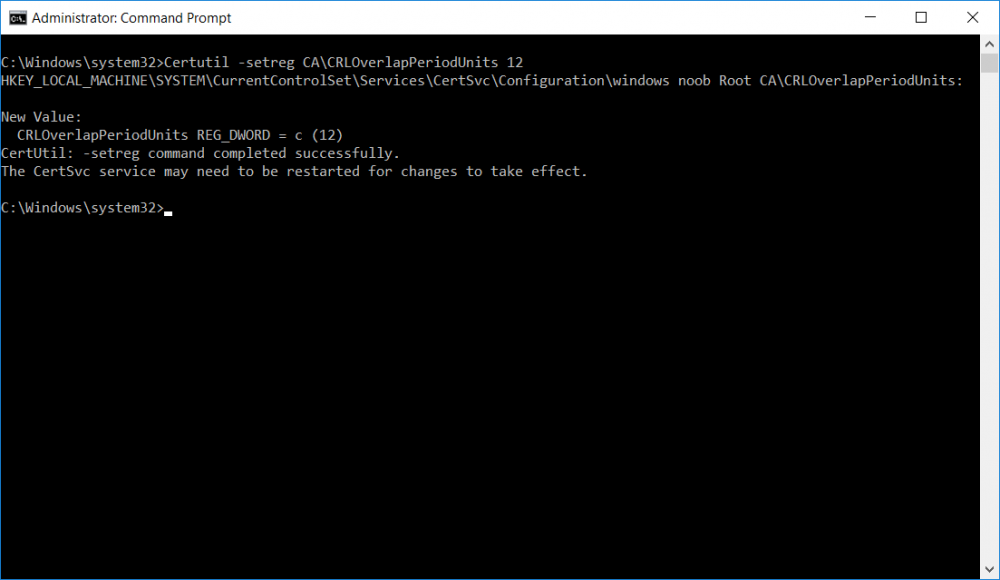
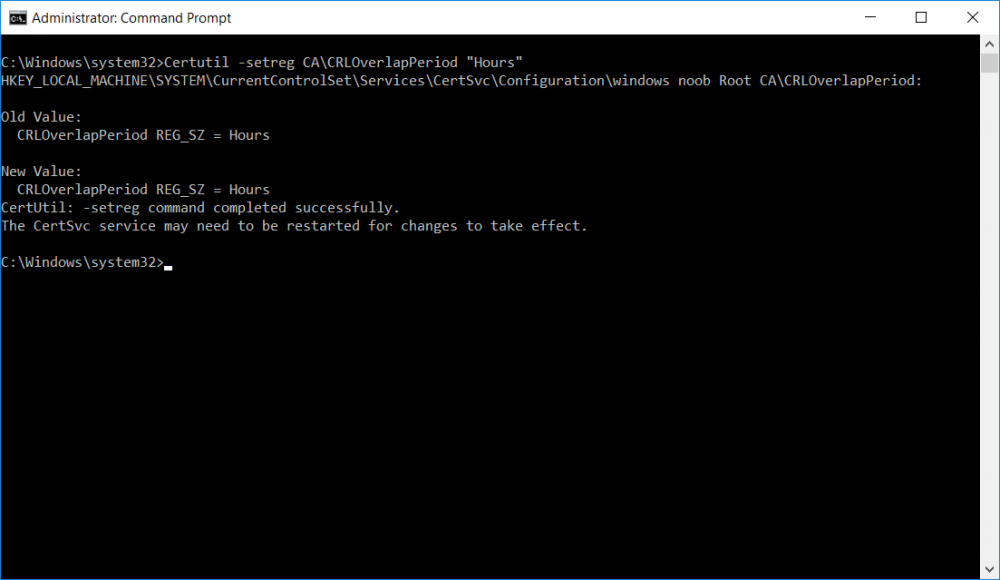
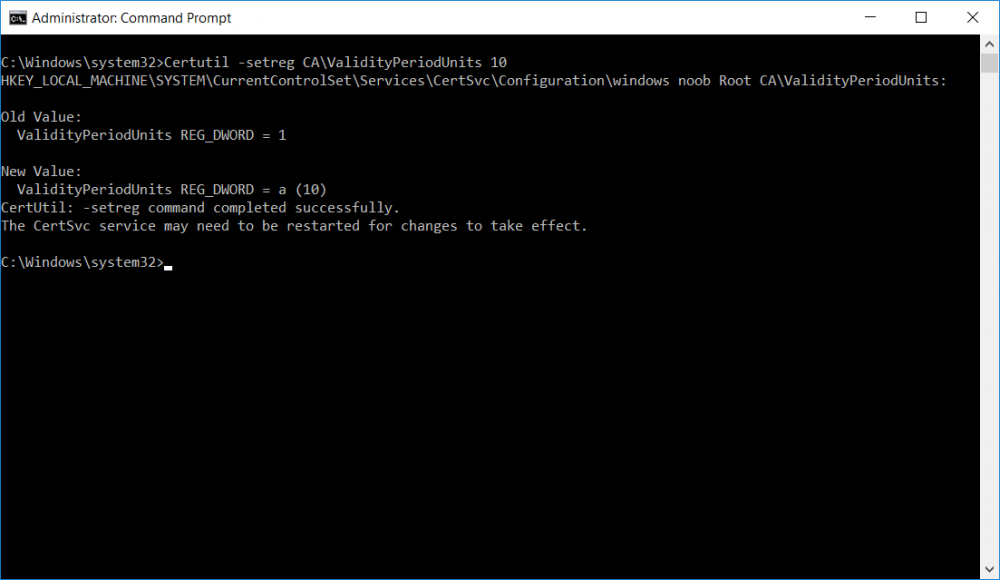
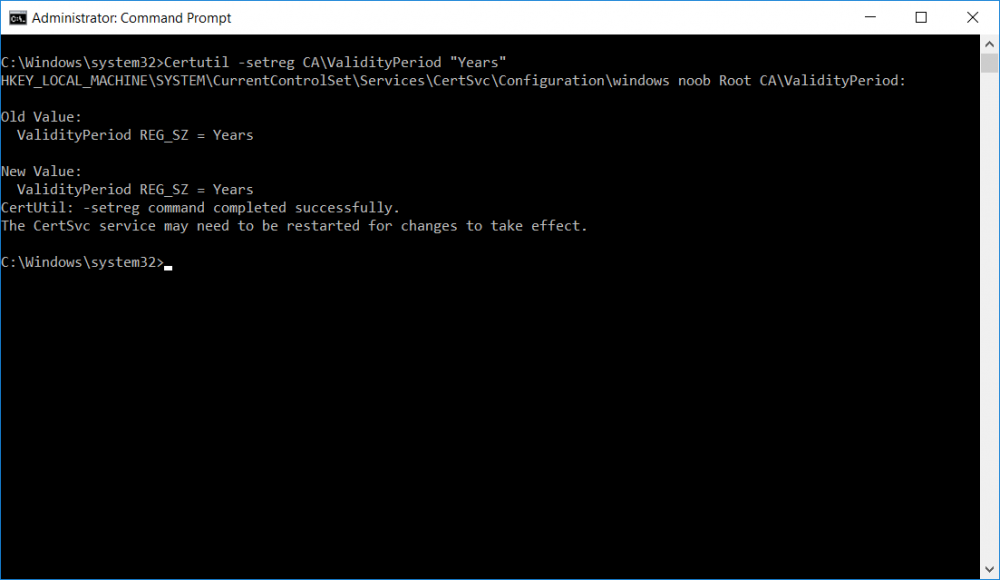
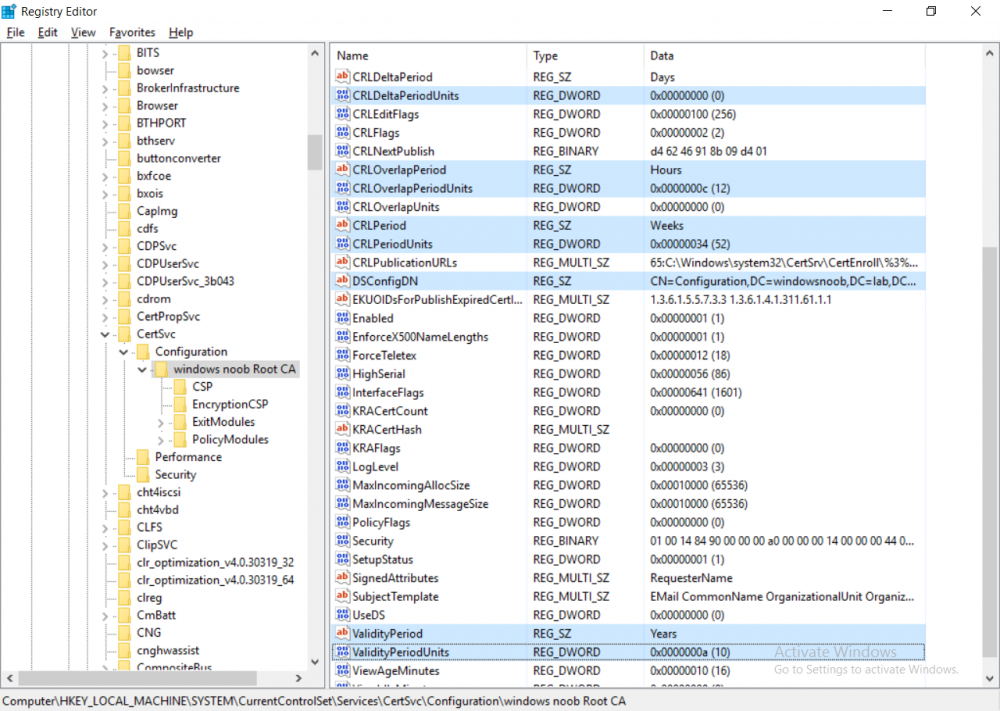
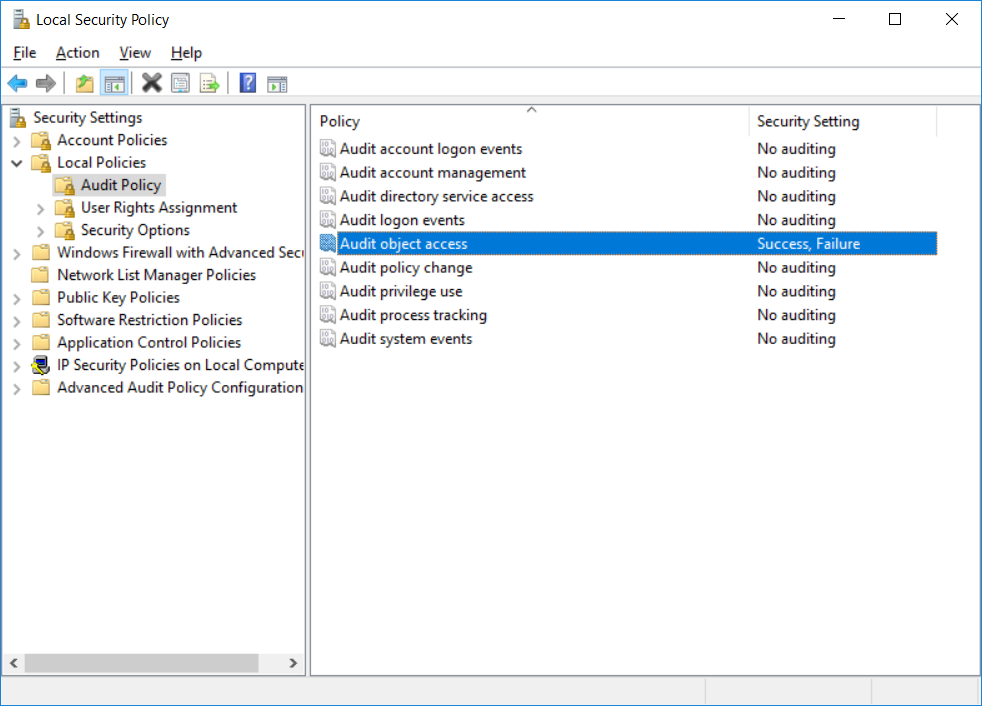
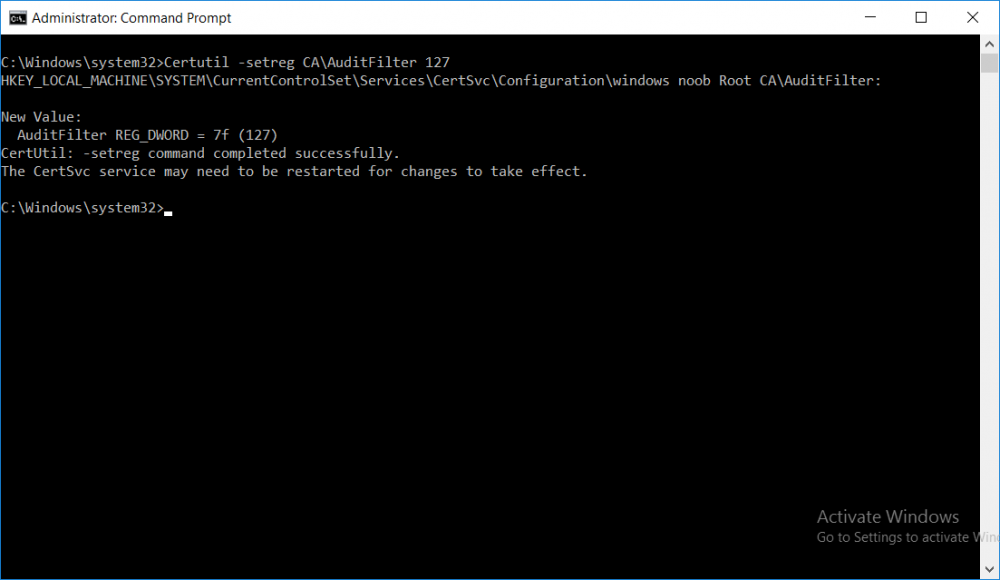
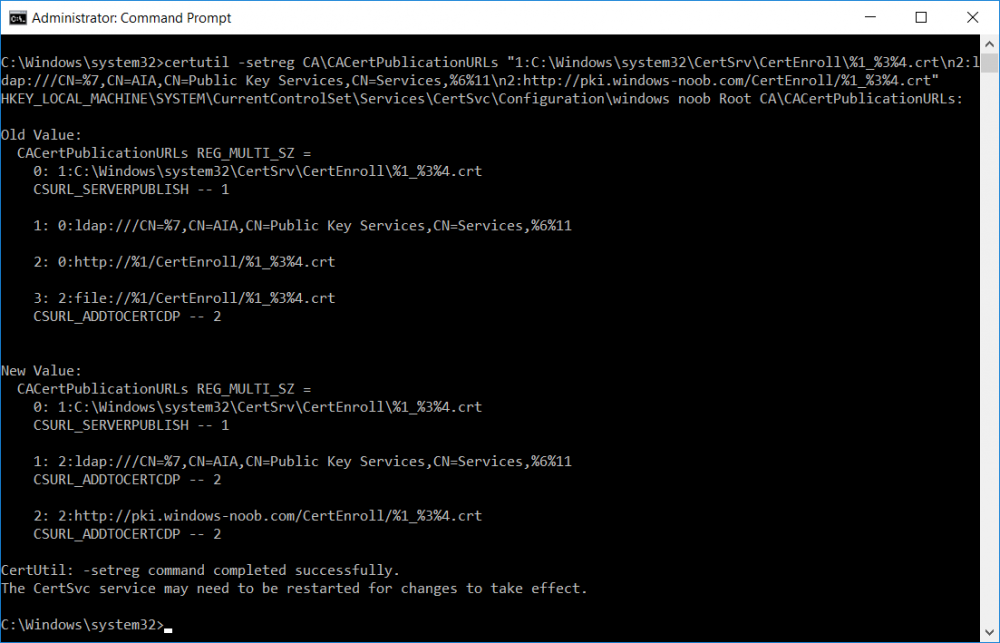
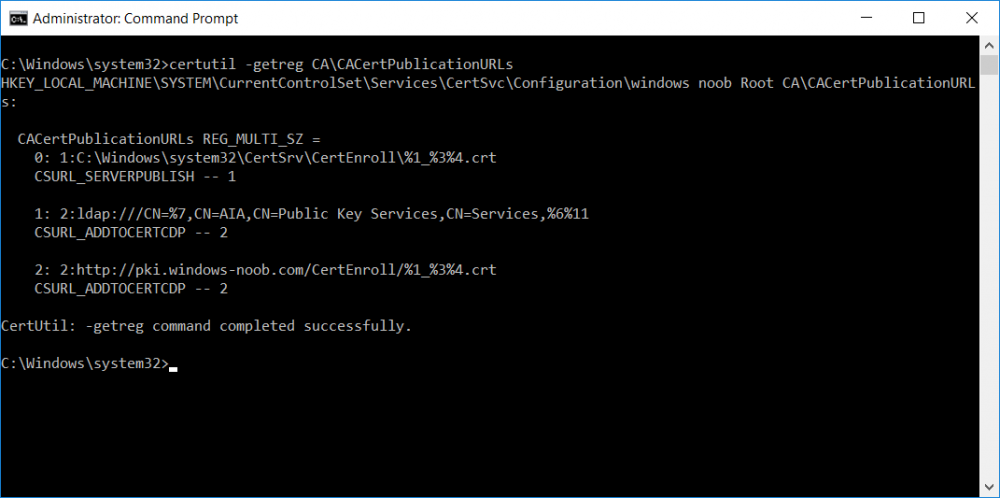
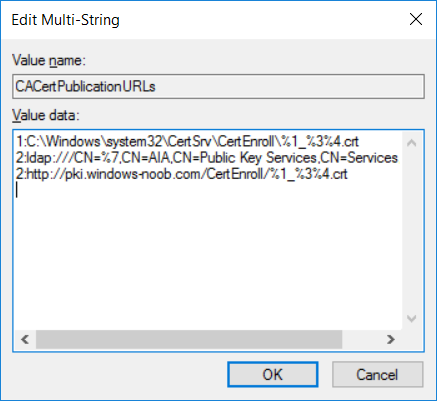
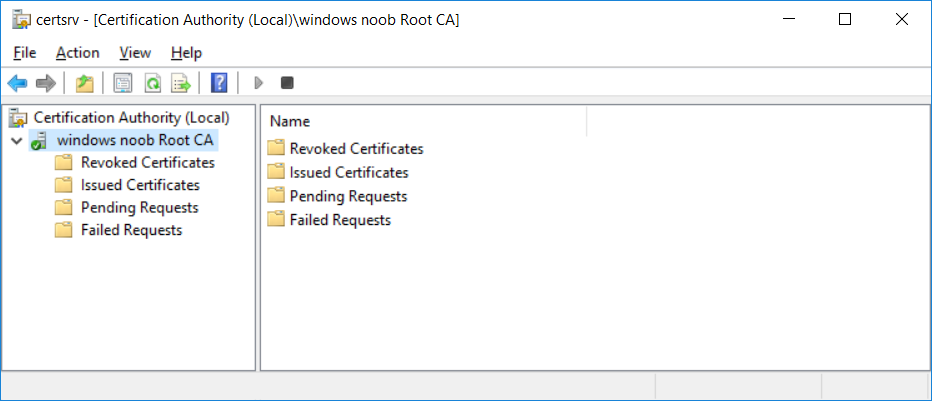
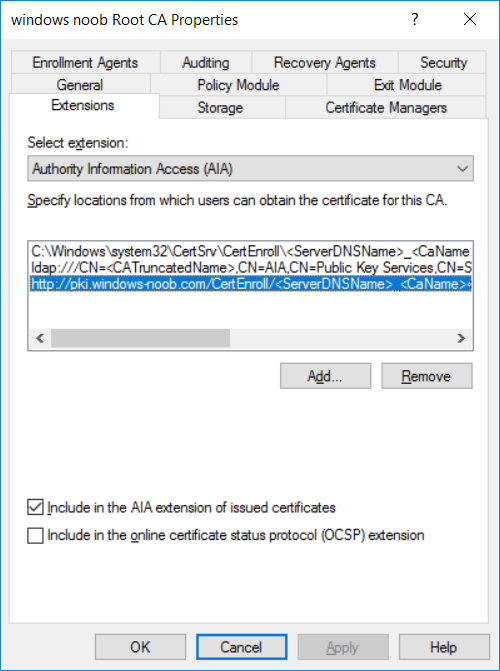
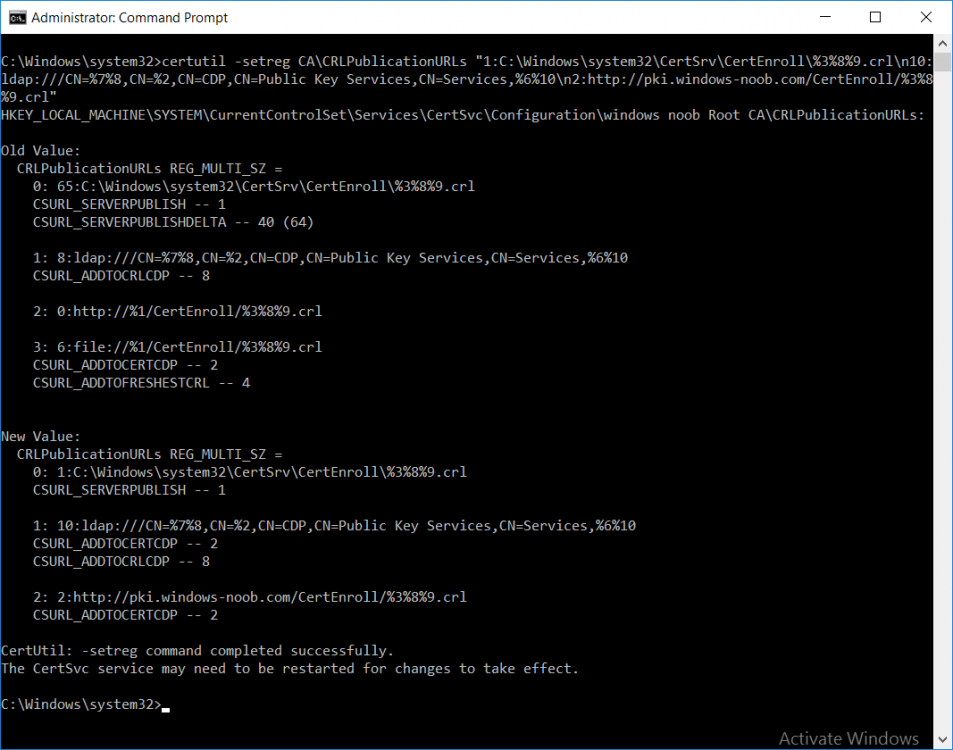
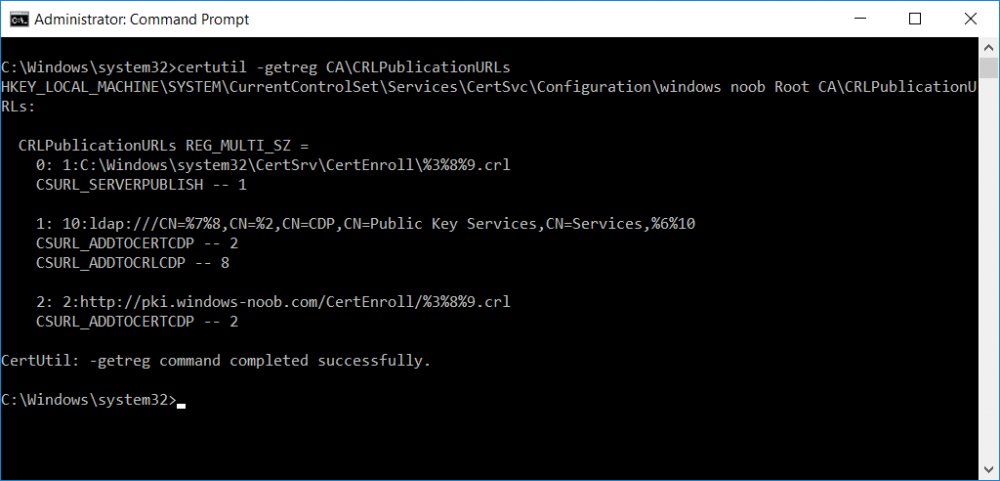
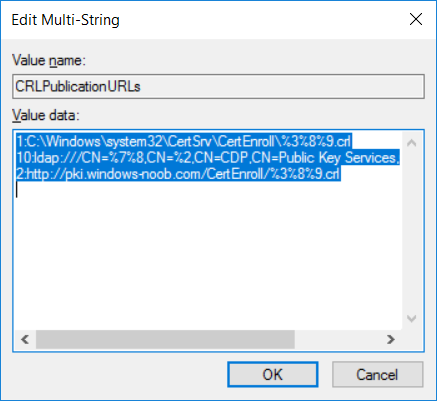
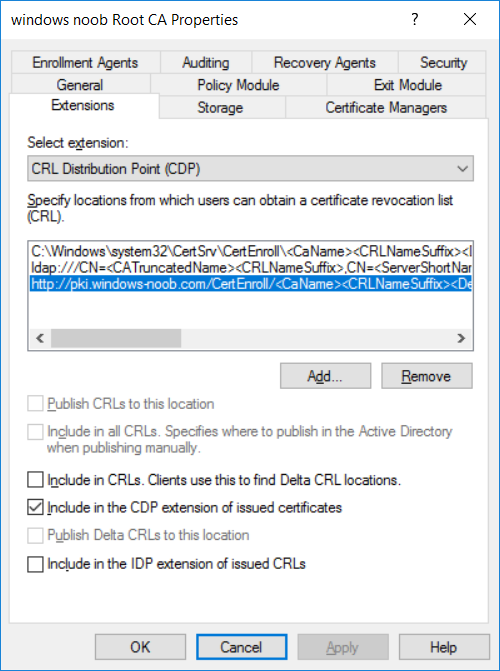
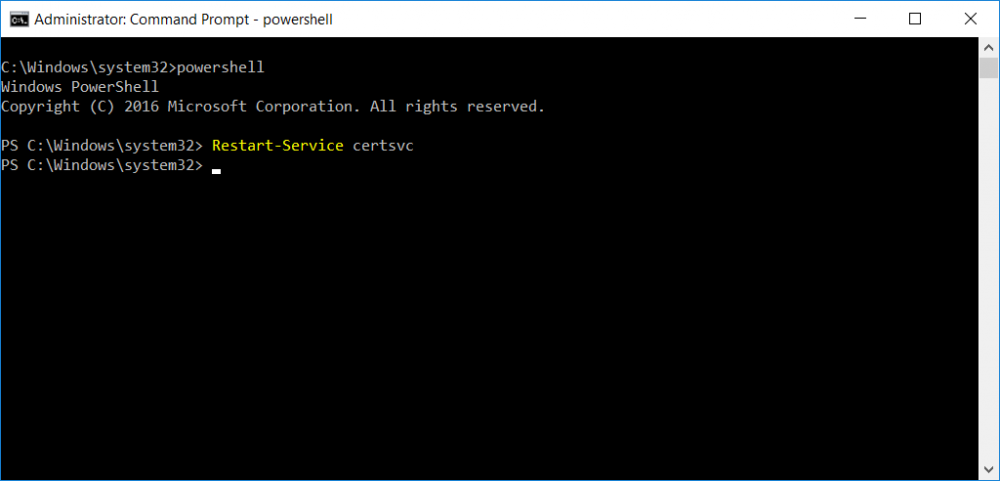
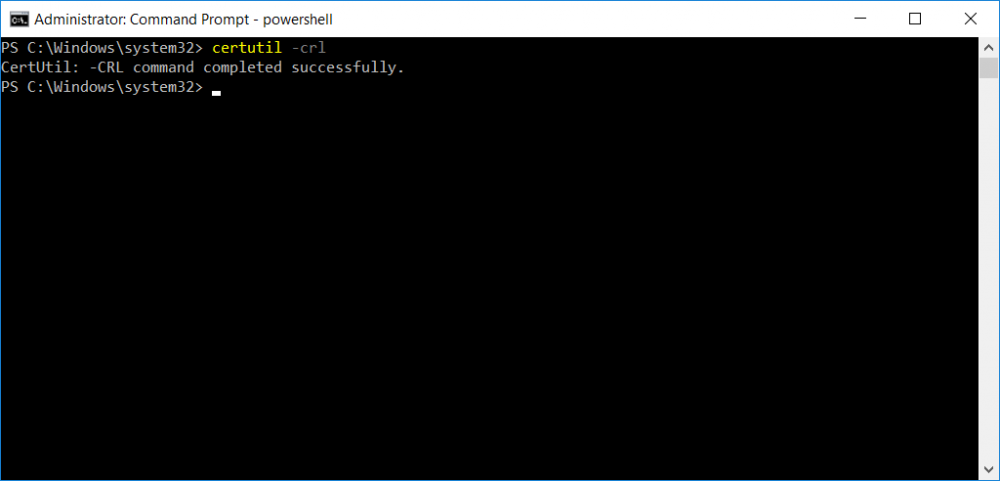
This series is comprised of different parts, listed below. Part 1 - Introduction and server setup Part 2 - Install and do initial configuration on the Standalone Offline Root CA Part 3 - Prepare the HTTP Web server for CDP and AIA Publication Part 4 - Post configuration on the Standalone Offline Root CA (this part) Part 5 - Installing the Enterprise Issuing CA Part 6 - Perform post installation tasks on the Issuing CA Part 7 - Install and configure the OCSP Responder role service Part 8 - Configure AutoEnroll and Verify PKI health In part 1 of this series, you configured your LAB for a 2 tier PKI hierarchy running on Windows Server 2016. You used PowerShell to create some virtual machines, and then installed Windows Server 2016, Windows 10 Enterprise version 1803 and optionally Smoothwall 3.1 before configuring the IP address scheme and Computer Names on the virtual machines. Finally you configured ADDS on DC01 so that you have a working Domain Controller for the rest of this LAB. In part 2 you installed and did the initial configuration on the Standalone Offline Root CA. In part 3 you prepared the HTTP Web Server for CDP and AIA Publication and you created a DNS record for the publicly available web server. Now you will perform post configuration on the Standalone Offline Root CA to set certificate revocation list (CRL) period registry settings using CertUtil, and then enable object access Auditing and finally, to configure three locations for the Authority Information Access (AIA) and four locations for the Certificate revocation list Distribution Point (CDP), again using CertUtil. Step 1. Configure CRL period registry settings using CertUtil In this step, you'll use CertUtil to set various related registry settings for the Certificate Revocation List periods in the registry on the Standalone Offline Root CA. Logon to the Standalone Offline Root CA as RootCA\Administrator. Right-click on Start, and choose Command Prompt (admin). I'll show screenshots of the output of each command separately so that you can compare it to your environment. To start off, you need to define the Active Directory Configuration Partition Distinguished Name, and to do that using certutil enter the following command: Certutil -setreg CA\DSConfigDN "CN=Configuration,DC=windowsnoob,DC=lab,DC=local" Note: You can determine what the configuration path should be (for your LAB) for the command above by logging on to the Domain Controller (DC01), and by opening Adsi Edit, and click on Action then select Connect to. In the window that appears, change Select a well known naming context to Configuration. In the Adsi Edit pane, right click on CN=Configuration,DC=windowsnoob,DC=lab,DC=local and choose Properties, scroll down and double click on Distinguished Name, copy the Value listed in the String attribute editor. The results of the certutil -setreg command on the Standalone Offline Root CA are shown below. Be sure that it states CertUtil: -setreg command completed successfully. Next you will define the Certificate Revocation List (CRL) Period Units, CRL Period and CRL Delta Period Units. To do so run the following commands from an administrative command prompt: Certutil -setreg CA\CRLPeriodUnits 52 Press Enter. The output of the above command is shown below. Certutil -setreg CA\CRLPeriod "Weeks" Press Enter. The output of the above command is shown below. Certutil -setreg CA\CRLDeltaPeriodUnits 0 Press Enter. The output of the above command is shown below. To define the CRL Overlap Period Units and the CRL Overlap Period, run the following commands from an administrative command prompt: Certutil -setreg CA\CRLOverlapPeriodUnits 12 Press Enter. The output of the above command is shown below. Certutil -setreg CA\CRLOverlapPeriod "Hours" Press Enter. The output of the above command is shown below. To define the Validity Period Units for all certificates issued by this CA, type following command and then press Enter. In this lab, the Enterprise Issuing CA should receive a 10 year lifetime for its CA certificate. To configure this, run the following commands from an administrative command prompt: Certutil -setreg CA\ValidityPeriodUnits 10 Press Enter. The output of the above command is shown below. Certutil -setreg CA\ValidityPeriod "Years" Press Enter. The output of the above command is shown below. Note: You can confirm all these 8 settings that you have just set on the Standalone Offline Root CA, by using CertUtil -getreg (and query the appropriate setting, for example Certutil -getreg CA\CRLPeriod), or simply browse the registry using RegEdit to the following address. HKLM\SYSTEM\CurrentControlSet\Services\CertSvc\Configuration\windows noob Root CA You can see those values highlighted in the screenshot below. Can the above all be done with PowerShell ? yup, and i'll add the commands later, check back for that. Step 2. Enable Auditing on the Standalone Offline Root CA Note: You cannot configure these setting via Group Policy as the Standalone Offline Root CA should not be connected to any Domain and is Offline (disconnected from the network). Auditing is the ability to log successful or failed attempts when performing certain actions, and as the Standalone Offline Root CA is an important security resource, you want to enable auditing. To enable auditing on the Standalone Offline Root CA click start, select Administrative Tools, and then select Local Security Policy. Expand Local Policies and then select Audit Policy. Double click Audit Object Access and then select Success and Failure then click OK (2). After configuring this, you'll see the following. To enable auditing for the CA you can select which group of events to audit in the Certificate Authority MMC snap-in or by configuring the AuditFilter registry key setting. To configure Auditing for all CA related events, run the following command from an administrative command prompt: Certutil -setreg CA\AuditFilter 127 Press Enter. The output of the above command is shown below. Step 3. Configure the AIA There are multiple different methods for configuring the Authority Information Access (AIA) and certificate revocation list distribution point (CDP) locations. You can use the user interface (in the Properties of the CA object), the certutil command, or directly edit the registry. The Authority Information Access (AIA) is used to point to the public key for the certification authority (CA). To configure the Authority Information Access (AIA) using certutil to set the following three locations on the Standalone Offline Root CA: Static file system LDAP (lightweight directory access path) HTTP Note: Edit the command below to use your public facing HTTP web server address, I'm using http://pki.windows-noob.com, you should use your own address. Open an administrative command prompt and do as follows: certutil -setreg CA\CACertPublicationURLs "1:C:\Windows\system32\CertSrv\CertEnroll\%1_%3%4.crt\n2:ldap:///CN=%7,CN=AIA,CN=Public Key Services,CN=Services,%6%11\n2:http://pki.windows-noob.com/CertEnroll/%1_%3%4.crt" Press Enter. The output of the above command is shown below. To confirm the output you can issue the following command: certutil -getreg CA\CACertPublicationURLs Press Enter. The output of the above command is shown below. If you look in the registry, under the following path: HKEY_LOCAL_MACHINE\System\CurrentControlSet\Services\CertSvc\Configuration\windows noob RootCA, you can confirm the CACertPublicationURLs by opening that REG_MULTI_SZ value. You should see the following: 1:C:\Windows\system32\CertSrv\CertEnroll\%1_%3%4.crt 2:ldap:///CN=%7,CN=AIA,CN=Public Key Services,CN=Services,%6%11 2:http://pki.windows-noob.com/CertEnroll/%1_%3%4.crt as shown in the screenshot below. You can also see this in the the Certification Authority console (certsrv) . To open the console, click Start, click Administrative Tools, and then click Certification Authority. In the navigation pane, expand the Certificate Authority (Local). Right-click windows noob Root CA and then click Properties. On the Extensions tab, under Select extension, click Authority Information Access (AIA) and you will see the graphical representation of the AIA settings that you've just configured using certutil. In the above step, you have used the following three different methods to confirm the specified settings. certutil registry certsrv.msc Step 4. Configure the CDP The CDP is where the certificate revocation list is maintained, which allows client computers to determine if a certificate has been revoked. To configure the Certificate revocation list Distribution Point (CDP) using certutil to set the following four locations on the Standalone Offline Root CA: Static file system LDAP (lightweight directory access path) HTTP File system The file system location (4th option) that you will set will allow the CRL to be copied over the network to the web server (webserver), which is why we earlier allowed the Cert Publishers group access to the share and folder. All CAs are members of the Cert Publishers group, so we effectively allowed all CAs to copy to the CertEnroll folder on the webserver computer. You may wish to grant a specific group rights to access this share instead, it's up to you. Note: Edit the command below to use your public facing HTTP web server address, I'm using http://pki.windows-noob.com, you should use your own address. certutil -setreg CA\CRLPublicationURLs "1:C:\Windows\system32\CertSrv\CertEnroll\%3%8%9.crl\n10:ldap:///CN=%7%8,CN=%2,CN=CDP,CN=Public Key Services,CN=Services,%6%10\n2:http://pki.windows-noob.com/CertEnroll/%3%8%9.crl" Press Enter. The output of the above command is shown below. After you run that command, run the following certutil command to verify your settings: certutil -getreg CA\CRLPublicationURLs Press Enter. The output of the above command is shown below. You can also verify it in the following registry location: HKEY_LOCAL_MACHINE\SYSTEM\CurrentControlSet\Services\CertSvc\Configuration\windows noob Root CA and in CertSrv.msc Step 5. restart the CertSvc service On the Standalone Offline Root CA, open an Administrative command prompt and type PowerShell. In the PowerShell command prompt issue the following command: Restart-Service certsvc Press Enter. The output of the above command is shown below. Step 6. Publish the CRL On the Standalone Offline Root CA, open an Administrative command prompt and type PowerShell. In the PowerShell command prompt issue the following command: certutil -crl Press Enter. The output of the above command is shown below. That's it for this part, please continue to Part 5 where you will Install the Enterprise Issuing CA. Recommended reading (1) - https://docs.microsoft.com/en-us/windows-server/administration/windows-commands/certutil (2) - https://docs.microsoft.com/en-us/previous-versions/windows/it-pro/windows-server-2003/cc776774(v=ws.10)
-
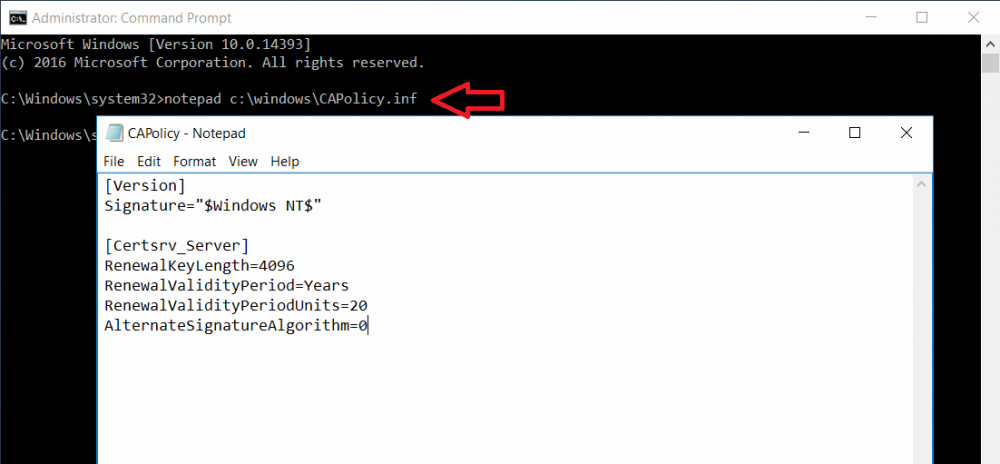
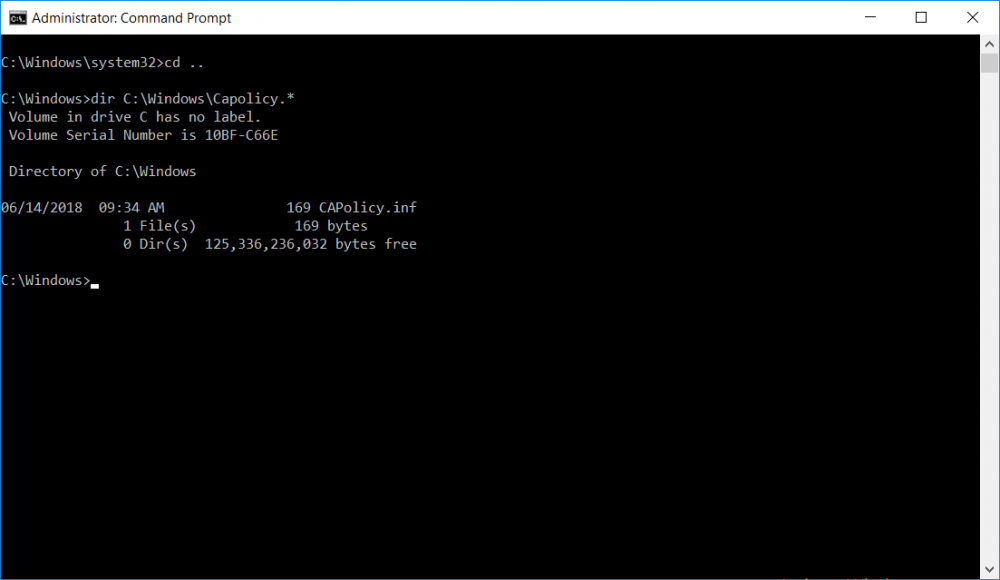
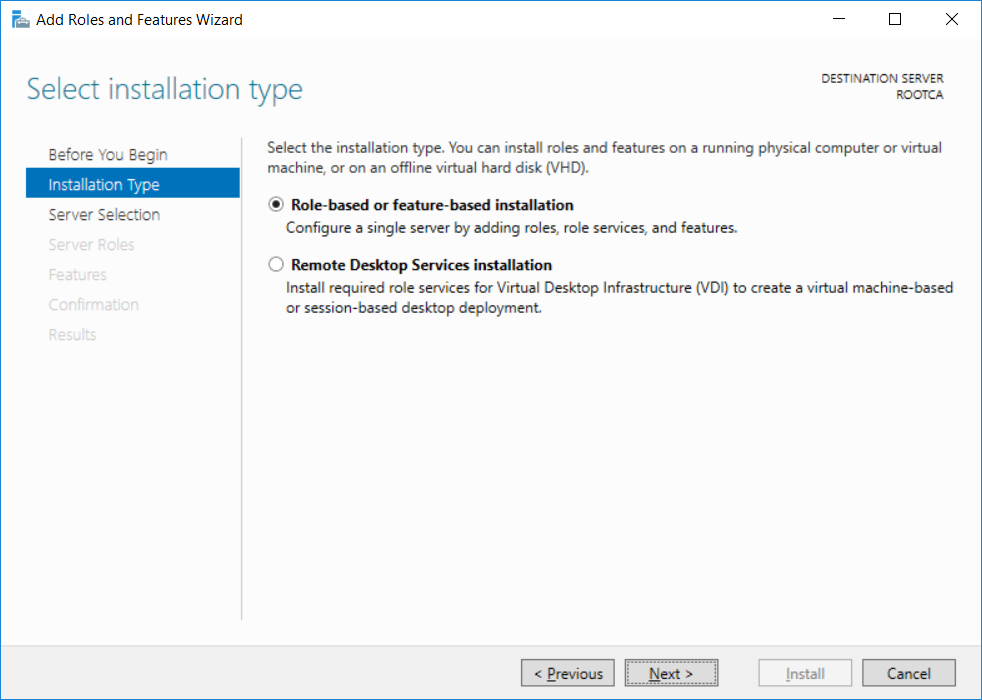
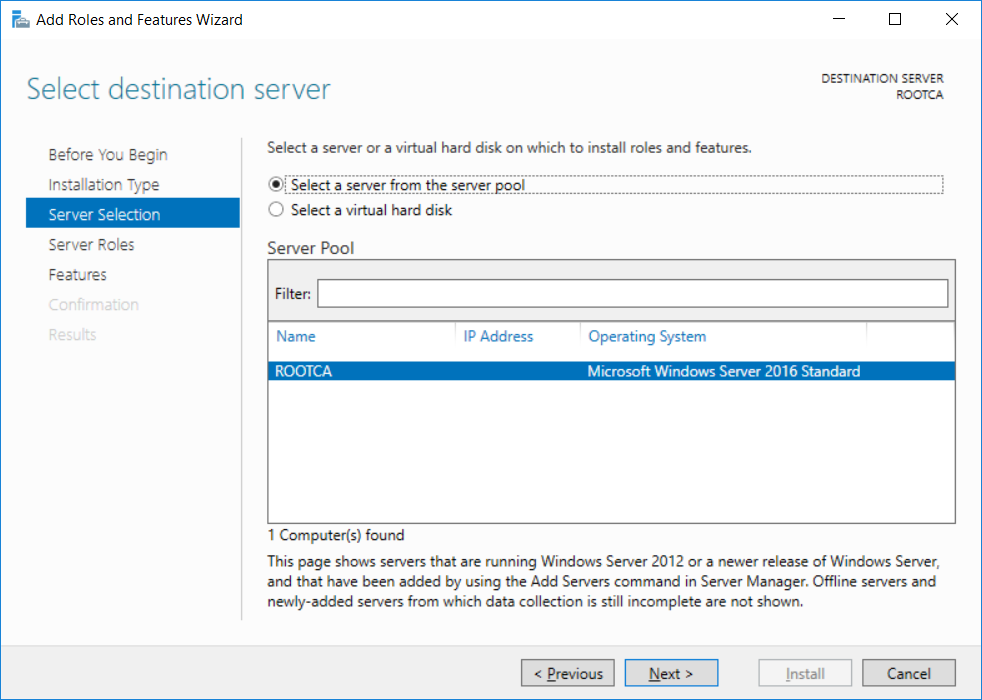
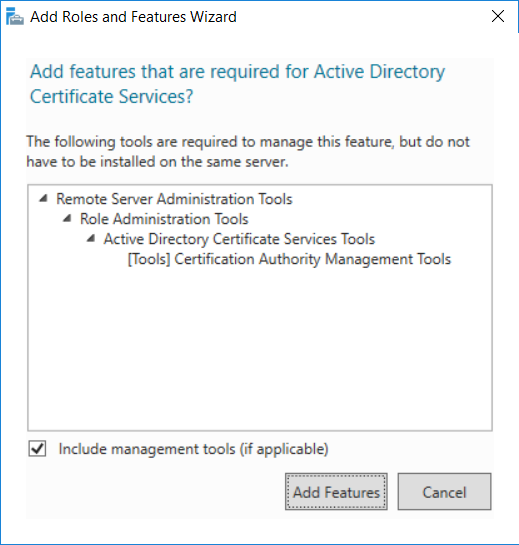
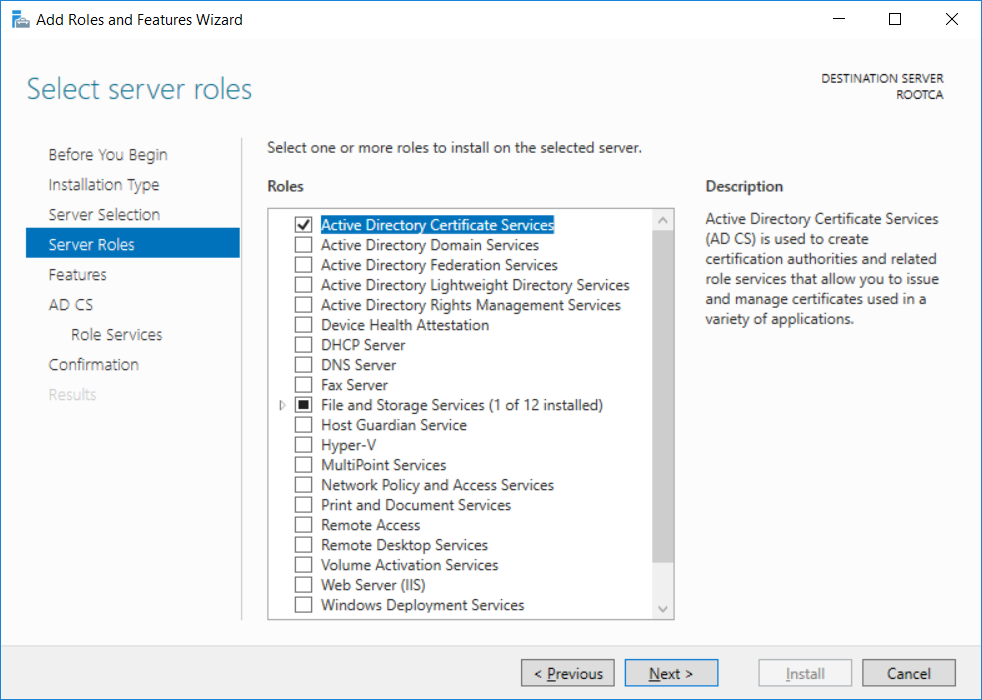
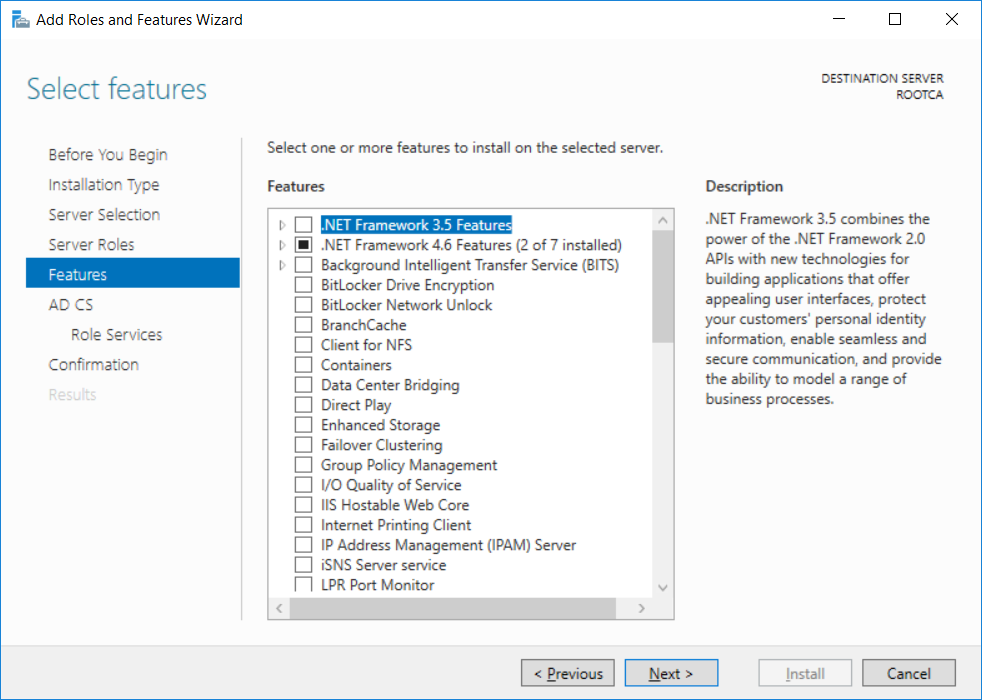
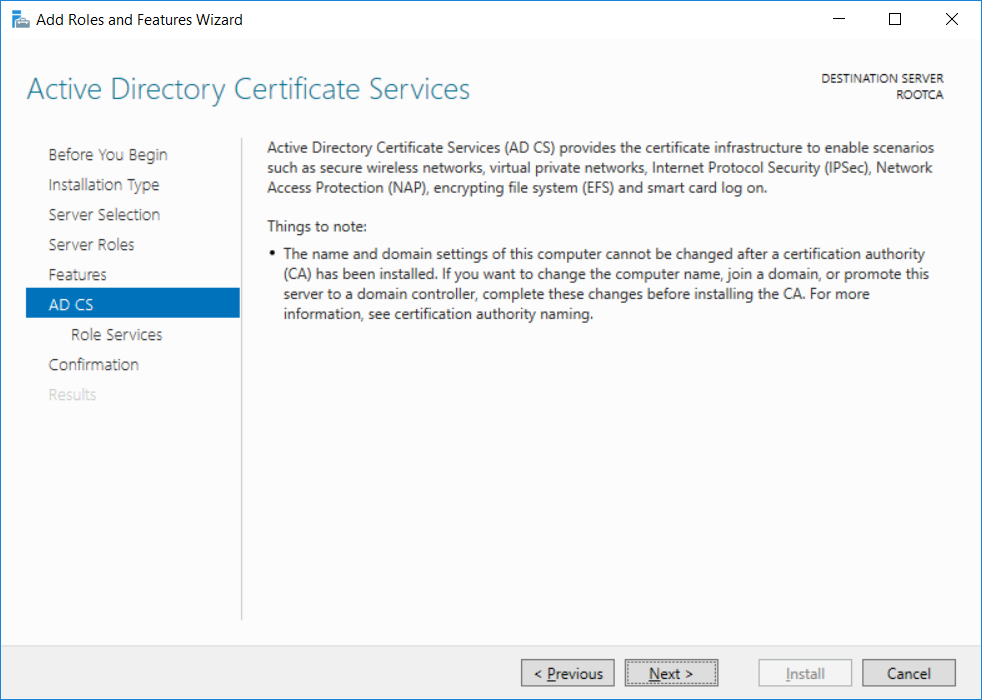
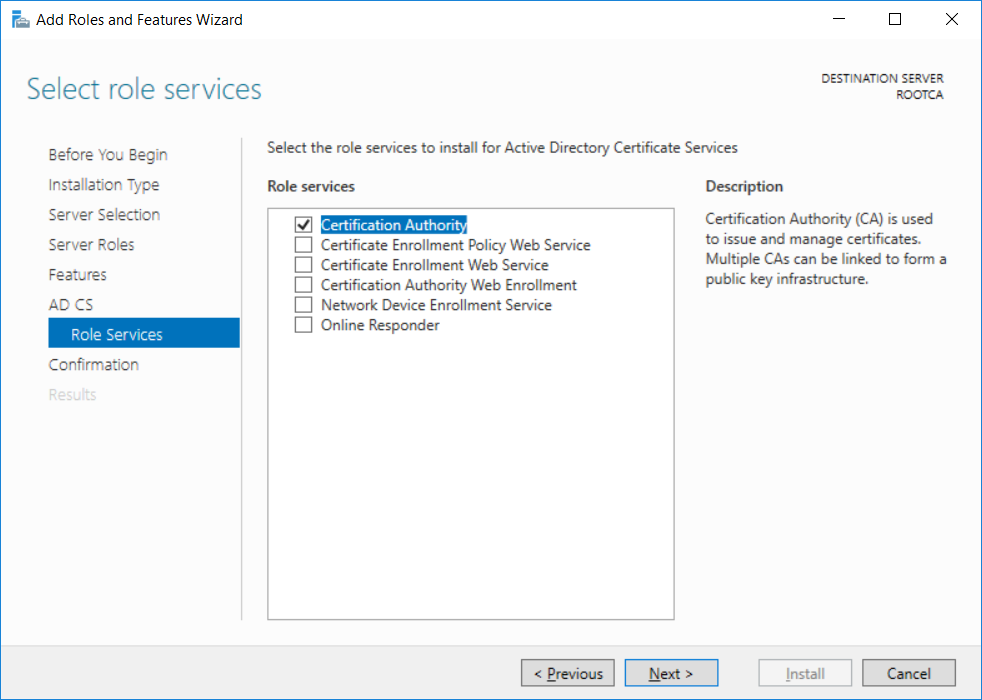
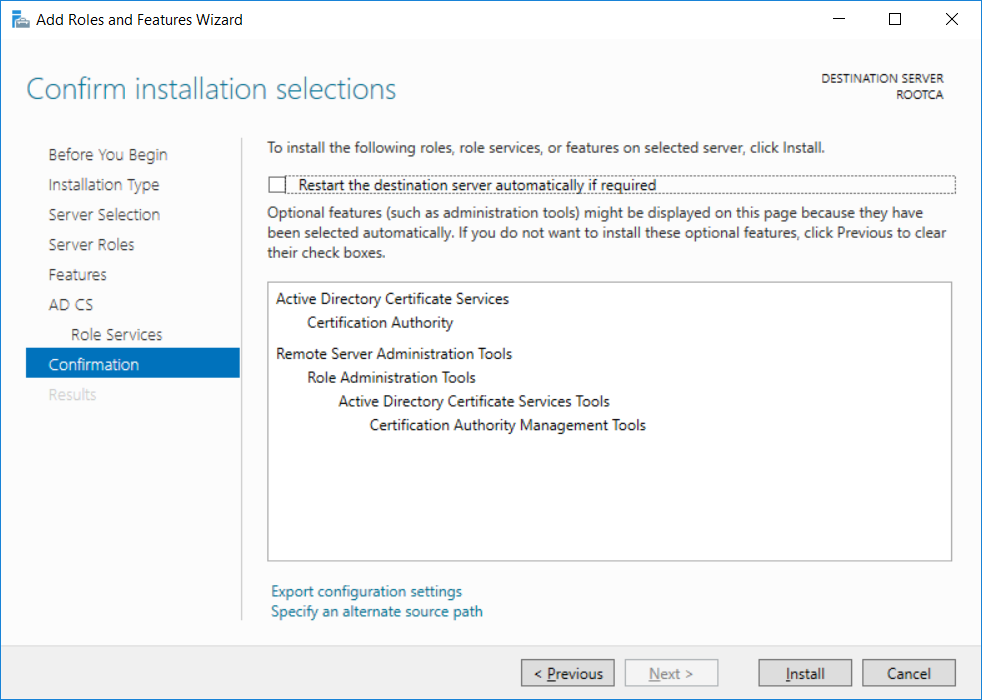
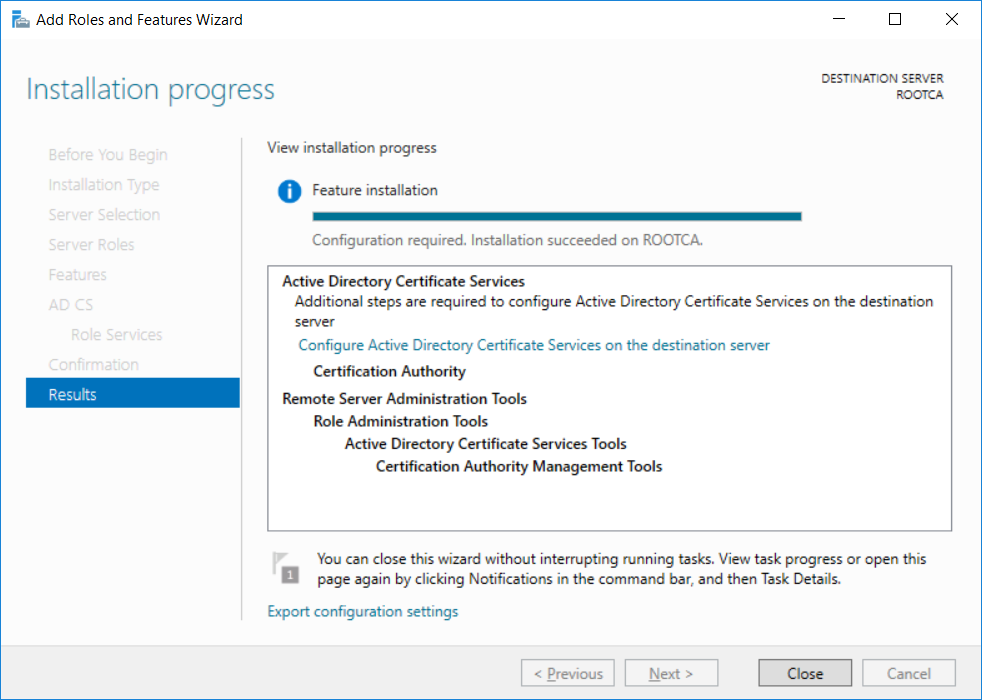
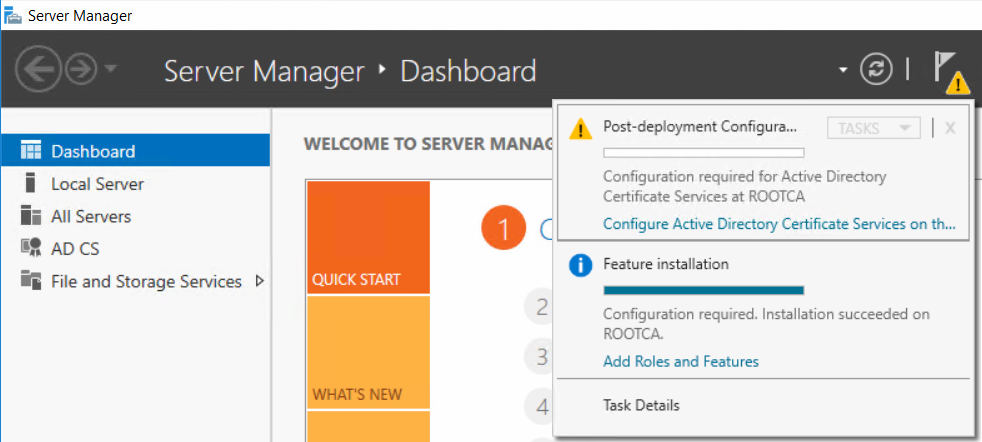
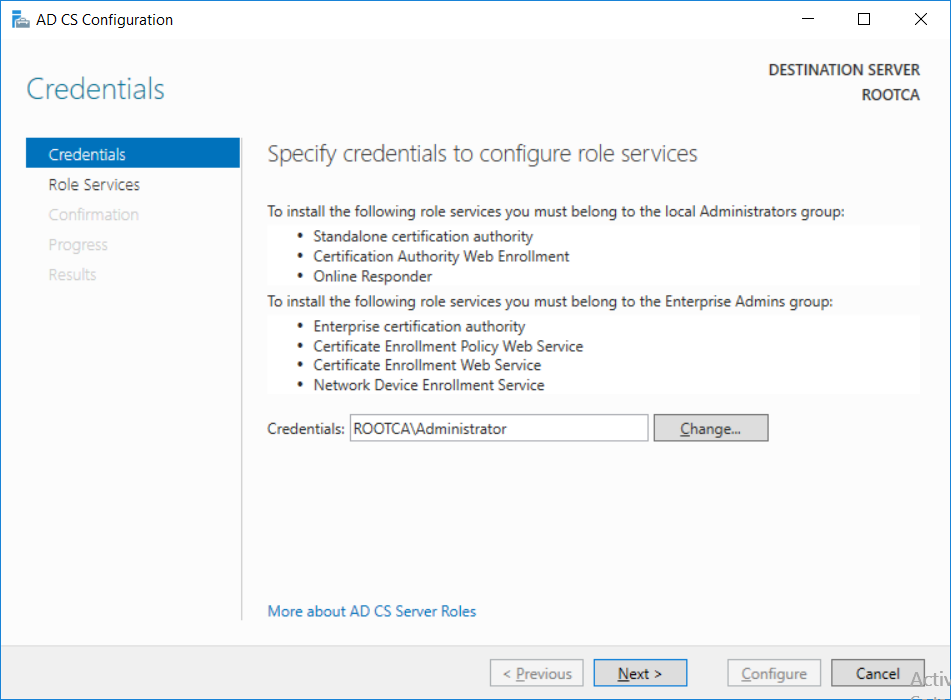
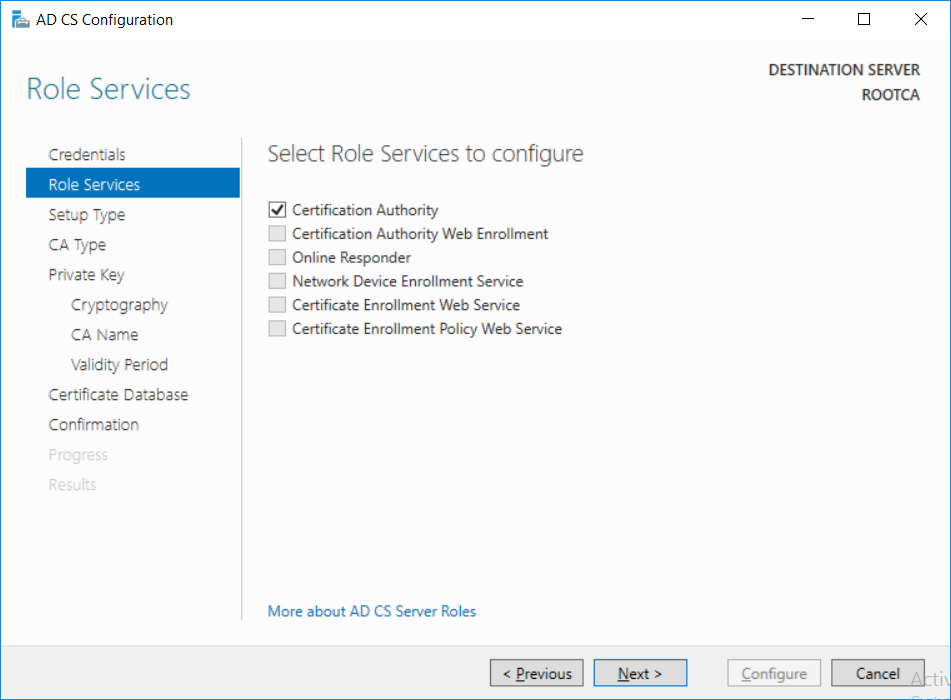
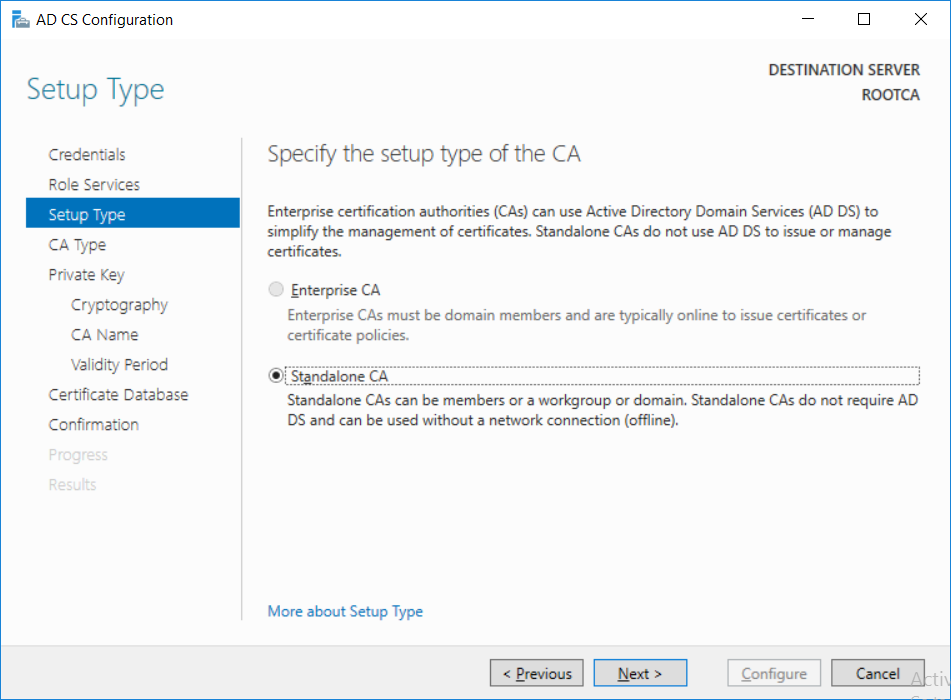
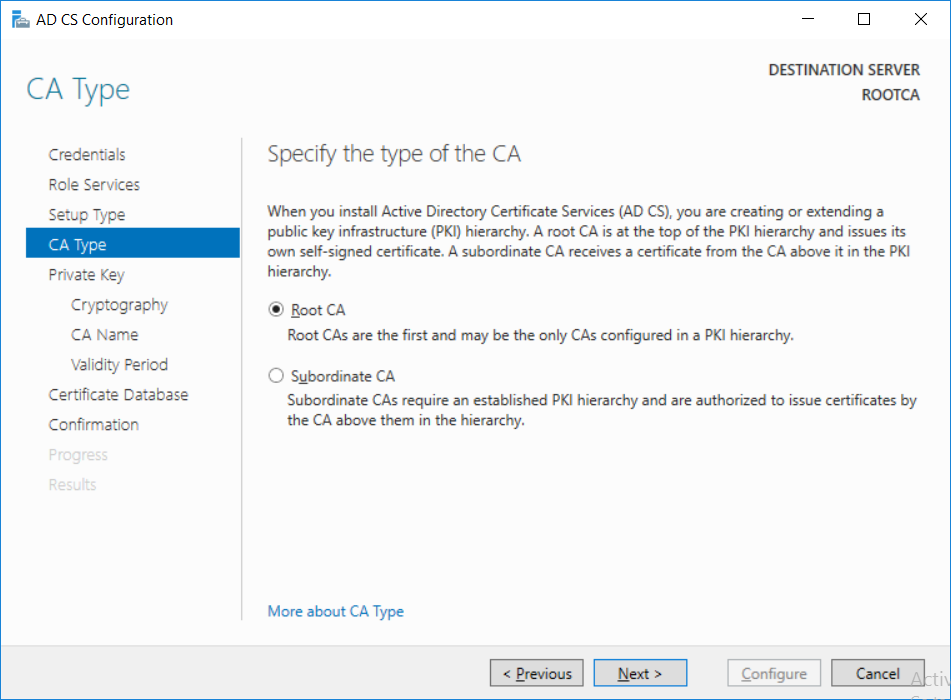
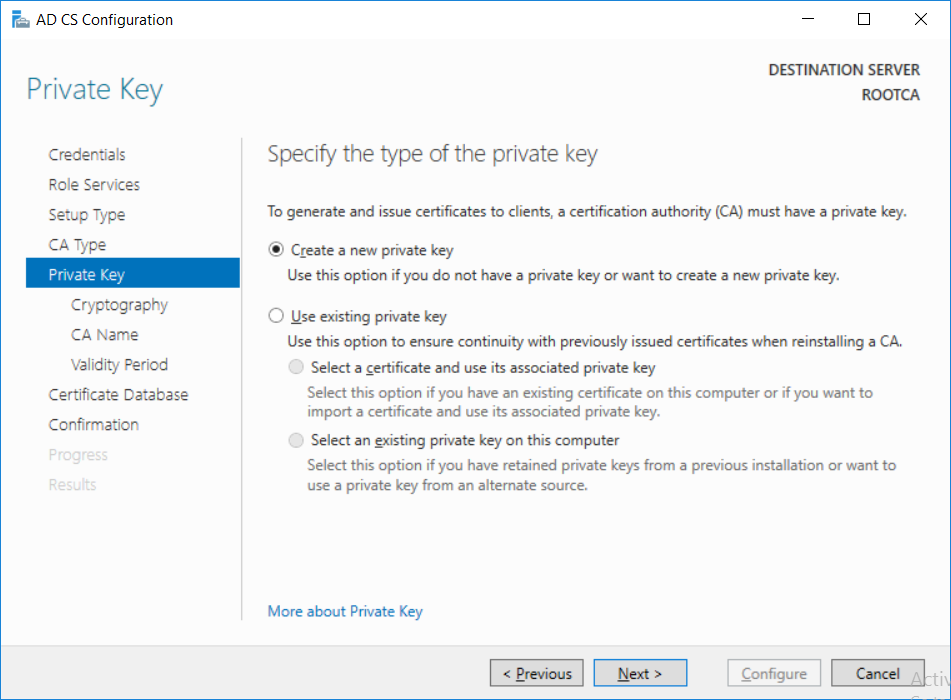
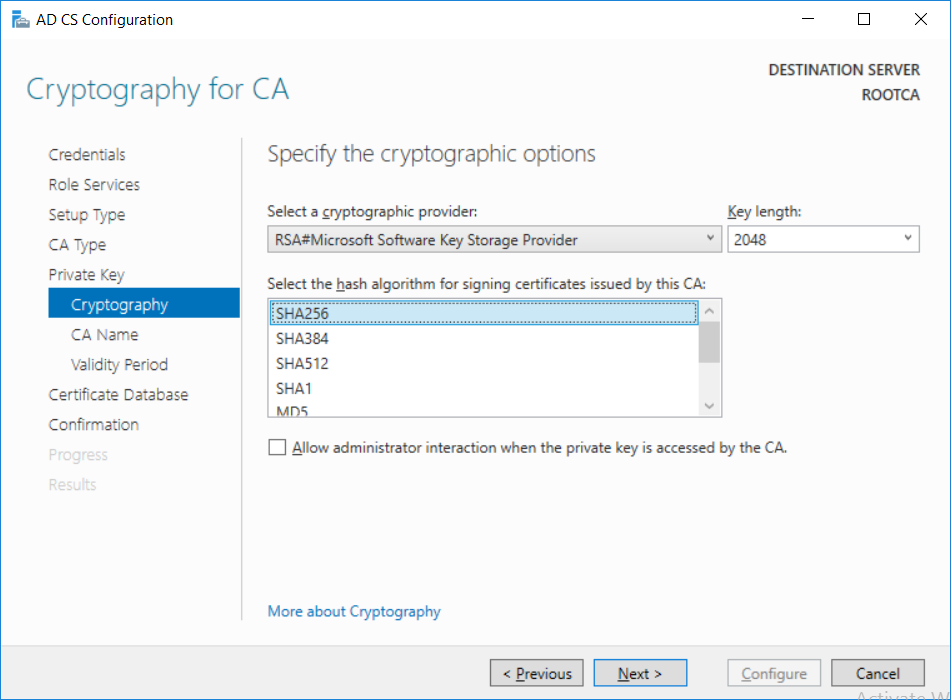
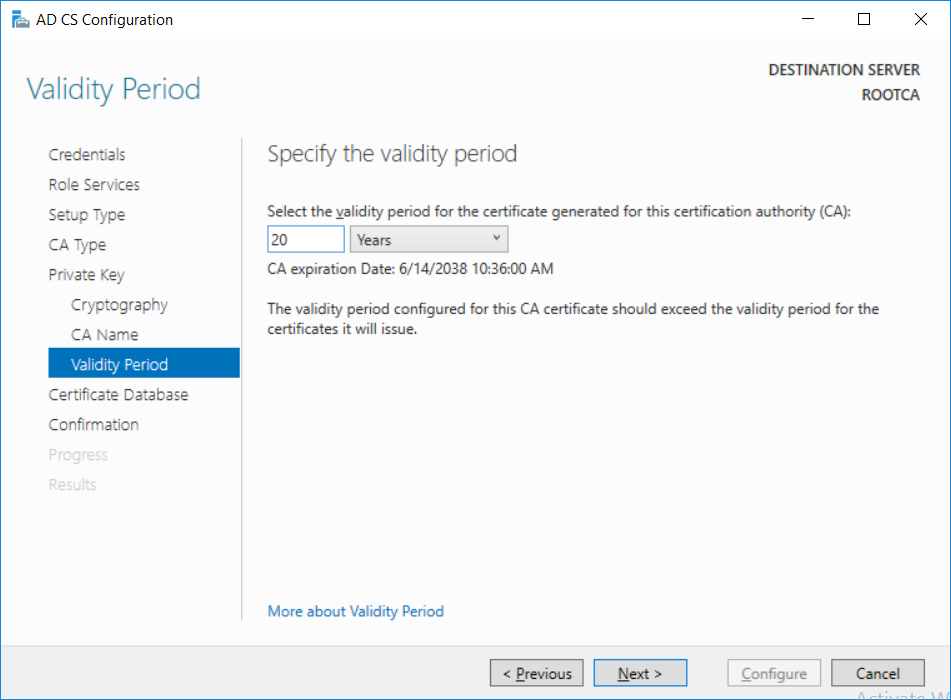
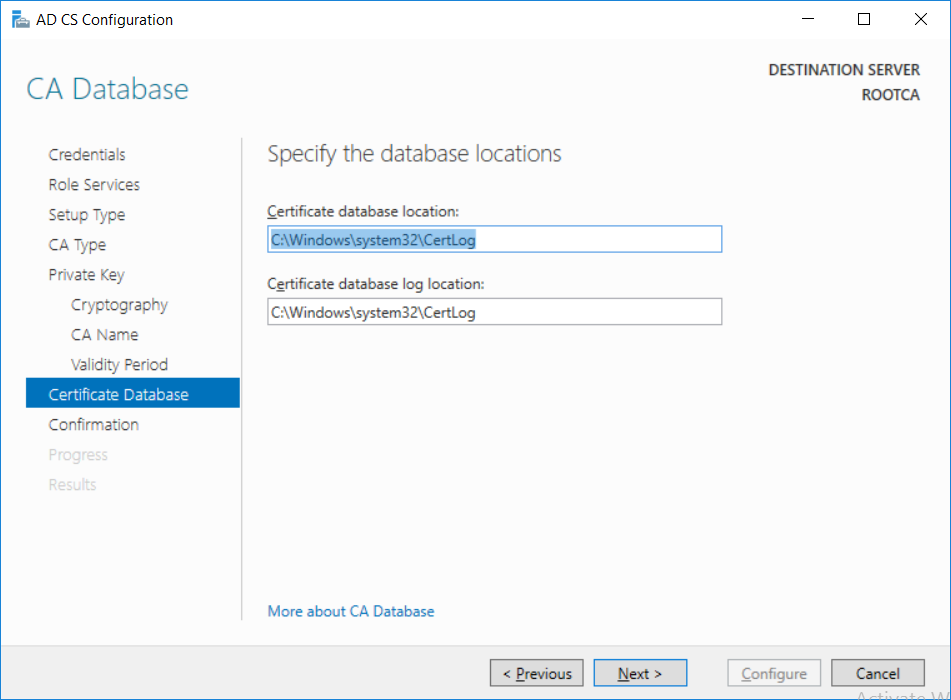
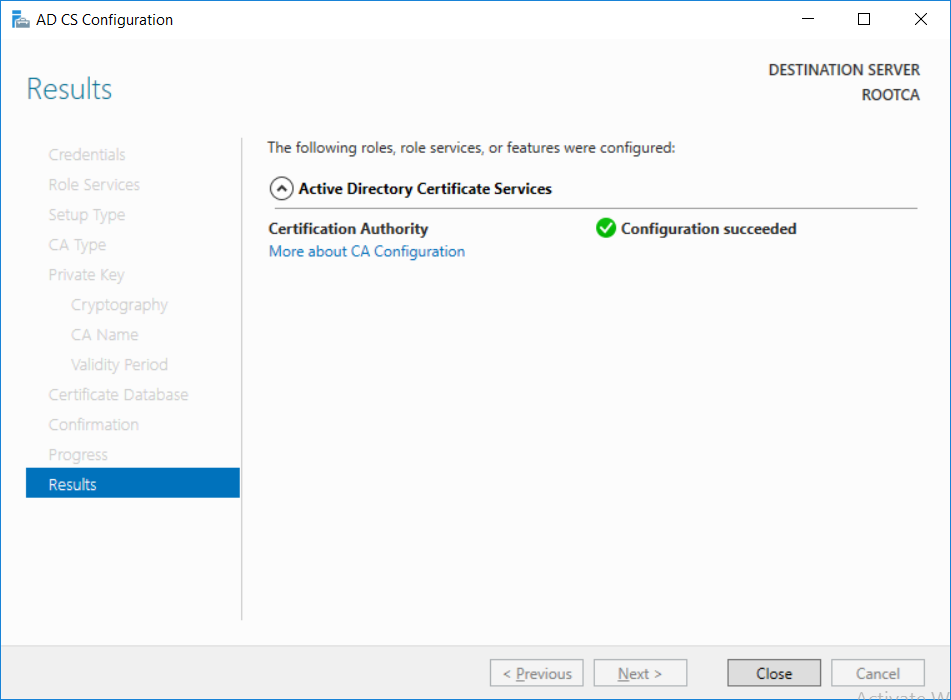
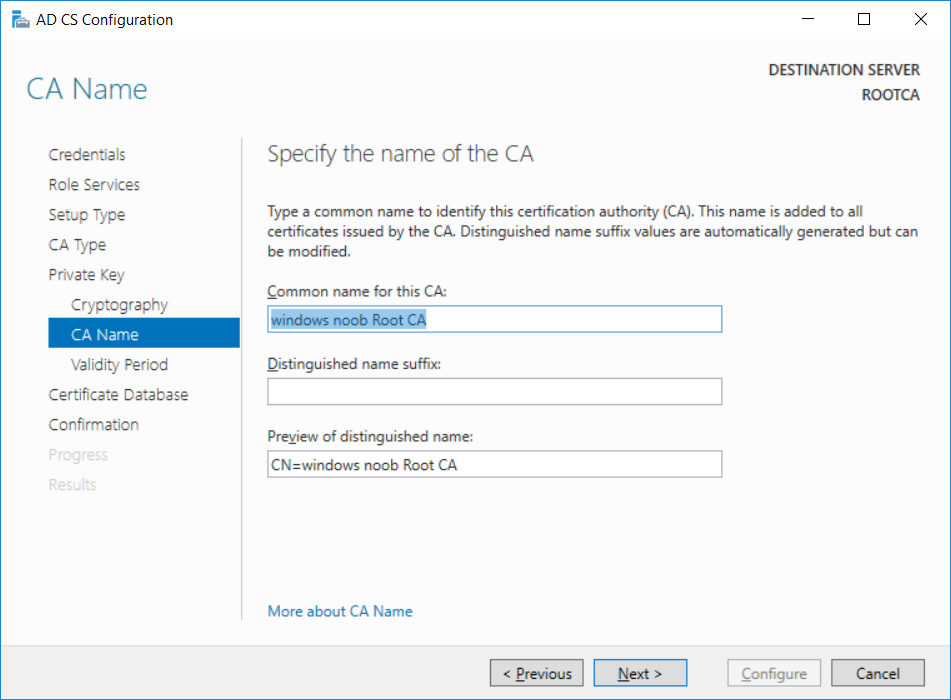
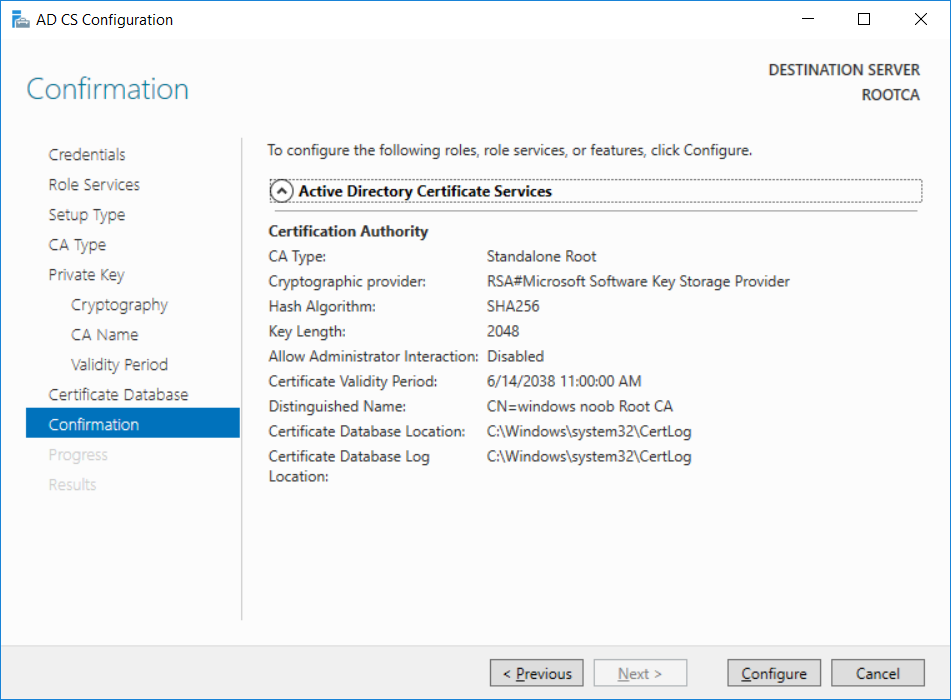
This series is comprised of different parts, listed below. Part 1 - Introduction and server setup Part 2 - Install and do initial configuration on the Standalone Offline Root CA (this part) Part 3 - Prepare the HTTP Web server for CDP and AIA Publication Part 4 - Post configuration on the Standalone Offline Root CA Part 5 - Installing the Enterprise Issuing CA Part 6 - Perform post installation tasks on the Issuing CA Part 7 - Install and configure the OCSP Responder role service Part 8 - Configure AutoEnroll and Verify PKI health In part 1 of this series, you configured your LAB for a 2 tier PKI hierarchy running on Windows Server 2016. You used PowerShell to create some virtual machines, and then installed Windows Server 2016, Windows 10 Enterprise version 1803 and optionally Smoothwall 3.1 before configuring the IP address scheme and Computer Names on the virtual machines. Finally you configured ADDS on DC01 so that you have a working Domain Controller for the rest of this LAB. In this part you'll install and do initial configuration on the Standalone Offline Root CA. What is a Standalone Offline Root CA ? If you've never dealt with PKI before you are probably wondering what a Standalone Offline Root CA is and why do you need it. I'll quote the following paragraph from the excellently written article about a Standalone Offline Root CA here. If you don't read the article itself, at least read the Quote below. To cut a long story short, you should use a Standalone Offline Root CA because it lowers the possibility of compromise and ensures reliability of your Certificate Authority infrastructure. Step 1. Create a CAPolicy.inf file Before installing the Standalone Offline Root CA, you should create a CAPolicy.inf to define 'default' settings for CA templates, some of these settings cannot be changed later and you want them in place before creating any certificates on the Standalone Offline Root CA. So now that you know that you should create the file as a first step, let's go and do that. On the #11_RootCA virtual machine (RootCA), login as Administrator using the password specified. Open an administrative command prompt and type the following: notepad C:\Windows\CAPolicy.inf and press ENTER, when prompted to create new file, click Yes. Paste in the following text into the new CAPolicy.inf file. [Version] Signature="$Windows NT$" [Certsrv_Server] RenewalKeyLength=4096 RenewalValidityPeriod=Years RenewalValidityPeriodUnits=20 AlternateSignatureAlgorithm=0 Once done, save the file. Note: Any misspellings or mistakes will be ignored, so please copy/paste carefully. To understand what these values are, and why you are using them please see the following link, but in a nutshell, you are telling the CA that by default the Root CA should issue certificates that are valid for 20 years, feel free to adjust accordingly if you think it's appropriate but be aware of the consequences (having to re-issue certificates etc.). I'd recommend your verify that the file is indeed correctly named and in the C:\Windows folder. You don't want .TXT appended to it or it will be ignored. To verify, do the following: dir C:\Windows\Capolicy.* The file has the right name and is in the right location. Step 2. Install Active Directory Certificate Services Now that you've created the CAPolicy.inf file you are ready to install Active Directory Certificate Services on the Standalone Offline Root CA. To do so, open Server Manager and select Add Roles and Features. Click Next and select Role-based or feature-based installation. Click Next and Select Select a server from the server pool, ensure that ROOTCA is selected. Click Next and select Active Directory Certificate Services from the choices available on the Select server roles page, if prompted to Add features that are required for Active Directory Certificate Services, click Add features. And here you see the Active Directory Certificate Services role is selected. Click Next to continue. on the Select features screen, click Next. Click Next, On the Active Directory Certificate Services introduction page, read the Things to note before clicking on Next. Insure that Certificate Authority is selected on the Confirmation screen, click on Install. Wait for the installation progress to finish successfully before clicking on Close. Click Close to close the wizard. Step 3. Configure Active Directory Certificate Services After the installation succeeded in the previous step, click on Configure Active Directory Certificate Services on the destination server in Server Manager. On the Specify credentials to configure role services screen, ensure your credentials are ROOTCA\Administrator and then click Next. Select the Certificate Authority role to configure… by default it is not selected. Click Next and select Standalone CA Click Next and on the Specify the type of the CA select Root CA Click Next. On the Specify the type of private key select Create a new private key and click Next. On the Specify the cryptographic options screen pay attention to the settings before clicking Next. For example, ensure that sha-256 is selected as sha-1 is dead (3). The key length defaults to 2048 but only change to 4096 if you are sure it doesn't break communication with your Switches and legacy applications. On the Specify the name for this CA, change Common Name for this CA to suit your needs, for example enter the following windows noob Root CA but do not change the other values. For more info about the CA Name see here (4). Click Next. On the Specify the validity period page, select 20 years instead of the default of 5. Click Next. On the Specify the database locations click Next. On the Confirmation screen review the details and change if necessary or if you are satisfied, click Configure. and you should see Configuration Succeeded. Click Close when done. Configuring the above with PowerShell To configure the above using PowerShell, use the following commands. First install the ADCS role Add-WindowsFeature Adcs-Cert-Authority -IncludeManagementTools Edit as necessary before running the below (which configures the ADCS role). Install-AdcsCertificationAuthority -CAType StandaloneRootCA -CACommonName "windows noob Root CA" -KeyLength 2048 -HashAlgorithm SHA256 -CryptoProviderName "RSA#Microsoft Software Key Storage Provider" -ValidityPeriod Years -ValidityPeriodUnits 20 -Force That's it for this part, in Part 3 you'll configure the Web server for CDP and AIA Publication. Recommended reading (1) - https://social.technet.microsoft.com/wiki/contents/articles/2900.offline-root-certification-authority-ca.aspx (2) - https://docs.microsoft.com/en-us/windows-server/networking/core-network-guide/cncg/server-certs/prepare-the-capolicy-inf-file (3) - https://blogs.technet.microsoft.com/askpfeplat/2015/03/15/sha-1-deprecation-and-changing-the-root-cas-hash-algorithm/ (4) - http://go.microsoft.com/fwlink/?LinkId=218063
-
- common name
- sha-1
-
(and 4 more)
Tagged with:
-
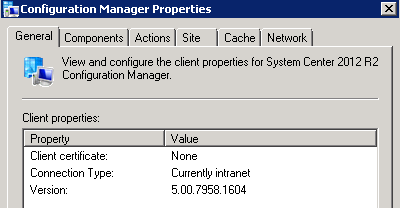
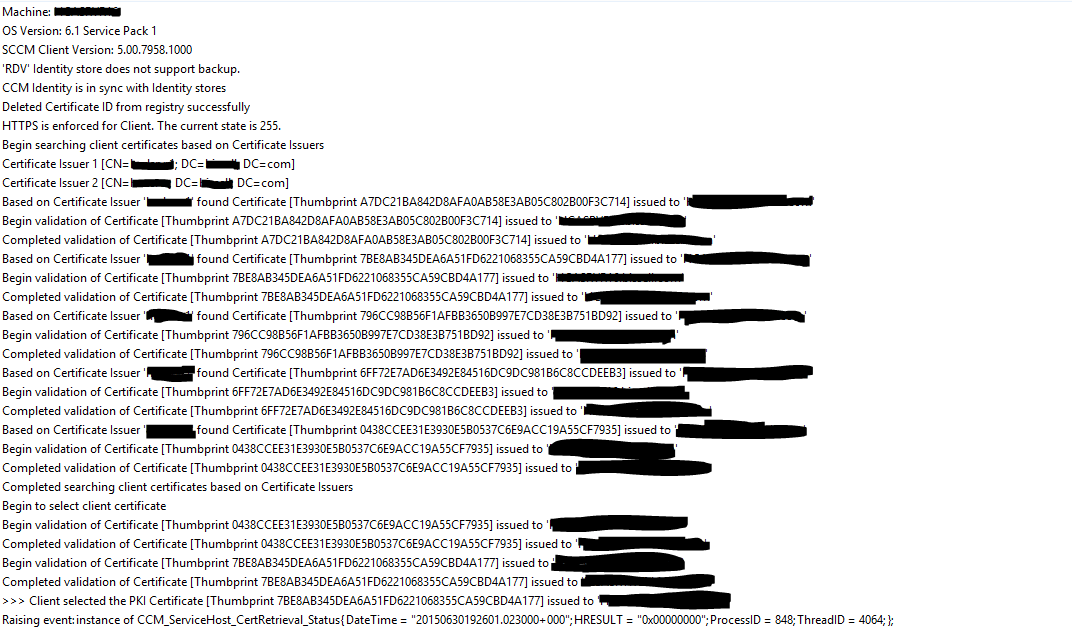
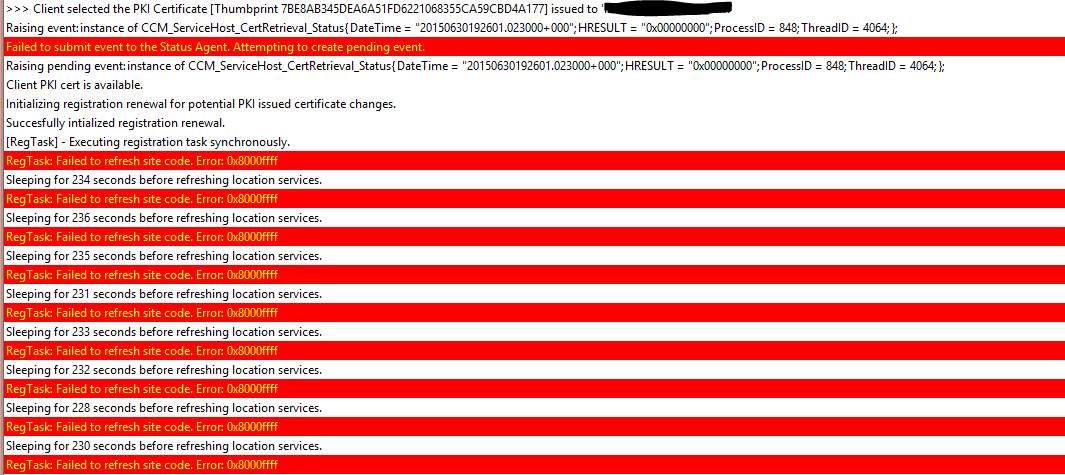
Hello WN community! I have a bit of stumper I was hoping to get some feedback on! Let me know what you think... Scenario: We're running SCCM 2012 now for a little over a year, problem free. We've noticed however, that randomly (about 10 out of 1000 clients) the SCCM Client is reporting that the PKI certificate is none. What's stranger still, is that in the ClientIDManagerStartup.log, it doesn't appear to have an issue detecting and selecting the PKI certificate... Directly after the client selects the Cert, the ClientIDManagerStartup.log fills up with this repeating for ages I have ran a repair on the client, same result. I checked to see if perhaps the clients were stuck in provisioning mode, and they're not. Sort of at a loss of what to check next! Any help would be greatly appreciated. Thanks
-
This list of guides is a living index covering Windows 365 Cloud PC, Microsoft Intune or Configuration Manager. The Configuration Manager Current Branch releases are meant for your production deployments and the Technical Preview releases are for testing new upcoming features in the product, and are aimed at Lab use only. The PKI guides are added as https communication within ConfigMgr and Intune is desired. These guides are broken down into different sections: Windows 365 Microsoft Intune Configuration Manager - Current Branch Configuration Manager - Technical Preview Setting up PKI Note: The guides in each section are (mostly) sorted in the direction of oldest first. Windows 365 How can I delete a Windows 365 Cloud PC How can I use multiple monitors with Windows 365 Using Windows 365 with Linux Introducing the Windows 365 App How can I resize a Windows 365 Cloud PC USA Windows 365 User Group session – video available Windows 365 – Your connection failed – Error Code 0x3000047 How can I configure alerts for Windows 365 activity in Intune Getting started with Windows 365 - Part 1. Introduction Getting started with Windows 365 - Part 2. Provisioning an Azure Ad Joined Cloud PC Getting started with Windows 365 - Part 3. Provisioning a Hybrid Azure Ad Joined Cloud PC Getting started with Windows 365 - Part 4. Connecting to your Cloud PC Getting started with Windows 365 - Part 5. Managing your Cloud PC Getting started with Windows 365 - Part 6. Point in time restore Getting started with Windows 365 - Part 7. Patching your Cloud PCs with Windows Autopatch Getting started with Windows 365 - Part 8. Windows 365 boot Getting started with Windows 365 - Part 9. Windows 365 switch Getting started with Windows 365 - Part 10. Windows 365 offline Windows 365 app not connecting try this Using alternate ANCs in your Windows 365 provisioning policy Location redirection with Windows 365 Troubleshooting Windows 365 connection issues via the troubleshoot option in the Windows 365 app A quick look at some of the new features in the Windows 365 app An update about location redirection on Windows 365 Cloud PCs Windows 365 end user improvements - open in browser, open in desktop app Windows 365 web client can now use your camera New video: Windows 365 Switch in action Windows 365 boot and Windows 365 switch go GA! Automating Windows 365 part 1 - Introducing Graph and setting up Visual Studio code Automating Windows 365 part 2 - Using Graph X-Ray Automating Windows 365 part 3 - Provisioning Cloud PC's Automating Windows 365 part 4 - Managing your Cloud PC Automating Windows 365 part 5 - Cloud PC reports A quick look at Windows 365 Boot dedicated mode A quick look at Windows 365 Boot shared mode Getting more out of Windows 365 – Windows 365 Boot Getting more out of Windows 365 – Windows 365 GPU Getting more out of Windows 365 – Windows 365 Frontline Getting more out of Windows 365 – Windows 365 Switch Getting more out of Windows 365 – Securing your Windows 365 PC’s Updating the Windows app to the latest version A quick look at using Windows 365 Cloud PC’s via Motorola Thinkphone Microsoft Intune How can I find out version info about Intune Preview in Azure ? How can I unlock Windows Holographic for Business features in Intune Preview? How can I determine how long a blade loads in Intune Preview in Azure ? How can I check the status of my Intune service ? Intune Preview in Azure get’s a new look and Software Updates for Windows 10 ! What is Windows Information Protection and how can I use it to protect Enterprise data on Windows 10 devices using Intune Using Intune to enable WIP to protect Enterprise data on Windows 10 devices (MAM-WE) Getting started with Microsoft Graph and using PowerShell to automate things in Intune How can I integrate Microsoft Store for Business with Intune in Azure How can I create a dynamic group containing all Windows 10 version 1709 in Intune in Azure ? How can I enable MDM auto-enrollment in Azure How can I customize the start screen in Windows 10 using Intune How can I use Windows AutoPilot with a Proxy ? Troubleshooting “Something went wrong error 801c0003” during enrollment via Windows AutoPilot and Microsoft Intune Configuring BitLocker in Intune - Part 1. Configuring BitLocker Configuring BitLocker in Intune - Part 2. Automating Encryption Configuring BitLocker in Intune - Part 3. Testing the scripts How can I send notification messages using PowerShell in Microsoft Intune How can I deploy custom favorites in Microsoft Edge to Windows 10 devices using Microsoft Intune Managing devices with Microsoft Intune: What’s new and what’s next – my notes (Part 1 – new features) Managing devices with Microsoft Intune: What’s new and what’s next – my notes (Part 2 – iOS) Managing devices with Microsoft Intune: What’s new and what’s next – my notes (Part 3 – Android) Managing devices with Microsoft Intune: What’s new and what’s next – my notes (Part 4 – macOS) Managing devices with Microsoft Intune: What’s new and what’s next – my notes (Part 5 – Windows) Learn how to leverage Intune support for Microsoft Graph and PowerShell to enable powerful automation and IT security- my notes How Microsoft uses Intune internally to manage Windows devices Android device management with Microsoft Intune – Part 1. Partnerships Android device management with Microsoft Intune – Part 2. Deployment Scenarios Android device management with Microsoft Intune – Part 3. Dedicated device management Android device management with Microsoft Intune – Part 4. Coming soon and what’s new How can I create dynamic groups for different HoloLens devices in Microsoft Intune Troubleshooting app deployment in Windows Autopilot Configuring the Registered Owner and Organization in Windows Autopilot delivered PCs Removing company data from Endpoint Manager enrolled phones Office 365 issues after Windows Autopilot Displaying a welcome page after Windows Autopilot completes Adding devices to an Azure AD group after Windows Autopilot is complete - part 1 Adding devices to an Azure AD group after Windows Autopilot is complete - part 2 Gathering logs and sending an email when resetting Windows Autopilot - part 1 Gathering logs and sending an email when you need to reset Windows Autopilot - part 2 Gathering logs and sending an email when you need to reset Windows Autopilot - part 3 Adding devices or users to an Azure AD group after Windows Autopilot is complete but only when the device is marked as Compliant Using the updated & secure Retire My PC app via Company Portal Prompting standard users to confirm or change Regional, Time Zone and Country settings after Windows Autopilot enrollment is complete Encrypting devices during Windows Autopilot provisioning (WhiteGlove) - Part 1 Encrypting devices during Windows Autopilot provisioning (WhiteGlove) - Part 2 Encrypting devices during Windows Autopilot provisioning (WhiteGlove) - Part 3 https://www.niallbrady.com/2024/04/06/pc-buyback-for-windows-autopilot-devices-part-2/ PC Buyback for Windows Autopilot devices – part 1 PC Buyback for Windows Autopilot devices – part 2 PC Buyback for Windows Autopilot devices – part 3 Deploying KB5030310 to devices as a Win32 app for Copilot Using remediation scripts to automate a setting for Copilot How can I disable Copilot ? Getting started with Azure Key Vault Configuration Manager Current Branch Installation - How can I install System Center Configuration Manager (Current Branch) Configuring Discovery - How can I configure discovery for System Center Configuration Manager (Current Branch) Configuring Boundaries - How can I configure boundaries in System Center Configuration Manager (Current Branch) Using Updates and Servicing in Offline mode - How can I use Updates and Servicing in Offline mode in System Center Configuration Manager (Current Branch) Using Updates and Servicing in Online mode - How can I use Updates and Servicing in Online mode in System Center Configuration Manager (Current Branch) Setting up the Software Update Point - How can I setup Software Updates in System Center Configuration Manager (Current Branch) Installing the Client agent - How can I configure client settings and install the ConfigMgr client agent in System Center Configuration Manager Current Branch Upgrading to System Center Configuration Manager (Current Branch) version 1602 from System Center Configuration Manager (Current Branch) version 1511 How can I use the Upgrade Task Sequence in System Center Configuration Manager (Current Branch) ? How can I use servicing plans in System Center Configuration Manager (Current Branch) to upgrade Windows 10 devices ? How can I deploy Windows 10 with MDT 2013 Update 2 integrated with System Center Configuration Manager (Current Branch) Setting up PKI Part 1 - Introduction and server setup Part 2 - Install and do initial configuration on the Standalone Offline Root CA Part 3 - Prepare the HTTP Web server for CDP and AIA Publication Part 4 - Post configuration on the Standalone Offline Root CA Part 5 - Installing the Enterprise Issuing CA Part 6 - Perform post installation tasks on the Issuing CA Part 7 - Install and configure the OCSP Responder role service Part 8 - Configure AutoEnroll and Verify PKI health How can I configure System Center Configuration Manager in HTTPS mode (PKI) - Part 1 How can I configure System Center Configuration Manager in HTTPS mode (PKI) - Part 2 New video: Fixing expired Root CA CDP and Crypt_E_REVOCATION_OFFLINE problems cheers niall
-
- 4
-

-

-
- current branch
- technical preview
- (and 12 more)
-
Hello Guys!! I'm wonderinf if some of you could help me out with ConfigManager site publishing for internet facing. our site server is configure to use HTTPS only with a working PKI. Site role and ccm clients are all runing very well on the internal. The site system has an externat FQDN configured and that FQDN is published on the internet. DNS entries seem good as well. Is there a tutorial or documentation on publishing my site for internet clients using TMG 2010 or F5? If some of you could helps, i would appreciate a lot
- 1 reply
-
- Internet based
- PKI
-
(and 3 more)
Tagged with:
-
Hello everyone, I’m having issues with workgroup computers, not domain systems when I request a certificate. The domain computers are receiving their certificates via GPO. It’s extremely weird. It has something to do with Windows 7 and Windows 2008 machines. On a 2003 server, I can request a certificate manually with certutil and "see" the certificate template. I copy over the exact command on windows 7 and it can’t "see" the certificate template. The Error --- Template not found. I have the following configuration: CA Enterprise I have created the SCCM Client Certificate I have created the SCCM Web Server Certificate I have created the SCCM Distribution Point Certificate GPO is configured SCCM 2012 R2 CU2 configured to do HTTP and HTTPS Installed SCCM Client Certificate Installed SCCM Web Server Certificate Installed Distribution Point Certificate Deployed to a domain computer good on PKI Workgroup Computers: I’m having issues with deploying certificates Windows 7 – (ERROR) not successful Windows Server 2008 R2 – (ERROR) not successful Windows Server 2003 - successful Windows XP – successful How I’m getting the certs for the clients is by utilizing the following scripts from this URL. http://www.ithierarchy.com/ITH/node/48 I did find a couple of errors in the code, but if it’s working on my Server 2003, then it should work on the others. Windows 7 and Windows 2008 R2 seem to have the same issue. The error I’m getting is the following: Command line requesting the cert ---- CertReq –new –f testcomputer.home.pvt.inf c:\client\testcomputer.home.pvt.req Error --- Template not found. SCCMClientCertificate (this is my template)
-
I have recently just installed SCCM 2012 following the guides provided by Windows-Noob. I used the HTTPS communication, and I am pretty sure all certificates were distributed to clients successfull as I see them Certificates on local machine. I have configured all the boundaries, client discovery, as well as the client push settings. I am using an SCCM account that I am still currently using in my SCCM 2007 environment, and it does indeed have domain admin rights. The 2012 Console does find all the clients, but will not install the client. When I try an isntall the client manually I get the following error: Microsoft Visual C++ Runtime Library Runtime Error! Program: ccmsetup.exe This application has requested the Runtime to terminate it in an unusual way. Please contact the applications's support team for more information. the CCMLog on the client looks like this <![LOG[Performing AD query: '(&(ObjectCategory=mSSMSManagementPoint)(mSSMSDefaultMP=TRUE)(mSSMSSiteCode=TOR))']LOG]!><time="11:49:38.895+240" date="08-19-2014" component="ccmsetup" context="" type="0" thread="1688" file="lsad.cpp:640"> <![LOG[Retrieved 0 MP records from AD for site 'TOR']LOG]!><time="11:49:40.005+240" date="08-19-2014" component="ccmsetup" context="" type="0" thread="1688" file="lsadcache.cpp:287"> <![LOG[Failed to get site version from AD with error 0x87d00215]LOG]!><time="11:49:40.005+240" date="08-19-2014" component="ccmsetup" context="" type="2" thread="1688" file="siteinfo.cpp:578"> <![LOG[siteCode: TOR]LOG]!><time="11:49:40.005+240" date="08-19-2014" component="ccmsetup" context="" type="1" thread="1688" file="ccmsetup.cpp:2051"> <![LOG[siteVersion: ]LOG]!><time="11:49:40.005+240" date="08-19-2014" component="ccmsetup" context="" type="1" thread="1688" file="ccmsetup.cpp:2052"> <![LOG[No MPs were specified from commandline or the mobileclient.tcf.]LOG]!><time="11:49:40.005+240" date="08-19-2014" component="ccmsetup" context="" type="1" thread="1688" file="ccmsetup.cpp:9730"> <![LOG[Downloading file ccmsetup.cab]LOG]!><time="11:49:40.005+240" date="08-19-2014" component="ccmsetup" context="" type="1" thread="1688" file="ccmsetup.cpp:5569"> <![LOG[Determining source location...]LOG]!><time="11:49:40.005+240" date="08-19-2014" component="ccmsetup" context="" type="1" thread="1688" file="ccmsetup.cpp:5419"> <![LOG[Found accessible source: C:\Windows\SysWOW64\CCM\Cache\INF00006.1.System]LOG]!><time="11:49:40.005+240" date="08-19-2014" component="ccmsetup" context="" type="1" thread="1688" file="ccmsetup.cpp:5489"> <![LOG[Found available source C:\Windows\SysWOW64\CCM\Cache\INF00006.1.System\]LOG]!><time="11:49:40.005+240" date="08-19-2014" component="ccmsetup" context="" type="1" thread="1688" file="ccmsetup.cpp:5505"> <![LOG[Downloading C:\Windows\SysWOW64\CCM\Cache\INF00006.1.System\ccmsetup.cab to C:\Windows\ccmsetup\ccmsetup.cab]LOG]!><time="11:49:40.005+240" date="08-19-2014" component="ccmsetup" context="" type="1" thread="1688" file="ccmsetup.cpp:5653"> <![LOG[File download 100% complete (9513 of 9513 bytes).]LOG]!><time="11:49:40.161+240" date="08-19-2014" component="ccmsetup" context="" type="0" thread="1688" file="ccmsetup.cpp:8848"> <![LOG[Deleted file C:\Windows\ccmsetup\ccmsetup.cab]LOG]!><time="11:49:40.255+240" date="08-19-2014" component="ccmsetup" context="" type="1" thread="1688" file="ccmsetup.cpp:9156"> <![LOG[Download complete.]LOG]!><time="11:49:40.255+240" date="08-19-2014" component="ccmsetup" context="" type="1" thread="1688" file="ccmsetup.cpp:5751"> <![LOG[C:\Windows\ccmsetup\ccmsetup.cab is Microsoft trusted.]LOG]!><time="11:50:05.895+240" date="08-19-2014" component="ccmsetup" context="" type="1" thread="1688" file="util.cpp:1309"> <![LOG[successfully extracted manifest file C:\Windows\ccmsetup\ccmsetup.xml from file C:\Windows\ccmsetup\ccmsetup.cab.]LOG]!><time="11:50:06.239+240" date="08-19-2014" component="ccmsetup" context="" type="1" thread="1688" file="ccmsetup.cpp:6554"> <![LOG[Loading manifest file: C:\Windows\ccmsetup\ccmsetup.xml]LOG]!><time="11:50:06.239+240" date="08-19-2014" component="ccmsetup" context="" type="1" thread="1688" file="manifest.cpp:153"> <![LOG[successfully loaded ccmsetup manifest file.]LOG]!><time="11:50:07.708+240" date="08-19-2014" component="ccmsetup" context="" type="1" thread="1688" file="manifest.cpp:171"> <![LOG[Checking if manifest version '5.00.7804.1000' is newer than the ccmsetup version '5.0.7804.1000']LOG]!><time="11:50:07.708+240" date="08-19-2014" component="ccmsetup" context="" type="1" thread="1688" file="ccmsetup.cpp:10140"> <![LOG[Running from temp downloaded folder or manifest is not newer than ccmsetup.]LOG]!><time="11:50:07.708+240" date="08-19-2014" component="ccmsetup" context="" type="1" thread="1688" file="ccmsetup.cpp:2188"> <![LOG[item 'i386/vcredist_x86.exe' is applicable. Add to the list.]LOG]!><time="11:50:07.817+240" date="08-19-2014" component="ccmsetup" context="" type="1" thread="1688" file="manifest.cpp:343"> <![LOG[item 'x64/vcredist_x64.exe' is applicable. Add to the list.]LOG]!><time="11:50:07.817+240" date="08-19-2014" component="ccmsetup" context="" type="1" thread="1688" file="manifest.cpp:343"> <![LOG[item 'i386/vc50727_x86.exe' is not applicable.]LOG]!><time="11:50:07.817+240" date="08-19-2014" component="ccmsetup" context="" type="1" thread="1688" file="manifest.cpp:348"> <![LOG[item 'x64/vc50727_x64.exe' is applicable. Add to the list.]LOG]!><time="11:50:07.817+240" date="08-19-2014" component="ccmsetup" context="" type="1" thread="1688" file="manifest.cpp:343"> <![LOG[item 'i386/WindowsUpdateAgent30-x86.exe' is not applicable.]LOG]!><time="11:50:07.817+240" date="08-19-2014" component="ccmsetup" context="" type="1" thread="1688" file="manifest.cpp:348"> <![LOG[item 'x64/WindowsUpdateAgent30-x64.exe' is applicable. Add to the list.]LOG]!><time="11:50:07.817+240" date="08-19-2014" component="ccmsetup" context="" type="1" thread="1688" file="manifest.cpp:343"> <![LOG[item 'i386/msxml6.msi' is not applicable.]LOG]!><time="11:50:07.817+240" date="08-19-2014" component="ccmsetup" context="" type="1" thread="1688" file="manifest.cpp:348"> <![LOG[item 'x64/msxml6_x64.msi' is applicable. Add to the list.]LOG]!><time="11:50:07.817+240" date="08-19-2014" component="ccmsetup" context="" type="1" thread="1688" file="manifest.cpp:343"> <![LOG[item 'i386/msrdcoob_x86.exe' is not applicable.]LOG]!><time="11:50:07.817+240" date="08-19-2014" component="ccmsetup" context="" type="1" thread="1688" file="manifest.cpp:348"> <![LOG[item 'x64/msrdcoob_amd64.exe' is not applicable.]LOG]!><time="11:50:07.817+240" date="08-19-2014" component="ccmsetup" context="" type="1" thread="1688" file="manifest.cpp:348"> <![LOG[item 'pkgmgr.exe' is not applicable.]LOG]!><time="11:50:07.817+240" date="08-19-2014" component="ccmsetup" context="" type="1" thread="1688" file="manifest.cpp:348"> <![LOG[item 'dism.exe' is applicable. Add to the list.]LOG]!><time="11:50:07.817+240" date="08-19-2014" component="ccmsetup" context="" type="1" thread="1688" file="manifest.cpp:343"> <![LOG[item 'wimgapi.msi' is not applicable.]LOG]!><time="11:50:07.817+240" date="08-19-2014" component="ccmsetup" context="" type="1" thread="1688" file="manifest.cpp:348"> <![LOG[item 'i386/MicrosoftPolicyPlatformSetup.msi' is not applicable.]LOG]!><time="11:50:07.817+240" date="08-19-2014" component="ccmsetup" context="" type="1" thread="1688" file="manifest.cpp:348"> <![LOG[item 'x64/MicrosoftPolicyPlatformSetup.msi' is applicable. Add to the list.]LOG]!><time="11:50:07.817+240" date="08-19-2014" component="ccmsetup" context="" type="1" thread="1688" file="manifest.cpp:343"> <![LOG[item 'i386/WindowsFirewallConfigurationProvider.msi' is not applicable.]LOG]!><time="11:50:07.817+240" date="08-19-2014" component="ccmsetup" context="" type="1" thread="1688" file="manifest.cpp:348"> <![LOG[item 'x64/WindowsFirewallConfigurationProvider.msi' is applicable. Add to the list.]LOG]!><time="11:50:07.817+240" date="08-19-2014" component="ccmsetup" context="" type="1" thread="1688" file="manifest.cpp:343"> <![LOG[item 'i386/Silverlight.exe' is applicable. Add to the list.]LOG]!><time="11:50:07.817+240" date="08-19-2014" component="ccmsetup" context="" type="1" thread="1688" file="manifest.cpp:343"> <![LOG[item 'i386/wic_x86_enu.exe' is not applicable.]LOG]!><time="11:50:07.817+240" date="08-19-2014" component="ccmsetup" context="" type="1" thread="1688" file="manifest.cpp:348"> <![LOG[item 'x64/wic_x64_enu.exe' is not applicable.]LOG]!><time="11:50:07.817+240" date="08-19-2014" component="ccmsetup" context="" type="1" thread="1688" file="manifest.cpp:348"> <![LOG[item 'i386/dotNetFx40_Client_x86_x64.exe' is applicable. Add to the list.]LOG]!><time="11:50:07.817+240" date="08-19-2014" component="ccmsetup" context="" type="1" thread="1688" file="manifest.cpp:343"> <![LOG[item 'SCEPInstall.exe' is applicable. Add to the list.]LOG]!><time="11:50:07.817+240" date="08-19-2014" component="ccmsetup" context="" type="1" thread="1688" file="manifest.cpp:343"> <![LOG[item 'i386/client.msi' is not applicable.]LOG]!><time="11:50:07.817+240" date="08-19-2014" component="ccmsetup" context="" type="1" thread="1688" file="manifest.cpp:348"> <![LOG[item 'x64/client.msi' is applicable. Add to the list.]LOG]!><time="11:50:07.817+240" date="08-19-2014" component="ccmsetup" context="" type="1" thread="1688" file="manifest.cpp:343"> <![LOG[Default CSP is Microsoft Enhanced RSA and AES Cryptographic Provider]LOG]!><time="11:50:07.817+240" date="08-19-2014" component="ccmsetup" context="" type="0" thread="1688" file="ccmutillib.cpp:1355"> <![LOG[Default CSP Type is 24]LOG]!><time="11:50:07.817+240" date="08-19-2014" component="ccmsetup" context="" type="0" thread="1688" file="ccmutillib.cpp:1356"> <![LOG[Discovering whether item 'i386/vcredist_x86.exe' exists.]LOG]!><time="11:50:07.817+240" date="08-19-2014" component="ccmsetup" context="" type="1" thread="1688" file="manifest.cpp:582"> <![LOG[Couldn't find a product with MSI product code '{1F1C2DFC-2D24-3E06-BCB8-725134ADF989}' in the MSI database.]LOG]!><time="11:50:07.817+240" date="08-19-2014" component="ccmsetup" context="" type="1" thread="1688" file="manifest.cpp:868"> <![LOG[item i386/vcredist_x86.exe has not been installed yet. Put to pending install list.]LOG]!><time="11:50:07.817+240" date="08-19-2014" component="ccmsetup" context="" type="1" thread="1688" file="manifest.cpp:638"> <![LOG[Discovering whether item 'x64/vcredist_x64.exe' exists.]LOG]!><time="11:50:07.817+240" date="08-19-2014" component="ccmsetup" context="" type="1" thread="1688" file="manifest.cpp:582"> <![LOG[Couldn't find a product with MSI product code '{4B6C7001-C7D6-3710-913E-5BC23FCE91E6}' in the MSI database.]LOG]!><time="11:50:07.817+240" date="08-19-2014" component="ccmsetup" context="" type="1" thread="1688" file="manifest.cpp:868"> <![LOG[item x64/vcredist_x64.exe has not been installed yet. Put to pending install list.]LOG]!><time="11:50:07.817+240" date="08-19-2014" component="ccmsetup" context="" type="1" thread="1688" file="manifest.cpp:638"> <![LOG[Discovering whether item 'x64/vc50727_x64.exe' exists.]LOG]!><time="11:50:07.817+240" date="08-19-2014" component="ccmsetup" context="" type="1" thread="1688" file="manifest.cpp:582"> <![LOG[Couldn't find a product with MSI upgrade code '{A8D19029-8E5C-4E22-8011-48070F9E796E}' in the MSI database.]LOG]!><time="11:50:07.817+240" date="08-19-2014" component="ccmsetup" context="" type="1" thread="1688" file="manifest.cpp:855"> <![LOG[item x64/vc50727_x64.exe has not been installed yet. Put to pending install list.]LOG]!><time="11:50:07.817+240" date="08-19-2014" component="ccmsetup" context="" type="1" thread="1688" file="manifest.cpp:638"> <![LOG[Discovering whether item 'x64/WindowsUpdateAgent30-x64.exe' exists.]LOG]!><time="11:50:07.817+240" date="08-19-2014" component="ccmsetup" context="" type="1" thread="1688" file="manifest.cpp:582"> <![LOG[Checking file 'C:\Windows\system32\wuapi.dll' version '7.5.7601.17514' expecting >= '7.4.7600.226'.]LOG]!><time="11:50:08.099+240" date="08-19-2014" component="ccmsetup" context="" type="0" thread="1688" file="manifest.cpp:1295"> <![LOG[Detected item 'x64/WindowsUpdateAgent30-x64.exe']LOG]!><time="11:50:08.099+240" date="08-19-2014" component="ccmsetup" context="" type="1" thread="1688" file="manifest.cpp:643"> <![LOG[Discovering whether item 'x64/msxml6_x64.msi' exists.]LOG]!><time="11:50:08.099+240" date="08-19-2014" component="ccmsetup" context="" type="1" thread="1688" file="manifest.cpp:582"> <![LOG[Checking file 'C:\Windows\system32\msxml6.dll' version '6.30.7601.17514' expecting >= '6.10.1129.0'.]LOG]!><time="11:50:08.099+240" date="08-19-2014" component="ccmsetup" context="" type="0" thread="1688" file="manifest.cpp:1295"> <![LOG[Detected item 'x64/msxml6_x64.msi']LOG]!><time="11:50:08.099+240" date="08-19-2014" component="ccmsetup" context="" type="1" thread="1688" file="manifest.cpp:643"> <![LOG[Discovering whether item 'dism.exe' exists.]LOG]!><time="11:50:08.099+240" date="08-19-2014" component="ccmsetup" context="" type="1" thread="1688" file="manifest.cpp:582"> <![LOG[File 'C:\Windows\system32\msrdc.dll' exists. Discovery passed]LOG]!><time="11:50:08.145+240" date="08-19-2014" component="ccmsetup" context="" type="0" thread="1688" file="manifest.cpp:1267"> <![LOG[Detected item 'dism.exe']LOG]!><time="11:50:08.145+240" date="08-19-2014" component="ccmsetup" context="" type="1" thread="1688" file="manifest.cpp:643"> <![LOG[Discovering whether item 'x64/MicrosoftPolicyPlatformSetup.msi' exists.]LOG]!><time="11:50:08.145+240" date="08-19-2014" component="ccmsetup" context="" type="1" thread="1688" file="manifest.cpp:582"> <![LOG[Couldn't find a product with MSI upgrade code '{19B9818B-7432-49E9-BC02-B126025EE235}' in the MSI database.]LOG]!><time="11:50:08.145+240" date="08-19-2014" component="ccmsetup" context="" type="1" thread="1688" file="manifest.cpp:855"> <![LOG[item x64/MicrosoftPolicyPlatformSetup.msi has not been installed yet. Put to pending install list.]LOG]!><time="11:50:08.145+240" date="08-19-2014" component="ccmsetup" context="" type="1" thread="1688" file="manifest.cpp:638"> <![LOG[Discovering whether item 'x64/WindowsFirewallConfigurationProvider.msi' exists.]LOG]!><time="11:50:08.161+240" date="08-19-2014" component="ccmsetup" context="" type="1" thread="1688" file="manifest.cpp:582"> <![LOG[Validated file 'C:\Windows\ccmsetup\WindowsFirewallConfigurationProvider.msi' hash '3BF0651FD4A01170925CEF694468D4EF6F64D76FD3413DEBD14CB8DE019AA10E']LOG]!><time="11:50:08.489+240" date="08-19-2014" component="ccmsetup" context="" type="0" thread="1688" file="util.cpp:2399"> <![LOG[File 'C:\Windows\ccmsetup\WindowsFirewallConfigurationProvider.msi' exists. Discovery passed]LOG]!><time="11:50:08.489+240" date="08-19-2014" component="ccmsetup" context="" type="0" thread="1688" file="manifest.cpp:1267"> <![LOG[Detected item 'x64/WindowsFirewallConfigurationProvider.msi']LOG]!><time="11:50:08.489+240" date="08-19-2014" component="ccmsetup" context="" type="1" thread="1688" file="manifest.cpp:643"> <![LOG[Discovering whether item 'i386/Silverlight.exe' exists.]LOG]!><time="11:50:08.489+240" date="08-19-2014" component="ccmsetup" context="" type="1" thread="1688" file="manifest.cpp:582"> <![LOG[32-bit Hive selected]LOG]!><time="11:50:08.489+240" date="08-19-2014" component="ccmsetup" context="" type="1" thread="1688" file="manifest.cpp:965"> <![LOG[item i386/Silverlight.exe has not been installed yet. Put to pending install list.]LOG]!><time="11:50:08.489+240" date="08-19-2014" component="ccmsetup" context="" type="1" thread="1688" file="manifest.cpp:638"> <![LOG[Discovering whether item 'i386/dotNetFx40_Client_x86_x64.exe' exists.]LOG]!><time="11:50:08.489+240" date="08-19-2014" component="ccmsetup" context="" type="1" thread="1688" file="manifest.cpp:582"> <![LOG[Detected item 'i386/dotNetFx40_Client_x86_x64.exe']LOG]!><time="11:50:08.489+240" date="08-19-2014" component="ccmsetup" context="" type="1" thread="1688" file="manifest.cpp:643"> <![LOG[Discovering whether item 'SCEPInstall.exe' exists.]LOG]!><time="11:50:08.489+240" date="08-19-2014" component="ccmsetup" context="" type="1" thread="1688" file="manifest.cpp:582"> <![LOG[Validated file 'C:\Windows\ccmsetup\SCEPInstall.exe' hash '495B488FFCEE7C2D682AC6ABFC62D7F9CCB15E22911BA2B76C41307343E617CC']LOG]!><time="11:50:10.630+240" date="08-19-2014" component="ccmsetup" context="" type="0" thread="1688" file="util.cpp:2399"> <![LOG[Checking file 'C:\Windows\ccmsetup\SCEPInstall.exe' version '4.1.0522.0000' expecting >= '4.1.522.0'.]LOG]!><time="11:50:10.630+240" date="08-19-2014" component="ccmsetup" context="" type="0" thread="1688" file="manifest.cpp:1295"> <![LOG[Detected item 'SCEPInstall.exe']LOG]!><time="11:50:10.630+240" date="08-19-2014" component="ccmsetup" context="" type="1" thread="1688" file="manifest.cpp:643"> <![LOG[Discovering whether item 'x64/client.msi' exists.]LOG]!><time="11:50:10.630+240" date="08-19-2014" component="ccmsetup" context="" type="1" thread="1688" file="manifest.cpp:582"> <![LOG[item x64/client.msi has not been installed yet. Put to pending install list.]LOG]!><time="11:50:10.630+240" date="08-19-2014" component="ccmsetup" context="" type="1" thread="1688" file="manifest.cpp:638"> <![LOG[No client patches are detected.]LOG]!><time="11:50:10.677+240" date="08-19-2014" component="ccmsetup" context="" type="0" thread="1688" file="ccmsetup.cpp:1713"> <![LOG[No client language packs are detected.]LOG]!><time="11:50:10.677+240" date="08-19-2014" component="ccmsetup" context="" type="0" thread="1688" file="ccmsetup.cpp:1754"> <![LOG[searching for available transform]LOG]!><time="11:50:10.677+240" date="08-19-2014" component="ccmsetup" context="" type="1" thread="1688" file="ccmsetup.cpp:1784"> <![LOG[searching for available transform]LOG]!><time="11:50:10.677+240" date="08-19-2014" component="ccmsetup" context="" type="1" thread="1688" file="ccmsetup.cpp:8966"> <![LOG[No transform available for this locale. Installation will proceed with no transformation.]LOG]!><time="11:50:11.192+240" date="08-19-2014" component="ccmsetup" context="" type="1" thread="1688" file="ccmsetup.cpp:1869"> <![LOG[Validated file 'C:\Windows\ccmsetup\vcredist_x86.exe' hash '97C260D35BCFE18E046A1C413B9FC5A2754B8F790F7ACE669A3BE2500C0DF229']LOG]!><time="11:50:11.771+240" date="08-19-2014" component="ccmsetup" context="" type="0" thread="1688" file="util.cpp:2399"> <![LOG[Validated file 'C:\Windows\ccmsetup\vcredist_x64.exe' hash '7451BA5C6C05347789717561E871A303A4D171850790A3CDC99D4DDBF07E320B']LOG]!><time="11:50:12.130+240" date="08-19-2014" component="ccmsetup" context="" type="0" thread="1688" file="util.cpp:2399"> <![LOG[Validated file 'C:\Windows\ccmsetup\vc50727_x64.exe' hash '0551A61C85B718E1FA015B0C3E3F4C4EEA0637055536C00E7969286B4FA663E0']LOG]!><time="11:50:12.396+240" date="08-19-2014" component="ccmsetup" context="" type="0" thread="1688" file="util.cpp:2399"> <![LOG[Validated file 'C:\Windows\ccmsetup\MicrosoftPolicyPlatformSetup.msi' hash '8C42189693C3220017E8C93A79B989EE126ADF33EADBE229011404C123B7B897']LOG]!><time="11:50:12.521+240" date="08-19-2014" component="ccmsetup" context="" type="0" thread="1688" file="util.cpp:2399"> <![LOG[File 'C:\Windows\ccmsetup\Silverlight.exe' with hash '417B442E128D821119008ACEEEE6CDC2A41224377A829B6EC52BABA2724F0151' from manifest doesn't match with the file hash 'E3B0C44298FC1C149AFBF4C8996FB92427AE41E4649B934CA495991B7852B855']LOG]!><time="11:50:12.521+240" date="08-19-2014" component="ccmsetup" context="" type="2" thread="1688" file="util.cpp:2404"> <![LOG[Deleted file C:\Windows\ccmsetup\Silverlight.exe]LOG]!><time="11:50:12.521+240" date="08-19-2014" component="ccmsetup" context="" type="1" thread="1688" file="ccmsetup.cpp:9156"> <![LOG[Validated file 'C:\Windows\ccmsetup\client.msi' hash '2F0819F959E788CF843F42E9CA7B44E258B8B4BA37BB63902DB39ACF747BE7DA']LOG]!><time="11:50:14.474+240" date="08-19-2014" component="ccmsetup" context="" type="0" thread="1688" file="util.cpp:2399"> <![LOG[Downloading file i386\Silverlight.exe]LOG]!><time="11:50:14.474+240" date="08-19-2014" component="ccmsetup" context="" type="1" thread="1688" file="ccmsetup.cpp:5569"> <![LOG[Downloading C:\Windows\SysWOW64\CCM\Cache\INF00006.1.System\i386\Silverlight.exe to C:\Windows\ccmsetup\Silverlight.exe]LOG]!><time="11:50:14.474+240" date="08-19-2014" component="ccmsetup" context="" type="1" thread="1688" file="ccmsetup.cpp:5653"> <![LOG[Download complete.]LOG]!><time="11:50:14.505+240" date="08-19-2014" component="ccmsetup" context="" type="1" thread="1688" file="ccmsetup.cpp:5751"> <![LOG[successfully downloaded client files.]LOG]!><time="11:50:14.505+240" date="08-19-2014" component="ccmsetup" context="" type="1" thread="1688" file="ccmsetup.cpp:1408"> <![LOG[Validated file 'C:\Windows\ccmsetup\vcredist_x86.exe' hash '97C260D35BCFE18E046A1C413B9FC5A2754B8F790F7ACE669A3BE2500C0DF229']LOG]!><time="11:50:14.630+240" date="08-19-2014" component="ccmsetup" context="" type="0" thread="1688" file="util.cpp:2399"> <![LOG[Validated file 'C:\Windows\ccmsetup\vcredist_x64.exe' hash '7451BA5C6C05347789717561E871A303A4D171850790A3CDC99D4DDBF07E320B']LOG]!><time="11:50:14.786+240" date="08-19-2014" component="ccmsetup" context="" type="0" thread="1688" file="util.cpp:2399"> <![LOG[Validated file 'C:\Windows\ccmsetup\vc50727_x64.exe' hash '0551A61C85B718E1FA015B0C3E3F4C4EEA0637055536C00E7969286B4FA663E0']LOG]!><time="11:50:14.864+240" date="08-19-2014" component="ccmsetup" context="" type="0" thread="1688" file="util.cpp:2399"> <![LOG[Validated file 'C:\Windows\ccmsetup\MicrosoftPolicyPlatformSetup.msi' hash '8C42189693C3220017E8C93A79B989EE126ADF33EADBE229011404C123B7B897']LOG]!><time="11:50:14.927+240" date="08-19-2014" component="ccmsetup" context="" type="0" thread="1688" file="util.cpp:2399"> <![LOG[File 'C:\Windows\ccmsetup\Silverlight.exe' with hash '417B442E128D821119008ACEEEE6CDC2A41224377A829B6EC52BABA2724F0151' from manifest doesn't match with the file hash 'E3B0C44298FC1C149AFBF4C8996FB92427AE41E4649B934CA495991B7852B855']LOG]!><time="11:50:14.927+240" date="08-19-2014" component="ccmsetup" context="" type="2" thread="1688" file="util.cpp:2404"> <![LOG[A Fallback Status Point has not been specified. Message with STATEID='325' will not be sent.]LOG]!><time="11:50:14.927+240" date="08-19-2014" component="ccmsetup" context="" type="1" thread="1688" file="ccmsetup.cpp:9428"> <![LOG[CcmSetup failed with error code 0x87d0029e]LOG]!><time="11:50:14.927+240" date="08-19-2014" component="ccmsetup" context="" type="1" thread="1672" file="ccmsetup.cpp:10544"> Please let me know if I require addtional info. Any help is appreciated.
-
- SCCM 2012 Client Install
- SCCM
-
(and 3 more)
Tagged with:
-
Hi guys, I'm running through different topics and technet document in order to properly make my SCCM 2012 R2 infrastructure available to internet based clients. Here the background of the beast: Single Site Setup (All roles on the same machine and additional DP's on the intranet side) PKI Certificates implementation is complete and all server roles have been moved to HTTP communication Now comes the question of the Internet availability and it gets tricky. I currently have a TMG 2010 reverse proxy with a single NIC in a DMZ and not joined to AD. According to Microsoft’s documentation, TMG/ISA servers can do SSL Bridging (which needs to access to AD and specific certificates installed) or SSL Tunneling (this one doesn't work with TMG and is simply forwarding requests to the destination host. It can be done by my firewall but it's also the least secure way of working). I also have seen that installing a dedicated MP/DP in the DMZ is a solution but I’m wondering what the best solution is. In my case, I’d rather avoid messing up with TMG and make ADLDS available in the DMZ while setting up a dedicated MP/DP in the same network. Can some of you let me know what their experience is with IBCM implementation, the solution chosen, etc? Thanks for sharing, Fed
-
Hello, all. This is my first post here, and I'm in need of some assistance from some System Center experts. We are looking at possibly deploying Internet Based Management in our SCCM 2012 environment, but it looks like we can't do it when we push the upgrade from 2007 to production. We do NOT have Internet Based Management in our current SCCM 2007 environment. The scenario we would most likely use is having the MP in our intranet and using a reverse proxy server with PKI to allow Internet clients to authenticate into our network. We have an F5 that would handle the traffic coming in, and the incoming https connections would terminate there and then be sent from the F5 back to the internal MP. Question 1) Can we do this after our SCCM 2012 environment is up and running in production? If so, what do we need to do to make it happen? Should we go ahead and create the Workstation Certs and the Web Server Certs now, or can all of the certificate creation wait until we're at the point of setting up Internet Based Management? Question 2) Will any roles need to be recreated when we implement Internet Based Management if it's done later, or will we need to rework our hierarchy? We want to avoid that as much as possible. Question 3) Can documentation be provided for the above answers (i.e. technet or something similar)? Thank you SO MUCH. I appreciate it!! Sarah
- 2 replies
-
- internet based
- pki
-
(and 3 more)
Tagged with:
-
I am having great problems trying to install SCCM 2012 client onto a computer with a network connection to the internet, but NOT a member of a domain. i am using the PKI setup within SCCM2012 and have created a RootCA and deployed certificates throughout the local AD and assigned to Group Policies. The machines on the local AD network which receive the policies seem to have a great "handshake" and end up connecting to SCCM and appearing in the main console. Laptops, Computers that are roaming, and not part of my local AD Network are not having such a good time. i believe it is the Certificate communication which is not working. i am exporting the Certificate from the "Certificate Services" within SCCM Server, and then copying this file over to the clients using a USB key. i am then importing the certificate with Private keys into their local certificate store, and all appears fine. until i run ccmsetp.exe. Excerpt from the ccmsetup.log attached, i need ur help <![LOG[Only one MP https://syna01vsscc001d.syn.local is specified. Use it.]LOG]!><time="15:46:04.339-60" date="06-15-2012" component="ccmsetup" context="" type="1" thread="7832" file="ccmsetup.cpp:8763"> <![LOG[Have already tried all MPs. Couldn't find DP locations.]LOG]!><time="15:46:04.339-60" date="06-15-2012" component="ccmsetup" context="" type="3" thread="7832" file="ccmsetup.cpp:9647"> <![LOG[GET 'https://syna01vsscc001d.syn.local/CCM_Client/ccmsetup.cab']LOG]!><time="15:46:04.339-60" date="06-15-2012" component="ccmsetup" context="" type="1" thread="7832" file="httphelper.cpp:802"> <![LOG[begin searching client certificates based on Certificate Issuers]LOG]!><time="15:46:04.340-60" date="06-15-2012" component="ccmsetup" context="" type="1" thread="7832" file="ccmcert.cpp:3759"> <![LOG[Completed searching client certificates based on Certificate Issuers]LOG]!><time="15:46:04.340-60" date="06-15-2012" component="ccmsetup" context="" type="1" thread="7832" file="ccmcert.cpp:3918"> <![LOG[begin to select client certificate]LOG]!><time="15:46:04.340-60" date="06-15-2012" component="ccmsetup" context="" type="1" thread="7832" file="ccmcert.cpp:3999"> <![LOG[The 'Certificate Selection Criteria' was not specified, counting number of certificates present in 'MY' store of 'Local Computer'.]LOG]!><time="15:46:04.340-60" date="06-15-2012" component="ccmsetup" context="" type="0" thread="7832" file="ccmcert.cpp:4031"> <![LOG[3 certificate(s) found in the 'MY' certificate store.]LOG]!><time="15:46:04.340-60" date="06-15-2012" component="ccmsetup" context="" type="0" thread="7832" file="ccmcert.cpp:4060"> <![LOG[The 'MY' of 'Local Computer' store has 3 certificate(s). Using custom selection criteria based on the machine name.]LOG]!><time="15:46:04.340-60" date="06-15-2012" component="ccmsetup" context="" type="0" thread="7832" file="ccmcert.cpp:4099"> <![LOG[Machine name is 'SYN-L3-NMS-01'.]LOG]!><time="15:46:04.340-60" date="06-15-2012" component="ccmsetup" context="" type="0" thread="7832" file="ccmcert.cpp:2174"> <![LOG[There are no certificate(s) that meet the criteria.]LOG]!><time="15:46:04.340-60" date="06-15-2012" component="ccmsetup" context="" type="0" thread="7832" file="ccmcert.cpp:2003"> <![LOG[Performing search that includes SAN2 extensions...]LOG]!><time="15:46:04.340-60" date="06-15-2012" component="ccmsetup" context="" type="0" thread="7832" file="ccmcert.cpp:2210"> <![LOG[Certificate [Thumbprint 498357A12555F1D7EE8DFA009D39965880431790] doesn't have SAN2 extension.]LOG]!><time="15:46:04.340-60" date="06-15-2012" component="ccmsetup" context="" type="0" thread="7832" file="ccmcert.cpp:1563"> <![LOG[Certificate [Thumbprint 235A98C6BB65429BAF75F303B2CB66204AE20090] doesn't have SAN2 extension.]LOG]!><time="15:46:04.340-60" date="06-15-2012" component="ccmsetup" context="" type="0" thread="7832" file="ccmcert.cpp:1563"> <![LOG[Found a certificate with subject name as ‘SYNA01VSSCC001D.SYN.local’, but will continue to look for the certificate with subject name as ‘SYN-L3-NMS-01’.]LOG]!><time="15:46:04.340-60" date="06-15-2012" component="ccmsetup" context="" type="0" thread="7832" file="ccmcert.cpp:1540"> <![LOG[using custom selection criteria based on the machine NetBIOS name.]LOG]!><time="15:46:04.340-60" date="06-15-2012" component="ccmsetup" context="" type="0" thread="7832" file="ccmcert.cpp:4119"> <![LOG[Machine name is 'SYN-L3-NMS-01'.]LOG]!><time="15:46:04.340-60" date="06-15-2012" component="ccmsetup" context="" type="0" thread="7832" file="ccmcert.cpp:2174"> <![LOG[There are no certificate(s) that meet the criteria.]LOG]!><time="15:46:04.340-60" date="06-15-2012" component="ccmsetup" context="" type="0" thread="7832" file="ccmcert.cpp:2003"> <![LOG[GetSSLCertificateContext failed with error 0x87d00281]LOG]!><time="15:46:04.340-60" date="06-15-2012" component="ccmsetup" context="" type="3" thread="7832" file="ccmsetup.cpp:5356"> <![LOG[GetHttpRequestObjects failed for verb: 'GET', url: 'https://syna01vsscc001d.syn.local/CCM_Client/ccmsetup.cab']LOG]!><time="15:46:04.340-60" date="06-15-2012" component="ccmsetup" context="" type="3" thread="7832" file="httphelper.cpp:942"> <![LOG[DownloadFileByWinHTTP failed with error 0x87d00281]LOG]!><time="15:46:04.340-60" date="06-15-2012" component="ccmsetup" context="" type="3" thread="7832" file="httphelper.cpp:1076"> <![LOG[CcmSetup failed with error code 0x87d00281]LOG]!><time="15:46:04.341-60" date="06-15-2012" component="ccmsetup" context="" type="1" thread="3144" file="ccmsetup.cpp:9454">
-
Found this super post about certificates in sccm 2012: http://msandbu.wordp...m-2012-and-pki/


