Search the Community
Showing results for tags 'sccm cb'.
-
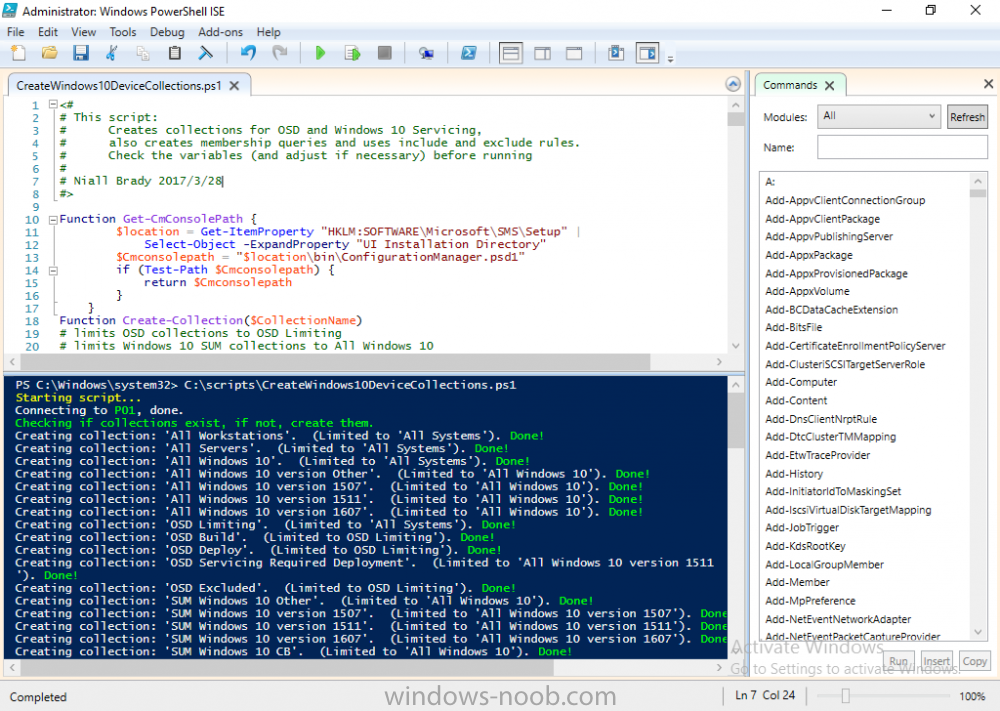
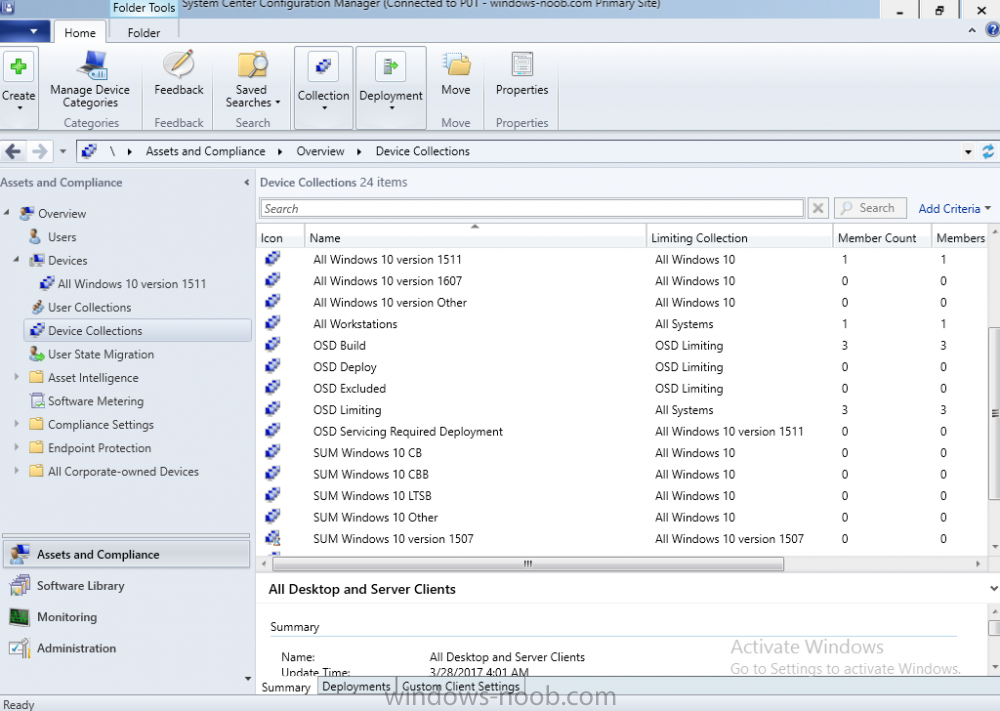
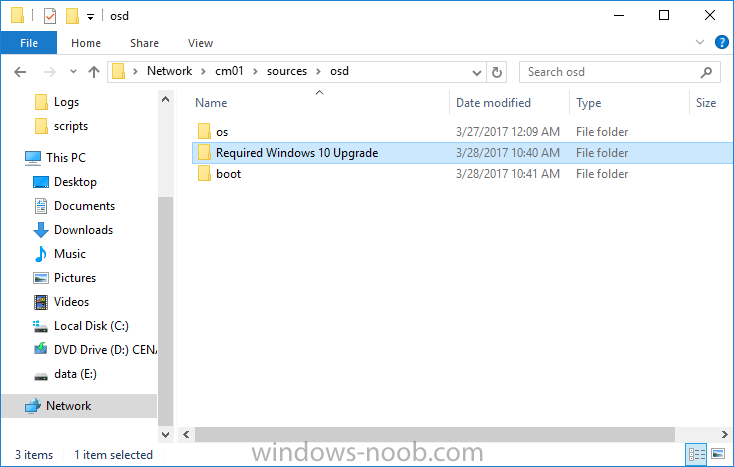
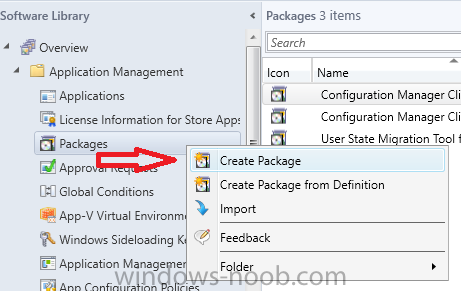
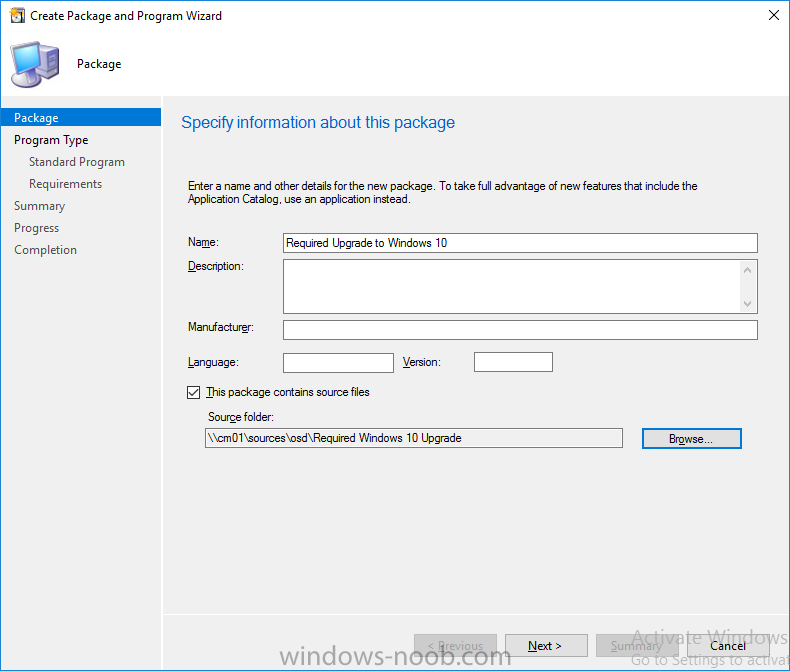
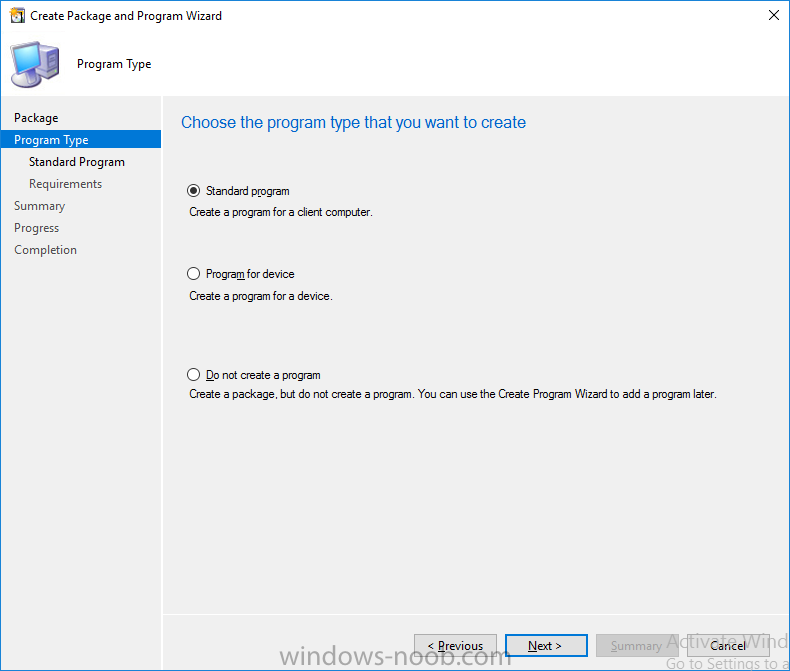
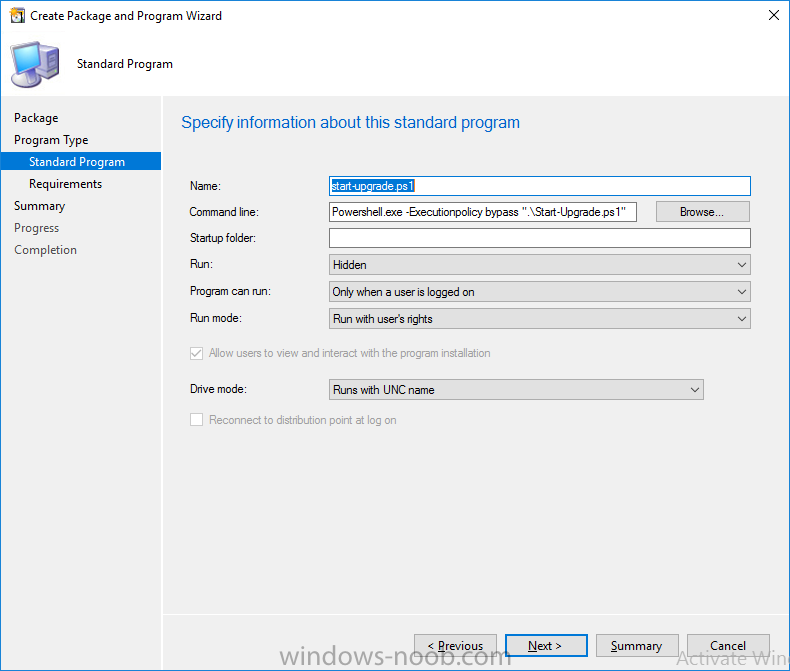
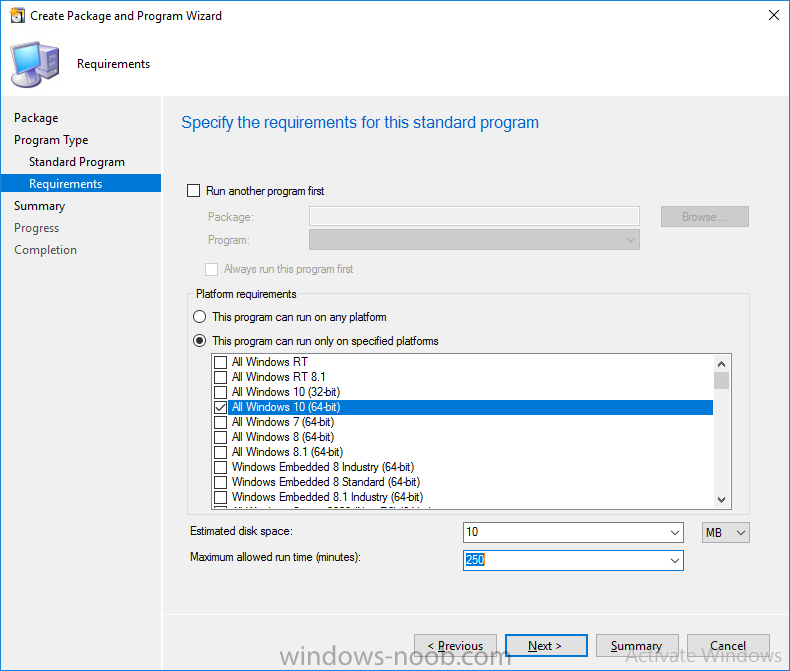
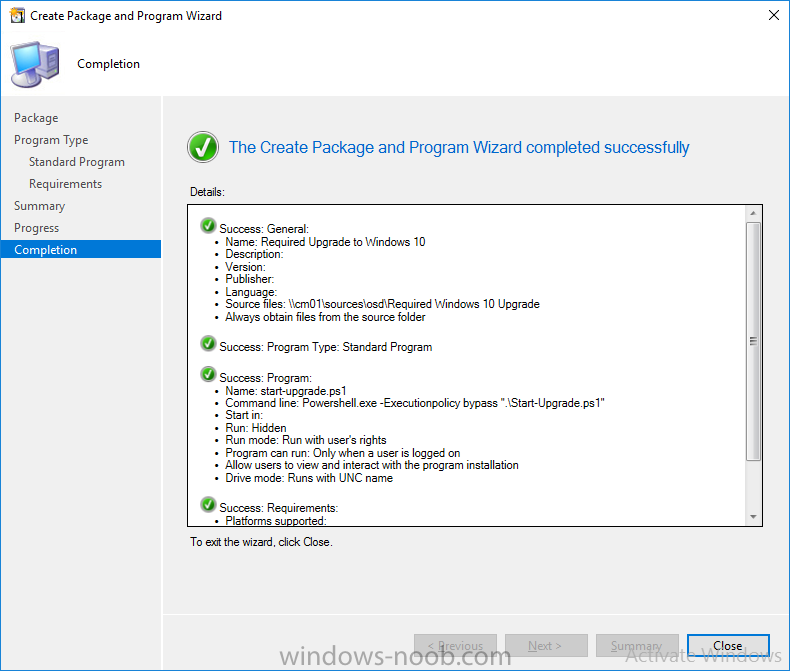
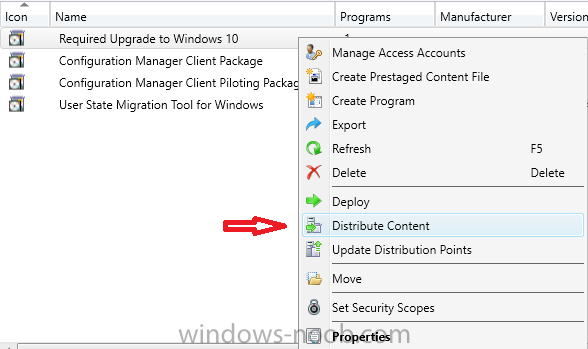
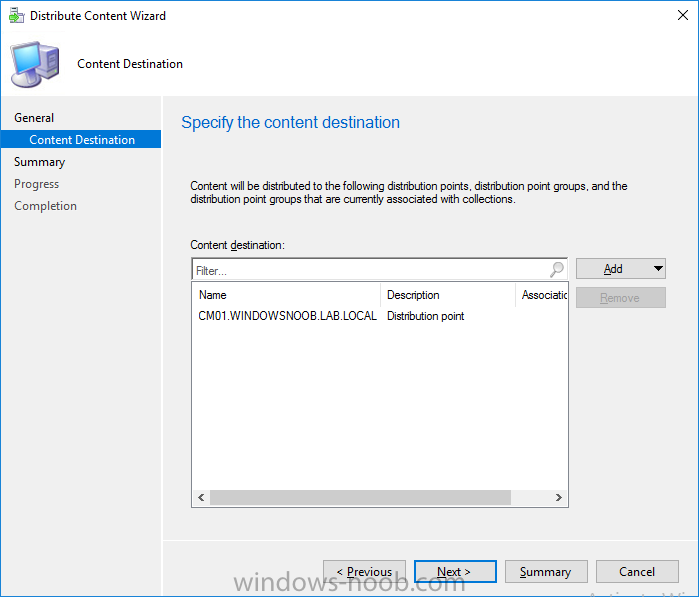
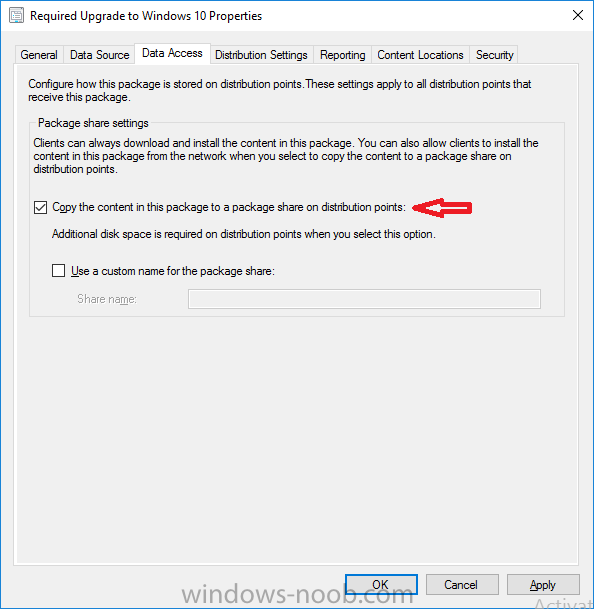
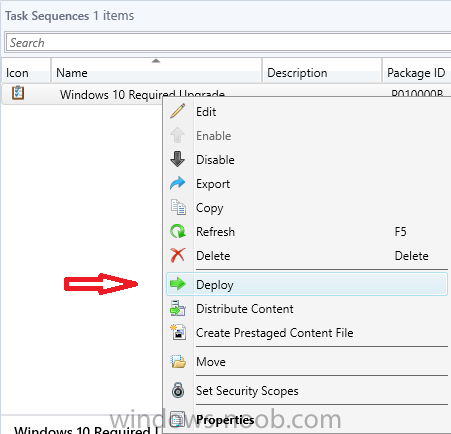
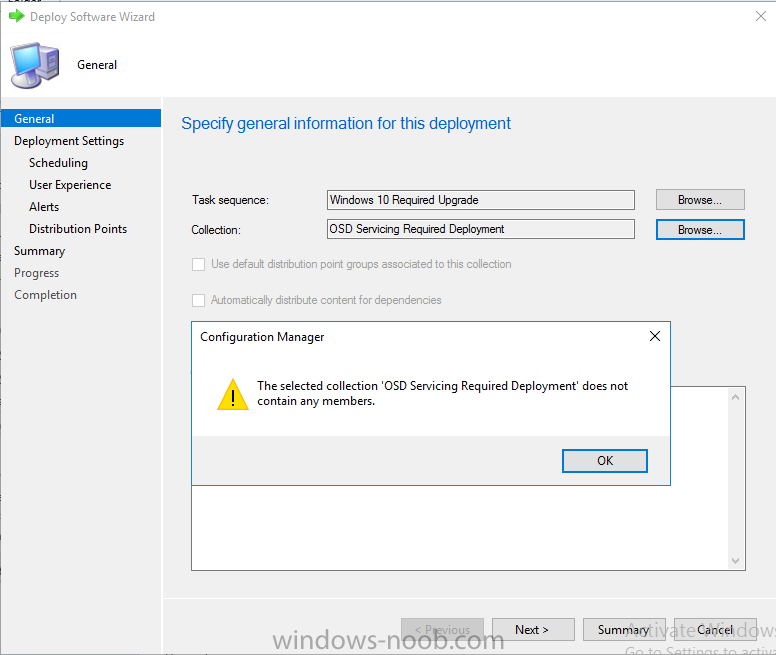
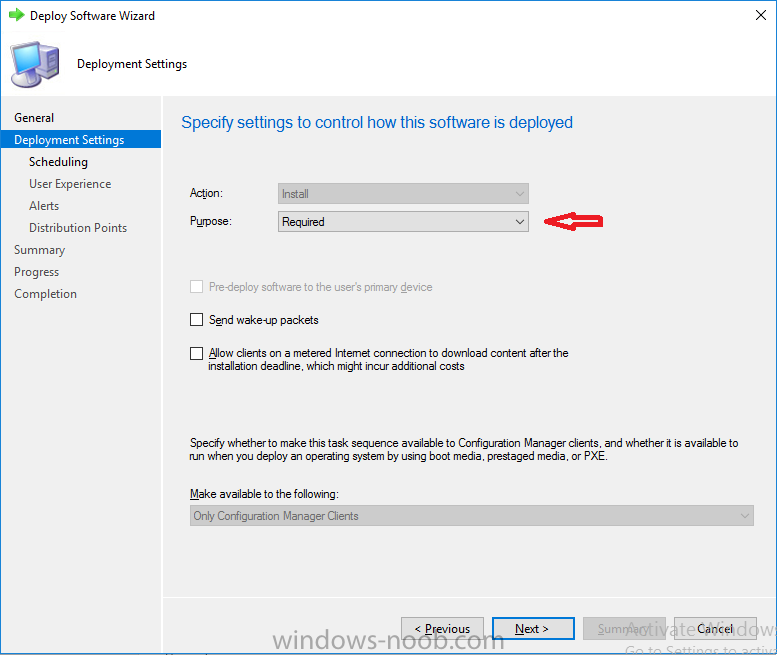
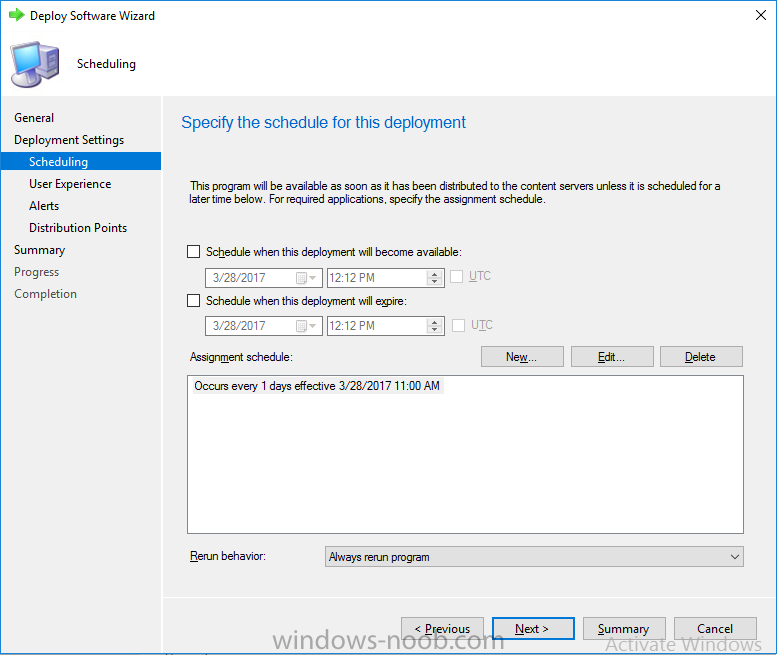
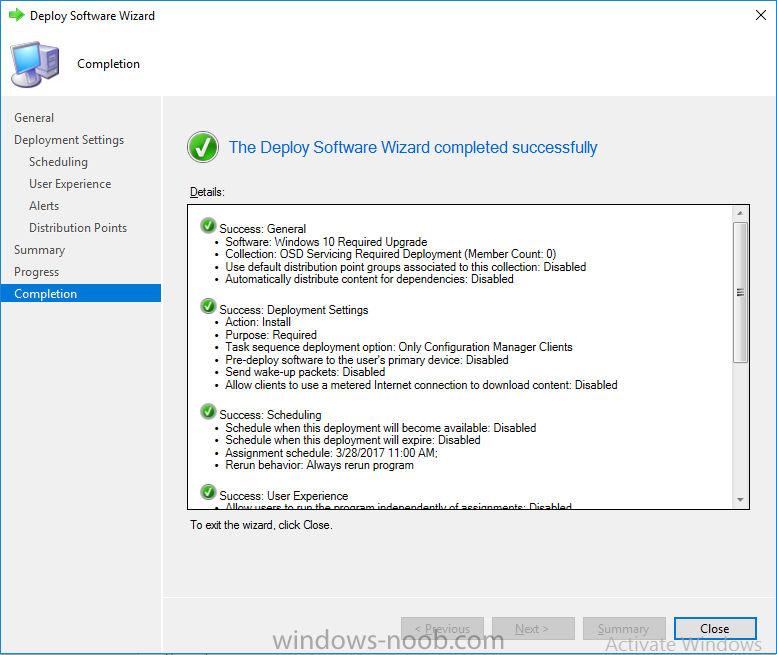
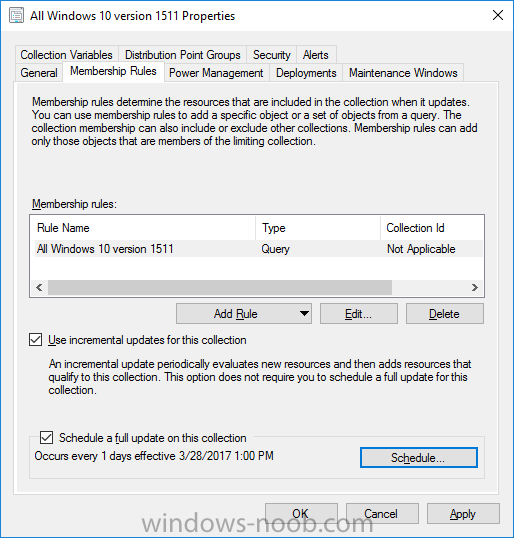
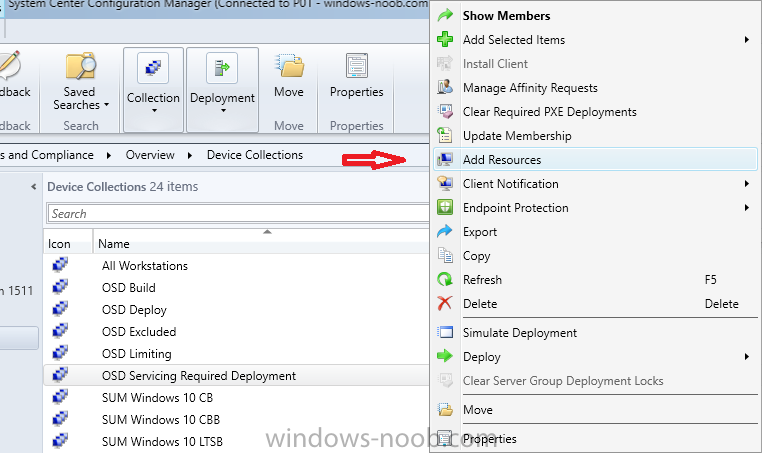
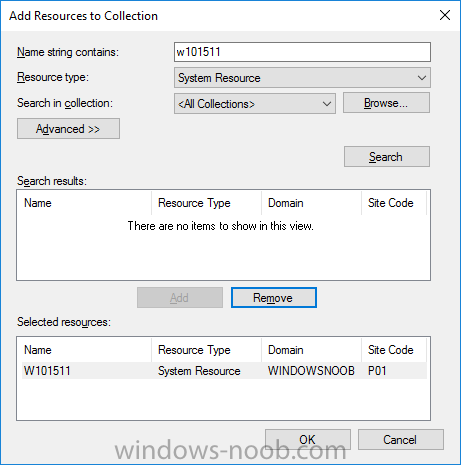
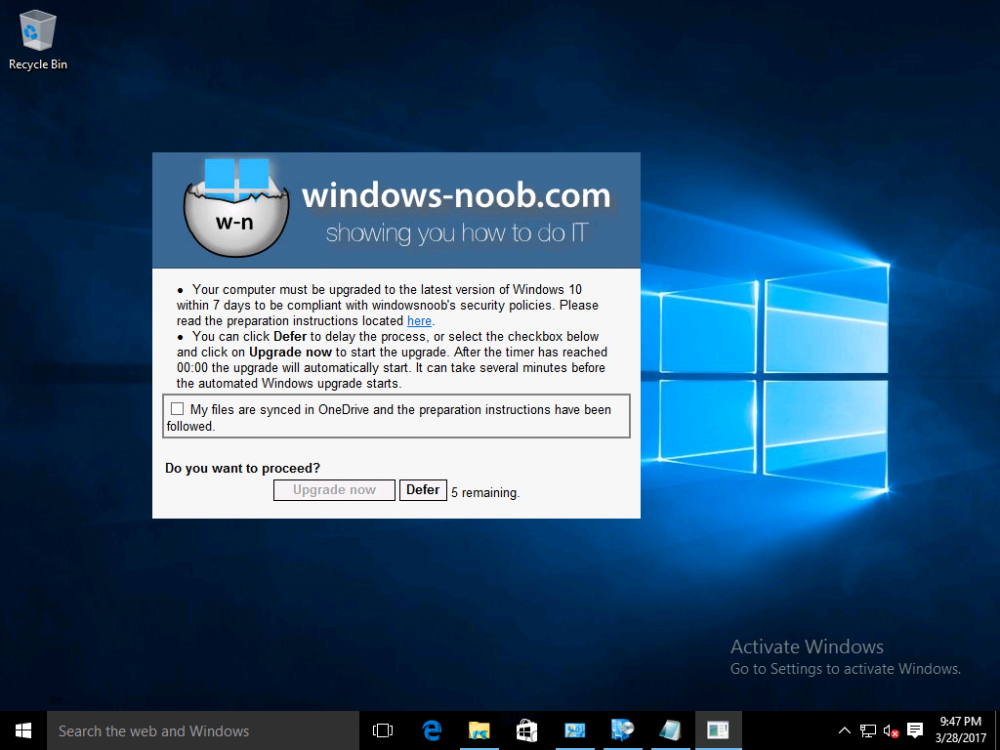
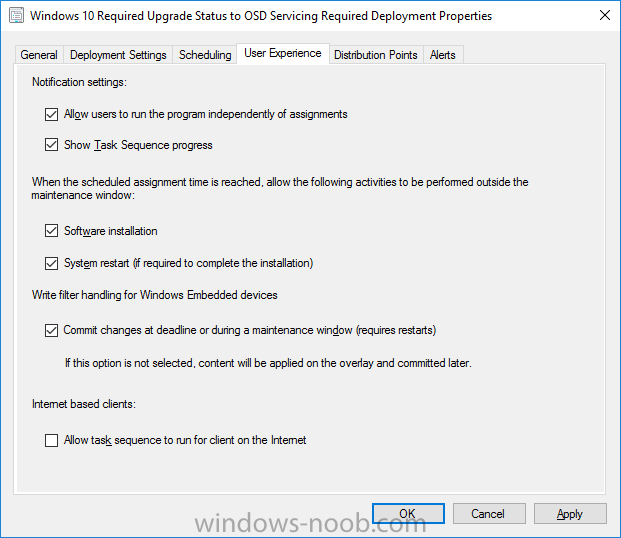
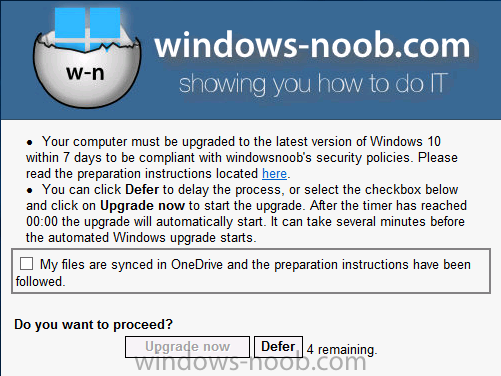
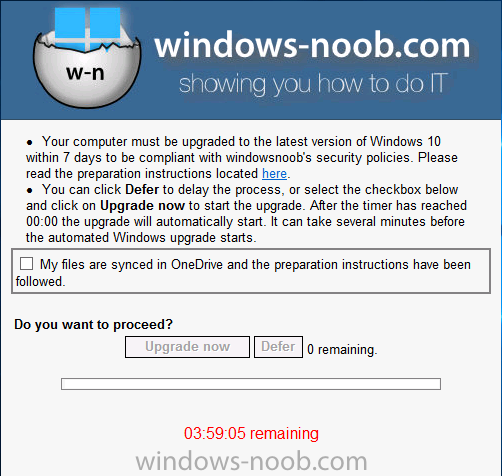
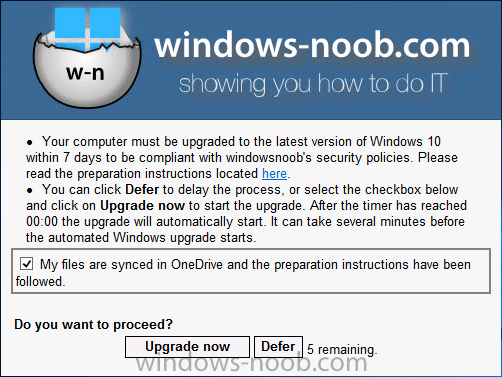
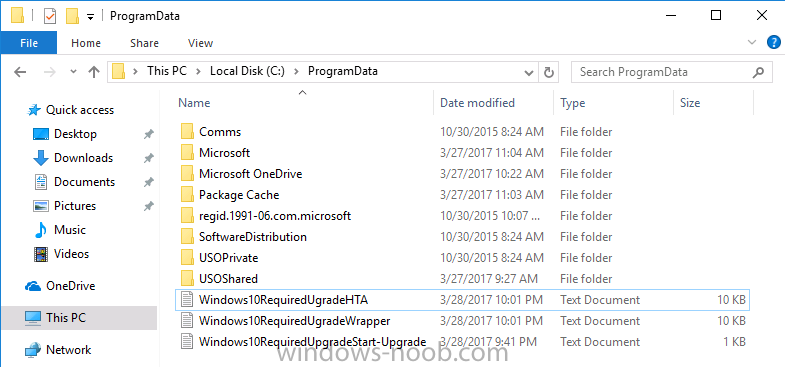
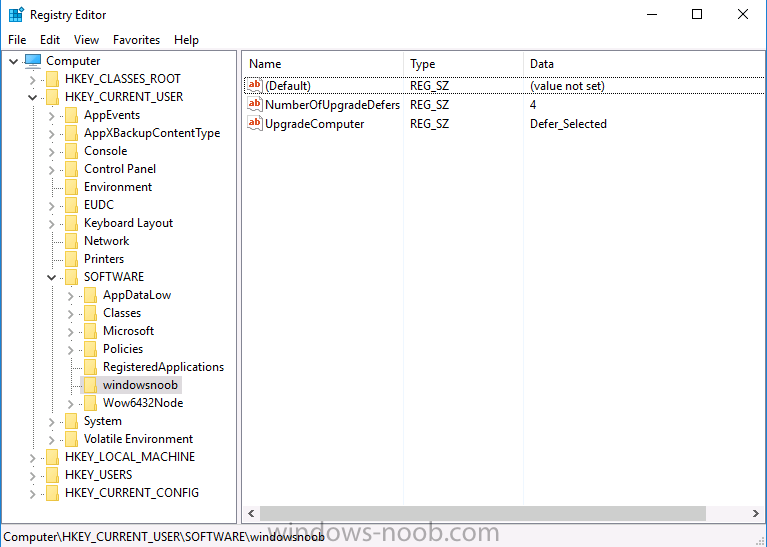
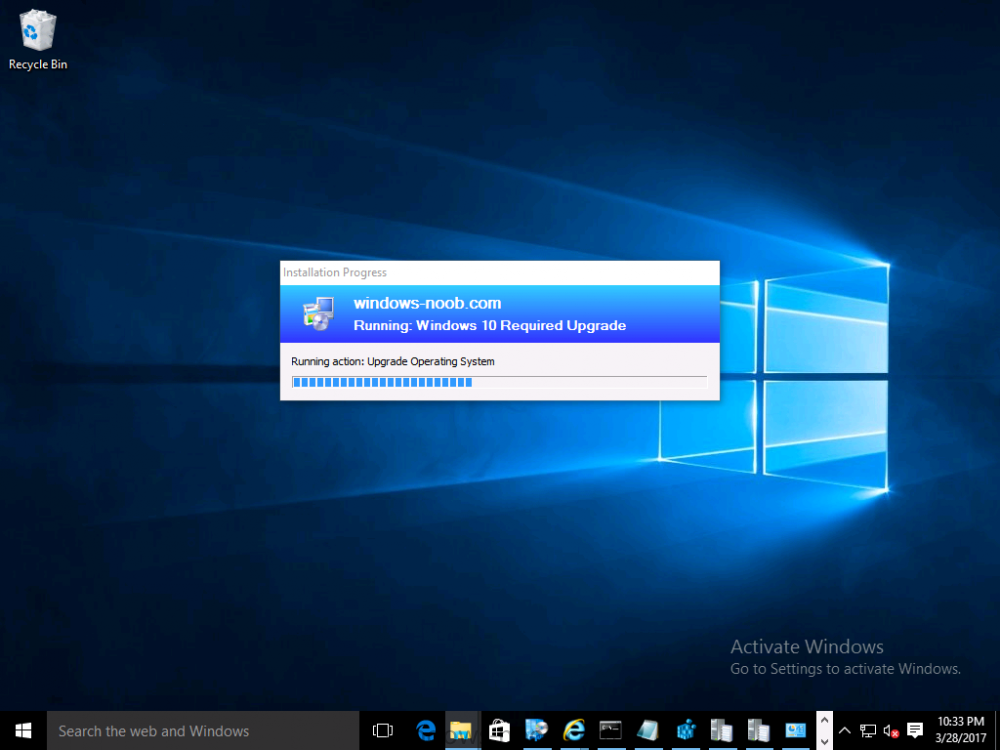
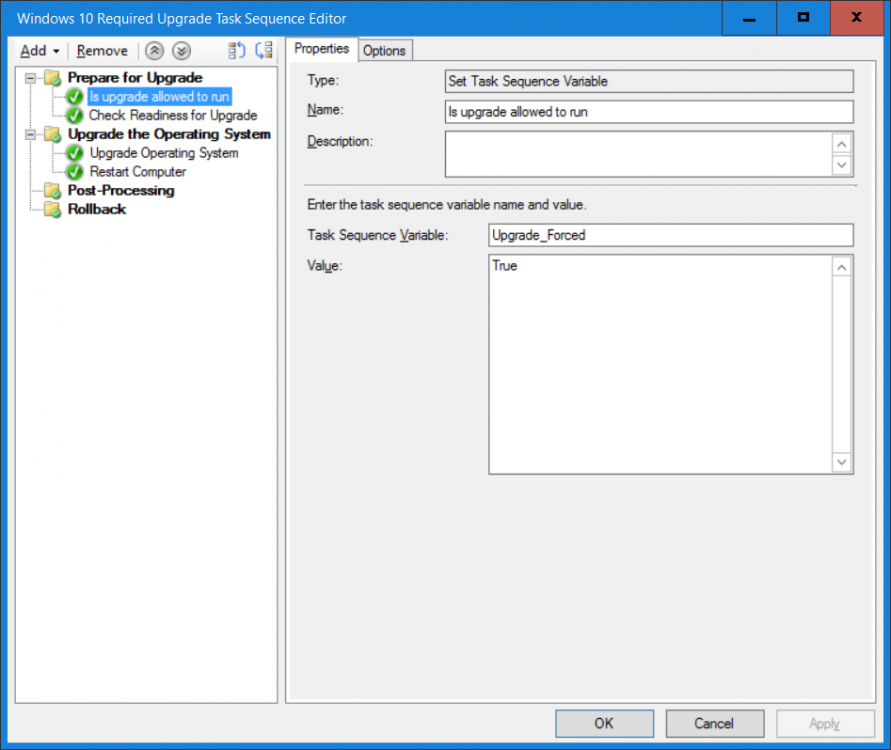
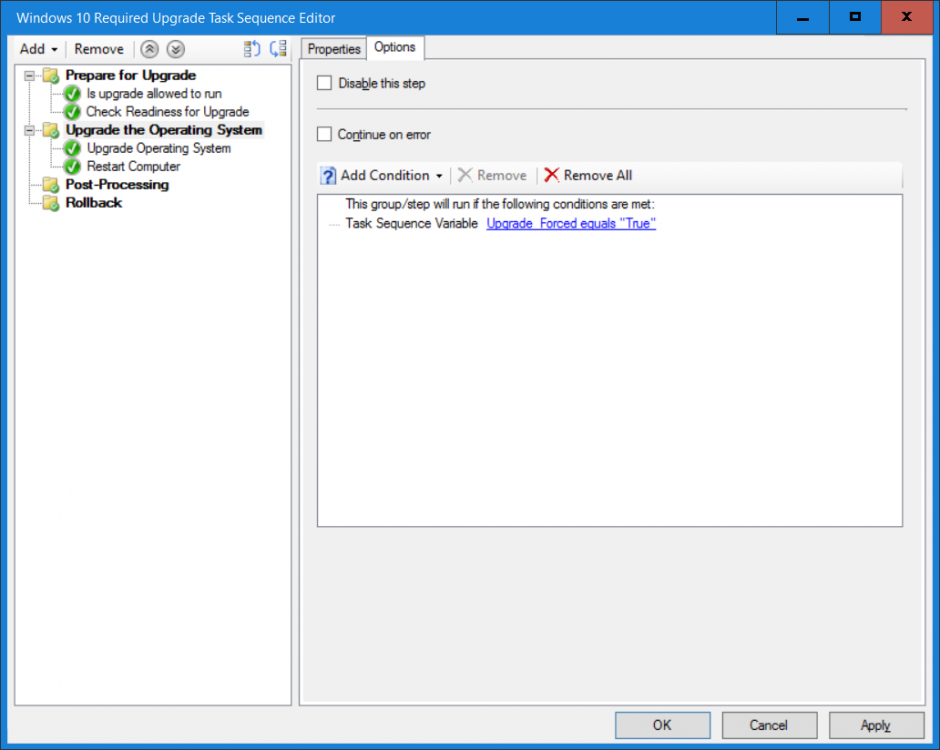
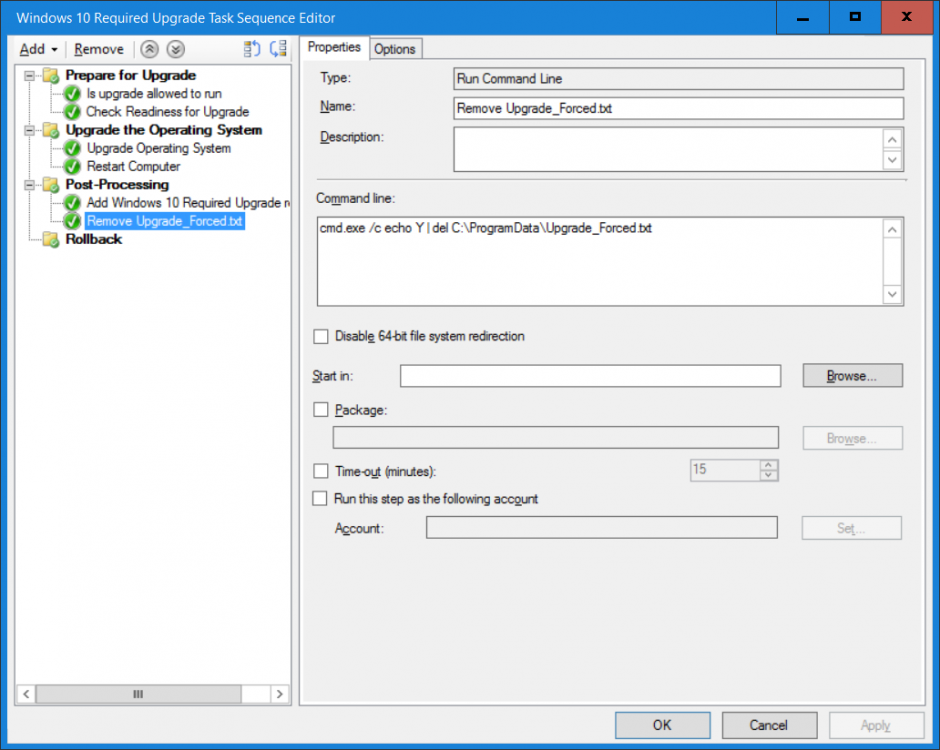
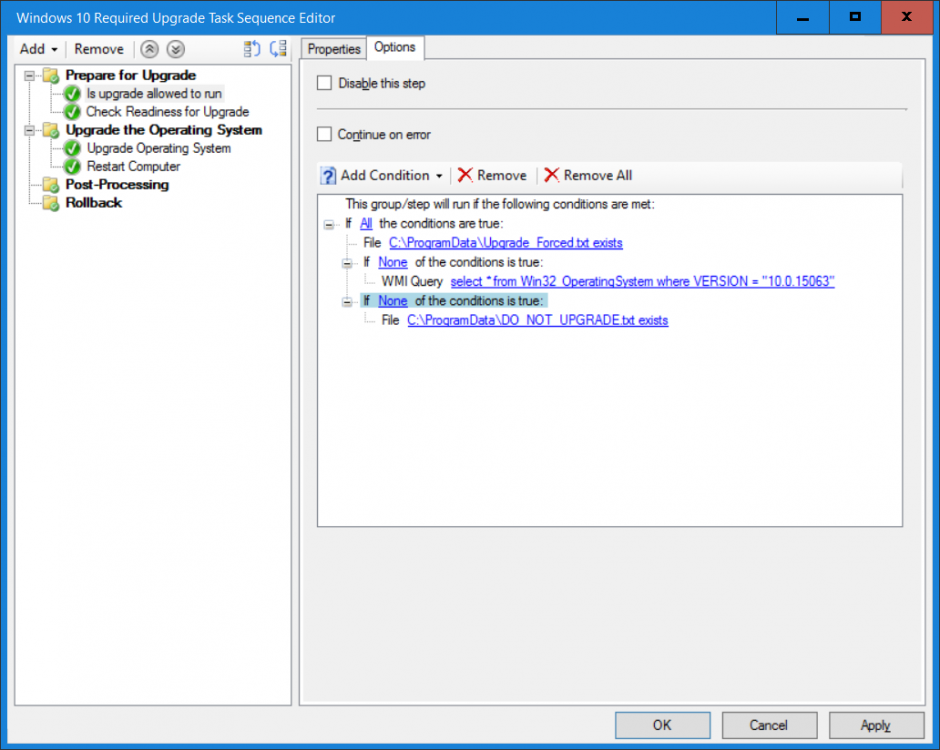
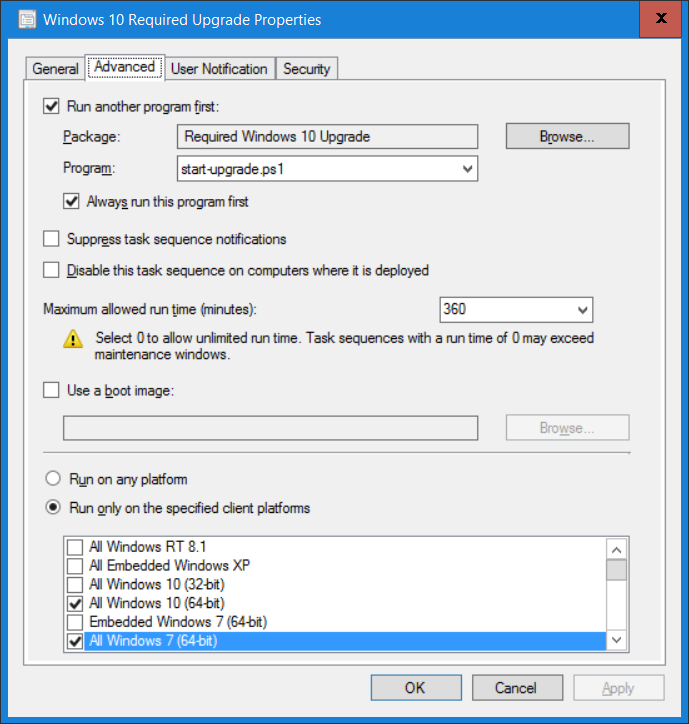
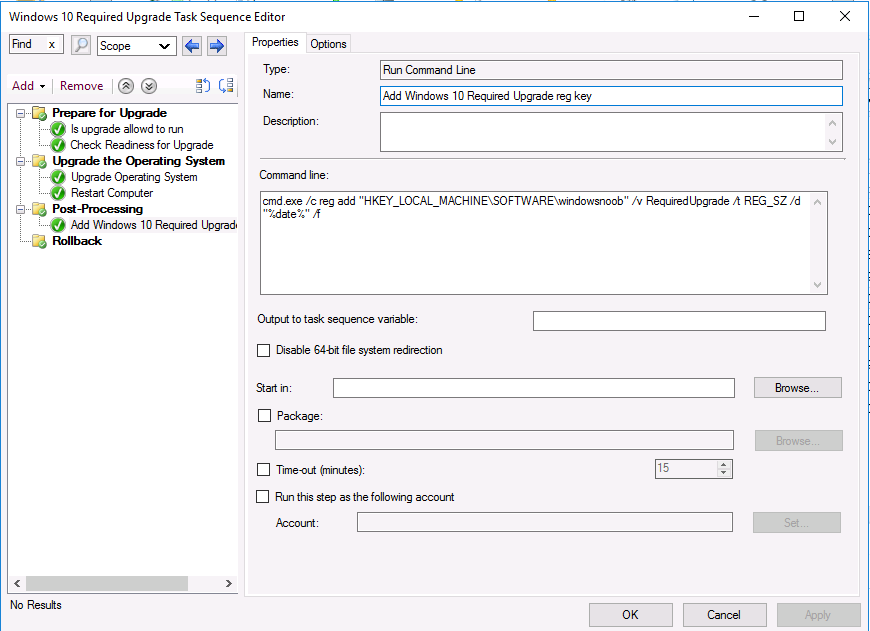
Note: I've upgraded the wrapper to PowerShell 2019/01/06 as explained here. Introduction This blog post is all about upgrading to Windows 10, either from Windows 7 or from an earlier release of Windows 10 to the latest release of Windows 10. Windows 10 is probably one of the fastest developing operating systems from Microsoft yet, and was initially released in July 2015 as Windows 10 version 1507. The version 1507 nomenclature equates to (YYMM) or year year, month month so you'll always know when a version was released to manufacturing (declared RTM). So far we've seen the following Windows 10 mainstream versions (not including LTSB/LTSC) Windows 10 version 1507 Windows 10 version 1511 Windows 10 version 1607 Windows 10 version 1703 Windows 10 version 1709 Windows 10 version 1803 Windows 10 version 1809 As each new version of Windows 10 is released, the new features it contains ensure that it is desirable to some and it's just a matter of time before people want to upgrade to that version given the chance, but even with all the latest and greatest features, some users just won't upgrade if given the choice for whatever reason. There is however another element to consider and that how long Microsoft will release security updates for any given release of Windows 10 (i.e. how long is that release supported by Microsoft). Michael Niehaus discusses simplifying Windows As A Service (WAAS) here but in a nutshell there is an 18-month servicing timeline for each release however, Microsoft have added an additional 6 months to ease your pain, for now. Update: In September 2018, Microsoft blogged the following after years of listening to customers complaining about the WAAS support lifecycle. In a nutshell, there are two main releases of Windows 10 for the Enterprise to think about going forward, the 03 releases (18 month support) and the 09 releases (30 months support). Based on that statement alone, Enterprises will most likely opt for the 09 releases to avoid disruption to business and to their end users. This leads you to deal with the security support ability in a couple of ways, you can make the new upgrade available in Software center and hope your users will upgrade (seriously do you think they will ?), or you can get tough and decide when and where they will upgrade. To do that you have two options: servicing plans task sequences I've discussed servicing plans here so I won't go over that subject again, they are a valid option for many but are not very dynamic. With task sequences you have far greater control over how to deal with things that can break servicing plans (such as incompatible AntiVirus software or Windows Language packs). Assuming that you've made the choice to use task sequences to forcefully upgrade your computers to the next version of Windows the next problem is how do you force the upgrade. The answer is defined by the purpose of the task sequence deployment, namely Required (or mandatory). Just mentioning the words Required and Task Sequence is usually enough to make any seasoned ConfigMgr admin shiver. Why ? well there are many cases of people who've had career changing events in relation to required task sequences, therefore using them must come with a big fat warning, so here it is. WARNING! Using required task sequences is risky! Use them with extreme care and always test thoroughly. Disclaimer: if you choose this method and it all goes wrong, I'm sorry, I cannot accept liability. In this guide I show you how to set it up in a safe way and I include a 'get out of jail free' in case you make a mistake. It's up to you to test what works in your organization and what doesn't. My advice is that you test this thoroughly in a lab and once you are happy with the results, recreate it in production and continue to test it thoroughly. Also, be very careful about how you add computers to the required collection especially if it involves queries. Note: The Get out of Jail free step will help to secure your environment towards any accidental upgrades. Now that that is out of the way, let's get on with it. In this post I'll show you one way of forcefully upgrading your computers from a soon to be unsupported version of Windows 10 to the latest and greatest, and I'll include steps and advice to help you 'protect' yourself from disaster. In this guide we'll be forcing our source Windows 10 version 1511 computers to upgrade to the target Windows 10 version 1607. Note: you can always change the target Windows 10 version to whatever build you want (using the TargetBuild variable) as described in the Troubleshooting section at the end of this guide. Notifying users There is one other thing to consider about required task sequences, they are normally for all intents and purposes zero touch meaning no user interaction. That is fine for simple quick changes such as upgrading applications but if your users are going to have one or two hours downtime due to a forced Windows upgrade, you'll want to notify them and give them options to defer for a limited time period to a time that makes sense for them. In this guide I assume that the client setting Show notifications for new deployments in Computer Agent is set to No, that is a common client setting in organizations as it means less annoyances for the end user and of course there are other ways to notify a user about mandatory actions (PowerShell Application Deployment Toolkit for example). The recently released System Center Configuration Manager (Current Branch) version 1702 contains a great ability to edit the user notification message shown to users but it's limited in ability and it depends on your configured notification settings. So how do we solve that problem in a nice way. ConfigMgr allows us to chain programs before the task sequence begins and that's the key to this solution. Step 1a. Get out of jail free (recommended) The wrapper will not allow the HTA to display if a file called DO_NOT_UPGRADE.txt is present in C:\ProgramData. If you are paranoid about accidental upgrades (and you should be if using required task sequences) then do as follows. 1. Create a package (with no content) with a program to deploy a text file to all computers that are at risk of accidental deployment. Run the package daily. The program is simply a one liner as follows: cmd.exe /c echo "Windows 10 Required Upgrade" > C:\ProgramData\DO_NOT_UPGRADE.txt 2. Target the OSD Servicing Required Deployment collection with another package/program that will remove the Do_NOT_Upgrade.txt file. Run the package every 2 hours. The program is again a one-liner, as follows: cmd.exe /c echo "Y" | del C:\ProgramData\Do_Not_Upgrade.txt The above actions should protect your computers from accidentally being targeted by the task sequence. Any computer that has the Do_NOT_Upgrade.txt file present, will not show the popup (HTA) and will not run the task sequence and thus, will not upgrade until you are ready to do so. Step 1b. Create some collections (optional) This step is optional but recommended as it will give you a base of collections to manage your deployments. To complete this step download the CreateWindows10DeviceCollections.ps1 PowerShell script in the downloads section and run it as Administrator in PowerShell ISE as shown below. This script not only creates collections to make your job of finding different versions of Windows 10 easier, but it adds queries, include and exclude rules as necessary. and below is a subset of the collections created (there are 18 in total). The OSD Servicing Required Deployment collection is limited to Windows 10 version 1511 as that is our target for the required upgrade. This does not mean that it will use all computers in that collection it just means it will only use computers added to the OSD Servicing Required Deployment collection provided that they are also present in All Windows 10 version 1511. This ensures that you are targeting the correct version of Windows 10 for the required upgrade. Step 2. Create a Package/Program In this step you'll add a simple package/program that contains a few scripts. These scripts have error checking, logging and more built in so that you can trace what was done and when. These scripts will be chained to the required task sequence meaning that they must run successfully (with an exit code of 0) before the actual task sequence can start. User actions such as Defer in the popup will force an exit code 99 and the task sequence cannot start. Download the scripts in the downloads section and extract somewhere useful. Copy the Required Windows 10 Upgrade folder to your source folder on your ConfigMgr server. In the ConfigMgr console, select Application Management, Packages and Create Package. Give the new package a suitable name such as Required Upgrade to Windows 10 and point it to the source folder. For Program Type, choose Standard Program. In the Specify information about this standard program screen fill in the following details, Note: keep in mind that if you set Program can run Only when a user is logged on that that becomes a requirement, i.e. that a user must be logged on in order for this to run. You may want to get even tougher and set the Program can run option to Whether or not a user is logged on. If you do set it to Whether or not a user is logged on, and if the user is not logged on, the scripts will write to HKEY_USERS\.DEFAULT\Software\windowsnoob and you may need to update the scripts to detect this change. Name: start-upgrade.ps1 Command line: Powershell.exe -Executionpolicy bypass ".\Start-Upgrade.ps1" Startup folder: Run: Hidden Program can run: Only when a user is logged on Run mode: Run with user's rights Drive Mode: Runs with UNC name Note: If your target computers are running Windows 7, then place a check mark in the All Windows 7 (64 bit) box also. in the Specify the requirements for this standard program screen use the following values This Program can run on only on specified platforms: All Windows 10 (64 bit) Estimated disk space: 10 MB Maximum allowed time (minutes): 250 click next through to completion. Step 3. Modify the package On the newly created package, right click and choose Properties, click the Data Access tab. Select Copy the content in this package to a package share on distribution points Click Apply and OK. Step 4. Distribute the package to your distribution points Right click the package and choose Distribute Content select your distribution points and continue through the wizard until completion Step 5. Modify an existing Windows 10 Required Upgrade task sequence In this step I'll assume you've already created your Windows 10 Required Upgrade task sequence. If you haven't already then take a look at this post to see how. Locate the task sequence in the ConfigMgr console, right click and choose Properties, in the Advanced tab place a check mark in Run another program first and select the Windows 10 Required Upgrade program. In the Run only on the specified client platforms screen select All Windows 10 (64 bit). Note: Make sure that Always run this program first is checked. Note: If your target computers are running Windows 7, then place a check mark in the All Windows 7 (64 bit) box also. Next, edit the task sequence and add a new Set Task Sequence Variable step as the first step in the task sequence, name it Is upgrade allowed to run. Fill in the following values Task Sequence Variable: Upgrade_Forced Value: True Click on the options tab and add the following options: If ALL the conditions are true: File C:\ProgramData\Upgrade_Forced.txt exists If None of the conditions is true: WMI Query: select * from Win32_OperatingSystem where VERSION = "10.0.15063" If None the conditions are true: File C:\ProgramData\DO_NOT_UPGRADE.txt exists These three checks allow us to halt the task sequence on computers that don't meet our upgrade criteria. Note: You'll need to decide what build is deemed 'the latest version' of Windows 10 in your organization and change accordingly. In this post I'm assuming that is Windows 10 version 1703 (build 10.0.15063). On the Upgrade Operating System step, edit the Options and include the following Task Sequence Variable: Upgrade_Forced=True Note: This will ensure that the required upgrade only occurs if the Upgrade_Forced.txt file was present in C:\ProgramData. Next in the Post-Processing group add a new Run Command Line step called Add Windows 10 Required Upgrade reg key with the following command line: cmd.exe /c reg add "HKEY_LOCAL_MACHINE\SOFTWARE\windowsnoob" /v RequiredUpgrade /t REG_SZ /d "%date%" /f This will allow you to run reports on when computers were upgraded using this method. Close the task sequence. Next create a new Run command line step called Remove Upgrade_Forced.txt with a cmd line of cmd.exe /c echo Y | del C:\ProgramData\Upgrade_Forced.txt Step 6. Deploy the task sequence In this step we deploy the task sequence with a purpose of required. Note: I'd strongly advise you to test this thoroughly in your lab and make sure to pick your collections correctly and to populate them very carefully. Right click on the task sequence and choose Deploy For collection choose OSD Servicing Required Deployment, and ignore the popup telling you it's empty, you can add computers to that collection later. Change the Purpose to Required For Scheduling click on New, then choose Schedule, then change it to run daily at 11am. For rerun, choose Always rerun program as you will update the limiting collection (All Windows 10 version 1511) membership daily @ 1pm and upgraded computers will fall out of the collection. In case they don't (for whatever reason) the wrapper checks for the targetbuild and if the computer matches that build, it will abort and not start the upgrade. Note: The above schedule will run our popup daily at 11am for 6 days prior to forcing the upgrade to Windows 10. You should change the schedule according to your preferences. Continue through the wizard until completion. Note: If you want to test run the Task Sequence from the Software Center or if you want your users to do this, then enable the Allow users to run the program independently of assignments checkbox on the User Experience tab. Step 7. Adjust Windows 10 limiting collections membership schedule Below you can see the membership rules update frequency on the limiting collection, it's set to run two hours after our Upgrade, adjust as necessary for your organization and your agreed schedule. Step 8. Add test computers to the OSD Servicing Required Deployment collection Note: Before doing this step, carefully read the Warning and Disclaimer at the top of this guide! Right click on the collection and choose Add Resources (or use your own chosen method to add computers) to add one or more test computer to the OSD Servicing Required Deployment collection. As this collection now has a live required task sequence deployed to it, do this step very very carefully, if in doubt stop what you are doing, go and have a coffee and try again when your nerves are calm. and add your test computers as you see fit.. Step 8. Monitor the experience on test computers Login to a test computer, do a machine policy update in the ConfigMgr client actions and wait for the popup or kick it off via software center. After the computer receives the policy and the scheduled time is reached a popup is shown offering the user to Defer the upgrade or Upgrade now by selecting the appropriate checkbox and then clicking on Upgrade Now. Note: The clickable link goes to a non-existant url, you need to point it to whatever documentation you want your users to read in preparation for the upgrade. As each day passes (or based on your custom schedule) the counter reduces by 1 every time the popup appears. When there are no more deferrals left, a 4 hour countdown starts and when it reaches 00:00:00 the Windows 10 Required Upgrade will start. If the user closes the popup, the timer will resume where it left off when it is restarted. Alternatively, if the user doesn't want to defer, and they want to run the upgrade right now, they can place a checkmark in the 'My files are synced in OneDrive...' and then click Upgrade Now to start the task sequence. Either way, regardless of what your user clicks on, (based on the schedule in this guide) the computer will start the upgrade within 7 days (or earlier or later if you adjust the schedule). Once the Upgrade Now button is clicked on, or once the Timer reaches 00:00:00 the task sequence will automatically start (assuming that the DO_NOT_UPGRADE.txt is not present). Branding Simply replace the banner.png file included with one matching your Company Name, edit the upgrade.hta and locate the 'windowsnoob' name in the text field (line 347) and replace it with your own Company Name. Troubleshooting The popup creates 3 log files to troubleshoot the process, they are located in C:\ProgramData and named Windows10RequiredUpgradeHTA.log Windows10RequiredUpgradeWrapper.log Windows10RequiredUpgradeStartUpgrade.log The wrapper writes to the registry in HKCU\Software\windowsnoob Note: The collections, scripts and task sequence assume you are upgrading from Windows 10 version 1511 to Windows 10 version 1607, you'll need to edit the WMI Query in the task sequence to change Windows 10 build version when you move to creators update and for later versions of Windows, and you'll need to edit the TargetBuild variable in the wrapper.vbs script accordingly. Once done, you should change the Limiting Collection for the OSD Servicing Required Deployment collection to match the n-1 version of Windows 10 you want to migrate from. Tip: If you have rendering issues with the popup on different devices then edit the call ResizeWindow(425,335,500,375) values and ResizeWindow Function to fit your specific needs, I don't have access to too much hardware to test this on. The popup is fixed, if you want the user to be able to move it change the line caption="no" to caption="yes". If you want to programmatically use it then add a Window.moveTo(x, y) line. Downloads You can download the scripts used above in the following zip files: windowsnoob Required Upgrade HTA.zip CreateDeviceCollectionsWindows10.zip Summary Forcefully upgrading computers is a tricky area but hopefully this method gives you one more option to consider.
- 242 replies
-
- 1
-

-
- 1702
- forced upgrade
-
(and 2 more)
Tagged with:
-
hi i need to deploy server certificate to a domain witch have no CA in the AD ( external domains) i have several domains all have SCCM client ( install the sccm cert manually ) i have created a template in my root CA - no problem deploy it with GPO autoenrollment in my domain now i need anther Cert witch is server authentication where there is a way to deploy it witch SCCM ? thank you roni
-
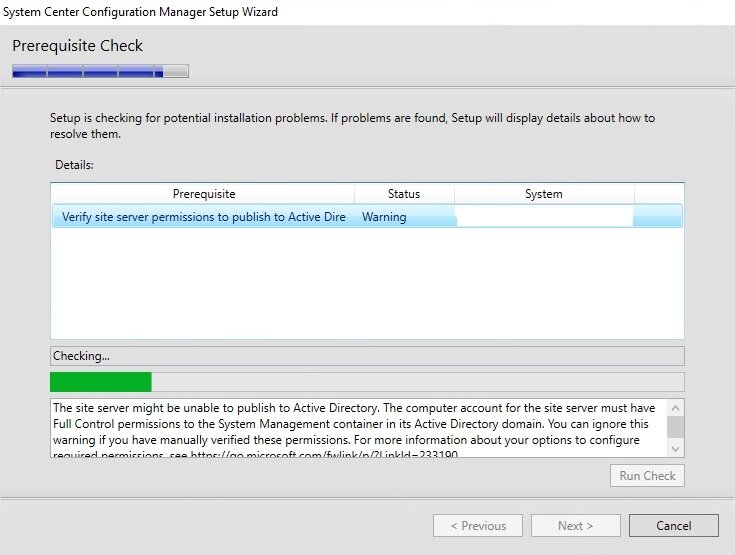
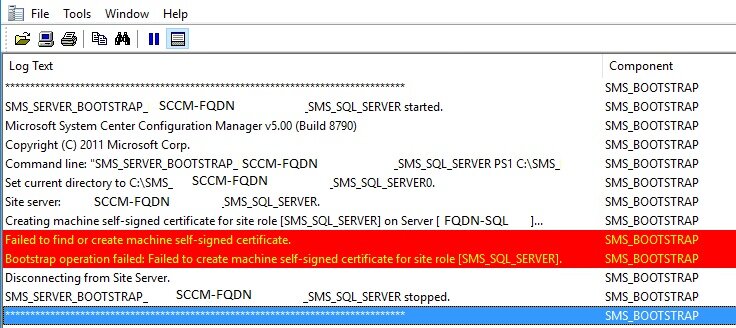
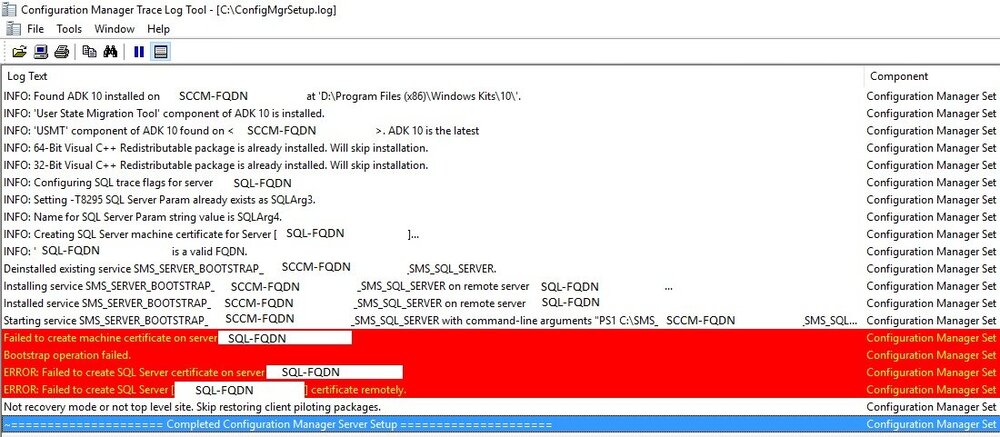
Hi All, First at all, Its a pleasure to sign in to this Forum. Thanks for your support! I'm working on a secured environment and trying to install SCCM CB 1902 for a demo purpose and are stucking on an error during SCCM install on step "Generating self signed certificate on SQL Server..." My insfrastructure: - AD DC Windows Server 2016 with System Management container created and respective permissions asigned - Remote SQL Server 2016 on Windows Server 2016. SQL service account with Admin Rights SCCM computer account with local Admin Rights and sysadmin SCCM installation account with local Admin Rights and sysadmin - Windows Server 2016 for SCCM installation SCCM installation account with local Admin Rights SCCM Computer account with local Admin Rights We control User Rights Management over GPO, Services Permission, Files Permission, etc... Other services like SCOM is already working. Attached Error Msg and installation Logs. Any help? Thanks in advance Regards
-
Hello, Ok, I am trying to figure out a somewhat wierd issue that I've been having for sometime now that I think I finally have a handle on as to what is causing my issues. I'll try to be breif... Several months ago, we moved from SCCM 2012 to current branch (on 1710 now). During that move, I was also asked to migrate the server from one host to another with a new server name (old one was just "SCCM", new one is "WCSSCCMS01") along with a new IP address. I did a fresh install of Windows Server 2016 along with the CB of SCCM and migrated the data over from the old server using the Migration tool built into SCCM (under the Administration tab on left in the console). Since then though, I've seemed to have "odd" issues that I never could explain. Task sequences that worked flawlessly before now had issues sometimes finishing or taking much much longer than before. Some deployments of software would never seem to get to machines. Things of that nature. I had noticed that many of my migrated objects stilll had the Package ID of the old server as well and, thinking that may have been part of the problem, I proceeded to recreate my task sequnces entirely on the new server thinking it would help. However, I have noticed that, while a machine will finish imaging and boot to Windows, the client seems to be corrupt. In fact, when I go into the Control Panel, the Configuration Manager isn't even listed! My fix has been to reinstall the client from the SCCM console and force to uninstall/install the client with the option to specify the site checked. This does some to work 85-90% of the time. Now for the strange part...I had to image a fresh machine today out of the box and realizd that I hadn't given it the right name during imaging and, upon booting into Windows, I proceeded to change the name. Since the config client hadn't installed and I just renamed it, I knew it wouldn't show up in SCCM just yet to push the client to it, I thought I'd just go into the SCCM folder on teh server and install the client from there by double-clicking the ccmsetup.exe file as I had done before in my old setup. It went ahead and installed "some" of the client. It only listed 6 tabs at the top (General, Components, Actions, Site, Cache, and Network). Additonally, the only actions available were "Machine Policy Retreival" and "User Policy Reteival." Odd I know...but the oddest part was that, under the General tab, it shows my assigned management point as being my old server! It even shows the site code of the old setup as well. That old server doesn't even exist anymore and has been deleted from AD completly at this point as well as it's DNS entries. My guess is that when it goes to install the client during a task sequence, it is somehow trying to pull MP of the old server and that is likely causing my wierd issues with sequnces not finishing and software not depoying correctly as I likely have several corrup installs out there. Anyone out there have a clue on how I can fix this? I don't even know where to start looking on this one... Thanks in advance for anyone who can assist...
-
Hi Everyone,
I'm a new Level 2 Technician as i was previously Level 1 technician and my main role was helping users troubleshoot issues on their Computer and recently had a few colleagues from Level 3 started helping me get into SCCM environment were i flourishing from their Wisdom, so found your site and started to visit this site to learn a few things and decided to register.
Thank you for visiting my page
-
Hi, I have the below custom setting file. The issue is it is not being applied on my builds. When i check the logs they state that the file has been processed successfully. Its like the rules get completely ignored [Settings] Priority=Init, ByDesktop, ByLaptop, DefaultGateway, Default Properties=ComputerLocationName, ComputerTypeName, ComputerSerialNumber [Init] ComputerSerialNumber=#Right("%SerialNumber%",10)# [ByLaptop] SubSection=Laptop-%IsLaptop% ComputerTypeName=L [ByDesktop] SubSection=Desktop-%IsDesktop% ComputerTypeName=D [DefaultGateway] 192.168.1.1=blanked 192.168.1.1=blanked 192.168.1.1=blanked [Blanked] ComputerLocationName=blanked [Blanked] ComputerLocationName=blanked [Blanked] ComputerLocationName=blanked [Default] OSInstall=Y ComputerLocationName=XXX ComputerTypeName=X OSDComputerName=%ComputerLocationName%%ComputerTypeName%%ComputerSerialNumber% SkipCapture=YES SkipAdminPassword=YES SkipProductKey=YES SkipComputerBackup=YES SkipBitLocker=YES
-
Hi, I have to deploy windows updates on critical servers which gets patched very rarely due to some team dependency. I have SCCM CB 1706 installed. My client set below conditions: 1. Updates should get downloaded beforehand 48 hours actual Installation date. 2. If needed, installation time may change. Deployment should accomodate that. 3. Deployment time is 2 hours for 1 batch. So in case if deployment gets carried over 2 hours, second batch should not start. How to achieve this 1. Without maintenance window 2. With maintenance window 3. Any other way apart from above 2 options
-
I have just built out a new sccm CB environment running alongside my 2012 r2. we have a server in our DMZ that is used as an MP, DP and SUP. I am trying to replication this for our CB environment. I have finally got all the Firewall ports opened that are required. I started installed the roles but am having a few issues. ADSI Edit isn't getting updated - Service account is used and has proper rights but nothing update my wsus on prem is working but on my dmz server the content folder is empty. I have enebled the whole site to use HTTPS. if anyone has any good links they have used I would greatly appreciate hearing of them or any suggestion. seeing these errors in the Component status: WSUS Control Manager failed to monitor WSUS Server "local.DMZ". WSUS Control Manager failed to configure proxy settings on WSUS Server "local.DMZ". MP Control Manager detected MP is not responding to HTTP requests. The http error is 2147500037.
-
I'm using SCCM 1710 and have been having the following error happen part way through the TS. This is from the SMSTS.log This link, https://support.microsoft.com/en-us/help/4096313/the-apply-driver-package-task-fails-with-error-80070057 says to update my Boot Images to my DP's and I've done that with my main PXE boot image, however I was a bit scared to go all the way. With such a large difference between the current ADK - 10.0.16299.0 - and the current production client ver. - 5.00.8577.1115 - I'm wanting some reassurance and guidance. I have several different Boot images, some of which are stored in the default directory ( \\servername>\SMS_<sitecode>\osd\boot\<x64>, which should mean they are being updated when I update SCCM) and others which are custom boot images. However, when I go to update the DP, an option for both types shows up that's not covered anywhere and I'm a bit nervous to go forward with. 1st, why is there such a large range on the default boot images? 2nd, I've done the update on my default boot image (without reloading to the current WinPE ver of the ADK) and still had the same error. Does that point to needing to reloading, or do I need to update all the boot images as well (I came into this environment after it had been set up already and are still using the previous TS.) 3rd, do I need to update any of the TS themselves after doing this update? I know some are using old MDK packages... Thanks for the help in advance.
-
I'm trying to create a new .wim capture of an updated Windows 10 1709 (Hyper-V VM). I created capture media w/ SCCM, ran it on NewBuild18v2 (my VM), it reboots, say username and password are wrong and shows defaultuser0 as option - can’t log into it. Administrator is listed, takes password and then gets stuck at “Just a Moment”. was able to get a cmd window w/ F12 and entered this via regedit - [HKEY_LOCAL_MACHINE\SOFTWARE\Microsoft\Windows\CurrentVersion\OOBE]"SkipMachineOOBE"=dword:00000001 Thanks to Frank Maxwitat from TechNet. It was able to restart and login but left me w/ a broken machine - start button wouldn't work, right click on task bar won't work, run works but I'm still stuck. I took the .wim it saved to my share and placed it in my TS and get an error (0x80070400) element not found. I don't know if it's a bad unattended file, but I've included it and the STSMS log for those who read them better than I. Main question - is there a way to salvage the VM and do another sysprep and capture, or do I need to start over? Thanks in advance for the help! smsts.log unattend.xml
-
Dear Experts, I Would like to get some inputs from you Please. My Data Center is located in 2 Regions. This data center is supplying the services (Windows Server, Network., etc) At Present we are planning to perform SCCM CB Implementation with High Availability for SCCM Client Roles. In fact not for SQL (Due to Commercial items) Single Standalone Primary Site is fair enough for the environment. However, We would like to reduce the usage of SQL Server, and make the Client facing roles with HA. Hence your inputs would be helpful for us Data Center Region A: Server 1 - SCCM Site Server - A Primary Site with Roles (Component Server, Site Server, Site System, Reporting Service Point, Other Non Client Facing Roles) Server 2 - SCCM Site System - Client Facing Roles (Management Point, Software Update Point/WSUS, Distribution Point (With WDS/PXE OSD Capabilties) Data Center Region B: Server 3 - SCCM Site System - Client Facing Roles (Management Point, Software Update Point/WSUS, Distribution Point (WithOut WDS/PXE OSD Capabilties) So all Client facing role, will be working with HA Option. However, PXE Boot for OSD will work only with SERVER 2 from WDS (Which respond to the Client during the OS Imaging) - To make this happen I need to mention the IP Details of WDS Server (Server 2 from Region A) in the DHCP Scope. Am I correct? The reason, I do not preferred to give the SERVER 3 (From Region B)as WDS Role with PXE, which we do not need to give the multiple entries with DHCP Scope (Option 66, 67) for OSD Please suggest, if this is looks good for an organization. The Ultimate goal is to reduce the SQL CPU Utilization.
- 8 replies
-
- sccm
- current branch
-
(and 8 more)
Tagged with:
-
Dear Experts, I Would like to take an advice from you all for ADK are talking about ADK: Would like to get few points here At Present, I am having SCCM 2012 SP2 with Windows 7 with ADK *10.0.0.26624* Assume the Site Code : ABC Now the Plan is to do side by Side migration with SCCM CB V1702 and Upgrade to SCCM CB V1710 and this is to support Windows 10. Site Code : DEF Before I install windows 10, I will be moving all the clients from Site Code : ABC to DEF I will be having all my Existing Client move from *Windows 7 Machines* to DEF Site In the New Environment, Will be Managing both windows 7 and windows 10 1. Application Management (Windows 7 and Windows 10) 2. Patch Management *Windows 7, 10* 3. OS Imaging *Windows 7, Windows 10* I Would like to make my environment to be stable with both OS. Please let me know which ADK Version is needed in my Environment for Windows 10 Operating System I Will be having 1. Windows 10 LTSB 2. Windows 10 Enterprise With Version 1803 3. Also Windows 7 SP1 Which ADK Version, I Should have in my Environment *DEF Site Code* After all successful, Migration will be moving out completely from the Site Code : ABC
-
Dear Experts, Very Shortly - I will be having SCCM CB in my environment. I would like to get an advice/inputs from you to perform the Windows 10 Deployment Scenario's. Would like to get an advice, what are the topics - I should cover for Windows 10 Readiness with SCCM CB Environment My Organization preferred to perform the Management in the same way which I am doing for Windows 7. However, I would like to give some value added proposal's Any recommendations from you Experts?
-
Dear Experts, Currently Managing the infra with 5600 End Points (1 Primary, 22 DP's) with Windows 7 Management. We are looking to upgrade to Current Branch 1702 and So on. Prior to the Deployment, Preferred to Create 1 Test Environment. We have already 1 PROD Environment. SYS Management Container is given with Permission (Full Control) for Primary Site server (Host name) of the Machine. If we grant the access for System Management Container with Full Control (For TEST Environment) server. It will be creating automatically with New Container (Right below to SMS-MP) right? Also, Preferred to get advice from you, about there will not be any impact with existing Containers. For added safer side, Shall I create another folder right below to System Management (Container) as TEST to progress further. Please share your advice
- 17 replies
-
- current branch
- sccm cb
- (and 7 more)
-
Dear Experts, I would like to get an advice from you Please. You may see multiple forums from me – As my Environment is bit complicated. Environment implemented by 3rd party and handover to us as part of transformation – Which we are struggling to upgrade or proceed further. Current Infrastructure: SCCM 2012 SP2 with Windows 7 Clients (Managing – Application, Patch, Operating System Deployment) This is running on Windows Server 2008 with SQL 2008 Required Infrastructure: It is required to Manage Windows 10 Clients, Windows 7 Operating System (Application, Patch, OS Deployment) After being and hearing more responses from our Engineer’s/Experts. It is planned to progress the Green Field Implementation 1. Windows Server 2016 2. SQL Server 2014 or SQL Server 2016 3. Windows 10 ADK with Version ADK 1709 - 10.1.16299 4. System Center Configuration Manager V1710 New Implementation along with Distribution Point 5. Making the Environment with Complete Readiness for all Application Source, OSD Task Sequences, Software Updates., etc., This New Infra will be completely ready with supporting all contents. IP Assignment: We are already having the Boundary Groups, which is based on the IP Range with Region wise in the OLD Environment. New Environment – Client Movement from Old Infrastructure: Let us consider we have the IP Range called 192.168.1.1 to 192.168.1.254 is active and supplying the service with Windows 7 Client OS on Old Infrastructure (SCCM 2012 SP2) Now, the New Infrastructure is ready with all sources (SCCM CB V1710) – If the Client IP Range, Boundary Settings for Site assignment is getting moved from Old Infra to New Infra By Using Automatic Site Client Push Installation 1. SCCM Agent Will get install/upgrade with Version CBV1710 2. Since the IP Range, Boundary Group is allocated with New Environment All the Deployments will get started to run on new Environment. By performing this activity 1. All Windows 7 Clients will be running with SCCM CBV1710 Agent Version 2. All Windows 7 Clients will be reporting to SCCM CBV1710 Infrastructure 3. Slowly, I can prepare myself for Windows 10 Upgrade Projects. Hence, it is require to have 2 Environments in the Same System Management Container (SCCM 2012 SP2, and SCCM CB V1710). If I hold the 2 Environment with Different Site code and host name, Will that be Okay.. Please Advice!! My Sincere apologize to have separate post. Earlier was discussed for the Migration (With in the same server)., but now we preferred to install the SCCM CB V1710 Infra with new server *Windows 2016 & SQL 2016 * and move all the Clients to the new Infrastructure.
-
- system management container
- sccm cb
- (and 7 more)
-
Dear Admin, My Apologize - I feel to raise this Question separately to make myself clarity on asking question and getting answer, As per the previous post, Phase I : Upgrade from SCCM 2012 SP2 to SCCM CB V1606 At Present, the Environment is having as below and mentioned with To - BE State After Successful, Completion with Phase I - Progressing Phase II as follows (As-IS and To-BE Infra) Please Validate if the As-IS to Phase I, II (To-BE) is Okay / Please suggest if any changes Kindly suggest me, My Sincere sorry if there is any repeated questions. I feel to get some added advice from you for MDT, ADK. At Present, We are using AS-IS Infra (SCCM 2012 SP2) with Operating System Windows 7 SP1 1. Application Deployment 2. Patch Deployment 3. OS Deployment *With Windows 7 SP1* We Continue with the same for all 3 above, and added to that Windows 10 OS as well with New Infra (Phase II SCCM CB V1710) Looking for your response and mentorship Regards, Veera
- 7 replies
-
- system center configuration manager
- sccm 2012
- (and 7 more)
-
actually i made a task sequence for MBAM to encrypt all drives - it starts only, when i´m login to Windows 10, but i need it while the tasksequence is running, before starting installing Office 365 and so on. Have anyone experience for this step? the mbam-client config (last step) set the registry for "no delay" and the mbam-client-Trigger -> reg.exe ADD HKLM\Software\Microsoft\Windows\CurrentVersion\Run /t REG_SZ /v TriggerMBAM /d "%ProgramFiles%\Microsoft\MDOP MBAM\MBAMClientUI.exe" /f will not run, have tried on different places in the tasksequence, but nothing worked ... is it in generall possible to start the encryption while running the "Installation" ... Thx for your help.
-
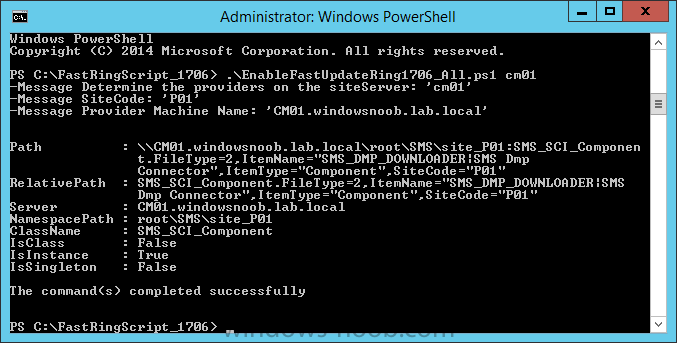
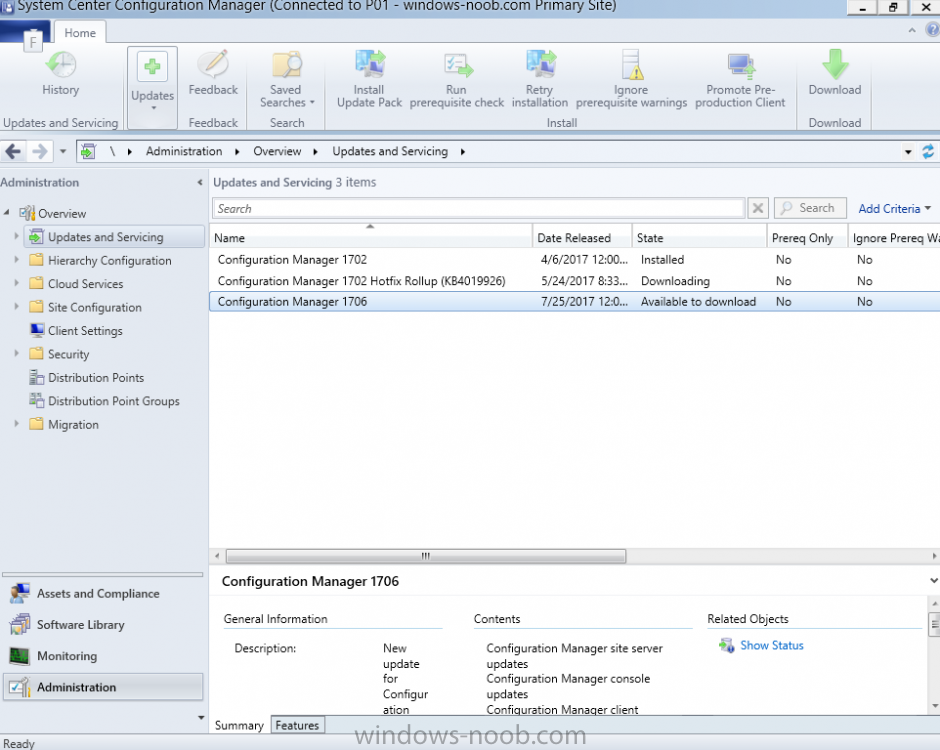
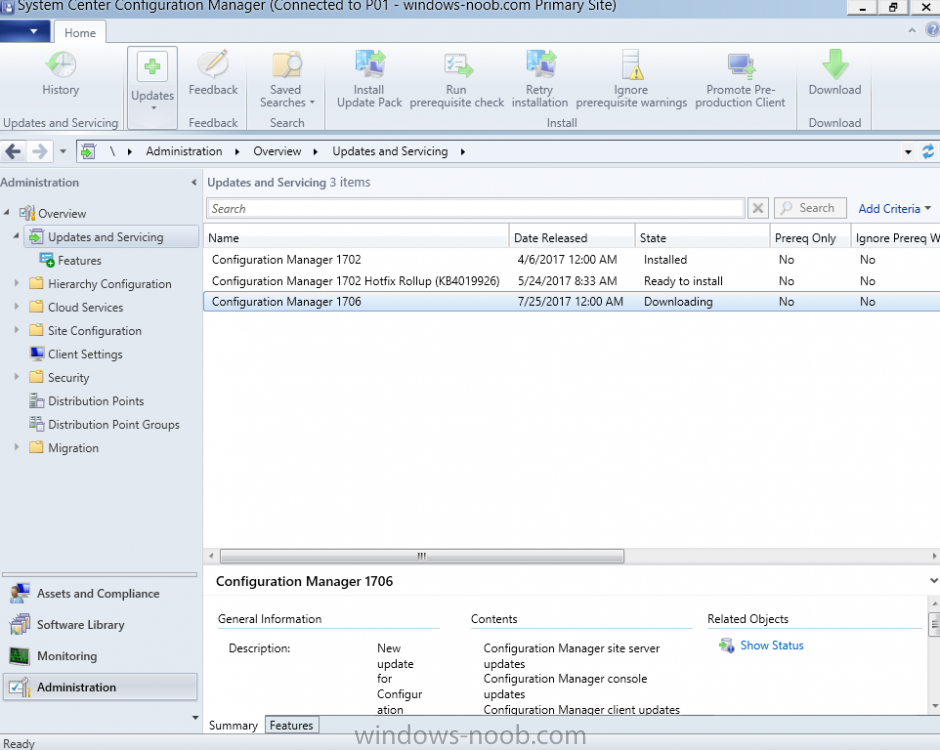
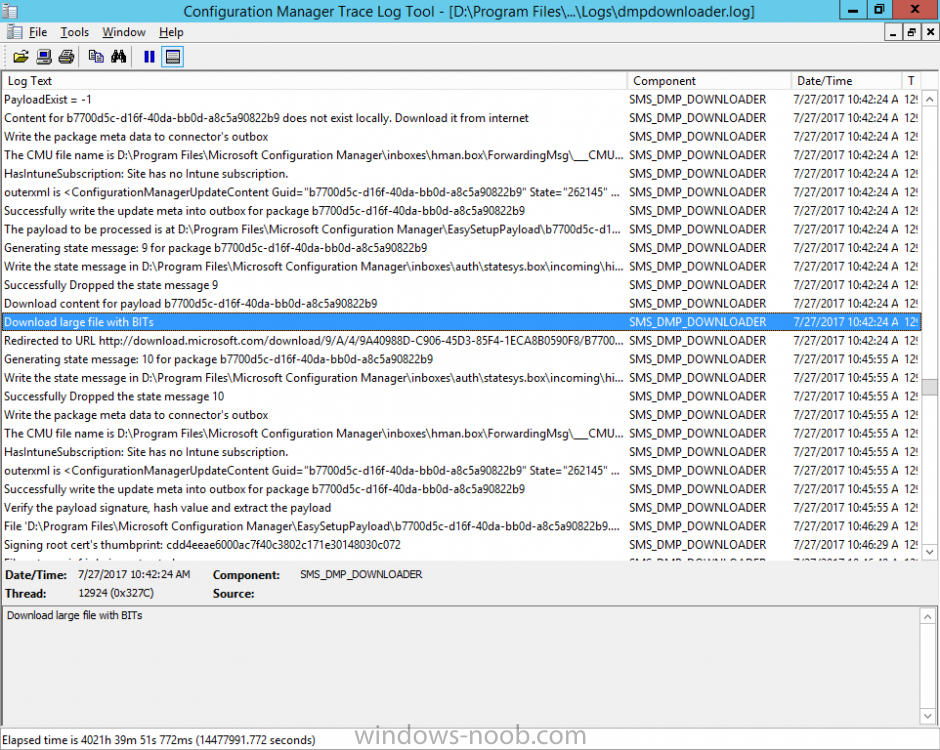
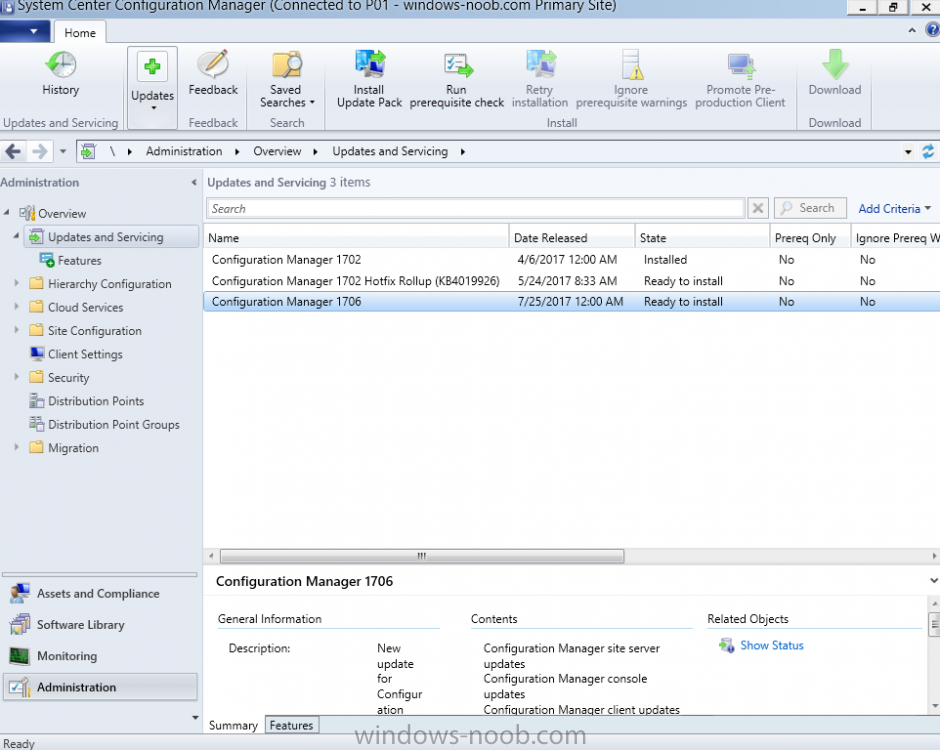
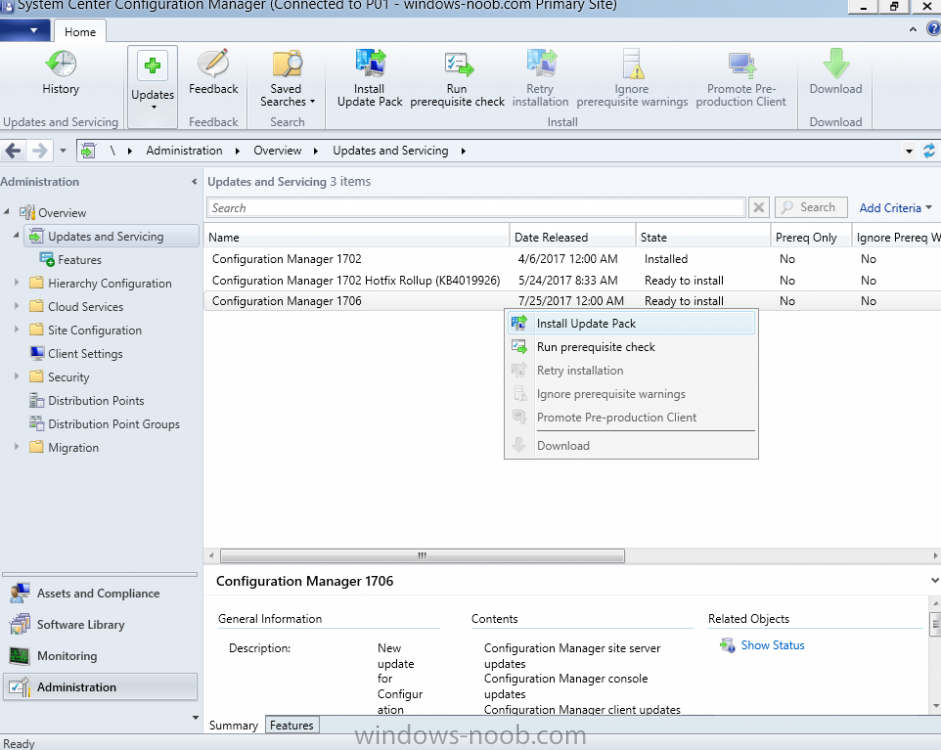
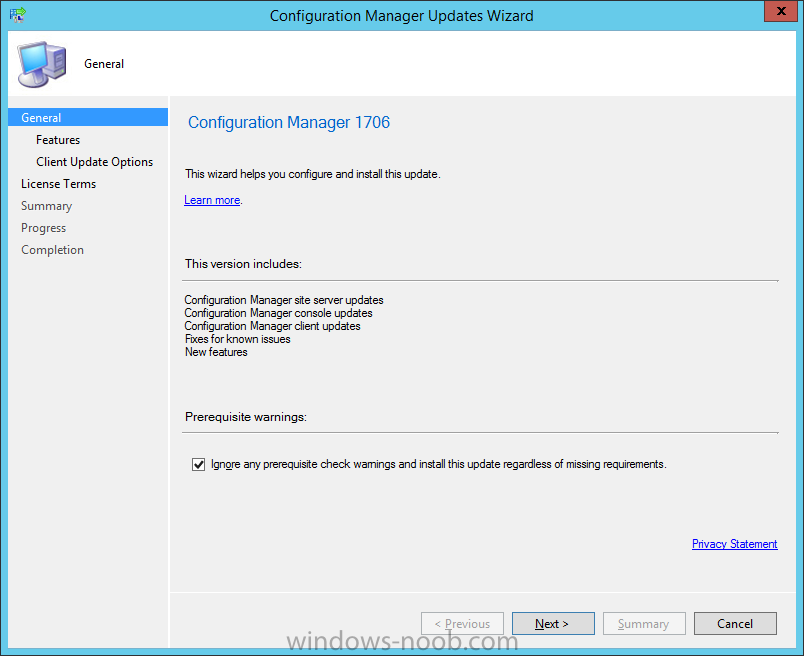
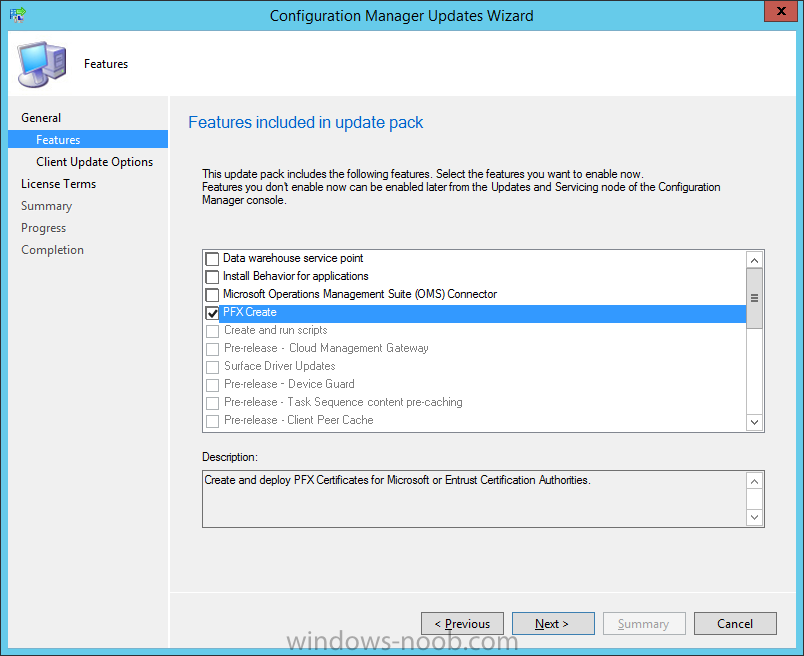
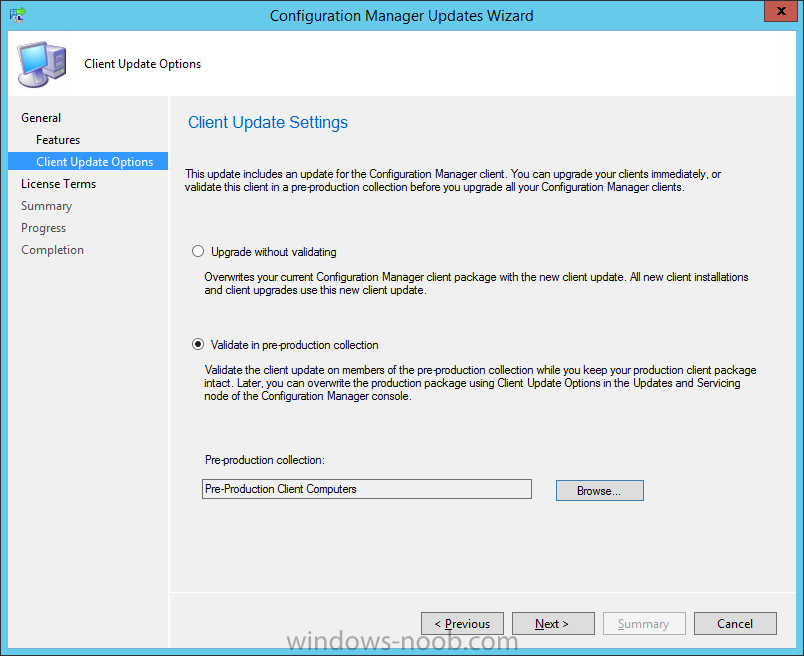
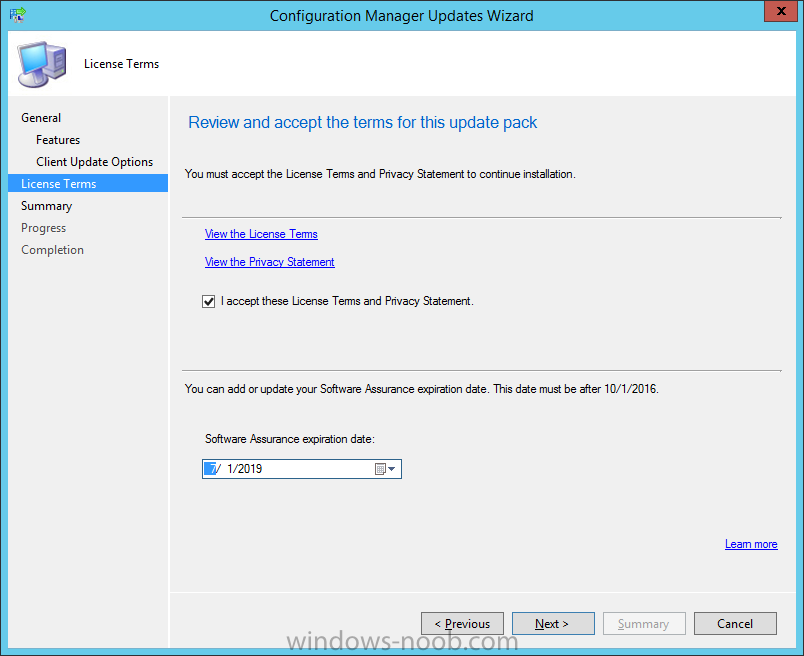
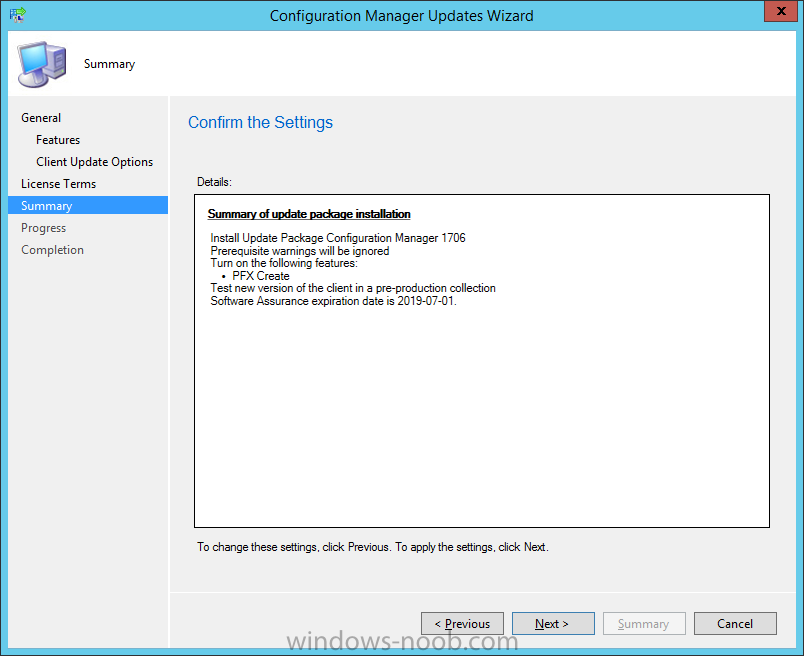
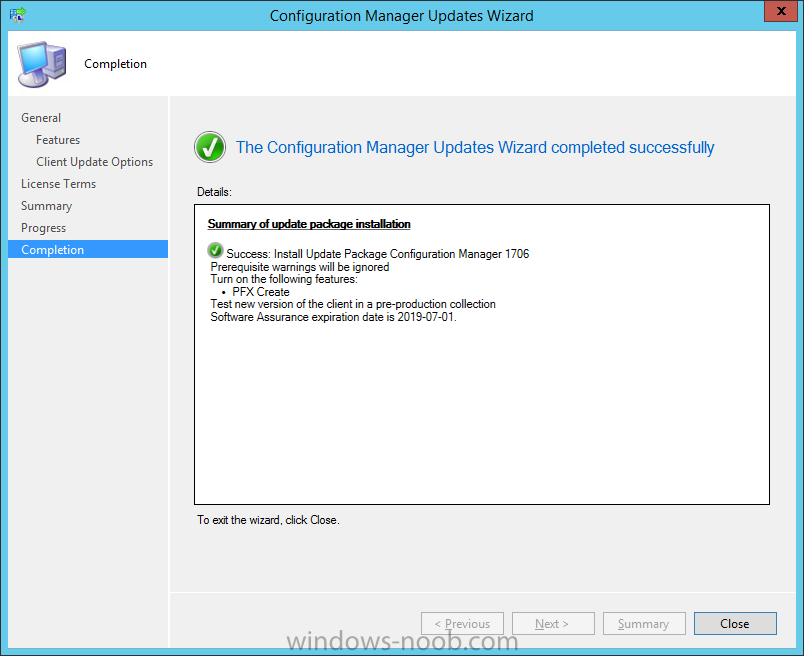
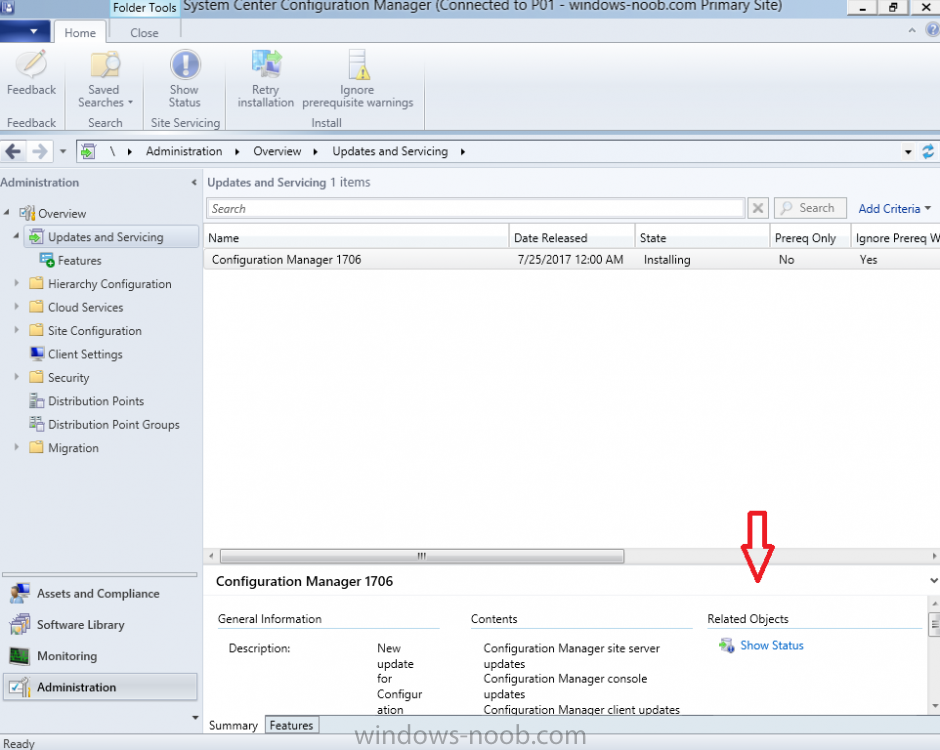
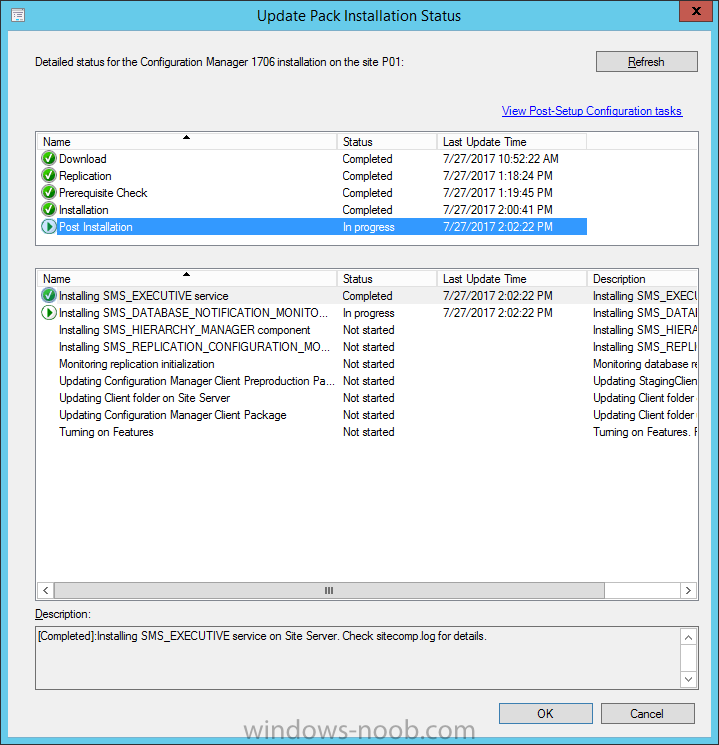
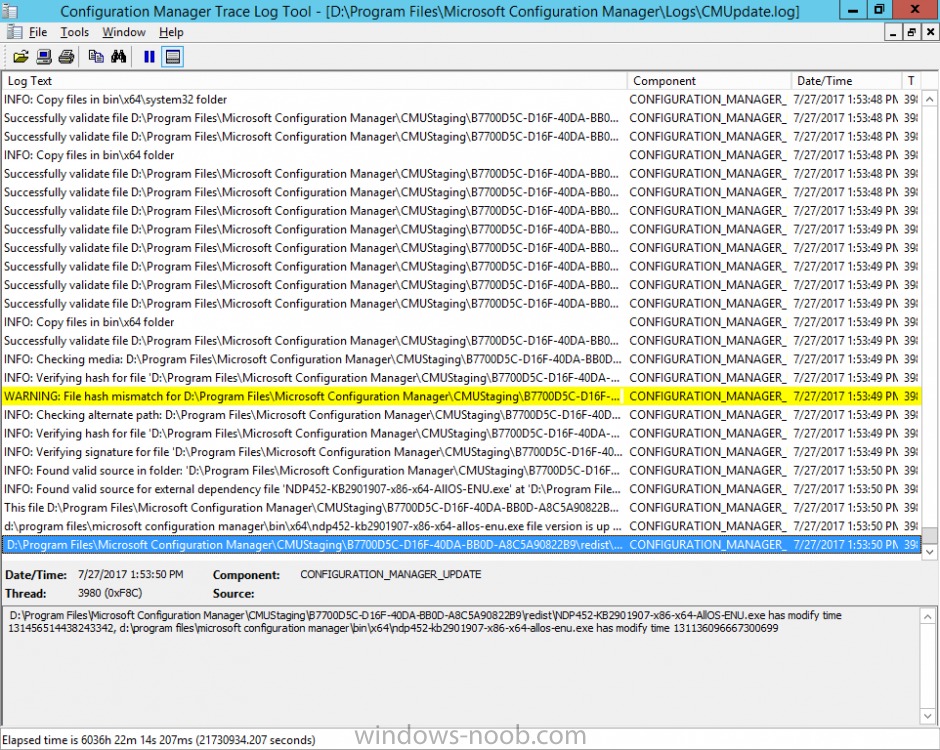
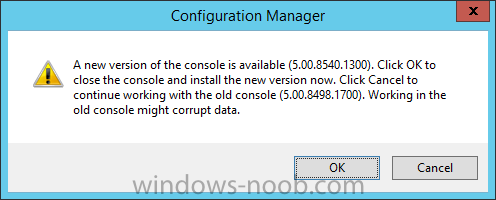
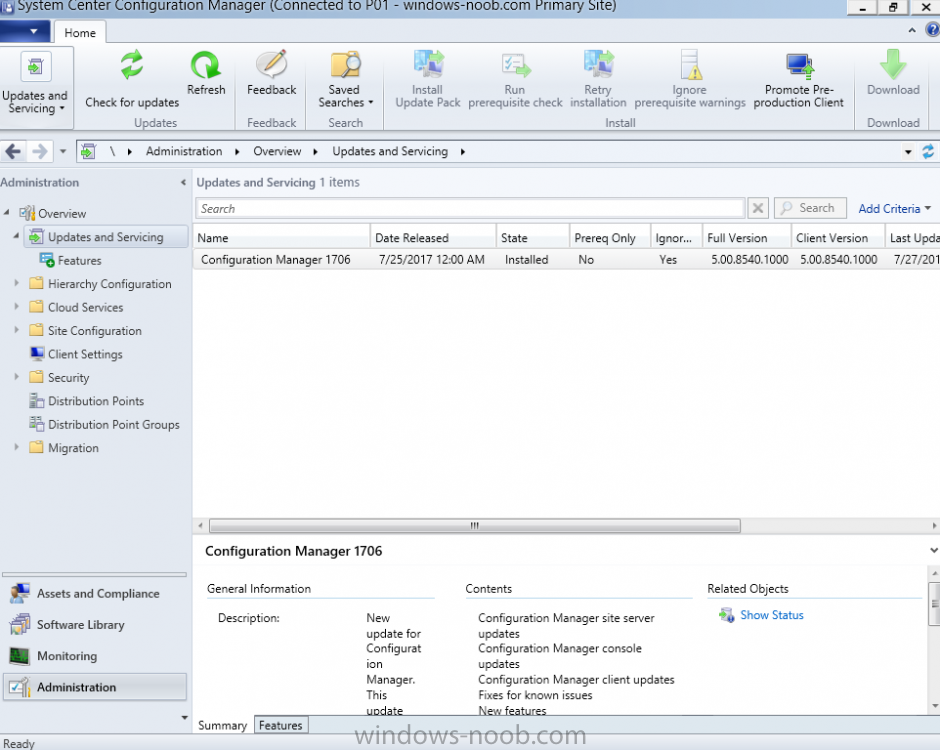
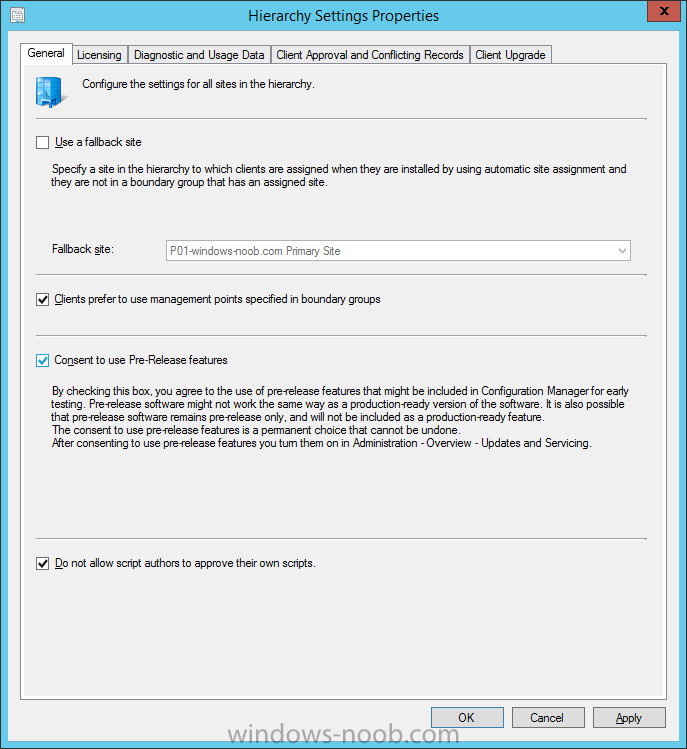
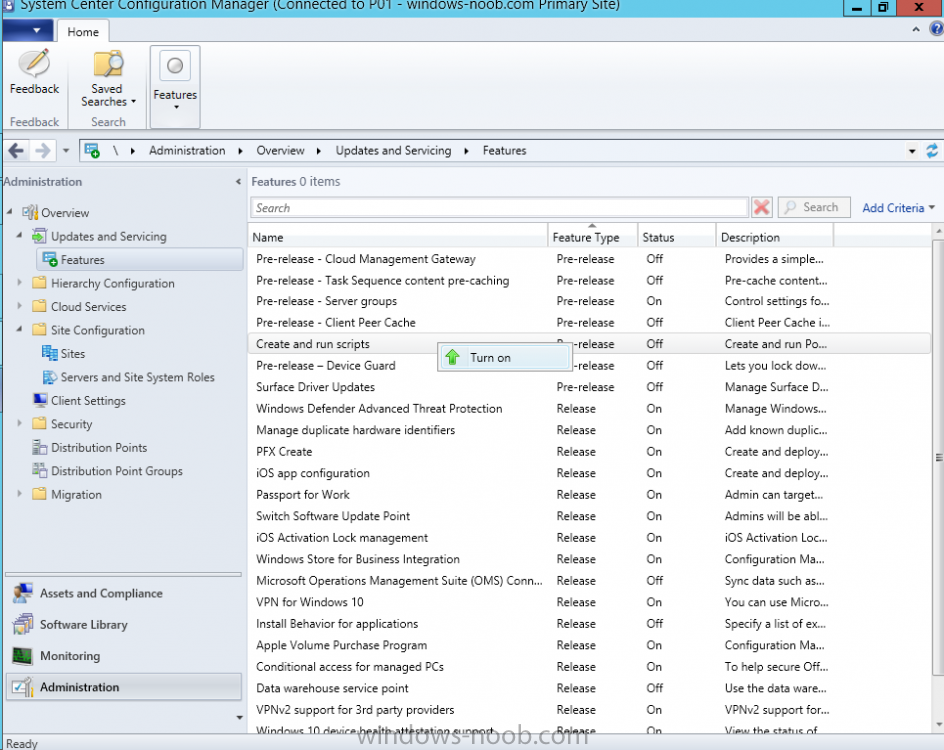
In a previous post you used PowerShell scripts to quickly install System Center Configuration Manager (Current Branch) version 1702. As of today (2017/7/29) System Center Configuration Manager (Current Branch) version 1702 is still the current baseline for the Current Branch releases. This post will focus on upgrading from one baseline version to the new release. Making sense of the different releases There are two main branches (of Configuration Manager) available, Current Branch and Technical Preview: System Center Configuration Manager (Current Branch) System Center Configuration Manager (Technical Preview) System Center Configuration Manager (Current Branch) is designed for use in production environments, for managing anything from small to very large Enterprises, whereas System Center Configuration Manager (Technical Preview) is for lab testing environments only and is limited to 10 clients. The Technical Preview releases are released monthly, and contain the latest and greatest features being trialed in the product, and usually these new features are the result of feedback from uservoice. Current Branch releases on the other hand are released only a few times per year and contain stable, tested features that are mature enough to release into production environments. Note: You cannot upgrade from a Current Branch to Technical Preview or vice versa, they are two distinct different branches. Microsoft have released the latest Current Branch offering known as System Center Configuration Manager (Current Branch) version 1706 so it's time to upgrade again. This release offers many new features, some of which are listed below. Windows 10 and Office 365 Manage Microsoft Surface driver updates – You can now use Configuration Manager to manage Microsoft Surface driver updates. Windows Analytics Commercial ID and Windows telemetry levels – You can now specify the Windows Analytics Commercial ID and configure telemetry, commercial data, and Internet Explorer data collection settings in Client Settings for use with Upgrade Readiness. Improved user experience for Office 365 updates – Improvements have been made to leverage the Office Click-to-Run user experience when a client installs an Office 365 update. This includes pop-up and in-app notifications, and a countdown experience. Windows 10 Security SecureBoot and TPM inventory data – Hardware inventory can now determine whether the device has SecureBoot enabled and various properties of the TPM (enabled by default). Windows Defender Device Guard – You can now include trust for specific files and folder paths in Device Guard policies. Modern Management Azure AD-enabled Cloud Management – You can now onboard the site to Azure AD via Cloud Services. Additionally, you can install the client on the Internet. Windows Update for Business enhancements – There is a new dedicated experience to configure and deploy deferral settings for easy discoverability. Streamlined Infrastructure Cloud services consolidation – There is now common experience for OMS Connector, Upgrade Readiness, Windows Store for Business, and Cloud Management. Reload boot images with latest WinPE version – During the “Update Distribution Points” wizard on a boot image, you can now reload the version of Windows PE in the selected boot image. Boundary Group improvements – Boundary groups now support configuring the time for fallback for software update points. Configuration Manager Update Reset Tool – We have added new tool to reset and restart in-console updates when they have problems downloading or replicating. Accessibility – Screen reader improvements and improved keyboard navigation in and out of the ribbon in the Configuration Manager console. Configuration Manager connected with Microsoft Intune Entrust as certificate authority for PFX Certificates – Entrust can now be used as the certificate authority for PFX certificates. Additional Android for Work features – You can now configure app configuration policies for Android for Work and support for available apps. Additional Compliance Policy settings – We added additional compliance policy settings that were previously available only in Intune standalone. Enrollment restriction conditions – Admin can now prevent enrollment for iOS or Android devices marked as personal. Cisco IPSec VPN support for iOS – Cisco IPsec will be a new connection type option for VPN profiles for iOS. Windows Edition Upgrade policy – This policy allows admins to set a policy to upgrade Windows 10 to Enterprise editions. Additional MAM settings – We added new settings such as block screen capture (Android only), disable contact sync, and disable printing. Windows configuration settings – We added new Windows configuration item settings that were previously only available in Intune standalone. Customer Feedback Create and run PowerShell scripts – You can now create and run scripts with parameters to devices and collections. Task Sequence improvements – You can now easily toggle when the task sequence progress is or is not displayed to the end user, on a granular step-by-step basis. Additionally, groups in the task sequence editor can be collapsed or expanded. Share an application from Software Center – You can copy a direct link to an application in Software Center using the new Share button in the Application Details view. Upgrading to 1706 Note: Before updating, please review the following checklist to verify you are ready for the update. When new Current Branch releases are made public, you have the choice of getting it immediately using a fast ring PowerShell script, or to wait a couple of weeks after which it is made available to the slow ring (and then show up in the ConfigMgr console). To use the fast ring PowerShell script, download it, and run it to self-extract to C:\FastRingScript_1706. Once extracted, start an administrative PowerShell cmd prompt in that folder and from there use the following command (where CM01 is the <SiteServer_Name | SiteServer_IP> of your CAS or standalone Primary site server). .\EnableFastUpdateRing1706_All.ps1 cm01 As per this screenshot To start the upgrade open the ConfigMgr console and find the Updates and servicing node as shown here. Click on Check for Updates in the ribbon, after a few moments you should see that Configuration Manager 1706 is available for download. Note: In the screenshot above you'll see that the Downloading arrow is greyed out, if you find yourself in this state you can do two things, wait until it automatically starts downloading, or click on the Check for Updates button again which will kick off the download. And the download starts... at which point you can open the dmpdownloader.log using Cmtrace to keep track of things. Once it has completed downloading it will be listed as a state of Ready to Install You need to click refresh in the ConfigMgr console to update the view. Installing the Update Right click on the update and choose Install Update Pack. when the Wizard appears, make your choice for pre-reqs and click next. review the features included in this update pack , and make selections if you wish, you can always add them later in the Console. Note: You'll also notice lots of Pre-Release features that are greyed out, to turn them on see the steps after upgrading the console the bottom of this guide. Before clicking next at the Client update settings please see this post accept the EULA and configure the software assurance expiration date and click through to the summary and then the wizard is complete. Monitor the update In the console, the state will change to Installing. You can click on Show Status to get status of what part of the upgrade it is doing. Which brings up this detailed pane that you can click through to get more information. In addition, I'd recommend you open the CMUpdate.log to review what's happening in real time. After the update is complete, click refresh in the console and you'll be reminded to update the ConfigMgr Console via a popup, the new version is 5.00.8498.1700. Make sure to update your console as you cannot use the new features until you do. Click OK to upgrade your ConfigMgr console, and after all is done you’ll see the 1706 version listed in the console. After upgrading the site Tip: If you want to gain access to the Pre-Release features, then select Site Configuration, Sites, Hierarchy Settings, and place a check mark in Consent to use Pre-Release features. And you can then turn on (or off) many of the pre-release features released in the 1706 update. Summary This is a huge release packed with features and new functionality and goes to prove the SCCM as a Service is working, David James and Team have done an exceptional job ! Here's to the continued development and refinement from the Engineering team @ Microsoft so that hopefully in 5 years time, we'll see SCCM 2206 Current Branch Recommended reading Checklist for updating to System Center Configuration Manager (Current Branch) 1706 - https://docs.microsoft.com/en-us/sccm/core/servers/manage/checklist-for-installing-update-1706 What's new In System Center Configuration Manager (Current Branch) 1706 - https://docs.microsoft.com/en-us/sccm/core/plan-design/changes/whats-new-in-version-1706 Hybrid features in 1706 - https://ems.world/2017/07/29/new-hybrid-features-in-configuration-manager-1706/ Create and run PowerShell scripts from the configuration manager console - https://docs.microsoft.com/en-us/sccm/apps/deploy-use/create-deploy-scripts
-
Hello All, Hope everyone is doing good. I am facing issue while importing the boot images or modifying the existing boot images post upgrade to SCCM CB from sccm 2012. We have recently upgraded from SCCM 2012 R2 SP1 to SCCM CB 1606 and then immediately to 1702. We have ADK v1607 and MDT 1443 installed on the primary server and upgrade went well w/o issue. Now I need to insert network drivers into our existing boot wims but every attempt add/remove modify boot wim is failing. Even I can not import any new boot wim directly into sccm console using MDT and SCCM add boot image wizard. The error I get when I use Add Boot Image wizards is : The specified file can not be imported. Make sure the file is not read only and you have read write access to it. I have followed below article including external links mentioned in that but of no help and I am still cursed with the error. https://www.windows-noob.com/forums/topic/12956-cant-add-boot-image-2012-r2-sp1-with-adk10/ Any help is highly appreciated. SO far I have done below but not of much help: 1) Restarted WMI service on server 2) Repaired ADK v1607 on Server and restarted the server 3) Used DISM to import drivers and optional components manually and then try to import boot image 4) Use MDT wizard for importing boot image 5) Installed ADK v1703 on admin PC and tried to import boot images 6) Have created fresh repository to store the sccm content for packages and have given Everyone - Full share permission and appropriate (FULL) NTFS permission to SYSTEM, Local Admins, SCCM Admins, SCCM Primary Server Computer account as well. 7) Checked SMSProv.log but unfortunately it captures nothing about this issue as I suspects issue with SMSProvider whihc is same Primary server. The SMSProv.log capturing only logs of incremental collection evaluation and nothing else.
- 9 replies
-
- sccm cb 1702
- boot wim
-
(and 2 more)
Tagged with:
-
Does anyone know if its possible to build Stand Alone Task Sequence Media for a Win10 Upgrade TS via SCCM CB 1606 that works? I added a Boot WIM to my Win10 Upgrade TS and I was able to create the media... but when I run the Upgrade TS off the USB stick it fails to copy over drivers locally into a custom location or into the TS Working directory. Are there any special settings to make the Upgrade work via TS Media? Looking for a way to get my remote users to be able to upgrade to Win10 1607. Thanks in advance
- 1 reply
-
- sccm ts media
- sccm upgrade
-
(and 1 more)
Tagged with:


