Jump to content


  • 0
anyweb

how can I deploy Office 2010 Professional Plus using SCCM 2007 - Part 2

Question

In part one of this guide, we prepared Office 2010 X86 by downloading the files required (including the OCT), and created our own MSP file. Now we will add that customised package to ConfigMgr.
Step 1. Create the Office 2010 Package

Note: Before starting this step, copy the c:\Office2010x86 folder we created in part one of this guide, to your application sources share on your SCCM server, eg:

\\WIN-CILZXI45G1Q\apps\office2010x86

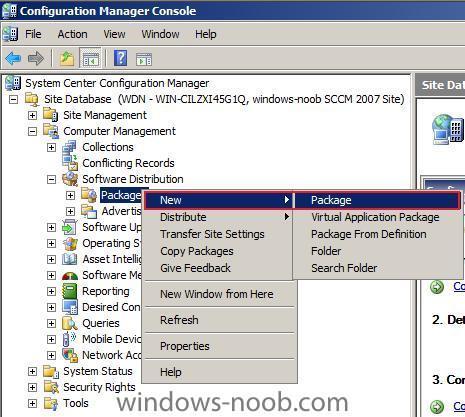
Open your ConfigMgr console, and expand Computer Management, Software Distribution. Right click on Packages and choose New Package.

new package.jpg

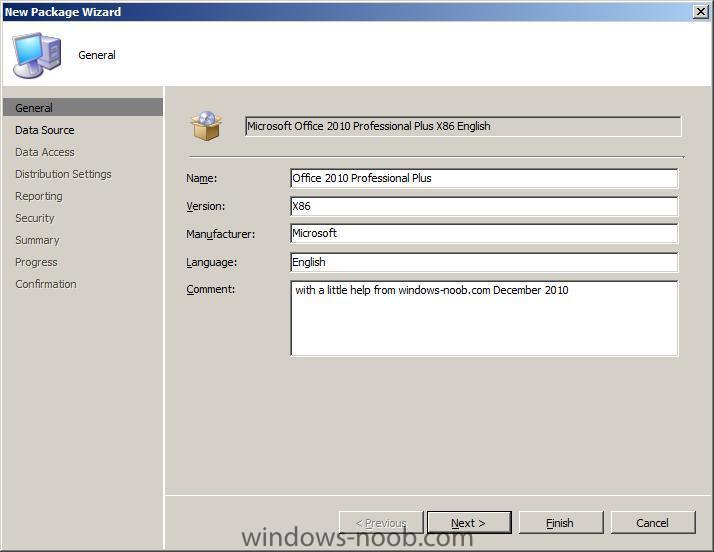
Fill in your package details on the wizard screen

general.jpg

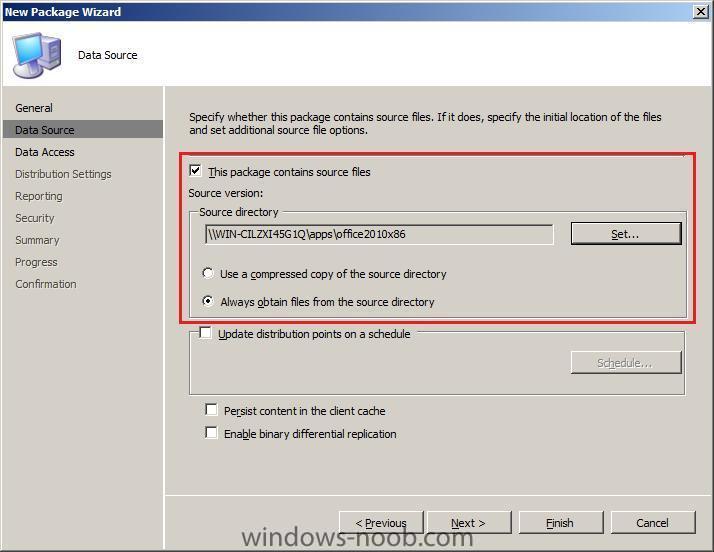
point it to the data source on your network share

data source.jpg

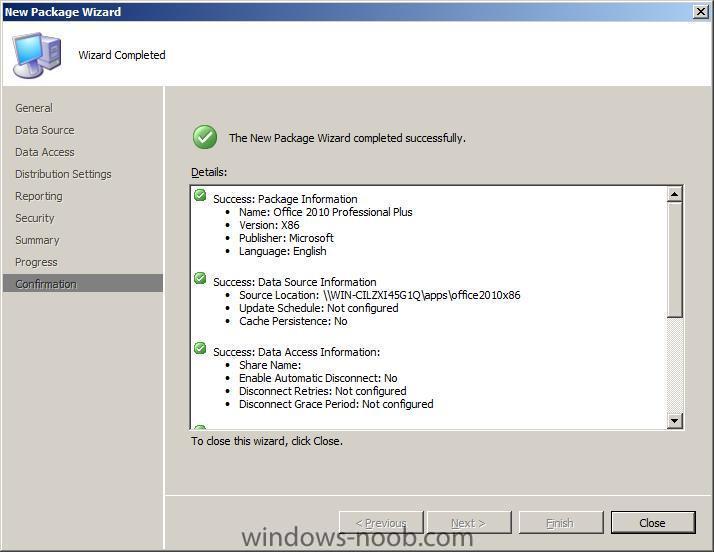
and click next through the wizard until you see the confirmation screen.

summary.jpg

Share this post


Link to post
Share on other sites

Recommended Posts

  • 0

Step 2. Create the Office 2010 Program.


Select our newly created package from above, expand it, right click on Programs and choose New Program


New program.jpg


fill in your program details


program details.jpg


enter your desired requirements, here you can limit the program availability to All Windows 7 X64 and All Windows 7 X86,


requirements.jpg


set the Environment to run Whether or not a user is logged on and make sure that 'allow users to' is NOT selected.


environment.jpg


for the Advanced properties, set allow this program to be installed from the Install software task sequence without being advertised


allow this program to be installed from the Install software task sequence without being advertised.jpg


and then click next through to the confirmation screen.


confirmation.jpg


click Close.

Share this post


Link to post
Share on other sites

  • 0

Step 3. Distribute to Distribution Points


We now need to copy our package to the distribution points serving our clients. Select our package, right click on distribution Points and select New Distribution Point.


new dp.jpg


click next at the welcome, then select your Distribution Points from the list (don't select any SMSPXE dps)


dp selected.jpg


click close at the confirmation screen.

Share this post


Link to post
Share on other sites

  • 0

Step 4. Advertise the Office 2010 Package


Ok you've nearly got everything in place, now you want to advertise the Package to a collection, if you havn't already done so create a collection called Office 2010.


Expand software distribution and select Advertisements, right click on advertisements and select new advertisement.


new advertisement.jpg


fill in the details


Name=Microsoft Office 2010 Professional Plus

Package=Microsoft Office 2010 Professional Plus X86 English

Program=Microsoft Office 2010 Professional Plus

Collection=Office 2010


new a wiz.jpg


We want the schedule to be optional, so leave it as it is


schedule.jpg


set the Distribution Point settings as follows


dp settings.jpg


and click through to the confirmation screen


confirmation.jpg


click close to finish.

Share this post


Link to post
Share on other sites

  • 0

Test the Office 2010 Deployment


Now that we have the groundwork done, you'll want to test the package on some Windows 7 clients. To do so you could use direct membership to add those computers to the Office 2010 collection, or better yet, setup a query on the collection and use Active Directory Group Membership to do it for you.


But for the purpose of this guide, let's add a virtual machine (Windows 7) to our Office 2010 collection using direct membership.


right click on your Office 2010 collection and choose properties


office 2010 properties.jpg


click on the Membership Rules tab, then click on the new direct membership button


membership rules.jpg


in the create direct membership wizard, use the drop down menus to select


Resource Class: System Resource

Attribute Name: Netbios Name

Value: Win7client01


input the values to match your computername you wish to test... in my case I used a virtual machine called win7client01


create direct membership.jpg


click next at collection limiting and on the Select resources screen, place a checkmark on the clients you want to add to the collection


select resources.jpg


click finish to exit the wizard.


On your Windows 7 client, monitor it until you see the New Program Notification prompt (or you can go into Configuration Manager Client, Actions tab and kick off the Machine Policy retrieval to speed things up).


The program becomes available in RAP.


ready in rap.jpg


Select it and click Run


due to our Advertisements distribution settings for the package, we are informed that the program must be downloaded before being run. This is the desired effect as we do not want it to start downloading and have users interupt the process midway by turning off. They can do so with this setting and it will resume the next time they start the computer.


must be downloaded.png


click on Download and the program download begins


program download status.png


when the Program is fully downloaded you'll be informed that it is ready to run. Click on Run. At this point Office 2010 is being installed in the background silently unless of course you are having a problem, in which case you should check the following folder on the client.


C:\Windows\Temp


Look for the setupexe log and check it to determine if there are any failure messages.


All things should go well however and Office 2010 will be installed !


office 2010 installed.jpg


Further reading:-


Technet: Troubleshooting a Configuration Manager 2007 Installation of Office 2010

Share this post


Link to post
Share on other sites

  • 0

Hi,

first of all thank you for this great guide.

But i have a few questions and i hope you could help me.

1. We want to install office 2010 without any user promts but with a progressbar, because the user should recognize that Office is intalling / updating at the moment. I am using OCT like you do it in your guide just changing display level to basic and i checked supress modal dialogs and no cancel. But Office is allways installed completly silent. Do you have any idea?


2. After Office is installed it is not activated. I am using MAK with a valid Office Key. In OCT i add AUTO_ACTIVATION 1 (dont know the exact syntax right now) but it has no effect.


Any suggestion is welcome.

Share this post


Link to post
Share on other sites

Join the conversation

You can post now and register later. If you have an account, sign in now to post with your account.

Guest
Answer this question...

×   Pasted as rich text.   Paste as plain text instead

  Only 75 emoji are allowed.

×   Your link has been automatically embedded.   Display as a link instead

×   Your previous content has been restored.   Clear editor

×   You cannot paste images directly. Upload or insert images from URL.

Loading...


×
×
  • Create New...

Important Information

We have placed cookies on your device to help make this website better. You can adjust your cookie settings, otherwise we'll assume you're okay to continue.