Note: this works for me, your mileage may vary, it's worth a try, let me know if it helps.
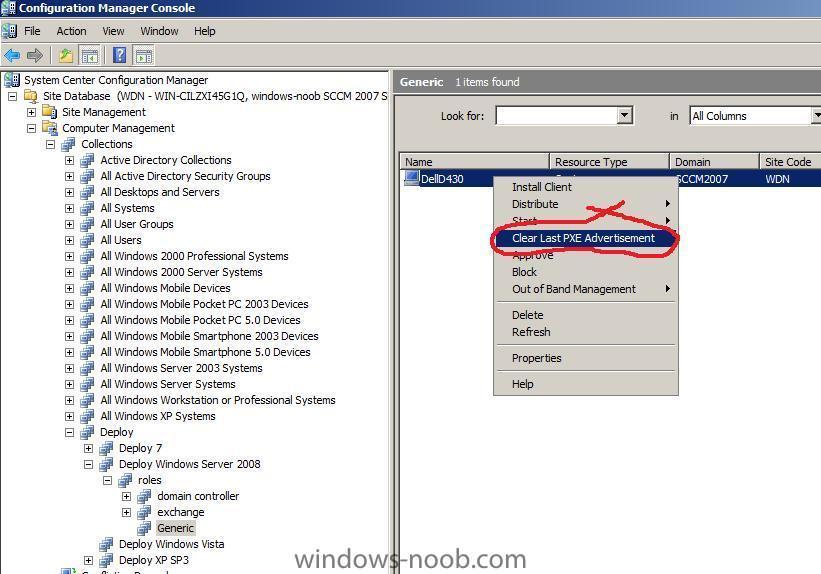
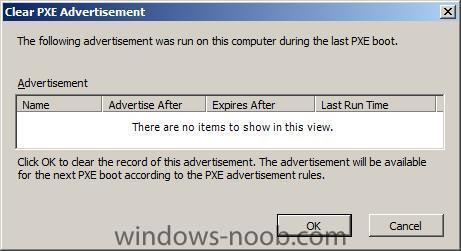
if you've just started testing with SCCM you'll no doubt see this when imaging a client over and over, after you image the computer you cannot image it again until you right click on the computer in SCCM and choose 'clear last PXE advertisement'
when you do that, you should be able to image the computer again, which is great when you are testing clients over and over to get your Task Sequence working...
however, after doing this a few times it no longer works, the clear last PXE advertisement no longer works
and when you PXE boot the client you still see the abortpxe message
Downloaded WDSNBP

Architecture: x64

The details below show the information relating to the PXE boot request for this computer. Please provide these details to your Windows Deployment Services Administrator so that this request can be approved.

Pending Request ID: 45

Contacting Server: 192.168.3.1.
TFTP Download: smsboot\x64\abortpxe.com

PXE Boot aborted. Booting to next device...
Those lines above have added to my grey hair content many times as I would try all sort of things to resolve this including
1. deleting the advertisement and re-advertising it 2. restarting WDS and DHCP service 3. restarting SCCM server 4. all of the above and then some....
until finally I tried the following method which appears to work just fine,
Step 1.Add a rule
Add a direct membership rule on the collection you are deploying to by right clicking on it and choose properties.
click on the Membership Rules tab
click on the blue computer icon to create a direct membership rule
when the wizard appears click next
change the drop down menus so they are like this
Resource Class: System Resource
Attribute name: Name
*you can choose Netbios Name also*
enter your computername that you want to remove the abortpxe.com feature from in lowercase or use wildcards eg: dell%
click next and leave the collection blank, click next again
and here's the fun part !!!
look at the list, theres TWO of the computers with the same name... select them both *or only one if one appears* and click next
click finish and then click ok at this screen
Step 2. Refresh the collection
Refresh the collection by selecting it and hitting F5
you should now see more than one of your original computers listed with the same name...
Step 3. You are done !
That's it, your advertisement will begin working again now as now SCCM 'sees' the computer again. If you want you can delete the obsolete computers listed, it really doesn't matter if you leave them there or delete them.
We have placed cookies on your device to help make this website better. You can adjust your cookie settings, otherwise we'll assume you're okay to continue.
Note: this works for me, your mileage may vary, it's worth a try, let me know if it helps.


if you've just started testing with SCCM you'll no doubt see this when imaging a client over and over, after you image the computer you cannot image it again until you right click on the computer in SCCM and choose 'clear last PXE advertisement'
when you do that, you should be able to image the computer again, which is great when you are testing clients over and over to get your Task Sequence working...
however, after doing this a few times it no longer works, the clear last PXE advertisement no longer works
and when you PXE boot the client you still see the abortpxe message
Those lines above have added to my grey hair content many times as I would try all sort of things to resolve this including
1. deleting the advertisement and re-advertising it
2. restarting WDS and DHCP service
3. restarting SCCM server
4. all of the above and then some....
until finally I tried the following method which appears to work just fine,
Step 1.Add a rule
Add a direct membership rule on the collection you are deploying to by right clicking on it and choose properties.
click on the Membership Rules tab
click on the blue computer icon to create a direct membership rule
when the wizard appears click next
change the drop down menus so they are like this
*you can choose Netbios Name also*
enter your computername that you want to remove the abortpxe.com feature from in lowercase or use wildcards eg: dell%
click next and leave the collection blank, click next again
and here's the fun part !!!
look at the list, theres TWO of the computers with the same name... select them both *or only one if one appears* and click next
click finish and then click ok at this screen
Step 2. Refresh the collection
Refresh the collection by selecting it and hitting F5
you should now see more than one of your original computers listed with the same name...
Step 3. You are done !
That's it, your advertisement will begin working again now as now SCCM 'sees' the computer again. If you want you can delete the obsolete computers listed, it really doesn't matter if you leave them there or delete them.
that's it
abortpxe.com is kaboof !
related reading > http://blogs.msdn.com/b/steverac/archive/2013/10/03/delete-behavior-for-devices-in-configmgr-2012.aspx
Share this post
Link to post
Share on other sites